Page 422 of 510
5 - 29
CHASREAR WHEEL AND REAR BRAKE
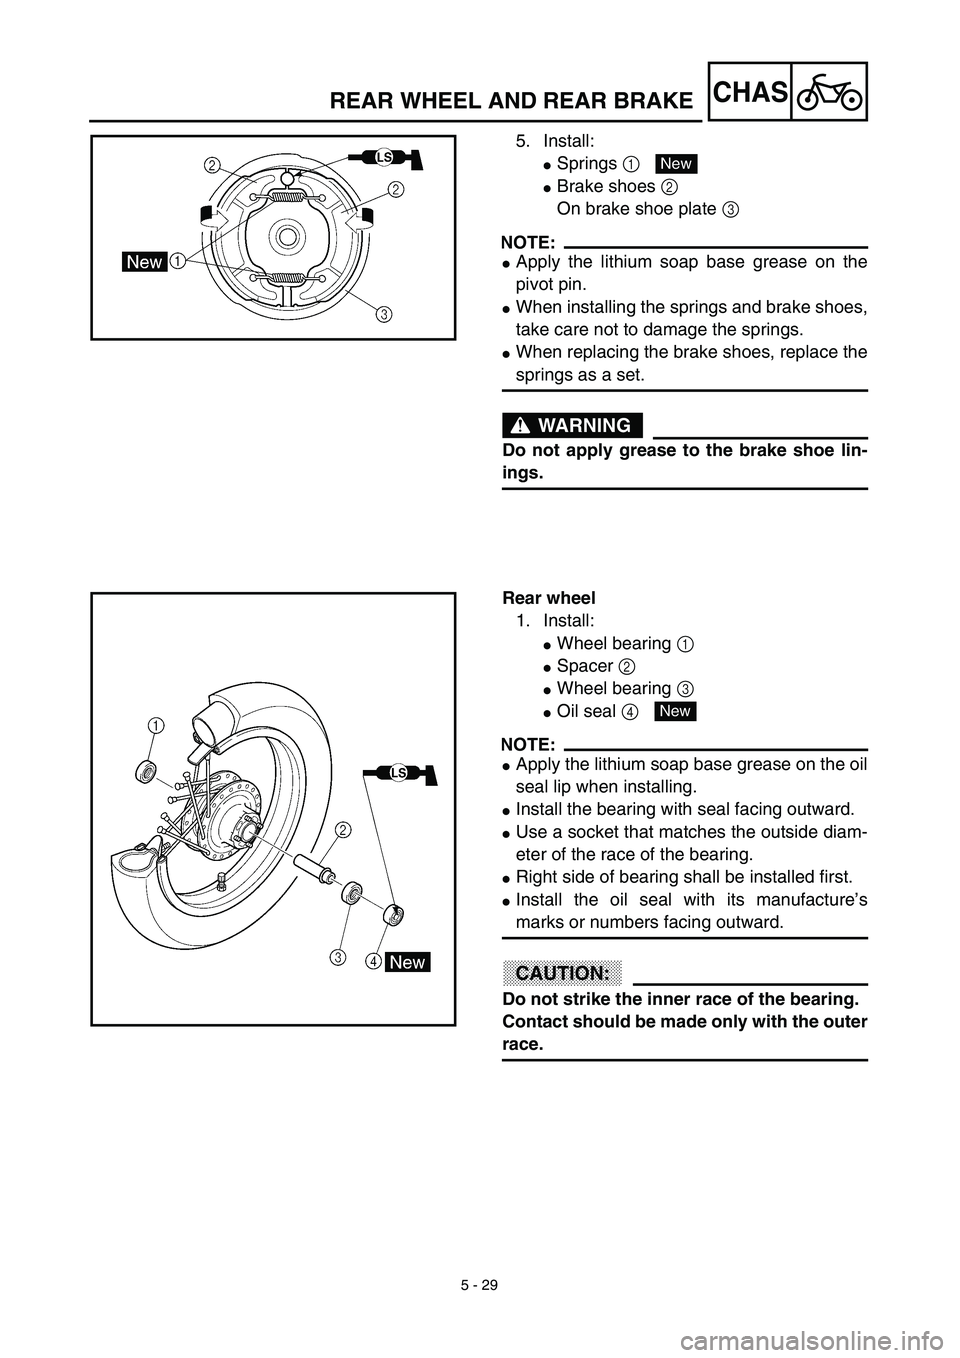
5. Install:
�Springs 1
�Brake shoes 2
On brake shoe plate 3
NOTE:
�Apply the lithium soap base grease on the
pivot pin.
�When installing the springs and brake shoes,
take care not to damage the springs.
�When replacing the brake shoes, replace the
springs as a set.
WARNING
Do not apply grease to the brake shoe lin-
ings.
New
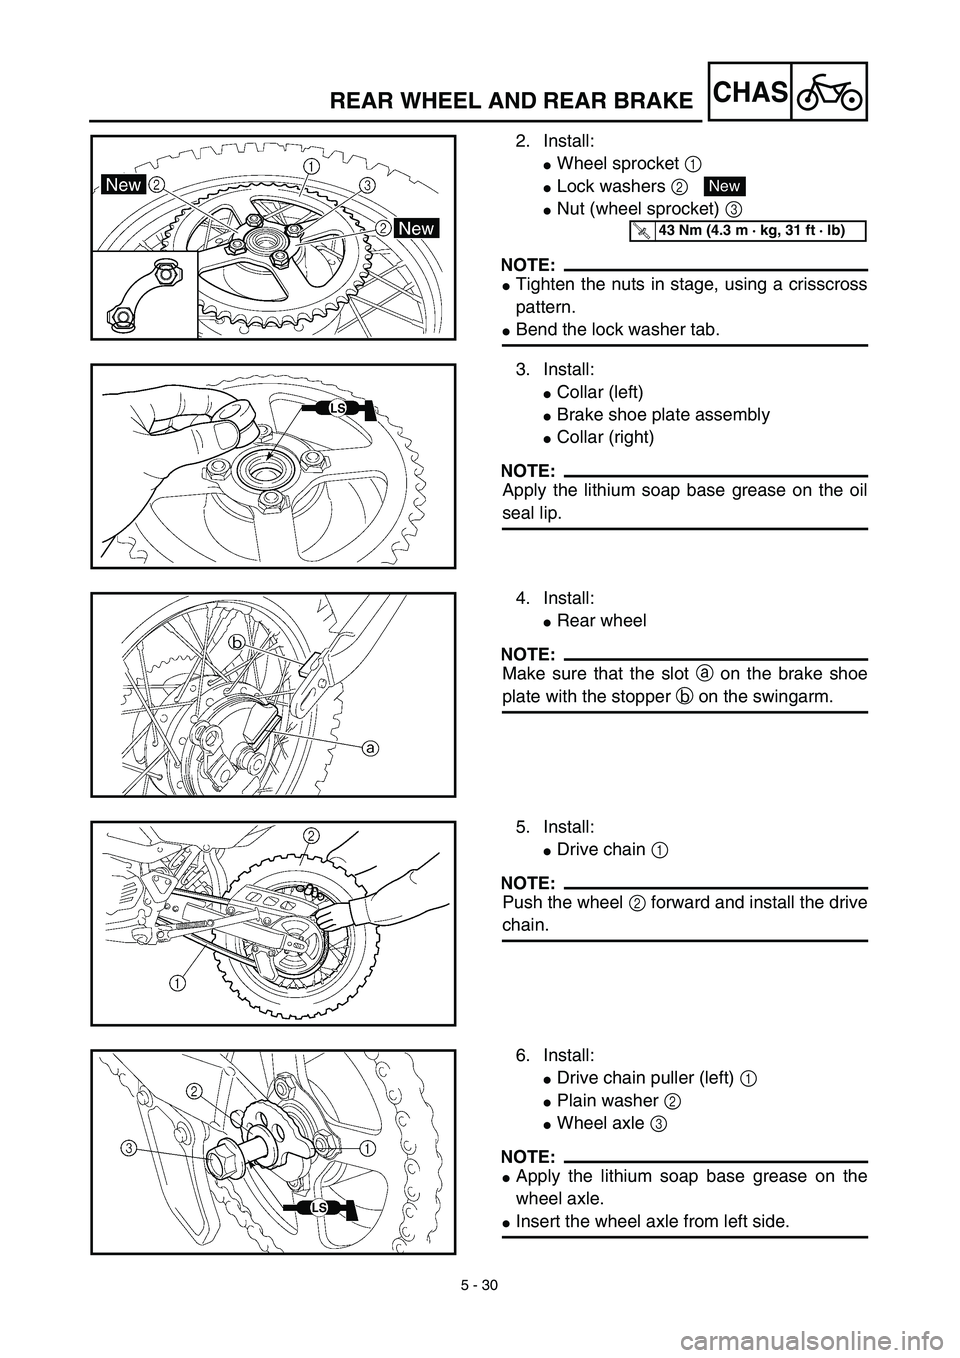
Rear wheel
1. Install:
�Wheel bearing 1
�Spacer 2
�Wheel bearing 3
�Oil seal 4
NOTE:
�Apply the lithium soap base grease on the oil
seal lip when installing.
�Install the bearing with seal facing outward.
�Use a socket that matches the outside diam-
eter of the race of the bearing.
�Right side of bearing shall be installed first.
�Install the oil seal with its manufacture’s
marks or numbers facing outward.
CAUTION:
Do not strike the inner race of the bearing.
Contact should be made only with the outer
race.
New
Page 424 of 510
5 - 30
CHASREAR WHEEL AND REAR BRAKE
2. Install:
�Wheel sprocket 1
�Lock washers 2
�Nut (wheel sprocket) 3
NOTE:
�Tighten the nuts in stage, using a crisscross
pattern.
�Bend the lock washer tab.
New
T R..43 Nm (4.3 m · kg, 31 ft · lb)
3. Install:
�Collar (left)
�Brake shoe plate assembly
�Collar (right)
NOTE:
Apply the lithium soap base grease on the oil
seal lip.
4. Install:
�Rear wheel
NOTE:
Make sure that the slot a on the brake shoe
plate with the stopper b on the swingarm.
5. Install:
�Drive chain 1
NOTE:
Push the wheel 2 forward and install the drive
chain.
6. Install:
�Drive chain puller (left) 1
�Plain washer 2
�Wheel axle 3
NOTE:
�Apply the lithium soap base grease on the
wheel axle.
�Insert the wheel axle from left side.
Page 426 of 510
5 - 31
CHASREAR WHEEL AND REAR BRAKE
7. Install:
�Drive chain puller (right) 1
�Plain washer 2
�Axle nut 3
NOTE:
Temporarily tighten the axle nut at this point.
8. Adjust:
�Drive chain slack a
Refer to “DRIVE CHAIN SLACK
ADJUSTMENT” section in the CHAP-
TER 3.
Drive chain slack:
35 ~ 50 mm (1.4 ~ 2.0 in)
9. Tighten:
�Axle nut 1
T R..60 Nm (6.0 m · kg, 43 ft · lb)
10. Install:
�Spring 1
�Brake rod 2
�Pin 3
�Wing nut 4
On brake camshaft lever 5.
11. Adjust:
�Brake pedal free play
Refer to “REAR BRAKE ADJUST-
MENT” section in the CHAPTER 3.
Page 428 of 510
5 - 32
CHASFRONT FORK
EC550000
FRONT FORK
Extent of removal:1 Front fork removal
Extent of removal Order Part name Q’ty Remarks
Preparation for removalFRONT FORK REMOVAL
Hold the machine by placing the
suitable stand under the engine.
WARNING
Support the machine securely so there is nodanger of it falling over.
Front wheel Refer to “FRONT WHEEL AND FRONT
BRAKE” section.
(Refer to “FRONT WHEEL” section for
the TT-R125LW.)
Handlebar Refer to “HANDLEBAR” section.
1 Cap 1
2 Pinch bolt (upper bracket) 1 Only loosening.
3 Cap bolt 1Loosen when disassembling the front fork.
4 Pinch bolt (lower bracket) 1 Only loosening.
5Front fork
1
1
Page 474 of 510
5 - 55
CHASSWINGARM
EC570000
SWINGARM
Extent of removal:1 Swingarm removal
Extent of removal Order Part name Q’ty Remarks
Preparation for removalSWINGARM REMOVAL
Hold the machine by placing the
suitable stand under the engine.
WARNING
Support the machine securely so there is nodanger of it falling over.
Rear wheel Refer to “REAR WHEEL AND REAR
BRAKE” section.
1 Drive chain tensioner (upper) 1
2 Drive chain tensioner (lower) 1
3 Bolt (connecting arm-frame) 1
4 Bolt (rear shock absorber-relay arm) 1Hold the swingarm.
5 Pivot shaft 1
6 Swingarm 1
1