Page 53 of 134

2-28
E
EJU01312
Storage compartments
A front storage compartment, a glove
compartment, and rear storage compart-
ments are provided.
NOTE:@ �Make sure that the storage compartments
are properly secured before operating the
watercraft.
�The storage compartments are not
designed to be waterproof. If you carry
objects that must be kept dry, such as the
manuals, put them in a waterproof bag.
@
EJU01313
Front storage compartment
The front storage compartment 2 is
located at the bow.
To open the front storage compartment,
pull the hood latch 1 up, and then open the
hood.
To close the front storage compartment,
push down on the rear of the hood until it
latches securely.
WARNING@ �The front storage compartment is not
ventilated. Fuel vapors can be a fire or
explosion hazard. To avoid injury or
death, do not store fuel or flammable
liquids inside.
�Cargo should not exceed 15 kg (33 lb)
in the front storage compartment.
@
NOTE:@ Make sure that the front storage compart-
ment is properly secured before operating
the watercraft.
@
Front storage compartment:
Capacity: 120 L (31.7 US gal, 26.4 Imp gal)
Load limit: 15 kg (33 lb)
UGU572.book Page 28 Wednesday, August 28, 2002 1:31 PM
Page 55 of 134

2-30
E
EJU01314
Rear storage compartments
The rear storage compartments 2 are
located on both sides of the aft deck.
To open a rear storage compartment, pull
the latch 1 up, and then open the cover.
To close a rear storage compartment,
push down on the cover until it latches
securely.
NOTE:@ Make sure that the rear storage compart-
ments are properly secured before operat-
ing the watercraft.
@
WARNING@ �The rear storage compartments are
not ventilated. Fuel vapors can be a
fire or explosion hazard. To avoid
injury or death, do not store fuel or
flammable liquids here.
�Cargo should not exceed 22.5 kg
(50 lb) in either the port or starboard
storage compartment.
@
NOTE:@ There is a drain plug 3 in each compart-
ment. To drain water in a rear storage com-
partment into the engine compartment,
remove the plug by turning it counterclock-
wise.
@
Rear storage compartments:
Capacity: 160 L (42.3 US gal, 35.2 Imp gal)
Load limit: 22.5 kg (50 lb)
UGU572.book Page 30 Wednesday, August 28, 2002 1:31 PM
Page 58 of 134

3-1
E
EJU01041
Fuel and oil
This engine uses Yamaha’s oil injection
system, which provides superior lubrication
by ensuring the proper oil ratio for all operat-
ing conditions. No fuel premixing is neces-
sary except during the engine break-in
period. Simply pour gasoline into the fuel
tank and oil into the oil tank.
EJU01911
Gasoline
WARNING@ GASOLINE AND ITS VAPORS ARE
HIGHLY FLAMMABLE AND EXPLOSIVE!
�Do not smoke when refueling, and
keep away from sparks, flames, or
other sources of ignition.
�Stop engine before refueling.
�Refuel in a well-ventilated area with
the watercraft in a horizontal position.
�Do not stand or sit on the watercraft
while refueling in case of fire.
�Take care not to spill gasoline. If gaso-
line spills, wipe it up immediately with
dry rags. Always properly dispose of
gasoline-soaked rags.
�Avoid overfilling the fuel tank. Stop fill-
ing when the fuel level just reaches the
bottom of the filler tube. Do not fill up
the filler tube because fuel expands as
it warms up and could overflow. If tem-
porarily leaving the watercraft with a
full fuel tank, do not leave it in direct
sunlight. Leave it in a well-ventilated
area with the watercraft in a horizontal
position.
�Tighten the filler cap securely after
refueling.
�If you should swallow some gasoline,
inhale a lot of gasoline vapor, or get
gasoline in your eyes, get immediate
medical attention.
UGU572.book Page 1 Wednesday, August 28, 2002 1:31 PM
Page 60 of 134

3-3
E
EJU01960
Filling the fuel tank
CAUTION:@ Be careful when refueling. Avoid getting
water or other contaminants in the fuel
tank. Contaminated fuel can cause poor
running or engine damage.
@
1. Remove the rear and front seats. (See
pages 2-4 to 2-5 for seat removal and
installation procedures.)
2. Remove the fuel tank filler cap, and
slowly add fuel to the fuel tank.
3. Stop filling when the fuel level just
reaches the bottom a of the engine oil
tank.
4. Add 15 L (4 US gal, 3.3 Imp gal) to fill the
fuel tank.
WARNING@ Do not add more than 15 L (4 US gal,
3.3 Imp gal) to the fuel tank, otherwise
fuel can overflow when filling the fuel
tank or when it warms up and expands.
@
NOTE:@ �The fuel tank is full when the fuel level b
is visible behind the oil tank.
�The rear and front seats must be removed
in order to watch the fuel level in the fuel
tank while adding fuel.
�Do not fill into the filler tube because gas-
oline could overflow.
@
Fuel tank capacity:
Total: 70 L (18.5 US gal, 15.4 Imp gal)
Reserve: 12 L (3.2 US gal, 2.6 Imp gal)
UGU572.book Page 3 Wednesday, August 28, 2002 1:31 PM
Page 61 of 134

3-4
E
EJU01316
Filling the oil tank
WARNING@ �Do not add gasoline to the oil tank.
Fire or explosion could result.
�Oil in the bilge is a serious fire hazard.
Wipe up any spilled oil immediately.
@
CAUTION:@ Do not allow the oil tank to become com-
pletely empty. If the oil tank becomes
empty the oil injection pump must be
bled to ensure proper oil flow, otherwise
engine damage may occur. If bleeding of
the oil pump is necessary, have a
Yamaha dealer bleed it.
@
1. Remove the rear and front seats to
access the oil filler cap. (See pages 2-4
and 2-5 for seat removal and installation
procedures.)
2. Open the oil tank filler cap, and very
slowly add engine oil to the oil tank.
3. Stop pouring when the oil just reaches
the bottom of the filler tube.
NOTE:@ �The rear and front seats must be removed
in order to watch the oil level in the oil
tank while adding oil.
�Be careful not to spill oil or overfill the
tank.
�Do not fill into the filler tube because oil
could overflow.
@
Oil tank capacity:
5.5 L (1.5 US gal, 1.2 Imp gal)
UGU572.book Page 4 Wednesday, August 28, 2002 1:31 PM
Page 62 of 134

3-5
E
EJU01346
Pre-operation checks
EJU01347
Pre-operation check list
Before operating this watercraft, perform the checks in the following check list. See the
accompanying text in this chapter for details on how to perform the checks.
WARNING@ If any item in the pre-operation check list is not working properly, have it inspected
and repaired before operating the watercraft, otherwise an accident could occur.
@
NOTE:@ Pre-operation checks should be made thoroughly each time the watercraft is used. This pro-
cedure can be completed in a short time. It is worth the time spent to assure safety and reli-
ability.
@
ITEM ROUTINE PAGE
Engine compartment Remove all seats to ventilate the engine com-
partment. Check for fuel vapors or loose electri-
cal connections3-6
Bilge Check for water and fuel residue and remove if
necessary3-7
Throttle Check that the throttle lever springs back 3-10
Steering system Check for proper steering system operation 3-10
Shift lever and reverse gate Check for proper operation 3-11
Fuel and oil Check fuel and oil level and add if necessary
Check hoses and tanks for leakage3-6
Water separator Check for water and drain if necessary 3-7
Battery Check electrolyte level and battery condition 3-8
Front and rear seats Check that the seats are properly secured 2-4–2-5
Hull/Deck Check the hull and deck for cracks or other dam-
age—
Jet unit Check for debris and remove if necessary 3-12
Fire extinguisher Check the condition and replace if necessary 3-9
Engine shut-off cord Check condition and replace is frayed or broken 3-12
Switches Check the start switch, engine stop switch and
engine shut-off switch for proper operation when
the watercraft is in the water3-13
Cooling water pilot outlet Check that water is discharged while the engine
is running and the watercraft is in the water3-13
Multifunction meter Check for warning indications and proper opera-
tion3-13
UGU572.book Page 5 Wednesday, August 28, 2002 1:31 PM
Page 63 of 134

3-6
E
EJU01048
Pre-operation check points
EJU01878
Engine compartment
Ventilate the engine compar tment before
each use.
To ventilate the engine compartment
remove the rear and front seats. (See pages
2-4 and 2-5 for seat removal and installation
procedures.) Allow the engine compartment
to remain open for a few minutes to allow
any fuel vapors to escape. Also, check for
loose electrical connections.
WARNING@ Failure to ventilate the engine compart-
ment could result in fire or explosion. Do
not start the engine if there is a fuel leak
or a loose electrical connection.
@
EJU01318
Fuel and oil systems
Check the fuel system for leakage, cracks
or malfunctions before each use. (See page
4-10 for check points and correct proce-
dures.)
1. Remove the fuel tank filler cap to release
any pressure that might have built up in
the fuel tank.
2. Remove the rear and front seats. (See
pages 2-4 to 2-5 for seat removal and
installation procedures.)
3. Check the fuel and oil levels in the tanks
and replenish if necessary. (See pages
3-3 and 3-4 for filling instructions.)
UGU572.book Page 6 Wednesday, August 28, 2002 1:31 PM
Page 65 of 134
3-8
E
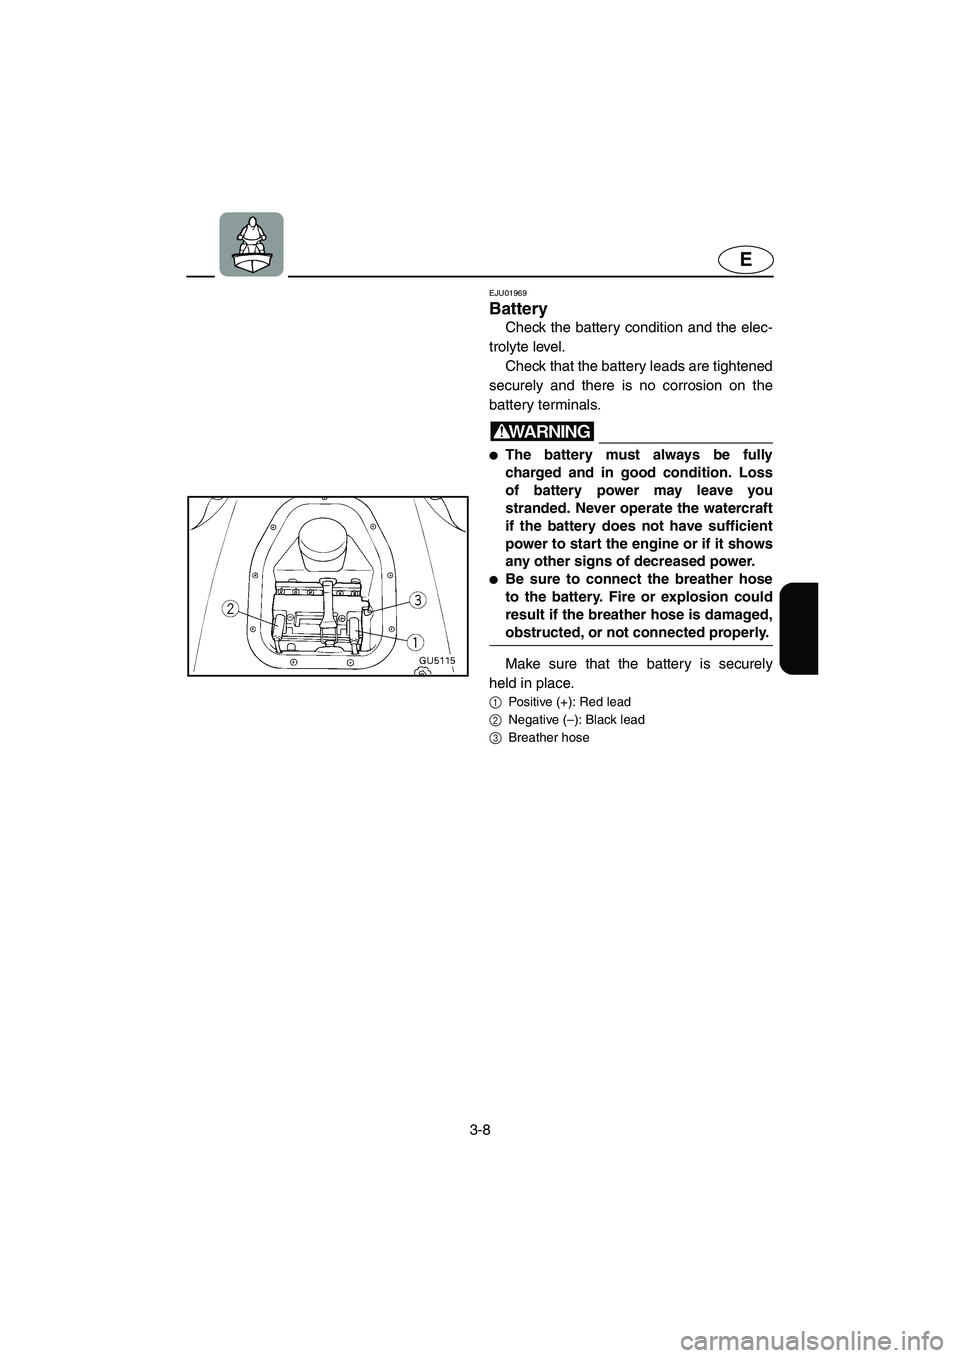
EJU01969
Battery
Check the battery condition and the elec-
trolyte level.
Check that the battery leads are tightened
securely and there is no corrosion on the
battery terminals.
WARNING@ �The battery must always be fully
charged and in good condition. Loss
of battery power may leave you
stranded. Never operate the watercraft
if the battery does not have sufficient
power to start the engine or if it shows
any other signs of decreased power.
�Be sure to connect the breather hose
to the battery. Fire or explosion could
result if the breather hose is damaged,
obstructed, or not connected properly.
@
Make sure that the battery is securely
held in place.
1
Positive (+): Red lead
2
Negative (–): Black lead
3
Breather hose
UGU572.book Page 8 Wednesday, August 28, 2002 1:31 PM