Page 19 of 116

3-2
INSTRUMENT AND CONTROL FUNCTIONS
3
EAU03733
.(Parking)
The steering is locked, and the tail-
light, license light and auxiliary light
are on, but all other electrical sys-
tems are off. The key can be
removed.
To turn the main switch to “
.”:
1. Turn the key to “LOCK”.
2. Slightly turn the key counter-
clockwise until it stops.
3. While still turning the key coun-
terclockwise, push it in until it
snaps into place.
ECA00043
cC
Do not use the parking position for
an extended length of time, other-
wise the battery may discharge.
EAU04901
ABS warning light “”ABS warning lightECA00019
cC
If the ABS warning light comes on
or flashes while riding, the ABS
may be defective. If this occurs,
have a Yamaha dealer check the
electrical circuit.
See page 3-13 for an explanation of
the ABS.
The electrical circuit of the warning
light can be checked by setting the
engine stop switch to “#” and turning
the key to “ON”.
The warning light should come on for
a few seconds, and then go off. If the
warning light does not come on or
remains on, have a Yamaha dealer
check the electrical circuit.
EAU03034
Indicator and warning lightsIndicator and warning lightsEAU04121
Turn signal indicator lights “4”
and “6”
Turn signal indicator lightsThe corresponding indicator light
flashes when the turn signal switch is
pushed to the left or right.
13
45
2
1. Left turn signal indicator light “4”
2. ABS warning light “”
3. High beam indicator light “&”
4. Oil change indicator light “
7”
5. Right turn signal indicator light “6”
5SJ-28199-E1 7/11/02 11:03 AM Page 17
Page 20 of 116

3-3
EWA00069
w
When the ABS warning light
comes on or flashes while riding,
the brake system reverts to con-
ventional braking. Therefore, be
careful not to cause the wheel to
lock during emergency braking.
NOTE:
The ABS warning light may come on
while pushing the start switch and
while accelerating the engine with the
scooter on its centerstand, but this
does not indicate a malfunction.
EAU00063
High beam indicator light “&”High beam indicator lightThis indicator light comes on when
the high beam of the headlight is
switched on.
INSTRUMENT AND CONTROL FUNCTIONS
3
EAU03734
Oil change indicator light “7”Oil change indicator lightThis indicator light comes on at the
initial 1,000 km and every 3,000 km
thereafter to indicate that the engine
oil should be changed.
If the engine oil is changed before the
oil change indicator comes on (i.e.
before the periodic oil change interval
has been reached), the indicator light
must be reset after the oil change for
the next periodic oil change to be
indicated at the correct time. (See
page 6-17 for the resetting proce-
dure.)
The electrical circuit of the indicator
light can be checked according to the
following procedure.
1. Set the engine stop switch to “#”
and turn the key to “ON”.
2. Check that the indicator comes
on for a few seconds and then
goes off.
3. If the indicator light does not
come on, have a Yamaha dealer
check the electrical circuit.
NOTE:
The oil change indicator light may
flash when the engine is revved with
the scooter on the centerstand, but
this does not indicate a malfunction.
5SJ-28199-E1 7/11/02 11:03 AM Page 18
Page 55 of 116

6-4
PERIODIC MAINTENANCE AND MINOR REPAIR
6
8*Brake hoses•Check for cracks or damage.√√√√ √
•Replace. (See NOTE on page 6-5.)Every 4 years
9
*Wheels•Check runout and for damage.√√√√
10
*Tires•Check tread depth and for damage.
•Replace if necessary.
•Check air pressure.
•Correct if necessary.√√√√ √
11
*Wheel bearings•Check bearing for looseness or damage.√√√√
12
*Steering bearings•Check bearing play and steering for roughness.√√√√√
•Lubricate with lithium-soap-based grease.Every 20,000 km
13
*Chassis fasteners•Make sure that all nuts, bolts and screws are properly tightened.√√√√ √
14 Sidestand, centerstand•Check operation.
•Lubricate.√√√√ √
15
*Sidestand switch•Check operation.√√√√√ √
16
*Front fork•Check operation and for oil leakage.√√√√
17
*Shock absorber
assemblies•Check operation and shock absorbers for oil leakage.√√√√
18
*Carburetor•Adjust engine idling speed.√√√√√ √
19 Engine oil•Change. (See page 3-3 and 6-17 for more information
about the oil change indicator light.)√When the oil change indicator light comes on
(every 3,000 km)
•Check oil level and vehicle for oil leakage.Every 3,000 km√ NO. ITEM CHECK OR MAINTENANCE JOBODOMETER READING (× 1,000 km)
ANNUAL
CHECK
1 10203040
5SJ-28199-E1 7/11/02 11:03 AM Page 53
Page 56 of 116

6-5
PERIODIC MAINTENANCE AND MINOR REPAIR
6
EAU03884
NOTE:
8The air filter needs more frequent service if you are riding in unusually wet or dusty areas.
8Hydraulic brake service
9Regularly check and, if necessary, correct the brake fluid level.
9Every two years replace the internal components of the brake master cylinders and calipers, and change the
brake fluid.
9Replace the brake hoses every four years and if cracked or damaged.
20*Engine oil strainer•Clean.√
21
*Cooling system•Check coolant level and vehicle for coolant leakage.√√√√ √
•Change.Every 3 years
22 Final transmission oil•Check vehicle for oil leakage.√√ √
•Change.√√√
23
*V-belt•Replace.Every 20,000 km
24
*Front and rear brake
switches•Check operation.√√√√√ √
25 Moving parts and cables•Lubricate.√√√√ √
26
*Throttle grip housing
and cable•Check operation and free play.
•Adjust the throttle cable free play if necessary.
•Lubricate the throttle grip housing and cable.√√√√ √
27
*Lights, signals and
switches•Check operation.
•Adjust headlight beam.√√√√√ √ NO. ITEM CHECK OR MAINTENANCE JOBODOMETER READING (× 1,000 km)
ANNUAL
CHECK
1 10203040
5SJ-28199-E1 7/11/02 11:03 AM Page 54
Page 65 of 116
6-14
PERIODIC MAINTENANCE AND MINOR REPAIR
6
NOTE:
If a torque wrench is not available
when installing a spark plug, a good
estimate of the correct torque is
1/4–1/2 turn past finger tight.
However, the spark plug should be
tightened to the specified torque as
soon as possible.
4. Install the spark plug cap.
5. Install the cowling.To check the engine oil level
1. Place the scooter on the center-
stand.
NOTE:
Make sure that the scooter is posi-
tioned straight up when checking the
oil level. A slight tilt to the side can
result in a false reading.
2. Start the engine, warm it up for
several minutes, and then turn it
off.
EAU04611
Engine oilEngine oilThe engine oil level should be
checked before each ride. In addition,
the oil must be changed at the inter-
vals specified in the periodic mainte-
nance and lubrication chart and when
the oil change indicator light comes
on. Tightening torque:
Spark plug:
17.5 Nm (1.75 m·kgf)
5SJ-28199-E1 7/11/02 11:03 AM Page 63
Page 66 of 116
6-15
PERIODIC MAINTENANCE AND MINOR REPAIR
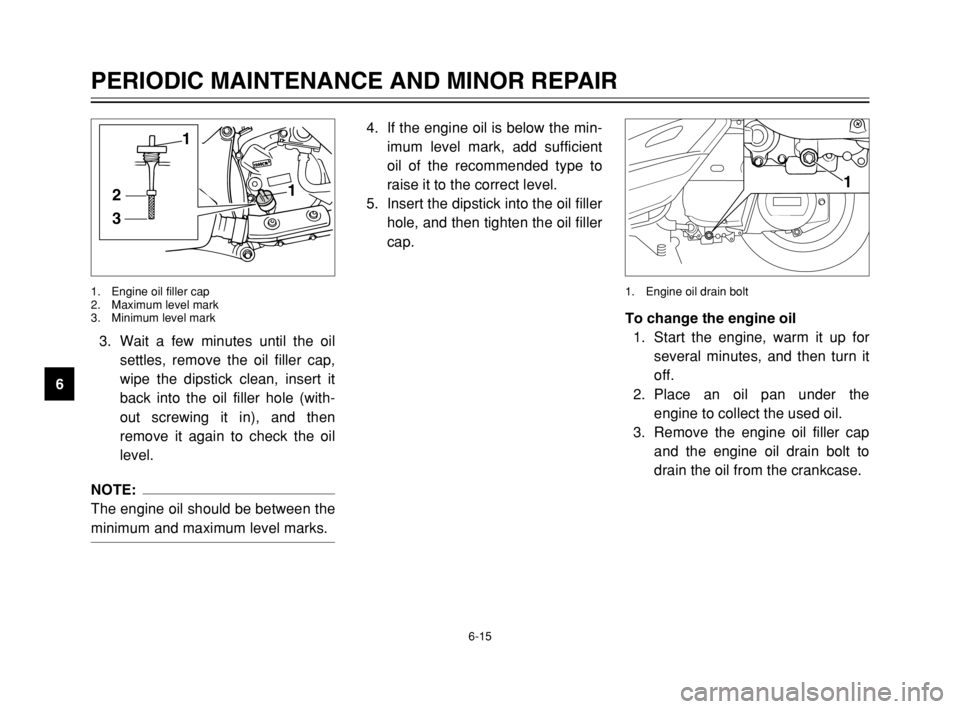
63. Wait a few minutes until the oil
settles, remove the oil filler cap,
wipe the dipstick clean, insert it
back into the oil filler hole (with-
out screwing it in), and then
remove it again to check the oil
level.
NOTE:
The engine oil should be between the
minimum and maximum level marks.
31
21
1. Engine oil filler cap
2. Maximum level mark
3. Minimum level mark
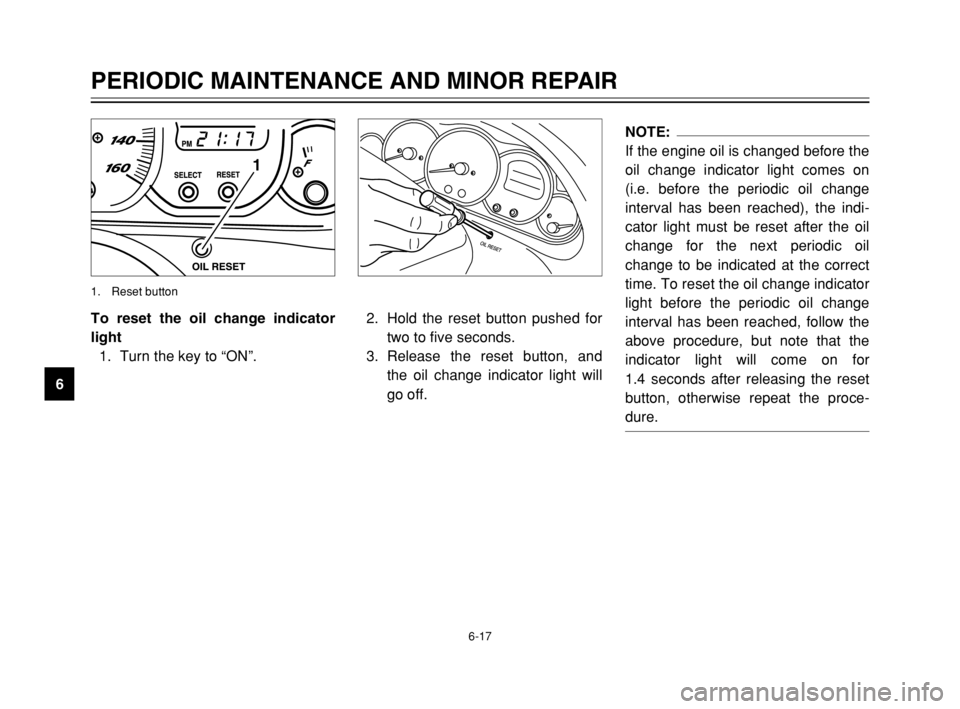
To change the engine oil
1. Start the engine, warm it up for
several minutes, and then turn it
off.
2. Place an oil pan under the
engine to collect the used oil.
3. Remove the engine oil filler cap
and the engine oil drain bolt to
drain the oil from the crankcase.
1
1. Engine oil drain bolt
4. If the engine oil is below the min-
imum level mark, add sufficient
oil of the recommended type to
raise it to the correct level.
5. Insert the dipstick into the oil filler
hole, and then tighten the oil filler
cap.
5SJ-28199-E1 7/11/02 11:03 AM Page 64
Page 67 of 116
6-16
PERIODIC MAINTENANCE AND MINOR REPAIR
6 4. Check the washer for damage
and replace it if necessary.
5. Install the washer and the engine
oil drain bolt, and then tighten
the drain bolt to the specified
torque.
NOTE:
Make sure that the washer is properly
seated.
12
1. Engine oil drain bolt
2. Washer
7. Start the engine, and then let it
idle for several minutes while
checking it for oil leakage. If oil is
leaking, immediately turn the
engine off and check for the
cause.
8. Reset the oil change indicator
light according to the following
procedure. 6. Add the specified amount of the
recommended engine oil, and
then install and tighten the oil
filler cap.
ECA00140
cC
8
8
Do not use oils with a diesel
specification of “CD” or oils of
a higher quality than specified.
In addition, do not use oils
labeled “ENERGY CONSERV-
ING
II” or higher.
8 8
Be sure no foreign material
enters the crankcase.
Tightening torque:
Engine oil drain bolt:
20 Nm (2.0 m0kgf)
Recommended engine oil:
See page 8-1.
Oil quantity:
Periodic oil change:
1.2 L
Total amount (dry engine):
1.4 L
5SJ-28199-E1 7/11/02 11:03 AM Page 65
Page 68 of 116
6-17
PERIODIC MAINTENANCE AND MINOR REPAIR
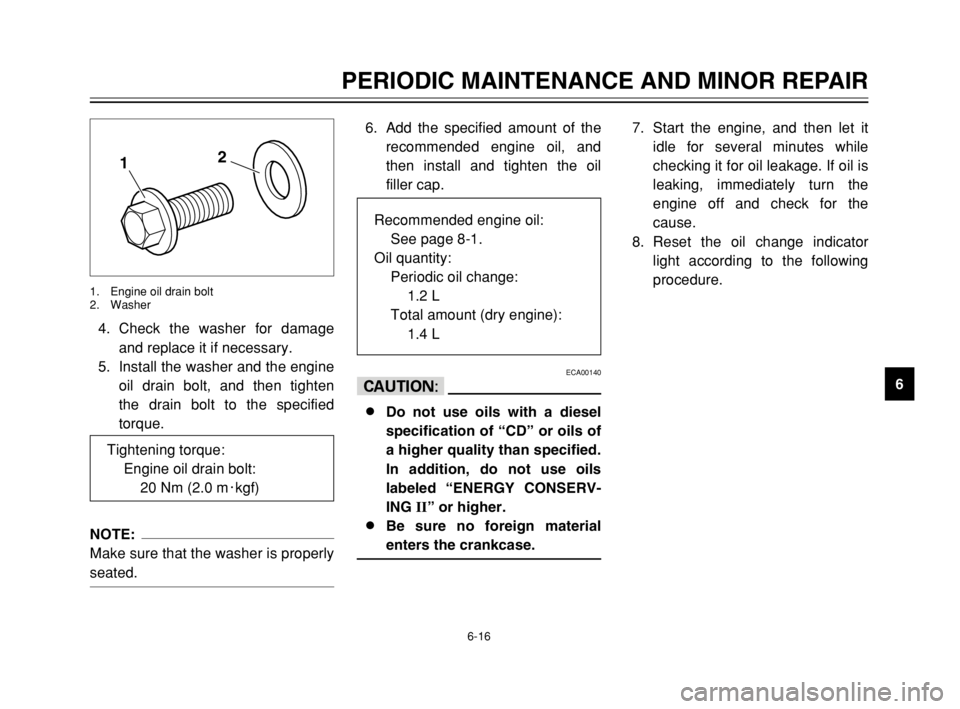
6To reset the oil change indicator
light
1. Turn the key to “ON”.
1
1. Reset button
NOTE:
If the engine oil is changed before the
oil change indicator light comes on
(i.e. before the periodic oil change
interval has been reached), the indi-
cator light must be reset after the oil
change for the next periodic oil
change to be indicated at the correct
time. To reset the oil change indicator
light before the periodic oil change
interval has been reached, follow the
above procedure, but note that the
indicator light will come on for
1.4 seconds after releasing the reset
button, otherwise repeat the proce-
dure.
2. Hold the reset button pushed for
two to five seconds.
3. Release the reset button, and
the oil change indicator light will
go off.
5SJ-28199-E1 7/11/02 11:03 AM Page 66