2003 YAMAHA MAJESTY 250 engine
[x] Cancel search: enginePage 74 of 116
6-23
PERIODIC MAINTENANCE AND MINOR REPAIR
6
EAU03094
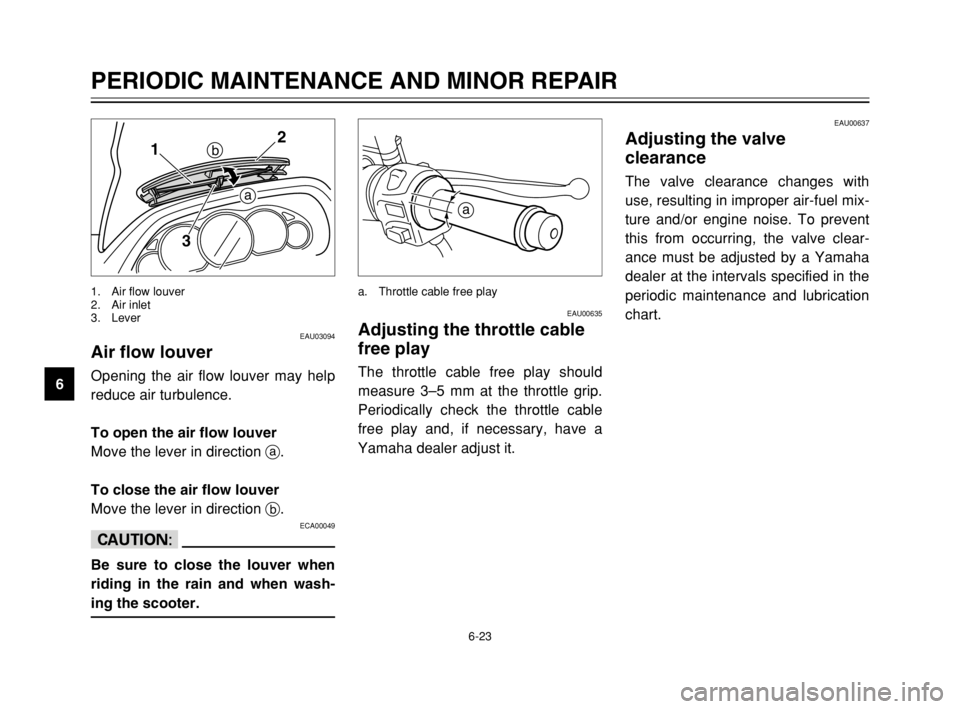
Air flow louverAir flow louverOpening the air flow louver may help
reduce air turbulence.
To open the air flow louver
Move the lever in direction a.
To close the air flow louver
Move the lever in direction b.
ECA00049
cC
Be sure to close the louver when
riding in the rain and when wash-
ing the scooter.
12
b
3a
1. Air flow louver
2. Air inlet
3. Lever
EAU00637
Adjusting the valve
clearance
Valve clearance, adjustingThe valve clearance changes with
use, resulting in improper air-fuel mix-
ture and/or engine noise. To prevent
this from occurring, the valve clear-
ance must be adjusted by a Yamaha
dealer at the intervals specified in the
periodic maintenance and lubrication
chart.
EAU00635
Adjusting the throttle cable
free play
Throttle cable free play, adjustingThe throttle cable free play should
measure 3–5 mm at the throttle grip.
Periodically check the throttle cable
free play and, if necessary, have a
Yamaha dealer adjust it.
a
a. Throttle cable free play
5SJ-28199-E1 7/11/02 11:03 AM Page 72
Page 81 of 116

6-30
PERIODIC MAINTENANCE AND MINOR REPAIR
6 8Refill with the same type of brake
fluid. Mixing fluids may result in a
harmful chemical reaction and
lead to poor braking perfor-
mance.
8Be careful that water or dust
does not enter the brake fluid
reservoir when refilling. Water
will significantly lower the boiling
point of the fluid and may result
in vapor lock, and dirt may clog
the ABS hydraulic unit valves.
8Brake fluid may deteriorate paint-
ed surfaces or plastic parts.
Always clean up spilled fluid
immediately.
8As the brake pads wear, it is nor-
mal for the brake fluid level to
gradually go down. However, if
the brake fluid level goes down
suddenly, have a Yamaha dealer
check the cause.
EAU02962
Checking and lubricating the
cables
Cables, checking and lubricatingThe operation of all control cables
and the condition of the cables
should be checked before each ride,
and the cables and cable ends
should be lubricated if necessary. If
a cable is damaged or does not move
smoothly, have a Yamaha dealer
check or replace it.
EW000112
w
Damage to the outer sheath may
interfere with proper cable opera-
tion and will cause the inner cable
to rust. Replace a damaged cable
as soon as possible to prevent
unsafe conditions.
EAU03976
Changing the brake fluidBrake fluid, changingHave a Yamaha dealer change the
brake fluid at the intervals specified in
the NOTE after the periodic mainte-
nance and lubrication chart. In addi-
tion, have the oil seals of the master
cylinders and calipers as well as the
brake hoses replaced at the intervals
listed below or whenever they are
damaged or leaking.
8Oil seals: Replace every two
years.
8Brake hoses: Replace every four
years.Recommended lubricant:
Engine oil
5SJ-28199-E1 7/11/02 11:03 AM Page 79
Page 84 of 116
6-33
PERIODIC MAINTENANCE AND MINOR REPAIR
6
EAU00794
Checking the steeringSteering, checkingWorn or loose steering bearings may
cause danger. Therefore, the opera-
tion of the steering must be checked
as follows at the intervals specified in
the periodic maintenance and lubrica-
tion chart.
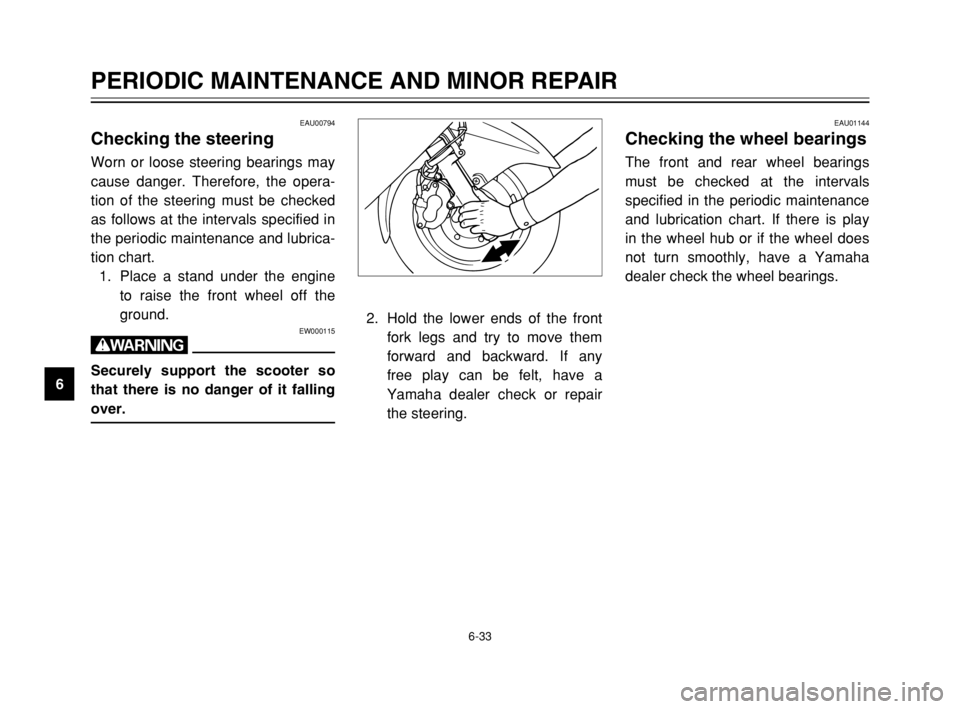
1. Place a stand under the engine
to raise the front wheel off the
ground.
EW000115
w
Securely support the scooter so
that there is no danger of it falling
over.
EAU01144
Checking the wheel bearingsWheel bearings, checkingThe front and rear wheel bearings
must be checked at the intervals
specified in the periodic maintenance
and lubrication chart. If there is play
in the wheel hub or if the wheel does
not turn smoothly, have a Yamaha
dealer check the wheel bearings.
2. Hold the lower ends of the front
fork legs and try to move them
forward and backward. If any
free play can be felt, have a
Yamaha dealer check or repair
the steering.
5SJ-28199-E1 7/11/02 11:03 AM Page 82
Page 94 of 116
6-43
PERIODIC MAINTENANCE AND MINOR REPAIR
6
EAU01581
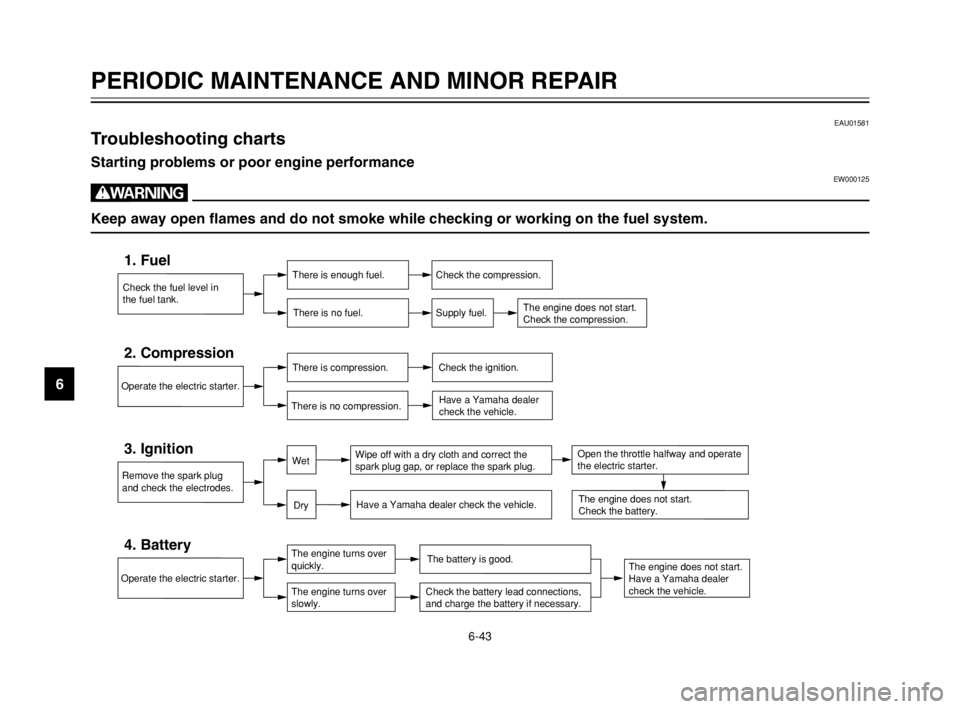
Troubleshooting chartsTroubleshooting chartsStarting problems or poor engine performanceEW000125
w
Keep away open flames and do not smoke while checking or working on the fuel system.
Check the fuel level in
the fuel tank.
1. FuelThere is enough fuel.
There is no fuel.Check the compression.
Supply fuel.
The engine does not start.
Check the compression.
Operate the electric starter.
2. CompressionThere is compression.
There is no compression.Check the ignition.
Have a Yamaha dealer
check the vehicle.
Remove the spark plug
and check the electrodes.
3. IgnitionWipe off with a dry cloth and correct the
spark plug gap, or replace the spark plug.
Have a Yamaha dealer check the vehicle.
The engine does not start.
Have a Yamaha dealer
check the vehicle.
The engine does not start.
Check the battery.
Operate the electric starter.
4. BatteryThe engine turns over
quickly.
The engine turns over
slowly.The battery is good.
Check the battery lead connections,
and charge the battery if necessary.
Dry
WetOpen the throttle halfway and operate
the electric starter.
5SJ-28199-E1 7/11/02 11:03 AM Page 92
Page 95 of 116
6-44
PERIODIC MAINTENANCE AND MINOR REPAIR
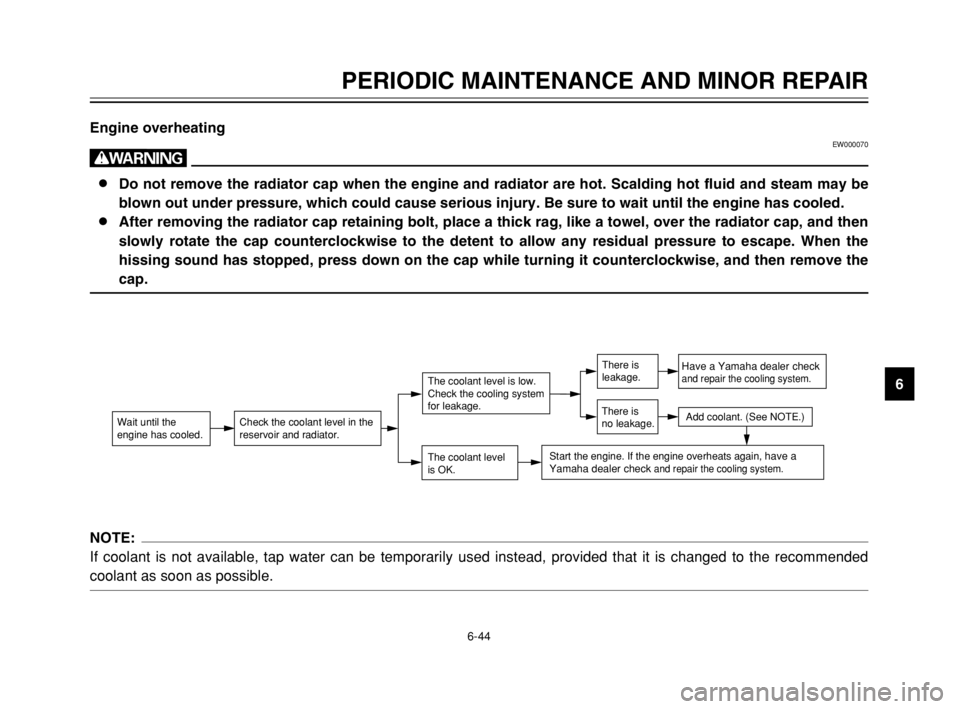
6 Engine overheating
EW000070
w
8 8
Do not remove the radiator cap when the engine and radiator are hot. Scalding hot fluid and steam may be
blown out under pressure, which could cause serious injury. Be sure to wait until the engine has cooled.
8 8
After removing the radiator cap retaining bolt, place a thick rag, like a towel, over the radiator cap, and then
slowly rotate the cap counterclockwise to the detent to allow any residual pressure to escape. When the
hissing sound has stopped, press down on the cap while turning it counterclockwise, and then remove the
cap.
NOTE:
If coolant is not available, tap water can be temporarily used instead, provided that it is changed to the recommended
coolant as soon as possible.
Wait until the
engine has cooled.Check the coolant level in the
reservoir and radiator.
The coolant level
is OK.
The coolant level is low.
Check the cooling system
for leakage.
Have a Yamaha dealer checkand repair the cooling system.
Add coolant. (See NOTE.)
Start the engine. If the engine overheats again, have a
Yamaha dealer check and repair the cooling system.
There is
leakage.
There is
no leakage.
5SJ-28199-E1 7/11/02 11:03 AM Page 93
Page 98 of 116

7-1
EAU03434
SCOOTER CARE AND STORAGE
7
CareCareWhile the open design of a scooter
reveals the attractiveness of the tech-
nology, it also makes it more vulnera-
ble. Rust and corrosion can develop
even if high-quality components are
used. A rusty exhaust pipe may go
unnoticed on a car, however, it
detracts from the overall appearance
of a scooter. Frequent and proper
care does not only comply with the
terms of the warranty, but it will also
keep your scooter looking good,
extend its life and optimize its perfor-
mance.Before cleaning
1. Cover the muffler outlet with a
plastic bag after the engine has
cooled down.
2. Make sure that all caps and cov-
ers as well as all electrical cou-
plers and connectors, including
the spark plug cap, are tightly
installed.
3. Remove extremely stubborn dirt,
like oil burnt onto the crankcase,
with a degreasing agent and a
brush, but never apply such
products onto seals, gaskets and
wheel axles. Always rinse the dirt
and degreaser off with water.Cleaning
ECA00011
cC
8
8
Avoid using strong acidic
wheel cleaners, especially on
spoked wheels. If such prod-
ucts are used on hard-to-
remove dirt, do not leave the
cleaner on the affected area
any longer than instructed.
Also, thoroughly rinse the area
off with water, immediately dry
it, and then apply a corrosion
protection spray.
8 8
Improper cleaning can damage
windshields, cowlings, panels
and other plastic parts. Use
only a soft, clean cloth or
sponge with mild detergent
and water to clean plastic.
5SJ-28199-E1 7/11/02 11:03 AM Page 96
Page 99 of 116

7-2
SCOOTER CARE AND STORAGE
7 8 8
Do not use any harsh chemical
products on plastic parts. Be
sure to avoid using cloths or
sponges which have been in
contact with strong or abra-
sive cleaning products, sol-
vent or thinner, fuel (gasoline),
rust removers or inhibitors,
brake fluid, antifreeze or elec-
trolyte.
8 8
Do not use high-pressure
washers or steam-jet cleaners
since they cause water seep-
age and deterioration in the
following areas: seals (of
wheel and swingarm bearings,
fork and brakes), electric com-
ponents (couplers, connec-
tors, instruments, switches
and lights), breather hoses
and vents.8 8
For scooters equipped with a
windshield: Do not use strong
cleaners or hard sponges as
they will cause dulling or
scratching. Some cleaning
compounds for plastic may
leave scratches on the wind-
shield. Test the product on a
small hidden part of the wind-
shield to make sure that it
does not leave any marks. If
the windshield is scratched,
use a quality plastic polishing
compound after washing.After normal use
Remove dirt with warm water, a mild
detergent, and a soft, clean sponge,
and then rinse thoroughly with clean
water. Use a toothbrush or bottle-
brush for hard-to-reach areas.
Stubborn dirt and insects will come
off more easily if the area is covered
with a wet cloth for a few minutes
before cleaning.After riding in the rain, near the sea
or on salt-sprayed roads
Since sea salt or salt sprayed on the
roads during winter are extremely
corrosive in combination with water,
carry out the following steps after
each ride in the rain, near the sea or
on salt-sprayed roads.
NOTE:
Salt sprayed on roads in the winter
may remain well into spring.
1. Clean the scooter with cold water
and a mild detergent after the
engine has cooled down.
ECA00012
cC
Do not use warm water since it
increases the corrosive action of
the salt.
2. Apply a corrosion protection
spray on all metal, including
chrome- and nickel-plated, sur-
faces to prevent corrosion.
5SJ-28199-E1 7/11/02 11:03 AM Page 97
Page 101 of 116
7-4
SCOOTER CARE AND STORAGE
7
StorageStorageShort-term
Always store your scooter in a cool,
dry place and, if necessary, protect it
against dust with a porous cover.
ECA00015
cC
8
8
Storing the scooter in a poorly
ventilated room or covering it
with a tarp, while it is still wet,
will allow water and humidity
to seep in and cause rust.
8 8
To prevent corrosion, avoid
damp cellars, stables (because
of the presence of ammonia)
and areas where strong chemi-
cals are stored.
Long-term
Before storing your scooter for sever-
al months:
1. Follow all the instructions in the
“Care” section of this chapter.
2. Drain the carburetor float cham-
ber by loosening the drain bolt;
this will prevent fuel deposits
from building up. Pour the
drained fuel into the fuel tank.
3. Fill up the fuel tank and add fuel
stabilizer (if available) to prevent
the fuel tank from rusting and the
fuel from deteriorating.
4. Perform the following steps to
protect the cylinder, piston rings,
etc. from corrosion.a. Remove the spark plug cap
and spark plug.
b. Pour a teaspoonful of engine
oil into the spark plug bore.
c. Install the spark plug cap onto
the spark plug, and then place
the spark plug on the cylinder
head so that the electrodes
are grounded. (This will limit
sparking during the next step.)
d. Turn the engine over several
times with the starter. (This
will coat the cylinder wall with
oil.)
e. Remove the spark plug cap
from the spark plug, and then
install the spark plug and the
spark plug cap.
EWA00003
w
To prevent damage or injury from
sparking, make sure to ground the
spark plug electrodes while turn-
ing the engine over.
5SJ-28199-E1 7/11/02 11:03 AM Page 99