Page 272 of 444

8-7
EBU00262
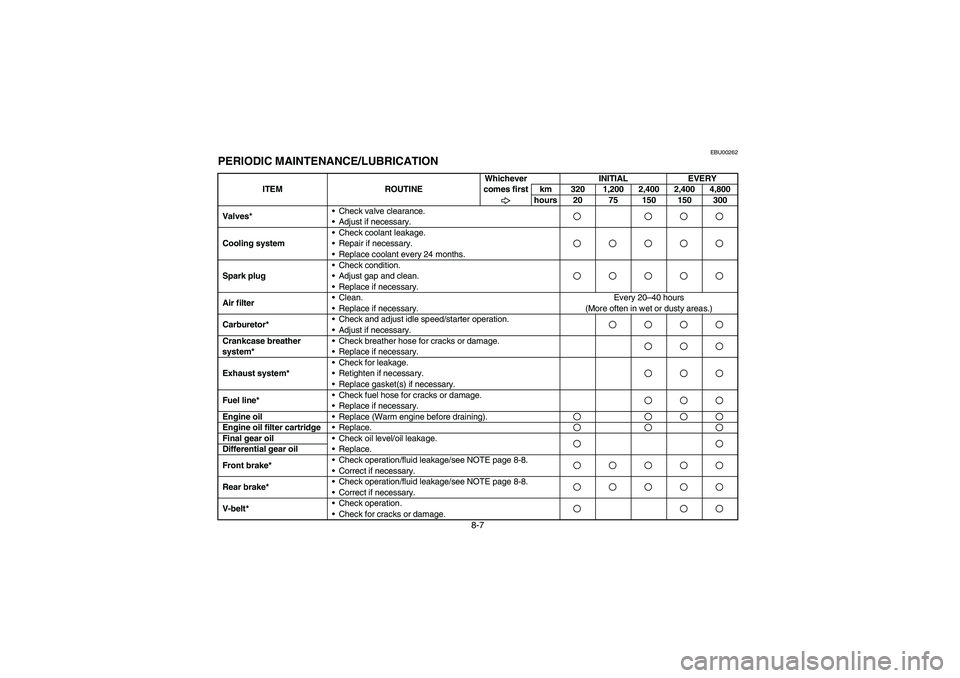
PERIODIC MAINTENANCE/LUBRICATION
ITEM ROUTINEWhichever
comes firstINITIAL EVERY
km 320 1,200 2,400 2,400 4,800
hours 20 75 150 150 300
Valves*•Check valve clearance.
•Adjust if necessary.
Cooling system•Check coolant leakage.
•Repair if necessary.
•Replace coolant every 24 months.Spark plug•Check condition.
•Adjust gap and clean.
•Replace if necessary.Air filter•Clean.
•Replace if necessary.Every 20–40 hours
(More often in wet or dusty areas.)
Carburetor*•Check and adjust idle speed/starter operation.
•Adjust if necessary.Crankcase breather
system*•Check breather hose for cracks or damage.
•Replace if necessary.Exhaust system*•Check for leakage.
•Retighten if necessary.
•Replace gasket(s) if necessary.Fuel line*•Check fuel hose for cracks or damage.
•Replace if necessary.Engine oil
•Replace (Warm engine before draining).Engine oil filter cartridge
•Replace.Final gear oil
•Check oil level/oil leakage.
•Replace.Differential gear oil
Front brake*•Check operation/fluid leakage/see NOTE page 8-8.
•Correct if necessary.Rear brake*•Check operation/fluid leakage/see NOTE page 8-8.
•Correct if necessary.V-belt*•Check operation.
•Check for cracks or damage.U5KM61.book Page 7 Friday, July 26, 2002 11:13 AM
Page 273 of 444

8-8
* It is recommended that these items be serviced by a Yamaha dealer.
** Lithium-soap-based greaseNOTE:Recommended brake fluid: DOT 4
Brake fluid replacement:
1. When disassembling the master cylinder or caliper cylinder, replace the brake fluid. Normally check
the brake fluid level and add fluid as required.
2. On the inner parts of the master cylinder and caliper cylinder, replace the oil seals every two years.
3. Replace the brake hoses every four years, or if cracked or damaged.Wheels*•Check balance/damage/runout.
•Repair if necessary.Wheel bearing*•Check bearing assemblies for looseness/damage.
•Replace if damaged.Front and rear
suspension*•Check operation.
•Correct if necessary.Steering system*•Check operation/Replace if damaged.
•Check toe-in/Adjust if necessary.Rear upper and lower
knuckle pivots*•Lubricate.**Drive shaft universal
joint*•Lubricate.**Engine mount*
•Check for cracks or damage.Front and rear axle boots*•Check operation.
•Replace if damaged.Stabilizer bushes*
•Check for cracks or damage.Fittings and Fasteners*•Check all chassis fittings and fasteners.
•Correct if necessary.
ITEM ROUTINEWhichever
comes firstINITIAL EVERY
km 320 1,200 2,400 2,400 4,800
hours 20 75 150 150 300
U5KM61.book Page 8 Friday, July 26, 2002 11:13 AM
Page 298 of 444
8-33 1. Engine oil filler cap
2. Engine oil dipstick
1. Bouchon de remplissage d’huile de moteur
2. Jauge d’huile
1. Tapa de relleno de aceite de motor
2. Varilla de medición del aceite de motor
EBU01099
Engine oil
Engine oil level measurement
1. Remove panel F. (See page 8-31 for panel
removal and installation procedures.)
2. Place the ATV on a level surface and warm
up the engine for several minutes.
3. Stop the engine.
4. Remove the engine oil filler cap and wipe off
the dipstick with a clean rag.
5. Insert the dipstick in the filler hole without
screwing it in.NOTE:_ Wait a few minutes until the oil level settles before
checking. _
U5KM61.book Page 33 Friday, July 26, 2002 11:13 AM
Page 310 of 444
8-45
‘1. Final gear oil drain bolt
1. Boulon de vidange de l’huile de couple conique arrière
1. Perno de drenaje de aceite de la transmisión final
10. Start the engine and warm it up for several
minutes. While warming up, check for oil
leakage. If oil leakage is found, stop the en-
gine immediately and check for the cause.
11. Install the panels.
EBU00880
Final gear oil
The final gear case must be checked for oil leak-
age before each ride. If any leakage is found, have
a Yamaha dealer check and repair the ATV.
Final gear oil replacement
1. Place the machine on a level place.
2. Place a container under the final gear case to
collect the used oil.
3. Remove the oil filler bolt and the drain bolt to
drain the oil.
U5KM61.book Page 45 Friday, July 26, 2002 11:13 AM
Page 322 of 444
8-57 1. Coolant reservoir tank cap
2. Maximum level mark
3. Minimum level mark
1. Bouchon du vase d’expansion
2. Repère de niveau maximum
3. Repère de niveau minimum
1. Tapa del depósito de refrigerante
2. Marca de nivel máximo
3. Marca de nivel mínimo
EBU01000
Cooling system
1. Check the coolant level in the reservoir when
the engine is cold as the coolant level will
vary with engine temperature. The coolant
level should be between the maximum and
minimum marks.
2. If the level is low, remove panel D. (See page
8-17 for panel removal and installation proce-
dures.)
U5KM61.book Page 57 Friday, July 26, 2002 11:13 AM
Page 332 of 444
8-67
12. Install the radiator cap.
13. Start the engine and let it idle for several min-
utes. Stop the engine, and then check the
coolant level in the radiator. If it is low, add
more coolant until it reaches the top of the ra-
diator.
14. Fill the coolant reservoir with coolant up to
the maximum level.
15. Install the coolant reservoir cap and check for
coolant leakage.NOTE:_ If any leakage is found, ask a Yamaha dealer to in-
spect the cooling system. _16. Install the panels and the front carrier.
U5KM61.book Page 67 Friday, July 26, 2002 11:13 AM
Page 346 of 444

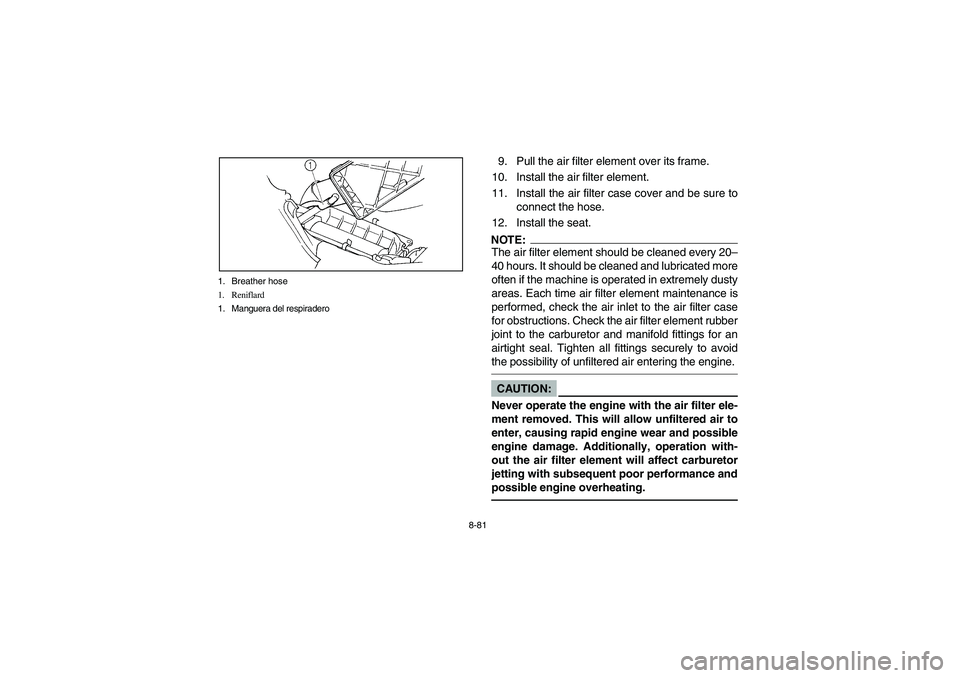
8-81 1. Breather hose
1. Reniflard
1. Manguera del respiradero
9. Pull the air filter element over its frame.
10. Install the air filter element.
11. Install the air filter case cover and be sure to
connect the hose.
12. Install the seat.NOTE:_ The air filter element should be cleaned every 20–
40 hours. It should be cleaned and lubricated more
often if the machine is operated in extremely dusty
areas. Each time air filter element maintenance is
performed, check the air inlet to the air filter case
for obstructions. Check the air filter element rubber
joint to the carburetor and manifold fittings for an
airtight seal. Tighten all fittings securely to avoid
the possibility of unfiltered air entering the engine. _CAUTION:_ Never operate the engine with the air filter ele-
ment removed. This will allow unfiltered air to
enter, causing rapid engine wear and possible
engine damage. Additionally, operation with-
out the air filter element will affect carburetor
jetting with subsequent poor performance and
possible engine overheating. _
U5KM61.book Page 81 Friday, July 26, 2002 11:13 AM
Page 348 of 444
8-83 1. V-belt cooling duct check hose (Left side)
1. Flexible de contrôle du conduit de refroidissement de la courroie
trapézoïdale (côté gauche)
1. Manguera de comprobación del conducto de enfriamiento de
la correa trapezoidal (Lado izquierdo)
1. V-belt case drain plug
1. Boulon de vidange du carter de la courroie
1. Tapón de drenaje de la caja de la correa trapezoidal
EBU00874
V-belt cooling duct check hose
If dust or water collects in the V-belt cooling duct
check hose, remove the hose and clean it.
V-belt case drain plug
After riding in water deep enough to allow it to en-
ter the V-belt case, remove this plug to drain the
water from the case.NOTE:_ If water drains from the V-belt case after removing
the plug, have a Yamaha dealer inspect the ATV
as the water may affect other engine parts. _
U5KM61.book Page 83 Friday, July 26, 2002 11:13 AM