2003 VOLVO XC70 ESP
[x] Cancel search: ESPPage 144 of 257

2003 VOLVO XC70
Position of load carriers
Make sure that the wing-shaped load carriers are installed on the roof r\
ails with the rounded edge
forward (see the inset illustration above). The load carriers are iden\
tical and can be placed anywhere
along the roof rails.
Reducing wind noise and improving fuel economy
To maximize fuel efficiency and minimize wind noise, Volvo recommends th\
at load carriers be removed
when not in use.
Fitting the load carriers (accessory)
Make sure that the load carrier is pressed firmly out against the roof r\
ail. Screw the load carrier in place.
Use the supplied torque wrench and tighten to the mark on the wrench (c\
orresponding to 6 Nm). See
illustration.
file:///K|/ownersdocs/2003/2003_XC70/03xc70_06a.htm (21 of 22)12/30/20\
06 4:18:00 PM
Page 161 of 257

2003 VOLVO XC70
Uniform tire quality grading
ALL PASSENGER CAR TIRES MUST CONFORM TO FEDERAL SAFETY REQUIREMENTS
IN ADDITION TO THESE GRADES
Quality grades can be found, where applicable, on the tire sidewall betw\
een the tread shoulder and
maximum section width. For example:
Treadwear 200 Traction AA Temperature A
TREADWEAR
The treadwear grade is a comparative rating based on the wear rate of th\
e tire when tested under
controlled conditions on a specified government test course. For example\
, a tire graded 150 would wear
one and one half (1 1/2) times as well on the government course as a t\
ire graded 100. The relative
performance of tires depends upon the actual conditions of their use, ho\
wever, and many depart
significantly from the norm due to variation in driving habits, service \
practices and differences in road
characteristics and climate.
TRACTION
The traction grades, from highest to lowest, are AA, A, B, and C, as mea\
sured under controlled
conditions on specified government test surfaces of asphalt and concrete\
. A tire marked C may have
poor traction performance. WARNING!
The traction grade assigned to this tire is based on braking (straight-\
ahead) traction tests and is not a
measure of cornering (turning) traction.
TEMPERATURE
The temperature grades are AA (the highest), A, B, and C, representing\
the tire's resistance to the
generation of heat and its ability to dissipate heat when tested under c\
ontrolled conditions on a specified
indoor laboratory test wheel. Sustained high temperature can cause the m\
aterial of the tire to degenerate
and reduce tire life, and excessive temperature can lead to sudden tire \
failure. The grade C corresponds
to a minimum level of performance which all passenger car tires must mee\
t under the Federal Motor
Safety Standard No. 109. Grades B and A represent higher levels of perfo\
rmance on the laboratory test
wheel than the minimum required by law.
file:///K|/ownersdocs/2003/2003_XC70/03xc70_07.htm (6 of 10)12/30/2006\
4:18:01 PM
Page 178 of 257

2003 VOLVO XC70
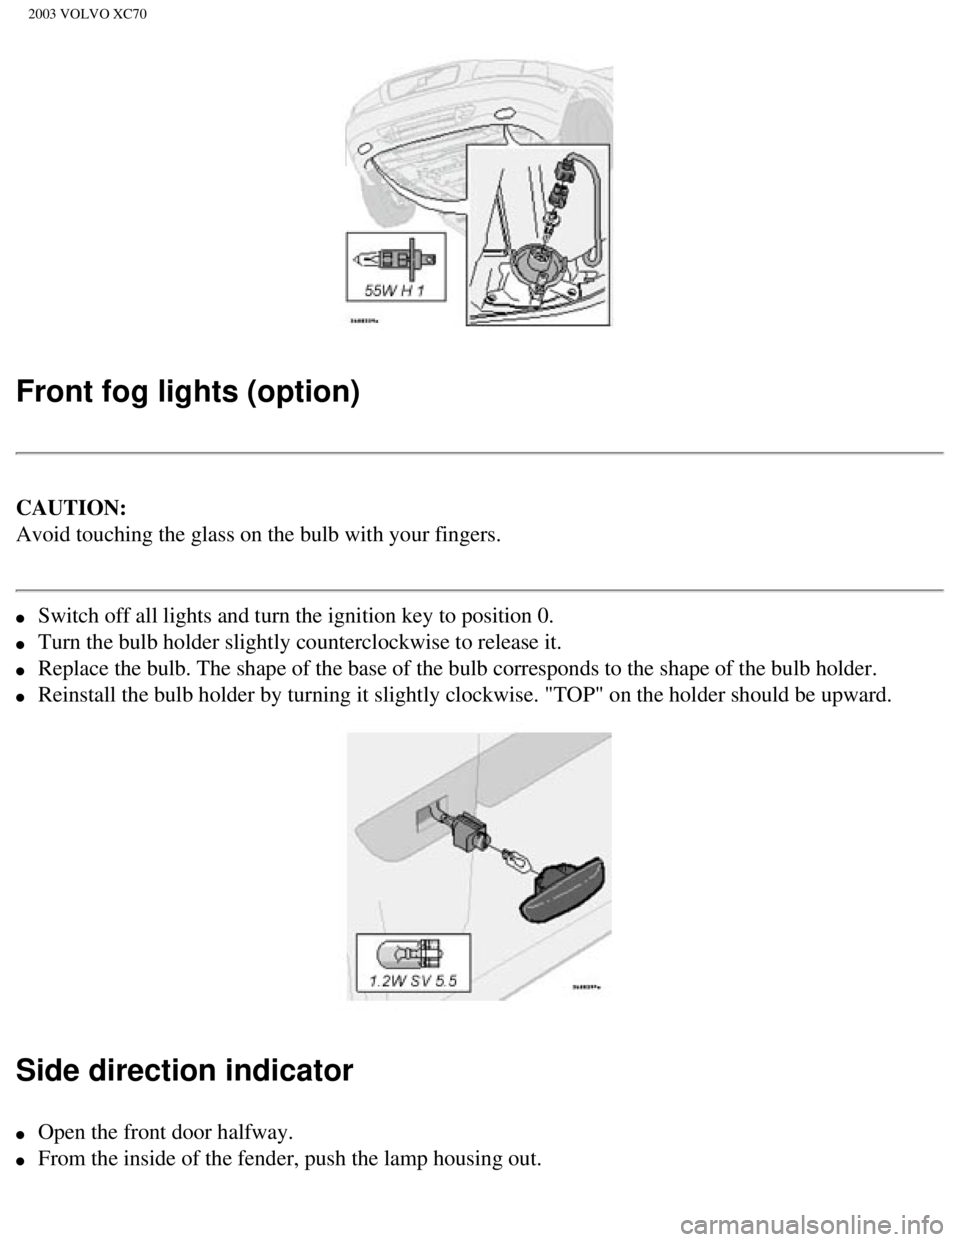
Front fog lights (option)
CAUTION:
Avoid touching the glass on the bulb with your fingers.
l Switch off all lights and turn the ignition key to position 0.
l Turn the bulb holder slightly counterclockwise to release it.
l Replace the bulb. The shape of the base of the bulb corresponds to the s\
hape of the bulb holder.
l Reinstall the bulb holder by turning it slightly clockwise. "TOP" on the\
holder should be upward.
Side direction indicator
l Open the front door halfway.
l From the inside of the fender, push the lamp housing out.
file:///K|/ownersdocs/2003/2003_XC70/03xc70_08a.htm (13 of 21)12/30/20\
06 4:18:03 PM
Page 184 of 257

2003 VOLVO XC70
Suitable detergents: Special car washing detergents should be used. Mix according to manufac\
turer's
instructions.
Bumpers: The bumpers are painted. Wash the bumpers with the same cleaning agent u\
sed on the rest of
the car. Never clean the bumpers with gasoline or paint thinner. Difficu\
lt spots can be removed with
denatured alcohol. To avoid scratches, do not dry the bumpers with paper\
. WARNING!
l When the car is driven immediately after being washed, apply the brakes \
several times in order to
remove any moisture from the brake linings.
l Engine cleaning agents should not be used when the engine is warm. This \
constitutes a fire risk.
pg. 128 Washing the car, Cleaning the upholstery
Automatic washing - simple and quick
l We do NOT recommend washing your car in an automatic wash during the fir\
st six months
(because the paint will not have hardened sufficiently).
l An automatic wash is a simple and quick way to clean your car, but it is\
worth remembering that it
may not be as thorough as when you yourself go over the car with sponge \
and water. Keeping the
underbody clean is most important, especially in the winter. Some automa\
tic washers do not have
facilities for washing the underbody.
l Before driving into an automatic wash, make sure that side view mirrors,\
auxiliary lamps, etc, are
secure, otherwise there is risk of the machine dislodging them.
Polishing and waxing
l Normally, polishing is not required during the first year after delivery\
. However, waxing may be
beneficial.
l Before applying polish or wax the car must be washed and dried. Tar spot\
s can be removed with
kerosene or tar remover. Difficult spots may require a fine rubbing comp\
ound.
l After polishing, use liquid or paste wax.
l Several commercially available products contain both polish and wax.
l Waxing alone does not substitute for polishing of a dull surface.
l A wide range of polymer-based car waxes can be purchased today. These wa\
xes are easy to use and
produce a long-lasting, high-gloss finish that protects the bodywork aga\
inst oxidation, road dirt and
fading.
file:///K|/ownersdocs/2003/2003_XC70/03xc70_08a.htm (19 of 21)12/30/20\
06 4:18:03 PM
Page 185 of 257

2003 VOLVO XC70
l Do not polish or wax your car in direct sunlight (the surface of the ca\
r should not be warmer than
113° F (45° C).
Cleaning the upholstery
l The fabric can be cleaned with soapy water or a detergent. For more difficult spot\
s caused by oil, ice
cream, shoe polish, grease, etc., use a clothing/fabric stain remover.
l The plastic in the upholstery can be cleaned with a soft cloth and mild soap soluti\
on.
l Leather upholstery/suede-like upholstery (alcanteraTM) can be cleaned with a soft cloth and mild
soap solution. For more difficult spots, Volvo offers a leather care kit\
.
l Under no circumstances should gasoline, naphtha or similar cleaning agen\
ts be used on the
plastic or the leather since these can cause damage.
Cleaning the seat belts
Clean only with lukewarm water and mild soap solution.
Cleaning floor mats
The floor mats should be vacuumed or brushed clean regularly, especially\
during winter, when they
should be taken out for drying. Spots on textile mats can be removed wit\
h a mild detergent.
Stain removal
l Take extra care when removing stains such as ink or lipstick since the c\
oloring can spread.
l Use solvents sparingly. Too much solvent can damage the seat padding.
l Start from the outside of the stain and work toward the center.
pg. 129 Maintenance service, Warranty
Maintenance service
Volvo advises you to follow the service program outlined in the Warranty\
and Service Records
Information booklet. This maintenance program contains inspections and s\
ervices necessary for the
proper function of your car. The maintenance services contain several ch\
ecks which require special
instruments and tools and therefore must be performed by a qualified tec\
hnician. To keep your Volvo in
top condition, specify time-tested and proven Genuine Volvo Parts and Ac\
cessories.
The Federal Clean Air Act - U.S.
file:///K|/ownersdocs/2003/2003_XC70/03xc70_08a.htm (20 of 21)12/30/20\
06 4:18:03 PM
Page 195 of 257

2003 VOLVO XC70
l The top half describes the oil's performance level.
l The center identifies the oil's viscosity.
l The bottom half tells whether the oil has demonstrated energy-conserving\
proper ties in a standard
test in comparison to a reference oil.
Viscosity (stable ambient temperatures)
Break-in Period
Although some oil consumption occurs during normal engine operation, mor\
e oil is consumed when the
engine is new as the internal parts generate higher friction while weari\
ng-in each other. From the time
the engine is new until the first service is performed, the oil consumpt\
ion could be higher than
normal. For this reason, it is especially important to check the oil eve\
ry time you refuel you car
during this period.
pg. 136 Engine oil
Checking the oil level
The oil level should be checked every time the car is refueled. This is \
especially important during
the period up to the first service.
CAUTION:
Not checking the oil level regularly can result in serious engine damage\
if the oil level becomes too low.
Park the car on a level surface and wait for at least 5 minutes after th\
e engine has been switched off. Be
sure the oil level is maintained between the upper and lower marks on th\
e dipstick. Low oil level can
damage the engine. Overfilling can result in high oil consumption and da\
mage the emissions system.
The distance between the dipstick marks represents approx. 1.6 US qt (1\
.5 liter). The oil should
preferably be checked when cold, before the engine has been started.
file:///K|/ownersdocs/2003/2003_XC70/03xc70_08b.htm (9 of 16)12/30/200\
6 4:18:04 PM
Page 204 of 257

2003 VOLVO XC70
4 Model plate
Vehicle Identification Number (VIN). Codes for color and upholstery, e\
tc. The plate is located in the
engine compartment, on the inside of the left front fender.
5 Vehicle Identification Number (VIN) *
The VIN plate is located on the top left surface of the dashboard. The V\
IN is also stamped on the right
hand door pillar.
6 Federal Motor Vehicle Safety Standards (FMVSS) specifications (USA)\
and Ministry of
Transport (CMVSS) standards (Canada)
Your Volvo is designed to meet all applicable safety standards, as evide\
nced by the certification label on
the facing side of the driver's door. For further information regarding \
these regulations, please consult
your Volvo retailer.
7 Child safety latch label
* The Vehicle Identification Number (VIN) should always be quoted in a\
ll correspondence concerning
your vehicle with the retailer and when ordering parts.
file:///K|/ownersdocs/2003/2003_XC70/03xc70_09.htm (2 of 11)12/30/2006\
4:18:05 PM
Page 220 of 257

2003 VOLVO XC70
If you have a key pad in the steering wheel press the right or left arro\
w to switch between preset stations.
Scan function
Press the SCAN button (HU-613) or the SOURCE button (HU-803) to star\
t the station scan function.
When a station is found, scanning stops for several seconds, after which\
scanning will continue.
Press the SCAN or SOURCE button when a station has been found if you wou\
ld like to listen to that
station and to discontinue the scan function.
pg. 156 Audio systems HU-613/HU-803 - radio
A - Automatic station preset
This function seeks and stores up to 10 strong AM or FM stations in a se\
parate memory. This function is
especially useful in areas where you are not familiar with the radio sta\
tions.
1. Press in the "AUTO" button for at least 2 seconds. A number of strong\
signal stations (max. 10) from
the currently selected waveband are now stored automatically in the memo\
ry. An "A" and "AUTO" is
displayed. If there is no station with sufficient signal strength "NO ST\
ATION" is displayed.
2. Turn "1-20/DISC" button if you wish to change to another of the auto-\
stored stations.
Another auto-stored station is selected with each turn.
file:///K|/ownersdocs/2003/2003_XC70/03xc70_10a.htm (7 of 10)12/30/200\
6 4:18:06 PM