2003 VOLVO XC70 ECO mode
[x] Cancel search: ECO modePage 74 of 257
2003 VOLVO XC70
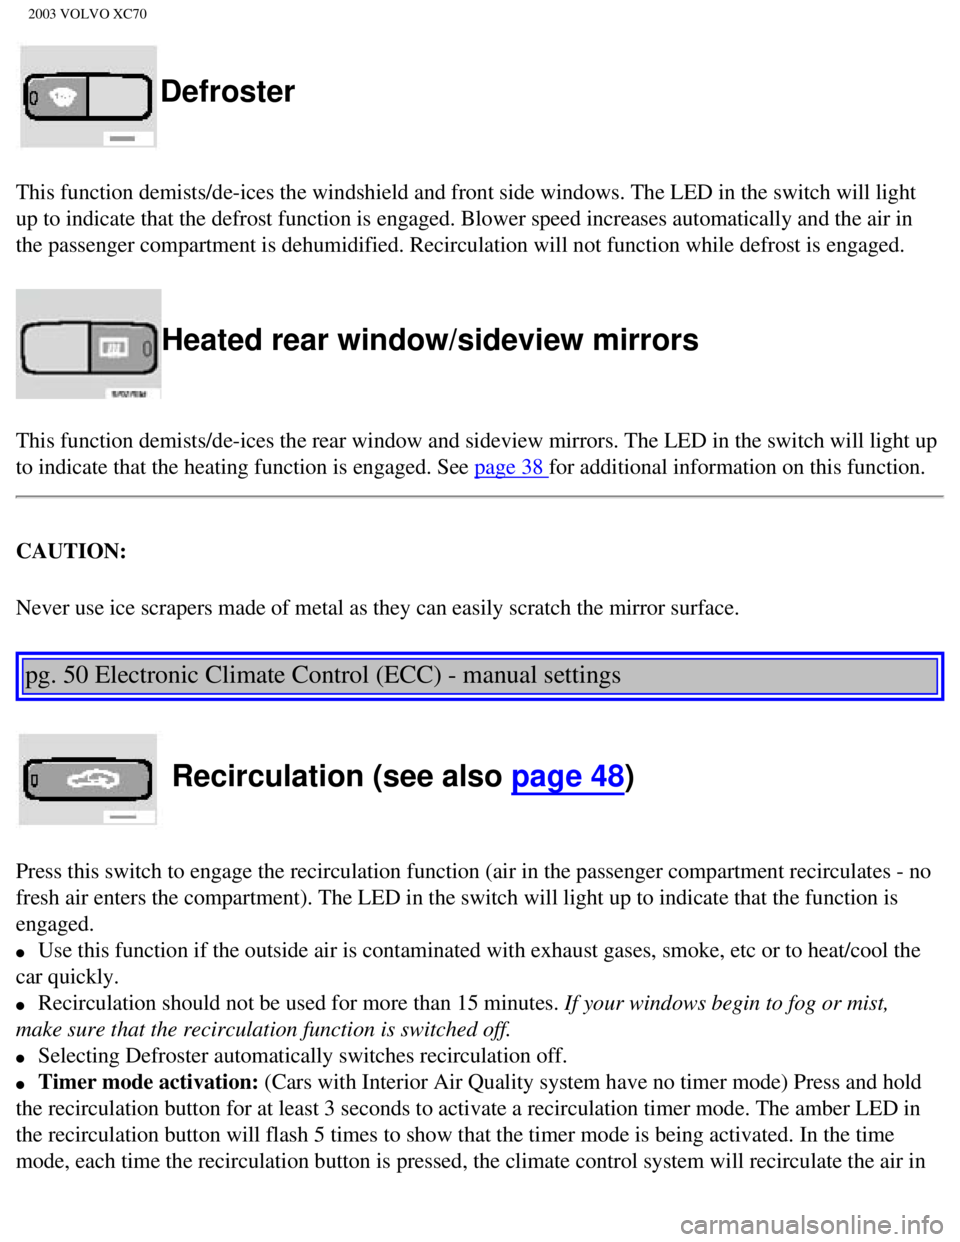
Defroster
This function demists/de-ices the windshield and front side windows. The\
LED in the switch will light
up to indicate that the defrost function is engaged. Blower speed increa\
ses automatically and the air in
the passenger compartment is dehumidified. Recirculation will not functi\
on while defrost is engaged.
Heated rear window/sideview mirrors
This function demists/de-ices the rear window and sideview mirrors. The \
LED in the switch will light up
to indicate that the heating function is engaged. See
page 38 for additional information on this function.
CAUTION:
Never use ice scrapers made of metal as they can easily scratch the mirr\
or surface.
pg. 50 Electronic Climate Control (ECC) - manual settings
Recirculation (see also page 48)
Press this switch to engage the recirculation function (air in the pass\
enger compartment recirculates - no
fresh air enters the compartment). The LED in the switch will light up \
to indicate that the function is
engaged.
l Use this function if the outside air is contaminated with exhaust gases,\
smoke, etc or to heat/cool the
car quickly.
l Recirculation should not be used for more than 15 minutes. If your windows begin to fog or mist,
make sure that the recirculation function is switched off.
l Selecting Defroster automatically switches recirculation off.
l Timer mode activation: (Cars with Interior Air Quality system have no timer mode) Press and \
hold
the recirculation button for at least 3 seconds to activate a recirculat\
ion timer mode. The amber LED in
the recirculation button will flash 5 times to show that the timer mode \
is being activated. In the time
mode, each time the recirculation button is pressed, the climate control\
system will recirculate the air in
file:///K|/ownersdocs/2003/2003_XC70/03xc70_03.htm (6 of 12)12/30/2006\
4:17:55 PM
Page 75 of 257
2003 VOLVO XC70
the passenger compartment for 5 to 12 minutes, depending on the outside \
air and then revert back to
fresh air.
l Timer mode deactivation: Press and hold the recirculation button for at least 3 seconds. The amb\
er
LED in the recirculation button will illuminate steadily for 5 seconds t\
o show a return to "normal" mode.
l In normal mode, when the recirculation button is pressed, the climate co\
ntrol system will recirculate
the air in the passenger compartment until the recirculation button is p\
ressed again.
l Timer mode memory: If the car is turned off while timer mode is active, timer mode will st\
ill be
active when the car is restarted.
Heated front seats (option)
Please see page 38 for more information on this function.
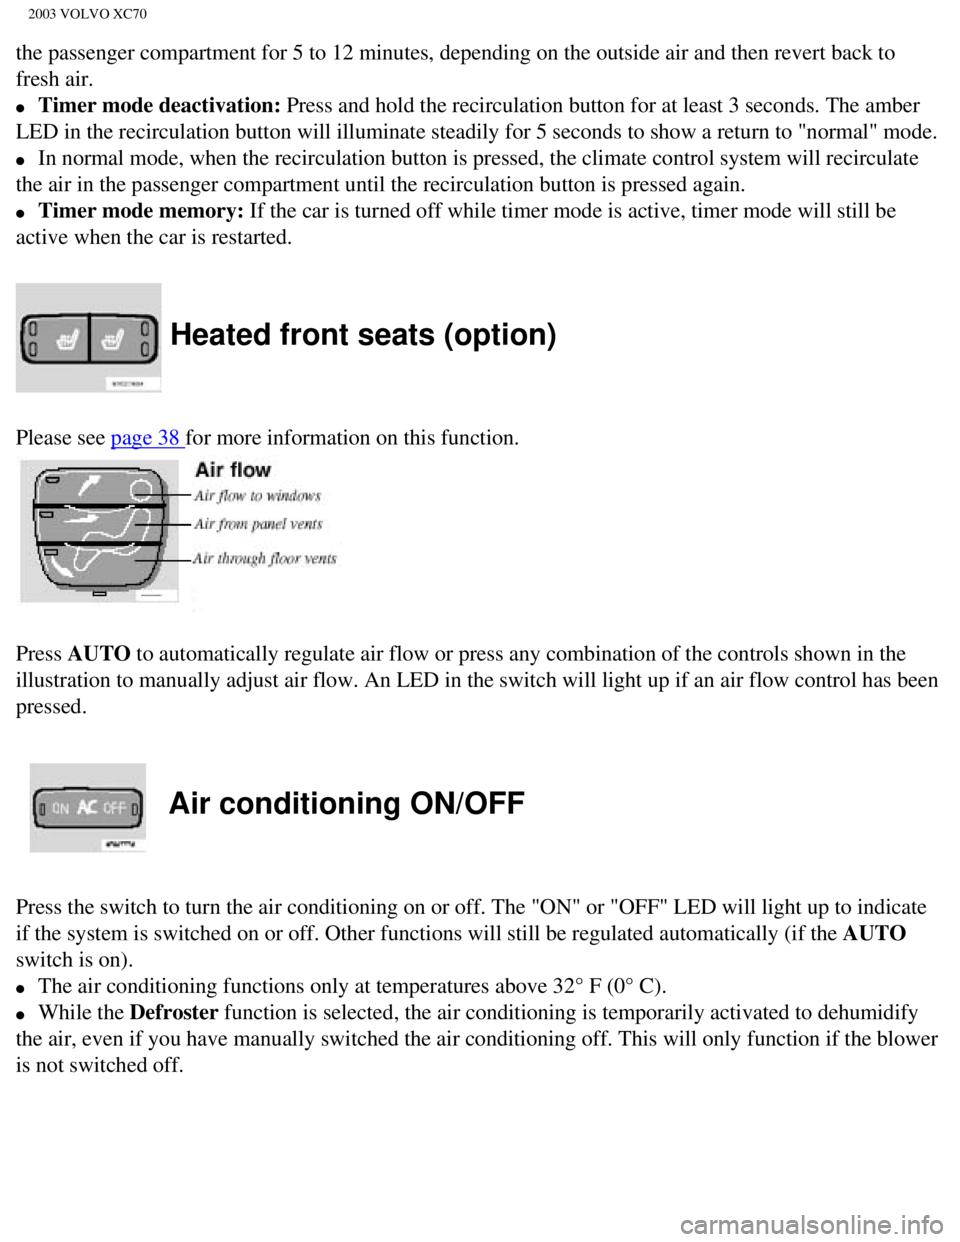
Press AUTO to automatically regulate air flow or press any combination of the cont\
rols shown in the
illustration to manually adjust air flow. An LED in the switch will ligh\
t up if an air flow control has been
pressed.
Air conditioning ON/OFF
Press the switch to turn the air conditioning on or off. The "ON" or "OF\
F" LED will light up to indicate
if the system is switched on or off. Other functions will still be regul\
ated automatically (if the AUTO
switch is on).
l The air conditioning functions only at temperatures above 32° F (0°\
C).
l While the Defroster function is selected, the air conditioning is temporarily activated to \
dehumidify
the air, even if you have manually switched the air conditioning off. Th\
is will only function if the blower
is not switched off.
file:///K|/ownersdocs/2003/2003_XC70/03xc70_03.htm (7 of 12)12/30/2006\
4:17:55 PM
Page 93 of 257
2003 VOLVO XC70
Models with 2-section rear seat
Lower the center seat head restraint if it is raised. Press the release \
button behind the right-hand support.
See illustration above.
Folding the outboard backrests down
Models with 2 or 3-section rear seat
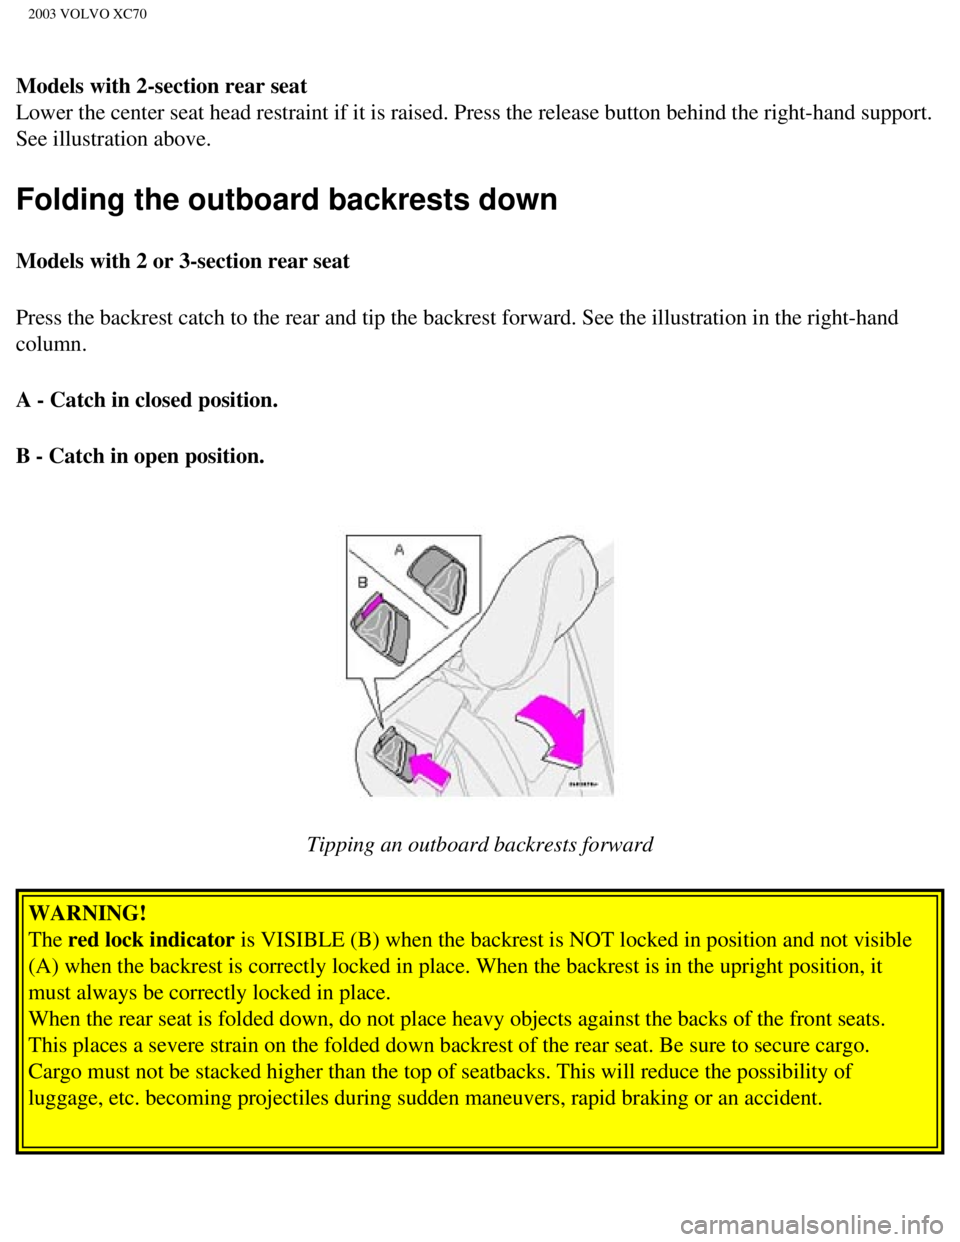
Press the backrest catch to the rear and tip the backrest forward. See t\
he illustration in the right-hand
column.
A - Catch in closed position.
B - Catch in open position.
Tipping an outboard backrests forward
WARNING!
The red lock indicator is VISIBLE (B) when the backrest is NOT locked in position and not vi\
sible
(A) when the backrest is correctly locked in place. When the backrest \
is in the upright position, it
must always be correctly locked in place.
When the rear seat is folded down, do not place heavy objects against th\
e backs of the front seats.
This places a severe strain on the folded down backrest of the rear seat\
. Be sure to secure cargo.
Cargo must not be stacked higher than the top of seatbacks. This will re\
duce the possibility of
luggage, etc. becoming projectiles during sudden maneuvers, rapid brakin\
g or an accident.
file:///K|/ownersdocs/2003/2003_XC70/03xc70_04b.htm (2 of 21)12/30/200\
6 4:17:57 PM
Page 116 of 257
2003 VOLVO XC70
alarm system(s). The car can also be locked/unlocked with the key.
If one of the transmitters is misplaced, contact your nearest authorized\
Volvo retailer for assistance.
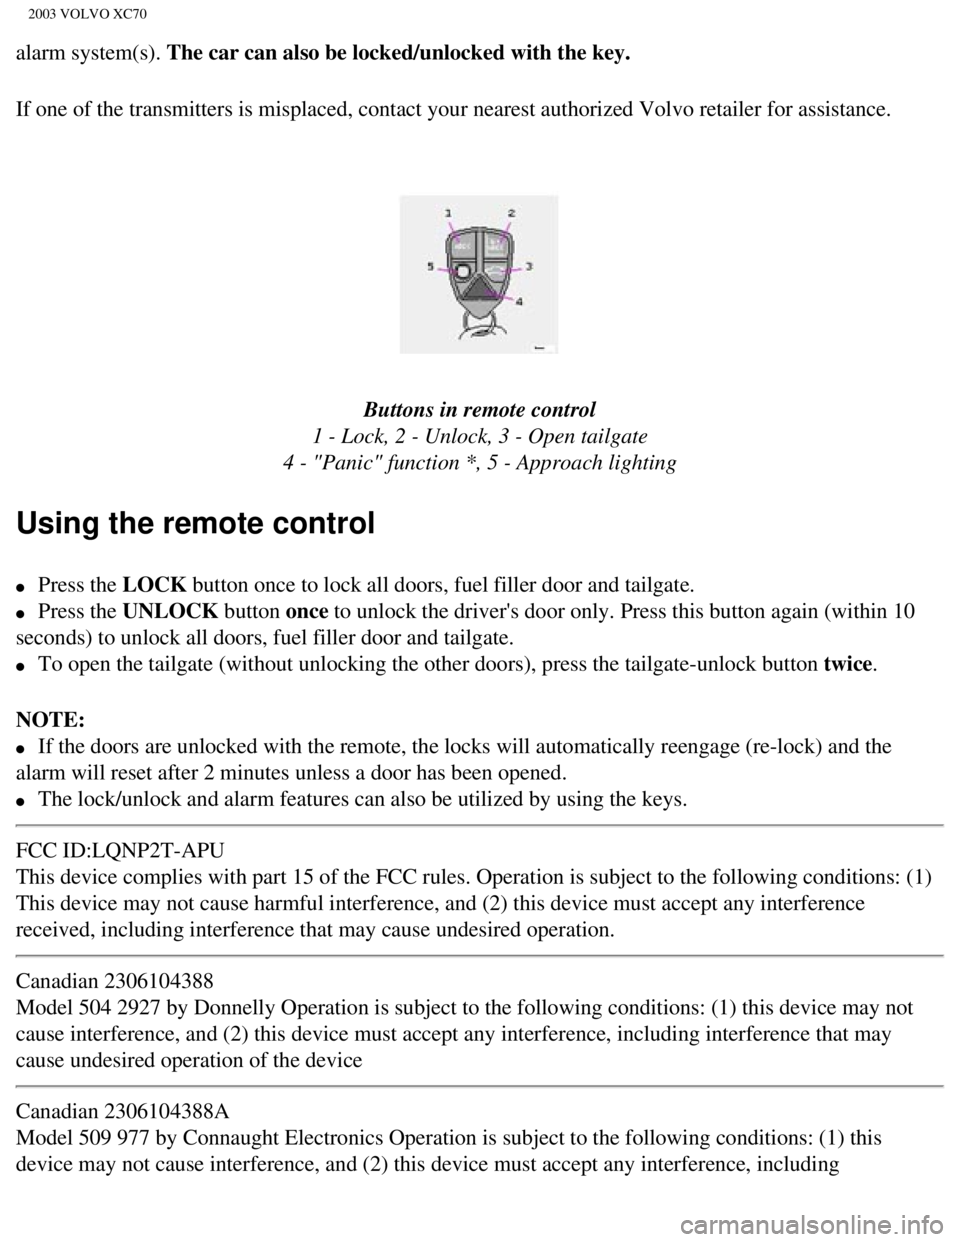
Buttons in remote control
1 - Lock, 2 - Unlock, 3 - Open tailgate
4 - "Panic" function *, 5 - Approach lighting
Using the remote control
l Press the LOCK button once to lock all doors, fuel filler door and tailgate.
l Press the UNLOCK button once to unlock the driver's door only. Press this button again (within 10
seconds) to unlock all doors, fuel filler door and tailgate.
l To open the tailgate (without unlocking the other doors), press the ta\
ilgate-unlock button twice.
NOTE:
l If the doors are unlocked with the remote, the locks will automatically \
reengage (re-lock) and the
alarm will reset after 2 minutes unless a door has been opened.
l The lock/unlock and alarm features can also be utilized by using the key\
s.
FCC ID:LQNP2T-APU
This device complies with part 15 of the FCC rules. Operation is subject\
to the following conditions: (1)
This device may not cause harmful interference, and (2) this device mu\
st accept any interference
received, including interference that may cause undesired operation.
Canadian 2306104388
Model 504 2927 by Donnelly Operation is subject to the following conditi\
ons: (1) this device may not
cause interference, and (2) this device must accept any interference, \
including interference that may
cause undesired operation of the device
Canadian 2306104388A
Model 509 977 by Connaught Electronics Operation is subject to the follo\
wing conditions: (1) this
device may not cause interference, and (2) this device must accept any\
interference, including
file:///K|/ownersdocs/2003/2003_XC70/03xc70_05.htm (4 of 11)12/30/2006\
4:17:58 PM
Page 136 of 257

2003 VOLVO XC70
WARNING!
Never leave the car unattended when the engine is running. If, by mistak\
e, the gear selector is moved
from P, the car may start moving.
R (Reverse)
Never engage R while the car is moving forward.
N (Neutral)
Neutral - no gear engaged. Use the parking brake.
D (Drive)
D is the normal driving position and should be used as often as possible\
to help improve fuel economy.
The car should not be moving when shifting from R to the D position.
Kickdown
Automatic shift to a lower gear (kickdown) is achieved by depressing t\
he accelerator pedal fully and
briskly. An upshift will occur when approaching the top speed for a part\
icular gear or by releasing the
accelerator pedal slightly. Kickdown can be used for maximum acceleratio\
n or when passing at highway
speeds. Kickdown does not function when the transmission is in the manual shift\
(geartronic)
mode (see next page).
Automatic transmission - adaptive system
The automatic transmission is controlled by an adaptive control system t\
hat constantly monitors the way
in which the transmission functions. It senses and adapts each gear shif\
t for optimal performance. The
system also monitors your particular driving style and adapts gear shift\
ing accordingly.
file:///K|/ownersdocs/2003/2003_XC70/03xc70_06a.htm (13 of 22)12/30/20\
06 4:18:00 PM
Page 138 of 257

2003 VOLVO XC70
downshift will not occur until the speed has decreased enough to allow t\
he lower gear to be used.
l If you slow down to a very low speed, the transmission will automaticall\
y shift down.
l When starting in the (MAN)ual position, 3rd gear is the highest gear t\
hat may be selected.
NOTE: Kickdown (see previous page) does not function when the transmission is in the manual shift
(geartronic) mode. The gear selector must be in the D (Drive) positi\
on.
W Winter/Wet driving mode - enhanced vehicle traction
l Mode W will function only if the gear selector is in the (D)rive posit\
ion.
l Press the button at the base of the gear selector to engage/disengage th\
is driving mode (see
illustration).
l An LED in the button will light up to indicate that W is engaged and this will also be displayed in the
instrument panel (see
page 27).
l This mode may be selected for starting/moving off on slippery roads.
pg. 94 All Wheel Drive - option
All Wheel Drive (AWD) - general information
Your Volvo can be equipped with permanent All Wheel Drive, which means t\
hat power is distributed
automatically between the front and rear wheels. Under normal driving co\
nditions, most of the engine's
power is directed to the front wheels. However, if there is any tendency\
for the front wheels to spin, an
electronically controlled coupling distributes power to the wheels that \
have the best traction.
Tire dimensions
Volvo recommends that you always drive on tires of the same brand, size,\
construction (radial), tread
file:///K|/ownersdocs/2003/2003_XC70/03xc70_06a.htm (15 of 22)12/30/20\
06 4:18:00 PM
Page 140 of 257

2003 VOLVO XC70
lower with the air conditioning on and the windows closed than with the \
air conditioning off and the
windows open.
l Using the onboard trip computer's fuel consumption modes can help you le\
arn how to drive more
economically.
Other factors that decrease gas mileage are:
l Dirty air cleaner
l Dirty engine oil and clogged oil filter
l Dragging brakes
l Incorrect front end alignment Some of the above mentioned items and othe\
rs are checked at the
standard Maintenance Service intervals.
NOTE: Vehicles equipped with automatic transmissions should use (D)rive as o\
ften as possible and
avoid using "kick-down" to help improve fuel economy. Vehicles equipped \
with manual transmissions
should use fifth gear at highway speeds. At other times, choose the high\
est gear that still allows smooth
acceleration.
Weight distribution affects handling
At the specified curb weight your car has a tendency to understeer, whic\
h means that the steering wheel
has to be turned more than might seem appropriate for the curvature of a\
bend. This ensures good
stability and reduces the risk of rear wheel skid. Remember that these p\
roperties can alter with the
vehicle load. The heavier the load on the rear of the vehicle (e.g., he\
avily loaded (max. 220 lbs, 100 kg)
cargo area or when towing a trailer, the less the tendency to understeer\
.
Handling, roadholding
Vehicle load, tire design and inflation pressure all affect vehicle hand\
ling. Therefore, check that the tires
are inflated to the recommended pressure according to the vehicle load. \
See "Tire pressure" section.
Loads should be distributed so that capacity weight or maximum permissib\
le axle loads are not
exceeded.
pg. 96 Points to remember
Cooling system
The risk for engine overheating is greatest, especially in hot weather, \
when:
l Towing a trailer up steep inclines for prolonged periods at wide open th\
rottle and low engine rpm.
l Stopping the engine suddenly after high speed driving (so-called "after\
-boiling" can occur).
l To avoid overheating, the following rules should be followed: Do not dri\
ve for prolonged periods at
file:///K|/ownersdocs/2003/2003_XC70/03xc70_06a.htm (17 of 22)12/30/20\
06 4:18:00 PM
Page 143 of 257
2003 VOLVO XC70
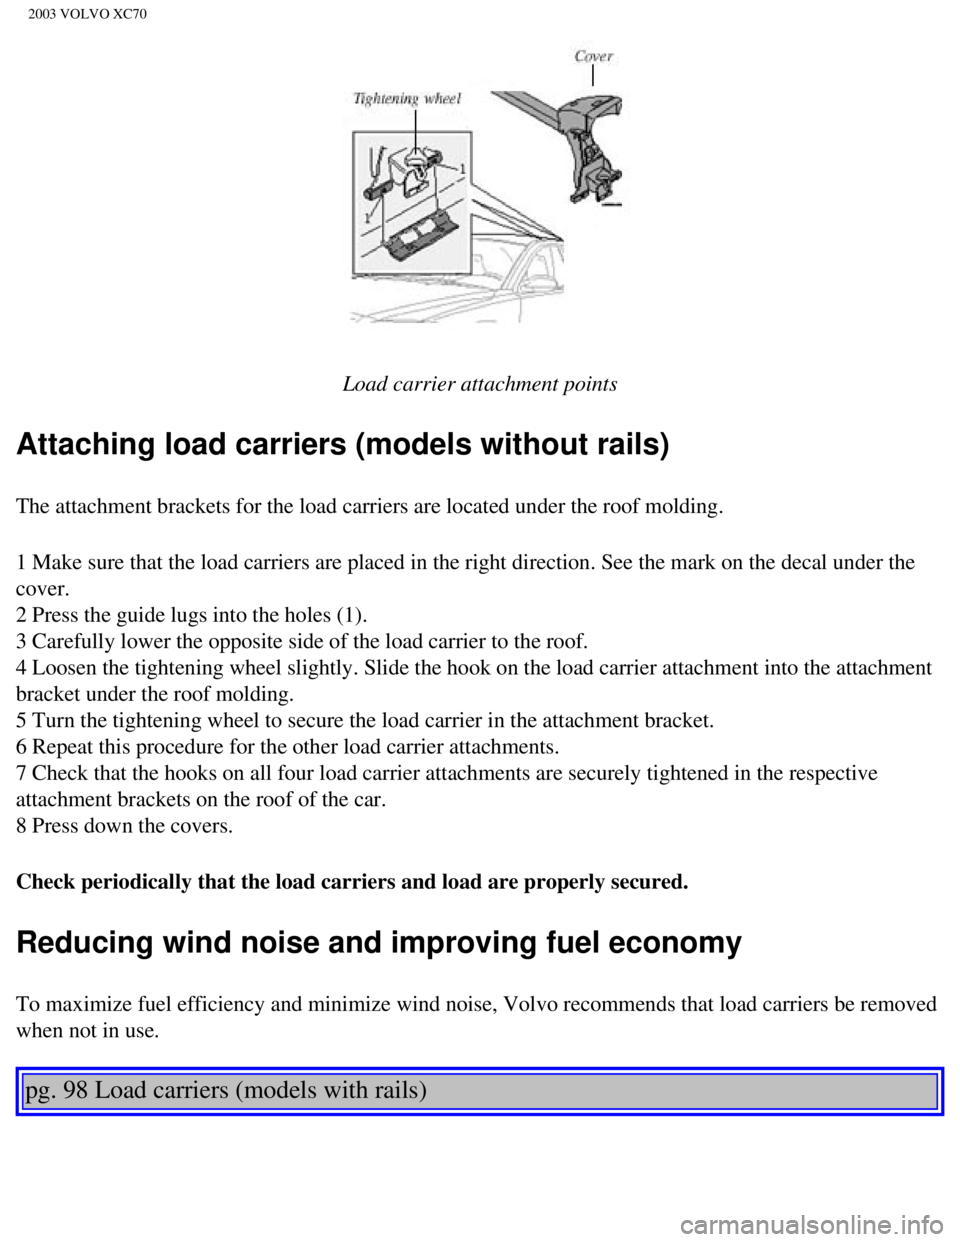
Load carrier attachment points
Attaching load carriers (models without rails)
The attachment brackets for the load carriers are located under the roof\
molding.
1 Make sure that the load carriers are placed in the right direction. Se\
e the mark on the decal under the
cover.
2 Press the guide lugs into the holes (1).
3 Carefully lower the opposite side of the load carrier to the roof.
4 Loosen the tightening wheel slightly. Slide the hook on the load carri\
er attachment into the attachment
bracket under the roof molding.
5 Turn the tightening wheel to secure the load carrier in the attachment\
bracket.
6 Repeat this procedure for the other load carrier attachments.
7 Check that the hooks on all four load carrier attachments are securely\
tightened in the respective
attachment brackets on the roof of the car.
8 Press down the covers.
Check periodically that the load carriers and load are properly secured.\
Reducing wind noise and improving fuel economy
To maximize fuel efficiency and minimize wind noise, Volvo recommends th\
at load carriers be removed
when not in use.
pg. 98 Load carriers (models with rails)
file:///K|/ownersdocs/2003/2003_XC70/03xc70_06a.htm (20 of 22)12/30/20\
06 4:18:00 PM