2003 VOLVO XC70 clock
[x] Cancel search: clockPage 3 of 257

2003 VOLVO XC70
Chapter 8 - Maintenance/Servicing
Chapter 9 - Specifications
Chapter 10 - Audio systems
HomeLink® Universal Transceiver (option)
Index
Back Cover
General information
Shiftlock
When your car is parked, the gear selector is locked in the (P)ark pos\
ition. To release the selector from
this position, turn the ignition key to position II (or start the engin\
e), depress the brake pedal, press the
button on the front of the gear selector knob and move the selector from\
(P)ark.
Keylock
This means that when you switch off the ignition, the gear selector must\
be in the (P)ark position before
the key can be removed from the ignition switch.
Anti-lock Brake System (ABS)
The ABS system in your car performs a self-diagnostic test when the vehi\
cle first reaches the speed of
approximately 12 mph (20 km/h). The brake pedal will pulsate several t\
imes and a sound may be audible
from the ABS control module. This is normal.
Fuel filler door
Press the button on the light switch panel (see
page 34) when the car is at a standstill to unlock the fuel
filler door. Please note that the fuel filler door will remain unlocked \
until the car begins to move
forward. An audible click will be heard when the fuel filler door relock\
s.
Fuel filler cap
After refueling, close the fuel filler cap by turning it clockwise until\
it clicks into place. If this cap is not
closed tightly or if the engine is running when the car is refueled, the\
Malfunction Indicator Lamp
file:///K|/ownersdocs/2003/2003_XC70/03xc70_00.htm (3 of 6)12/30/2006 \
4:17:50 PM
Page 42 of 257

2003 VOLVO XC70
information.
If the engine temperature remains high, check coolant level - see
page 131.
4 Trip odometer/reset button
The trip odometer is used for measuring shorter distances. The last digi\
t indicates 1/10 mile/kilometer. Press
the button quickly to toggle between trip odometers 1 and 2. Hold in the\
button for more than 2 seconds to
reset.
5 Odometer
6 Speedometer
7 General warning light (see
page 28).
8 High beam indicator light
9 Tachometer
Indicates engine speed in thousands of rpm. Do not drive for long with t\
he needle in the red section. The
engine has an built-in function preventing too high an engine speed. Whe\
n this function operates, you may
discern some pulsation, which is normal.
10 Gear and driving mode indicator The currently selected driving mode is displayed here. If you use the
Geartronic function on the automatic transmission, the currently selecte\
d gear will be displayed.
11 Ambient temperature indicator
This display indicates the air temperature outside your car. A "snowflak\
e" symbol in the text window is
displayed when the temperature is in the range of 23 - 36° F (-5 - +\
2° C).
Please note that this symbol does not indicate a fault with your car.
At low speeds or when the car is not moving, the temperature readings ma\
y be slightly higher than the actual
ambient temperature.
12 Clock/reset button
Turn the button to adjust the clock.
13 Fuel gauge
The fuel tank holds approximately 18.5 US gals (70 liters) or 19 US ga\
ls (72 liters) on models equipped with
All Wheel Drive.
When the warning light comes on there are approximately 1.8 US gal. (8 \
liters) of fuel remaining.
file:///K|/ownersdocs/2003/2003_XC70/03xc70_02a.htm (5 of 13)12/30/200\
6 4:17:53 PM
Page 76 of 257

2003 VOLVO XC70
Blower control
Turn the control clockwise to increase or counterclockwise to decrease t\
he blower speed. Pressing the
AUTO switch will automatically regulate blower speed and override manual\
adjustment.
NOTE: Turning the blower control counterclockwise as far as possible (an oran\
ge LED next to the
control will light up) will turn both the blower and the air conditioni\
ng off.
pg. 51 Electronic Climate Control (ECC) with Interior Air Quality syst\
em (option)
Interior Air Quality system (option)
Some cars are equipped with a Multifilter and Air quality sensor. The fi\
lter separates gases and particles,
thereby reducing the amounts of odors and contaminants entering the car.\
The Air quality sensor detects
increased levels of contaminants in the outside air. When the Air qualit\
y sensor detects contaminated
outside air, the air intake closes and the air inside the passenger comp\
artment is recirculated, i.e. no
outside air enters the car. The filter also cleans recirculated passenge\
r compartment air. When the Air
quality sensor is activated, the LED AUT comes on in
Operation:
Press to activate the Air quality sensor (normal setting).
Or select one of three functions by pressing
.
file:///K|/ownersdocs/2003/2003_XC70/03xc70_03.htm (8 of 12)12/30/2006\
4:17:55 PM
Page 128 of 257

2003 VOLVO XC70
NOTE: During a transitional period, a small number of service stations may sti\
ll have fuel nozzles that
are not compatible with the fuel filler neck on cars equipped with the e\
vaporative control system. Please
refer to
page 130 for additional information.
CAUTION:
l Do not refuel with the engine running *. Turn the ignition off or to pos\
ition I. If the ignition is on, an
incorrect reading could occur in the fuel gauge.
l After refueling, close the fuel filler cap by turning it clockwise until\
it clicks into place *.
l Allow for fuel expansion by not overfilling the tank. Overfilling could \
also cause damage to the
emission control systems.
l Avoid spilling gasoline when refueling. In addition to causing damage to\
the environment, gasolines
containing alcohol can cause damage to painted surfaces, which may not b\
e covered under the New
Vehicle Limited Warranty.
l Do not use gasolines containing methanol (methyl alcohol, wood alcohol)\
. This practice can result in
vehicle performance deterioration and can damage critical parts in the f\
uel system. Such damage may
not be covered under the New Vehicle Limited Warranty.
* If the fuel filler cap is not closed tightly or if the engine is runni\
ng when the car is refueled, the Check
Engine light (malfunction indicator lamp) may indicate a fault. Howeve\
r, your vehicle's performance
will not be affected. Use only Volvo original or approved fuel filler ca\
ps.
pg. 87 Starting the engine
Starting the engine
1. Fasten the seat belt.
WARNING!
Before starting, check that the seat, steering wheel and mirrors adjuste\
d properly. Make sure the brake
pedal can be depressed completely. Adjust the seat if necessary. See
page 56.
2. Apply the parking brake, if not already set. The gear selector (automatic transmission) is locked in
the (P)ark position (SHIFT-LOCK). Manual transmission: the clutch must be fully depressed.
3. Without touching the accelerator pedal, turn the ignition key* to the starting position. Allow the
starter to operate for up to 10 seconds. Release the key as soon as the \
engine starts. If the engine fails to
start, repeat this step.
file:///K|/ownersdocs/2003/2003_XC70/03xc70_06a.htm (5 of 22)12/30/200\
6 4:17:59 PM
Page 162 of 257

2003 VOLVO XC70
WARNING!
The temperature grade for this tire is established for a tire that is pr\
operly inflated and not overloaded.
Excessive speed, under-inflation, or excessive loading, either separatel\
y or in combination, can cause
heat buildup and possible tire failure.
pg. 112 Changing wheels
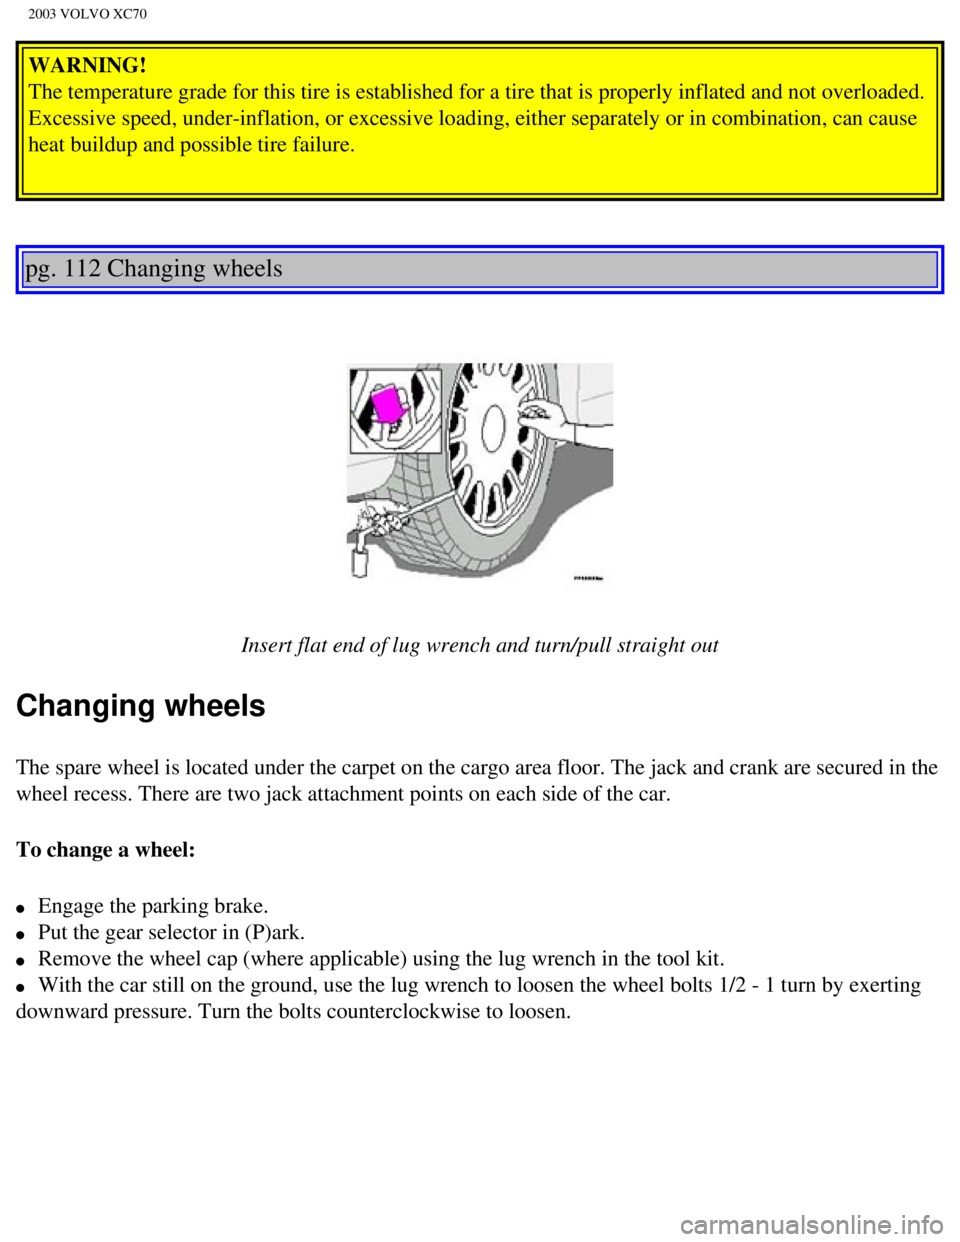
Insert flat end of lug wrench and turn/pull straight out
Changing wheels
The spare wheel is located under the carpet on the cargo area floor. The\
jack and crank are secured in the
wheel recess. There are two jack attachment points on each side of the c\
ar.
To change a wheel:
l Engage the parking brake.
l Put the gear selector in (P)ark.
l Remove the wheel cap (where applicable) using the lug wrench in the to\
ol kit.
l With the car still on the ground, use the lug wrench to loosen the wheel\
bolts 1/2 - 1 turn by exerting
downward pressure. Turn the bolts counterclockwise to loosen.
file:///K|/ownersdocs/2003/2003_XC70/03xc70_07.htm (7 of 10)12/30/2006\
4:18:01 PM
Page 173 of 257

2003 VOLVO XC70
Replacing high/low beam headlight bulbs
The headlight bulbs must be replaced from the engine compartment.
CAUTION:
l Do not touch the glass on halogen bulbs with your fingers. Grease, oil o\
r any other impurities can be
carbonized onto the bulb and cause damage to the reflector.
l Be sure to use bulbs of the correct type and voltage.
Removing a defective bulb
To remove a defective low beam bulb:
l Switch off all lights and turn the ignition switch to position 0.
l Open the hood.
l Remove the plastic cover over the bulb (1) by turning it counterclockw\
ise.
file:///K|/ownersdocs/2003/2003_XC70/03xc70_08a.htm (8 of 21)12/30/200\
6 4:18:03 PM
Page 174 of 257

2003 VOLVO XC70
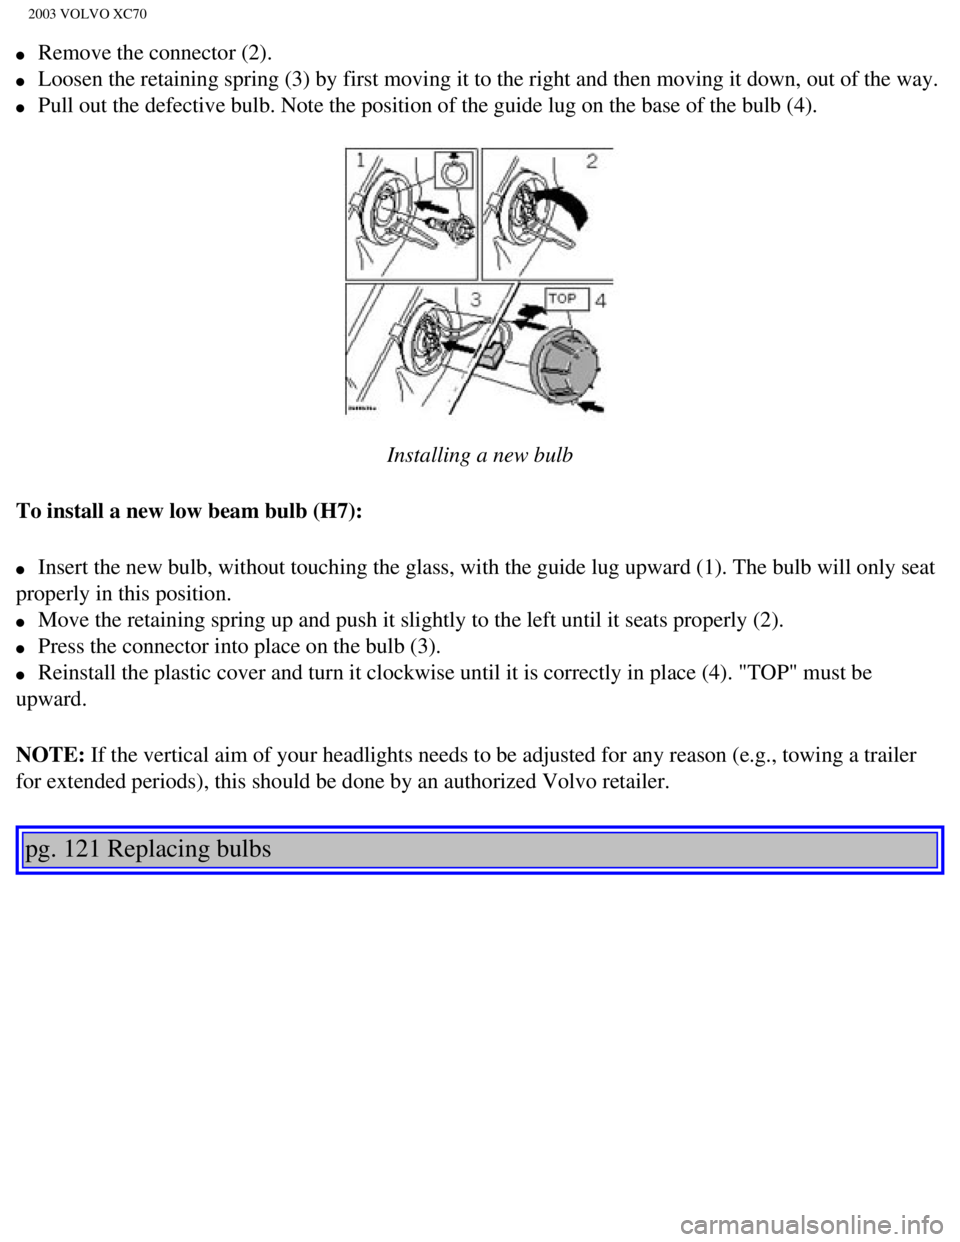
l Remove the connector (2).
l Loosen the retaining spring (3) by first moving it to the right and th\
en moving it down, out of the way.
l Pull out the defective bulb. Note the position of the guide lug on the b\
ase of the bulb (4).
Installing a new bulb
To install a new low beam bulb (H7):
l Insert the new bulb, without touching the glass, with the guide lug upwa\
rd (1). The bulb will only seat
properly in this position.
l Move the retaining spring up and push it slightly to the left until it s\
eats properly (2).
l Press the connector into place on the bulb (3).
l Reinstall the plastic cover and turn it clockwise until it is correctly \
in place (4). "TOP" must be
upward.
NOTE: If the vertical aim of your headlights needs to be adjusted for any reas\
on (e.g., towing a trailer
for extended periods), this should be done by an authorized Volvo retai\
ler.
pg. 121 Replacing bulbs
file:///K|/ownersdocs/2003/2003_XC70/03xc70_08a.htm (9 of 21)12/30/200\
6 4:18:03 PM
Page 175 of 257

2003 VOLVO XC70
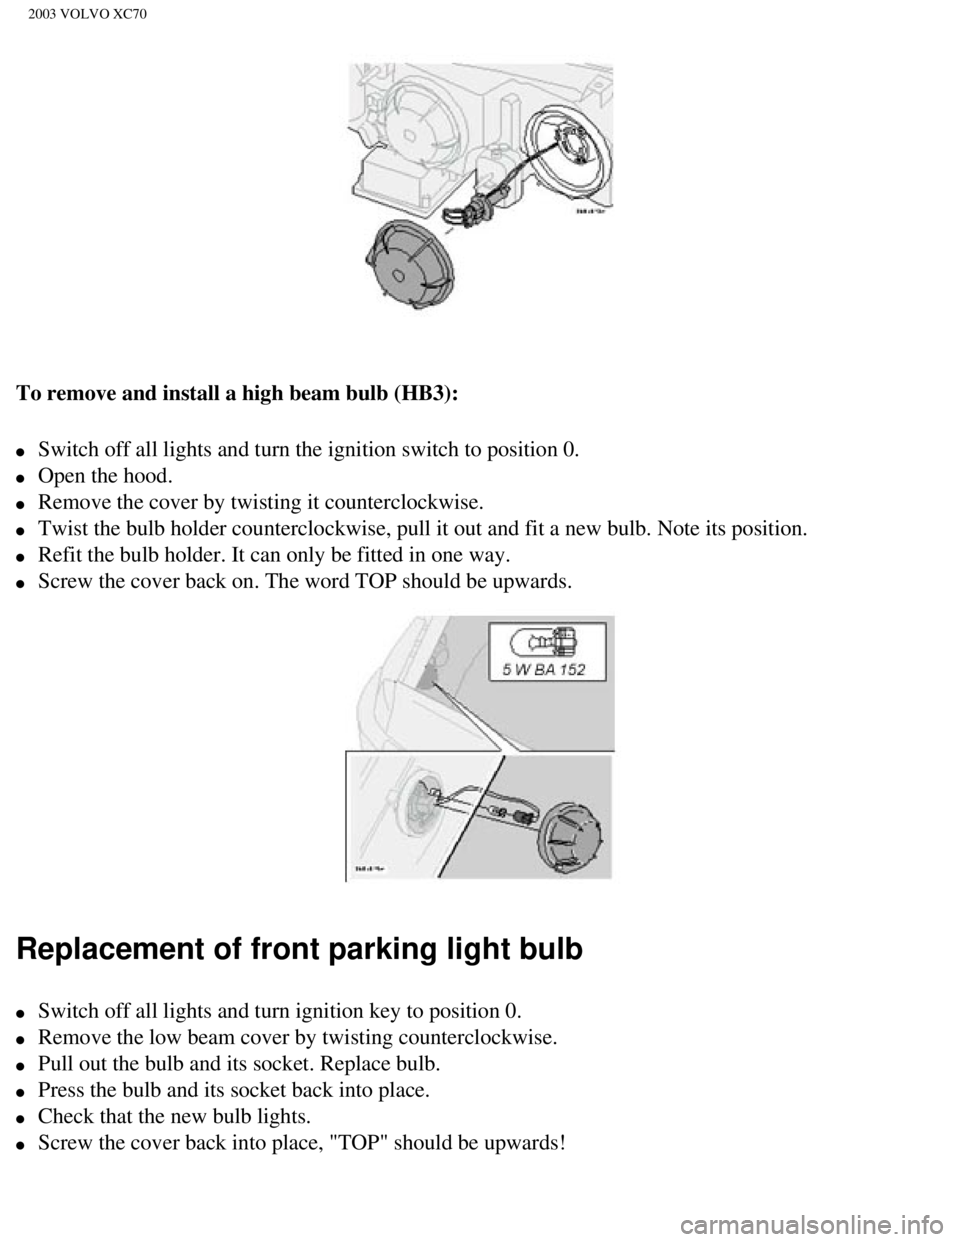
To remove and install a high beam bulb (HB3):
l Switch off all lights and turn the ignition switch to position 0.
l Open the hood.
l Remove the cover by twisting it counterclockwise.
l Twist the bulb holder counterclockwise, pull it out and fit a new bulb. \
Note its position.
l Refit the bulb holder. It can only be fitted in one way.
l Screw the cover back on. The word TOP should be upwards.
Replacement of front parking light bulb
l Switch off all lights and turn ignition key to position 0.
l Remove the low beam cover by twisting counterclockwise.
l Pull out the bulb and its socket. Replace bulb.
l Press the bulb and its socket back into place.
l Check that the new bulb lights.
l Screw the cover back into place, "TOP" should be upwards!
file:///K|/ownersdocs/2003/2003_XC70/03xc70_08a.htm (10 of 21)12/30/20\
06 4:18:03 PM