Page 65 of 109

Install the wheel bolts and tighten handtight. use the lug wrench, tighten crosswise(see illustration above) until all
bolts are snug.
Lower the vehicle to the ground and alternately tighten the bolts crosswise to 100 ft. lbs. (136 Nm).
Install the wheel cap (where applicable).
WARNING!
The jack must correctly engage the bar in the jack attachment (A). The car's weight must not rest on the jack
attachment (B). See illustration on page 96
.
Be sure the jack is on a firm, level, non-slippery surface.
Never allow any part of your body to be extended under a car supported by a jack.
Use the jack intended for the car when replacing a wheel. For any other job, use stands to support the side of the
car being worked on.
Apply the parking brake and put the gear selector in the (P)ark position.
Block the wheels standing on the ground, use rigid wooden blocks or large stones.
The jack should be kept well-greased.
CAUTION:
The car must not be driven with wheels of different dimensions or with a spare tire other than the one that came
with the car. The use of different size wheels can seriously damage your car's transmission.
Correct tightening torque on wheel bolts must be observed. The wheel bolts should never be greased or lubricated.
The extended, chromed wheel bolts must not be used with steel rims, as they make it impossible to fit the hub caps.
pg. 94
This page intentionally left blank.
Contents | Top of Page
ProCarManuals.com
Page 69 of 109

Fuse box in the passenger compartment
This fuse box is located at the far left side of the instrument panel. Extra fuses and the fuse removal tool are also stored
here. When replacing a blown fuse, be sure to replace it with a new one of the same color and amperage (written on
the fuse).
Location Amperage
1 Low beam headlights 15A
2 High beam headlights 20A
3 Power driver's seat 30A
4 Power passenger's seat 30A
5 -
6 -
7 Heated seats - front left (option) 15A
8 Heated seats - front right (option) 15A
9 ABS/STC/DSTC 5A
10 -
11 -
12 Headlight wipers (certain models) 15A
13 Electric socket 12 V 15A
14 Power passenger's seat 5A
15 Audio system, VNS 5A
16 Audio system 20A
17 Audio amplifier 30A
18 Front fog lights 15A
19 VNS display 10A
20 -
21 Automatic transmission, shiftlock, extended D2 feed 10A
22 Direction indicators 20A
23 Headlight switch module, climate control system, onboard diagnostic connector, steering wheel
lever modules 5A
24 Relay extended D1 feed: climate control system, power driver's seat, driver's info 10A
25 Ignition switch, relay starter motor, SRS, engine control module 10A
26 Climate control system blower 30A
ProCarManuals.com
Page 70 of 109

27-
28Electronic module - courtesy lighting 10A
29 -
30 Left front/rear parking lights 7.5A
31 Right front/rear parking lights, license plate lights 7.5A
32 Central electrical module, vanity mirror lighting, power steering, glove compartment light,
interior courtesy lighting 10A
33 Fuel pump 15A
34 Power sun roof 15A
35 Central locking system, power windows - left door mirror 25A
36 Central locking system, power windows - right door mirror 25A
37 Rear power windows, power child safety locks 30A
38 Alarm siren* 5A
* Please be aware that if this fuse is not intact, or if it is removed, the alarm will sound.
pg. 103 Fuses in the trunk
Fuses in the trunk
The fuses in the trunk are located behind the left panel. When replacing a blown fuse, be sure to replace it with a new
one of the same color and amperage (written on the fuse).
Ordinary fuses
Location Amperage
1 Rear electrical module, trunk lighting 10A
2 Rear fog light 10A
3 Brake lights 15A
4 Backup lights 10A
5 Rear window defroster, relay 15I - accessories 5A
6 Trunk release 10A
ProCarManuals.com
Page 71 of 109
7Folding rear head restraints 10A
8Central locking rear doors/fuel filler door 15A
9 Trailer hitch (30 feed) 15A
10 CD changer, VNS 10A
11 Accessory control module (AEM) 15A
12 -
13 -
14 Brake lights 7.5A
15 Trailer hitch (15I feed) 20A
16 Electrical socket in trunk - accessories 15A
17 -
18 -
pg. 104 Replacing bulbs
Replacing high/low beam headlight bulbs
The headlight bulbs must be replaced from the engine compartment.
CAUTION:
Do not touch the glass on halogen bulbs with your fingers. Grease, oil or any other impurities can be carbonized
onto the bulb and cause damage to the reflector.
Be sure to use bulbs of the correct type and voltage.
Removing a defective bulb
ProCarManuals.com
Page 72 of 109

To remove a defective bulb:
Switch off the ignition.
Open the hood.
Remove the plastic cover over the bulb (1) by turning it counterclockwise.
Remove the connector (2).
Loosen the retaining spring (3) by first moving it to the right and then moving it down, out of the way.
Pull out the defective bulb. Note the position of the guide lug on the base of the bulb (4).
Installing a new bulb
To install a new bulb:
Insert the new bulb, without touching the glass, with the guide lug upward (1). The bulb will only seat properly in
this position.
Move the retaining spring up and push it slightly to the left until it seats properly (2).
Press the connector into place on the bulb (3).
Reinstall the plastic cover and turn it clockwise until it is correctly in place (4). "TOP" must be upward.
NOTE: If the vertical aim of your headlights needs to be adjusted for any reason (e.g., towing a trailer for extended
periods), this should be done by an authorized Volvo retailer.
pg. 105 Replacing bulbs
Front parking light
Front parking lights
Switch off the ignition.
Remove the plastic cover over it the high beam bulb by turning it counterclockwise.
ProCarManuals.com
Page 73 of 109

Pull out the bulb and its socket. Replace the bulb.
Press the bulb and its socket back into place.
Switch on the ignition to test the bulb.
Reinstall the plastic cover and turn it clockwise until it is correctly in place. "TOP" must be upward) see illustration
on previous page).
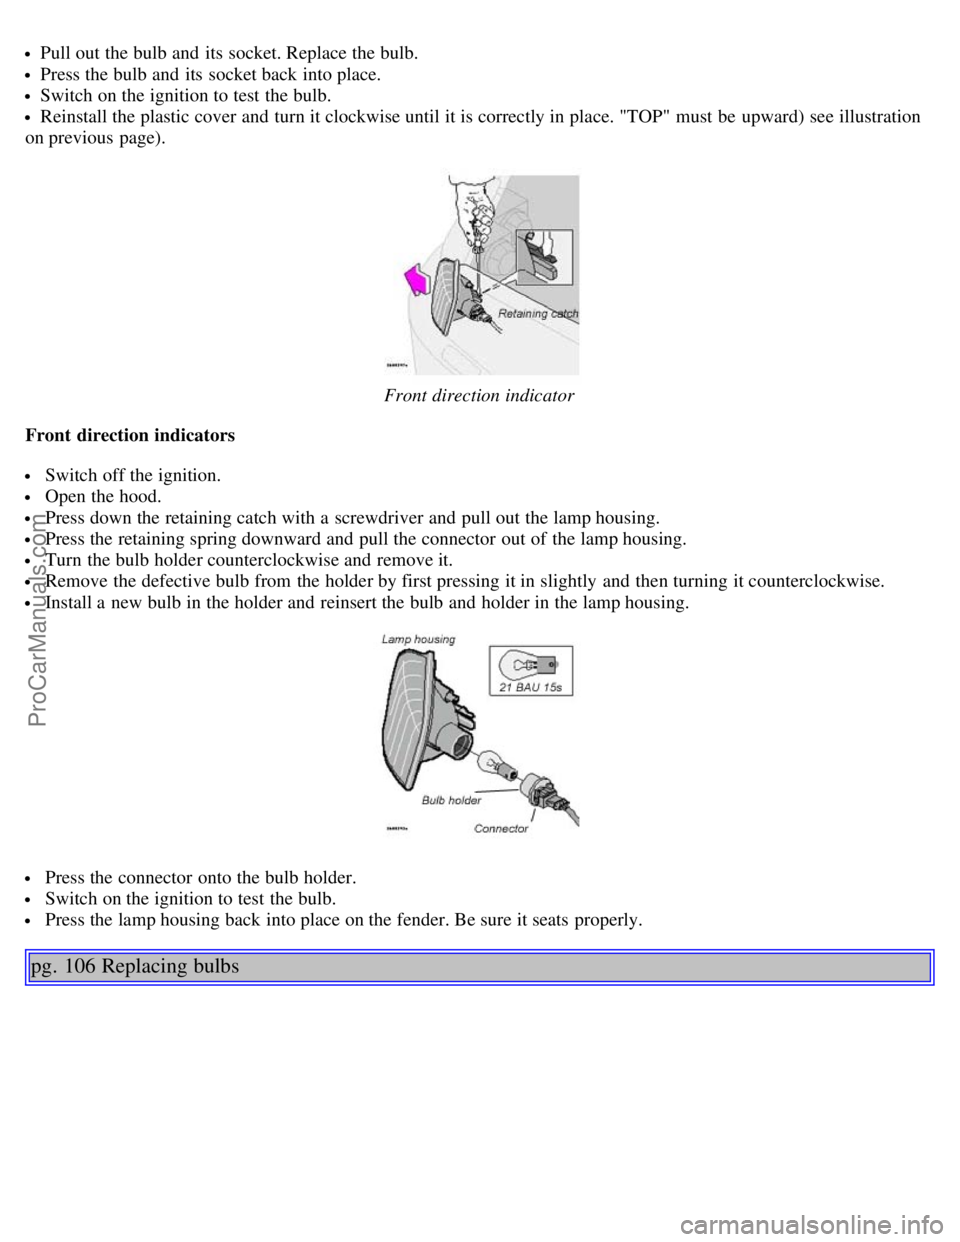
Front direction indicator
Front direction indicators
Switch off the ignition.
Open the hood.
Press down the retaining catch with a screwdriver and pull out the lamp housing.
Press the retaining spring downward and pull the connector out of the lamp housing.
Turn the bulb holder counterclockwise and remove it.
Remove the defective bulb from the holder by first pressing it in slightly and then turning it counterclockwise.
Install a new bulb in the holder and reinsert the bulb and holder in the lamp housing.
Press the connector onto the bulb holder.
Switch on the ignition to test the bulb.
Press the lamp housing back into place on the fender. Be sure it seats properly.
pg. 106 Replacing bulbs
ProCarManuals.com
Page 75 of 109
Front fog lights (option)
CAUTION:
Avoid touching the glass on the bulb with your fingers.
Switch off the ignition.
Turn the bulb holder slightly counterclockwise to release it.
Replace the bulb. The shape of the foot of the bulb corresponds to the shape of the bulb holder.
Reinstall the bulb holder by turning it slightly clockwise. "TOP" on the holder should be upward.
Vanity mirror lights
Carefully insert a screwdriver and pry out the lens.
Pry out the defective bulb and replace it.
Carefully press the lower edge of lens onto the four tabs and press the upper edge of the lens into place.
pg. 108 Replacing bulbs
ProCarManuals.com
Page 76 of 109
License plate lights
Switch off the ignition.
Loosen the screws with a torx screwdriver.
Carefully pull out the lamp housing.
Turn the bulb holder counterclockwise and pull it out.
Pull out the defective bulb and insert a new one.
Reinsert the bulb holder into the housing and turn it clockwise.
Reinstall the housing and screw it in place.
Door step courtesy lights
The door step courtesy lights are located under the dash on the driver's and passenger's sides. To replace a bulb:
Carefully insert a screwdriver and pry out the lens.
Replace the defective bulb.
Reinstall the lens.
Rear door step lights
Carefully insert a screwdriver and pry out the lens.
ProCarManuals.com