Page 307 of 345

’03 TUNDRA_U (L/O 0307)
298
2003 TUNDRA from Jul. ’03 Prod. (OM 34430U)
During recharging, the battery is pro-
ducing hydrogen gas.
Therefore, before recharging:
1. If recharging with the battery installed on the vehicle, be sure to disconnect
the ground cable.
2. Be sure the power switch on the re- charger is off when connecting the
charger cables to the battery and when
disconnecting them.
CAUTION
�Always charge the battery in an un-
confined area. Do not charge the
battery in a garage or closed room
where there is not sufficient ventila-
tion.
�Only do a slow charge (5 A or
less). Charging at a quicker rate is
dangerous. The battery may ex-
plode, causing personal injuries.
NOTICE
Never recharge the battery while the
engine is running. Also, be sure all
accessories are turned off.
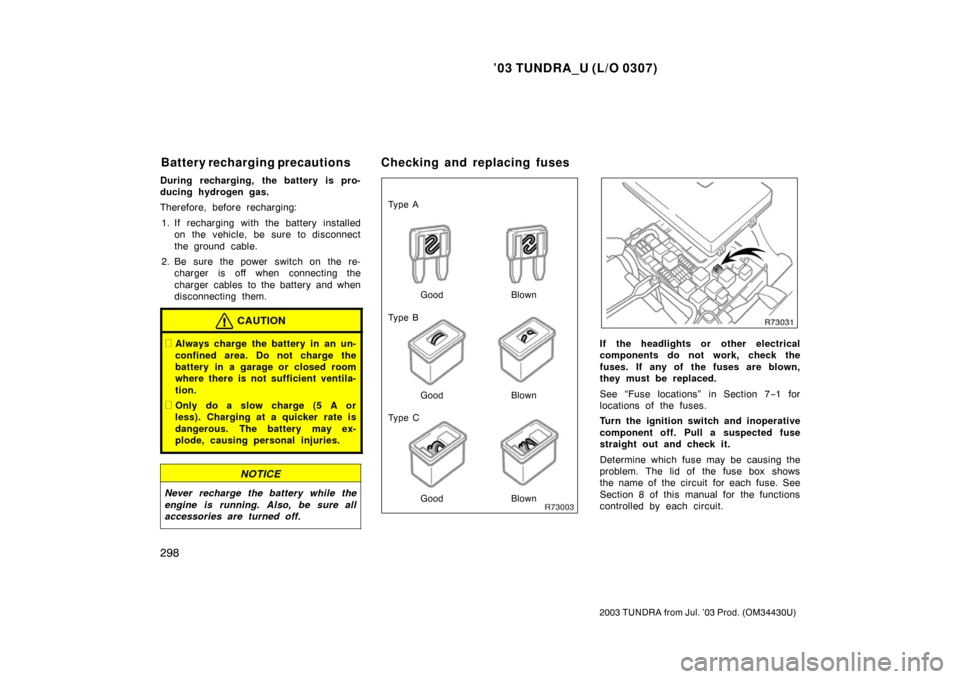
Ty p e A
Good Blown
Ty p e B
Ty p e C Good Blown
Good Blown
If the headlights or other electrical
components do not work, check the
fuses. If any of the fuses are blown,
they must be replaced.
See “Fuse locations” in Section 7
−1 for
locations of the fuses.
Turn the ignition switch and inoperative
component off. Pull a suspected fuse
straight out and check it.
Determine which fuse may be causing the
problem. The lid of the fuse box shows
the name of the circuit for each fuse. See
Section 8 of this manual for the functions
controlled by each circuit.
Battery recharging precautions Checking and replacing fuses
Page 309 of 345

’03 TUNDRA_U (L/O 0307)
300
2003 TUNDRA from Jul. ’03 Prod. (OM 34430U)
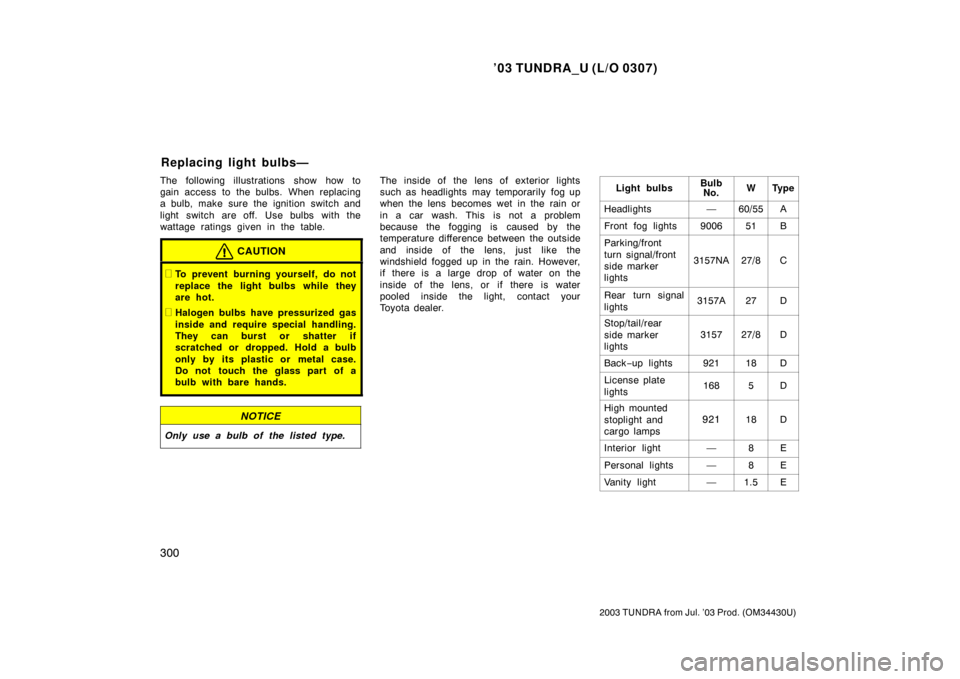
The following illustrations show how to
gain access to the bulbs. When replacing
a bulb, make sure the ignition switch and
light switch are off. Use bulbs with the
wattage ratings given in the table.
CAUTION
�To prevent burning yourself, do not
replace the light bulbs while they
are hot.
�Halogen bulbs have pressurized gas
inside and require special handling.
They can burst or shatter if
scratched or dropped. Hold a bulb
only by its plastic or metal case.
Do not touch the glass part of a
bulb with bare hands.
NOTICE
Only use a bulb of the listed type.
The inside of the lens of exterior lights
such as headlights may temporarily fog up
when the lens becomes wet in the rain or
in a car wash. This is not a problem
because the fogging is caused by the
temperature difference between the outside
and inside of the lens, just like the
windshield fogged up in the rain. However,
if there is a large drop of water on the
inside of the lens, or if there is water
pooled inside the light, contact your
Toyota dealer. Light bulbsBulb
No.WTy p e
Headlights—60/55A
Front fog lights900651B
Parking/front
turn signal/front
side marker
lights
3157NA27/8C
Rear turn signal
lights3157A27D
Stop/tail/rear
side marker
lights
315727/8D
Back −up lights92118D
License plate
lights1685D
High mounted
stoplight and
cargo lamps
92118D
Interior light—8E
Personal lights—8E
Vanity light—1.5E
Replacing light bulbs—
Page 310 of 345
’03 TUNDRA_U (L/O 0307)
301
2003 TUNDRA from Jul. ’03 Prod. (OM 34430U)
Light bulbsBulb
No.WTy p e
Door courtesy
lights1943.8D
Glove box light—1.2D
Step light—1.4D
A: HB2 halogen bulbs
B: HB4 halogen bulbs
C: Wedge base bulbs (amber)
D: Wedge base bulbs
E: Double end bulbs
1. Open the hood. Unplug the connec-
tor. Remove the rubber cover.
If the connector is tight, wiggle it.2. Release the bulb retaining spring and remove the bulb. Install a new
bulb and the bulb retaining spring.
To install a bulb, align the tabs of the
bulb with the cutouts of the mounting
hole.
—Headlights
Page 311 of 345
’03 TUNDRA_U (L/O 0307)
302
2003 TUNDRA from Jul. ’03 Prod. (OM 34430U)
“TOP PULL” mark
3. Install the rubber cover with the
“TOP PULL” mark upward, and fit it
securely on the boss. Then plug in
the connector.
Make sure the rubber cover fits securely
on the bulb base and the mounting body.
Aiming is not necessary after replacing
the bulb. When aiming adjustment is nec-
essary, contact your Toyota dealer. If either the left or right front fog lights
burns out, contact your Toyota dealer.
NOTICE
Do not try to replace the front fog
light bulbs by yourself. You may dam-
age the vehicle.
Use a Phillips�head screwdriver. Remove
and install the clip as shown in the fol-
lowing illustrations.
—Front fog lights
—Parking/front turn
signal/front side marker lights
Page 312 of 345
’03 TUNDRA_U (L/O 0307)
303
2003 TUNDRA from Jul. ’03 Prod. (OM 34430U)
Removing clip
Installing clip
Remove the bolts.
—Rear turn signal,
stop/tail/rear side marker and
back�up lights (type A)
Page 313 of 345
’03 TUNDRA_U (L/O 0307)
304
2003 TUNDRA from Jul. ’03 Prod. (OM 34430U)
a: Rear turn signal light
b: Stop/tail/rear side marker light
c: Back�up light
—Rear turn signal,
stop/tail/rear side marker and
back�up lights (type B)
Page 314 of 345
’03 TUNDRA_U (L/O 0307)
305
2003 TUNDRA from Jul. ’03 Prod. (OM 34430U)
a: Rear turn signal light
b: Stop/tail/rear side marker light
c: Back�up lightUse a Phillips�head screwdriver.
—License plate lights
Page 322 of 345

’03 TUNDRA_U (L/O 0307)
313
2003 TUNDRA from Jul. ’03 Prod. (OM 34430U)
ENGINE LUBRICATION
Oil capacity (drain and refill), L (qt., Imp.
qt.):
5VZ− FE engine
With filter 5.2 (5.5, 4.6)
Without filter 4.9 (5.2, 4.3)
2UZ− FE engine
With filter 6.2 (6.5, 5.5)
Without filter 5.7 (6.0, 5.0)
“Toyota Genuine Motor Oil” is filled in
your Toyota vehicle. Use Toyota approved
“Toyota Genuine Motor Oil” or equivalent
to satisfy the following grade and
viscosity.
Oil grade: API grade SL “Energy −Conserving” or
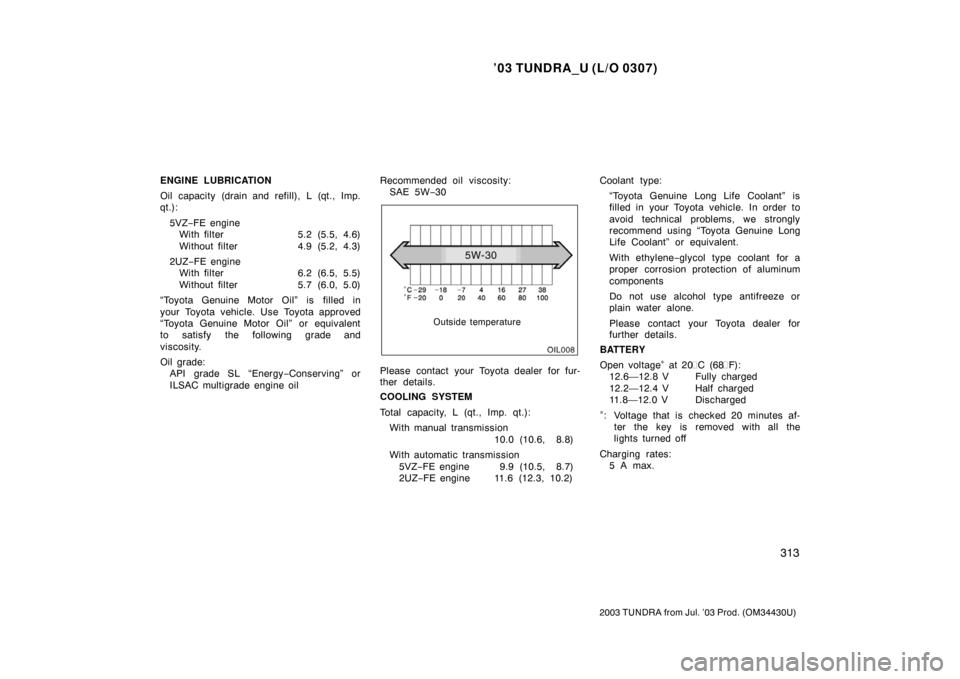
ILSAC multigrade engine oil Recommended oil viscosity:
SAE 5W −30
Outside temperature
Please contact your Toyota dealer for fur-
ther details.
COOLING SYSTEM
Total capacity, L (qt., Imp. qt.):
With manual transmission 10.0 (10.6, 8.8)
With automatic transmission 5VZ− FE engine 9.9 (10.5, 8.7)
2UZ− FE engine 11.6 (12.3, 10.2) Coolant type:
“Toyota Genuine Long Life Coolant” is
filled in your Toyota vehicle. In order to
avoid technical problems, we strongly
recommend using “Toyota Genuine Long
Life Coolant” or equivalent.
With ethylene− glycol type coolant for a
proper corrosion protection of aluminum
components
Do not use alcohol type antifreeze or
plain water alone.
Please contact your Toyota dealer for
further details.
BATTERY
Open voltage∗ at 20 �C (68 �F):
12.6—12.8 V Fully charged
12.2—12.4 V Half charged
11.8—12.0 V Discharged
∗: Voltage that is checked 20 minutes af- ter the key is removed with all the
lights turned off
Charging rates: 5 A max.