Page 155 of 312

’03 L/C U (L/O 0301)
151
If a tape side rewinds completely, the cas-
sette player will stop and then play that
same side. If a tape fast forwards com-
pletely, the cassette player will play the
other side of the tape, using the auto�re-
verse feature.
Compact Disc Player
If you want to fast forward or reverse
through a compact disc track, push and
hold in the fast forward or reverse button.
When you release the button, the compact
disc player will resume playing.
AM button
Push “AM” to turn on the radio and select
the AM band. “AM” will appear on the
display.
If the audio system is off, you can turn
on the radio by pushing “AM”. Also, push
“AM” to switch from cassette or compact
disc operation to radio operation.AUDIO�TUNE Knob
This knob is used to adjust the tone and
balance or to tune the station manually on
the radio mode.
Tone and sound balance adjustment func-
tion—
Each time you push the ”AUDIO�TUNE”
knob, the display changes as in the fol-
lowing. To adjust the tone and balance or
turn on or off the automatic sound leveliz-
er, turn the knob.
BAS:
Adjusts low�pitched tones.
MID: Adjusts mid�pitched tones.
TRE: Adjusts high�pitched tones.
BAL: Adjusts the sound balance between
the right and left speakers.
FAD: Adjusts the sound balance between
the front and rear speakers.
ASL: Turns on or off the automatic sound
levelizer.
Automatic sound levelizer: When the au-
dio sound becomes difficult to be heard
due to road noise, wind noise, etc. during
driving, the system adjusts to the optimum
volume and tone quality according to the
noise level. While the automatic sound
levelizer is on, ”ASL” appears on the dis-
play. Manual tuning function—
Turn the knob. The radio will step up or
down to another frequency.
DISC (Compact Disc) button
Push “DISC” to switch from radio or cas-
sette operation to compact disc operation.
If the audio system is off, you can turn
on the compact disc player by pushing
“DISC”. In both cases, a disc must alrea-
dy be loaded in the player.
When the audio is set into compact disc
operation, the display shows the track or,
track and disc number currently being
played.
If the player or another unit equipped with
the player malfunctions, your audio system
will display one of the three following er-
ror messages.
If “WAIT” appears on the display,
it indi-
cates that the inside of the player unit
may be too hot due to the very high ambi-
ent temperature. Remove the disc from
the player and allow the player to cool
down.
If “Err 1” appears on the display, it
indicates the disc is dirty, damaged or
label face down. Clean the disc or insert
it correctly.
Page 164 of 312

’03 L/C U (L/O 0301)
160
(b) When the radio mode is selected
”
CH ” button: Push this button to
select a station preset on the preset but-
ton of the front audio system. Each push
of the button changes to the station with
higher numbered preset button.
”
TUNE ” button: Push this button
for manual tuning or seek tuning.
�Push this button briefly. Each time you
push the button, the radio will step up
or down to another frequency.
�Push this button and hold it until you
hear a beep. The radio will begin seek-
ing up or down for a station, and will
stop on reception. Each time you push
the button, the stations will be
searched automatically one after anoth-
er.
(c) When the ”TAPE” mode is selected
”
PROG ” button: Push this button
to select the other side of a cassette
tape.
”
TRACK ” button: Push the left or
right side to skip forward or backward to
locate the song you want to hear. For
details, see ”SEEK TRACK button” on
page 154. (d) When the ”CD” mode is selected
”
DISC ” button:
Use this button to
search a desired disc.
”
TRACK ” button: Use this button
to search a desired track or push this
button and hold it to fast forward or rever-
se.
(e) Some basics
This system cannot be used if the audio
system is not turned on.
You cannot select ”AM” or ”FM” mode in
the rear seat if the ”FM” or ”AM” mode
is used on the front seats side.
If you select the same mode as the front
seats side, operating the controller will
affect the mode on the front seats side.
CAUTION
This system is not designed for a
driver. So, the driver should not use
this system while driving.
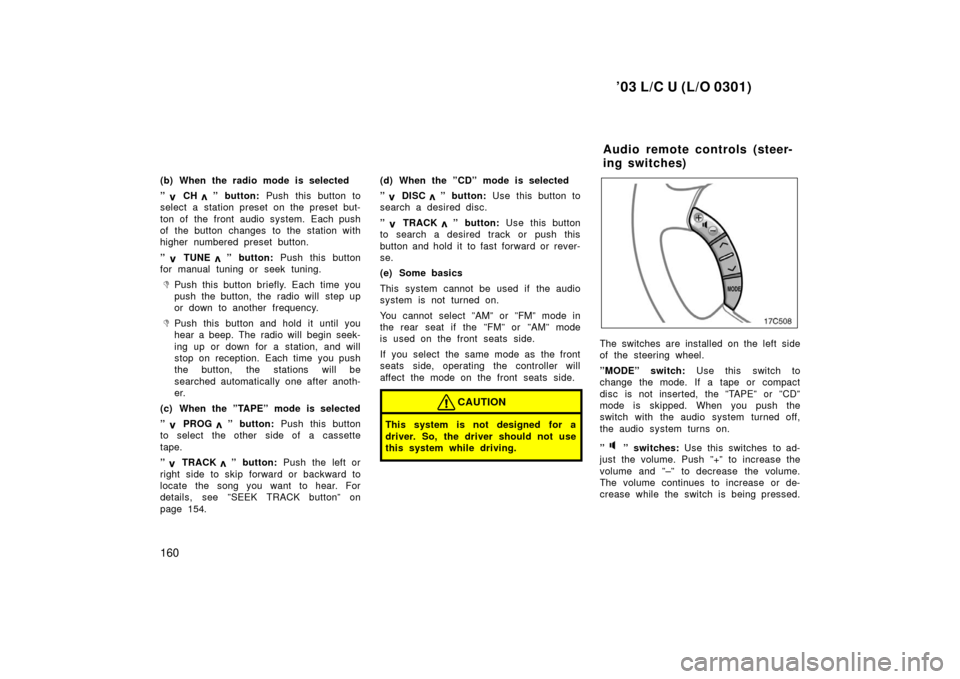
The switches are installed on the left side
of the steering wheel.
”MODE” switch: Use this switch to
change the mode. If a tape or compact
disc is not inserted, the ”TAPE” or ”CD”
mode is skipped. When you push the
switch with the audio system turned off,
the audio system turns on.
”
” switches: Use this switches to ad-
just the volume. Push ”+” to increase the
volume and ”–” to decrease the volume.
The volume continues to increase or de-
crease while the switch is being pressed.
Audio remote controls (steer-
ing switches)
Page 288 of 312

’03 L/C U (L/O 0301)
284
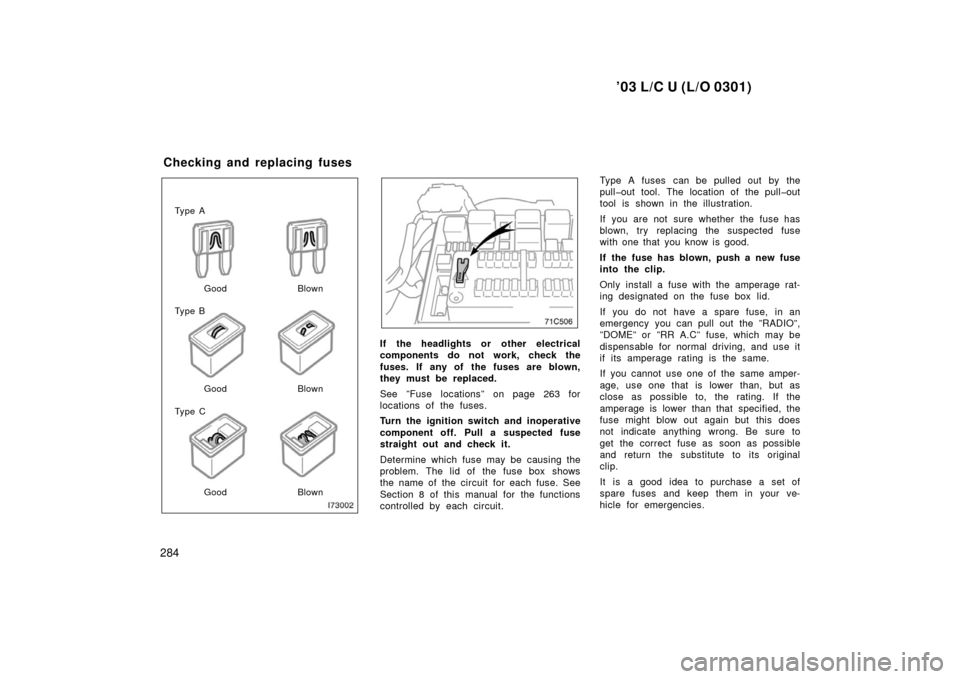
Ty p e A
Ty p e B
Ty p e CGood Blown
Good Blown
Good Blown
If the headlights or other electrical
components do not work, check the
fuses. If any of the fuses are blown,
they must be replaced.
See ”Fuse locations” on page 263 for
locations of the fuses.
Turn the ignition switch and inoperative
component off. Pull a suspected fuse
straight out and check it.
Determine which fuse may be causing the
problem. The lid of the fuse box shows
the name of the circuit for each fuse. See
Section 8 of this manual for the functions
controlled by each circuit. Type A fuses can be pulled out by the
pull�out tool. The location of the pull�out
tool is shown in the illustration.
If you are not sure whether the fuse has
blown, try replacing the suspected fuse
with one that you know is good.
If the fuse has blown, push a new fuse
into the clip.
Only install a fuse with the amperage rat-
ing designated on the fuse box lid.
If you do not have a spare fuse, in an
emergency you can pull out the ”RADIO”,
”DOME” or ”RR A.C” fuse, which may be
dispensable for normal driving, and use it
if its amperage rating is the same.
If you cannot use one of the same amper-
age, use one that is lower than, but as
close as possible to, the rating. If the
amperage is lower than that specified, the
fuse might blow out again but this does
not indicate anything wrong. Be sure to
get the correct fuse as soon as possible
and return the substitute to its original
clip.
It is a good idea to purchase a set of
spare fuses and keep them in your ve-
hicle for emergencies.
Checking and replacing fuses