Page 322 of 373
’03 4Runner_U (L/O 0305)
316
2003 4RUNNER from Apr. ’03 Prod. (OM 35820U)
1. Windshield and back window washer
fluid tank
2. Power steering fluid reservoir
3. Engine oil level dipstick
4. Engine coolant reservoir
5. Engine oil filler cap
6. Brake fluid reservoir
7. Fuse block
8. Battery
9. Condenser
10. Radiator
Engine compartment overview
� 1GR�FE engine
Page 323 of 373
’03 4Runner_U (L/O 0305)
317
2003 4RUNNER from Apr. ’03 Prod. (OM 35820U)
1. Windshield and back window washer
fluid tank
2. Power steering fluid reservoir
3. Engine coolant reservoir
4. Engine oil level dipstick
5. Engine oil filler cap
6. Brake fluid reservoir
7. Fuse block
8. Battery
9. Condenser
10. Radiator
�
2UZ�FE engine
Page 335 of 373

’03 4Runner_U (L/O 0305)
329
2003 4RUNNER from Apr. ’03 Prod. (OM 35820U)
NOTICE
If you spill the fluid, be sure to wash
it off with water to prevent it from
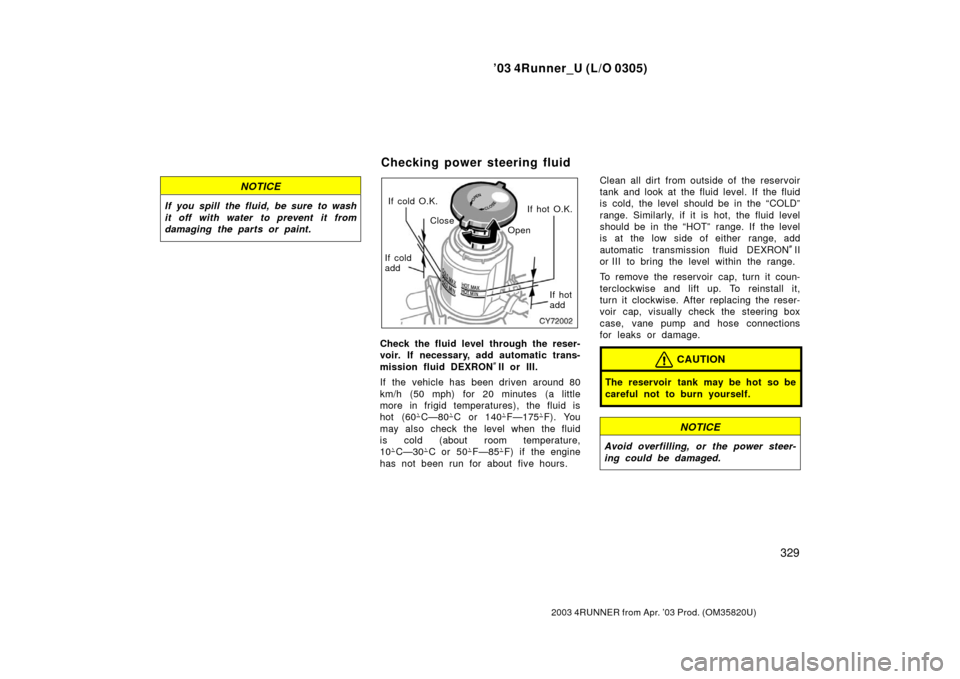
damaging the parts or paint.If cold O.K.
If hot O.K.
If cold
add If hot
add
Close
Open
Check the fluid level through the reser-
voir. If necessary, add automatic trans-
mission fluid DEXRON �II or III.
If the vehicle has been driven around 80
km/h (50 mph) for 20 minutes (a little
more in frigid temperatures), the fluid is
hot (60 �C—80 �C or 140 �F—175 �F). You
may also check the level when the fluid
is cold (about room temperature,
10 �C—30 �C or 50 �F—85 �F) if the engine
has not been run for about five hours. Clean all dirt from outside of the reservoir
tank and look at the fluid level. If the fluid
is cold, the level should be in the “COLD”
range. Similarly, if it is hot, the fluid level
should be in the “HOT” range. If the level
is at the low side of either range, add
automatic transmission fluid DEXRON
�II
or III to bring the level within the range.
To remove the reservoir cap, turn it coun-
terclockwise and lift up. To reinstall it,
turn it clockwise. After replacing the reser-
voir cap, visually check the steering box
case, vane pump and hose connections
for leaks or damage.
CAUTION
The reservoir tank may be hot so be
careful not to burn yourself.
NOTICE
Avoid overfilling, or the power steer-
ing could be damaged.
Checking power steering fluid
Page 342 of 373

’03 4Runner_U (L/O 0305)
336
2003 4RUNNER from Apr. ’03 Prod. (OM 35820U)
TIRE CHAIN SELECTION
Use the tire chains of correct size.
Regulations regarding the use of tire
chains vary according to location or
type of road, so always check the local
regulations before installing chains.
CHAIN INSTALLATION
Install the chains on the rear tires as
tightly as possible. Do not use tire
chains on the front tires. Retighten
chains after driving 0.5—1.0 km
(1/4—1/2 mile).
When installing chains on your tires, care-
fully follow the instructions of the chain
manufacturer.
If wheel covers are used, they will be
scratched by the chain band, so remove
the covers before putting on the chains.
CAUTION
�Do not exceed 50 km/h (30 mph) or
the chain manufacturer ’s recom-
mended speed limit, whichever is
lower.
�Drive carefully avoiding bumps,
holes, and sharp turns, which may
cause the vehicle to bounce.
�Avoid sharp turns or locked�wheel
braking, as use of chains may ad-
versely affect vehicle handling.
�When driving with chains installed,
be sure to drive carefully. Slow
down before entering curves to
avoid losing control of the vehicle.
Otherwise an accident may occur.
WHEN TO REPLACE YOUR WHEELS
If you have wheel damage such as
bending, cracks or heavy corrosion, the
wheel should be replaced.
If you fail to replace a damaged wheel,
the tire may slip off the wheel or cause
loss of handling control.
WHEEL SELECTION
When replacing wheels, care should be
taken to ensure that the wheels are re-
placed by ones with the same load ca-
pacity, diameter, rim width, and offset.
Correct replacement wheels are available
at your Toyota dealer.
A wheel of a different size or type may
adversely affect handling, wheel and bear-
ing life, brake cooling, speedometer/odom-
eter calibration, stopping ability, headlight
aim, bumper height, vehicle ground clear-
ance, and tire or snow chain clearance to
the body and chassis.
Replacing wheels
Page 352 of 373
’03 4Runner_U (L/O 0305)
346
2003 4RUNNER from Apr. ’03 Prod. (OM 35820U)
Low beam
(outside)
High beam
(inside)
1. Turn the bulb base counterclockwise to the front of the vehicle as shown.2. Unplug the connector while depress-ing the lock release.
If the connector is tight, wiggle it.3. Install a new bulb and connector into the mounting hole and turn
them clockwise to the front of the
vehicle.
Aiming is not necessary after replacing
the bulb. When aiming adjustment is nec-
essary, contact your Toyota dealer.
—Headlights
Page 353 of 373
’03 4Runner_U (L/O 0305)
347
2003 4RUNNER from Apr. ’03 Prod. (OM 35820U)
1. Turn the bulb base counterclockwise
to the front of the vehicle as shown.2. Unplug the connector while depress-ing the lock release.
If the connector is tight, wiggle it.3. Install a new bulb and connector into the mounting hole and turn
them clockwise to the front of the
vehicle.
—Front fog lights
Page 360 of 373

’03 4Runner_U (L/O 0305)
354
2003 4RUNNER from Apr. ’03 Prod. (OM 35820U)
COOLING SYSTEM
Total capacity, L (qt., Imp. qt.):
1GR�FE engine 9.8 (10.4, 8.6)
2UZ�FE engine 12.3 (13,0, 10.8)
Coolant type:
“Toyota Genuine Long Life Coolant” is
filled in your Toyota vehicle. In order to
avoid technical problems, we strongly
recommend using “Toyota Genuine Long
Life Coolant” or equivalent.
With ethylene�glycol type coolant for a
proper corrosion protection of aluminum
components
Do not use alcohol type antifreeze or
plain water alone.
Please contact your Toyota dealer for
further details.
BATTERY
Open voltage
∗ at 20 �C (68 �F):
12.6—12.8 V Fully charged
12.2—12.4 V Half charged
11.8—12.0 V Discharged
∗: Voltage that is checked 20 minutes af-
ter the key is removed with all the
lights turned off
Charging rates: 5 A max. AUTOMATIC TRANSMISSION
Fluid capacity (drain and ref
ill),
L (qt., Imp. qt.):
1GR�FE engineUp to 2.0 (2.1, 1.8)
2UZ�FE engine Up to 3.0 (3.2, 2.6)
Fluid type: Toyota Genuine ATF Type T�IV
Change automatic transmission fluid only
as necessary.
Generally, it is necessary to change
automatic transmission fluid only if your
vehicle is driven under one of the Special
Operating Conditions listed in your
“Scheduled Maintenance Guide” or
“Owner ’s Manual Supplement”. When
changing the automatic transmission fluid,
use only “Toyota Genuine ATF Type T�IV”
(ATF JWS3309 or NWS6500) to aid in
assuring optimum transmission perfor-
mance.
Notice: Using automatic transmission
fluid other than “Toyota Genuine ATF
Type T�IV” may cause deterioration in
shift quality, locking up of your trans-
mission accompanied by vibration, and
ultimately damage the automatic trans-
mission of your vehicle. Please contact your Toyota dealer for fur-
ther details.
TRANSFER
Oil capacity, L (qt., Imp. qt.):
1.4 (1.5, 1.2)
Oil type: Hypoid gear oil API GL�5
Recommended oil viscosity: SAE 75W�90
DIFFERENTIAL (1GR�FE engine)
Oil capacity, L (qt., Imp. qt.): Two�wheel drive models 3.05 (3.2, 2.7)
Four�wheel drive models Front 1.5 (1.6, 1.3)
Rear 3.05 (3.2, 2.7)
Oil type: Hypoid gear oil API GL�5
Recommended oil viscosity: Front SAE 75W�90
Rear Above �18 �C (0 �F)
SAE 90
Below �18 �C (0 �F)
SAE 80W or 80W�90
Page 362 of 373

’03 4Runner_U (L/O 0305)
356
2003 4RUNNER from Apr. ’03 Prod. (OM 35820U)
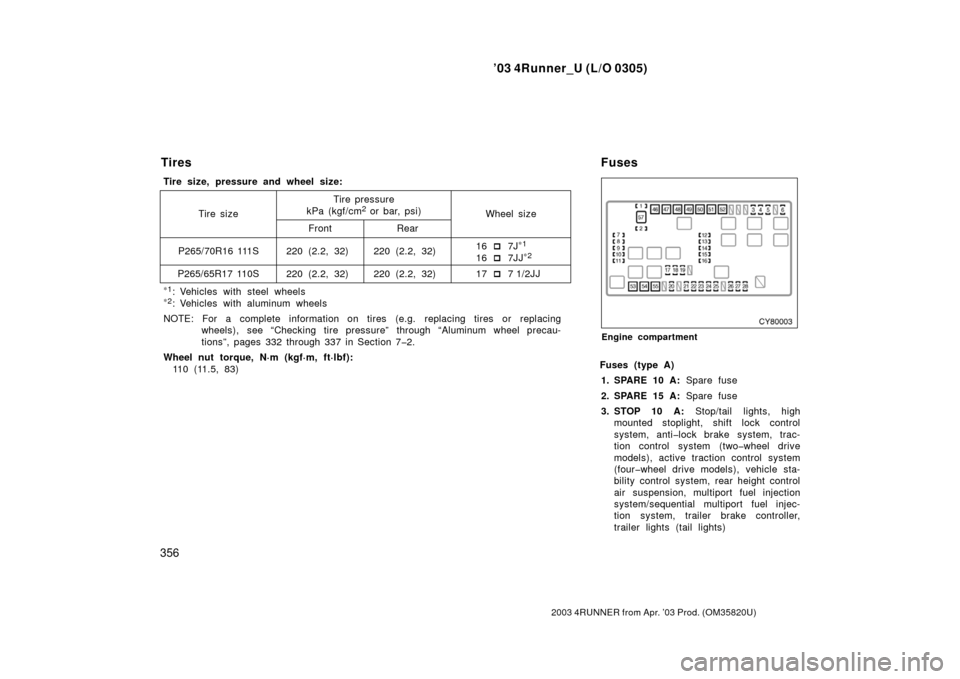
Engine compartment
Fuses (type A)
1. SPARE 10 A: Spare fuse
2. SPARE 15 A: Spare fuse
3. STOP 10 A: Stop/tail lights, high
mounted stoplight, shift lock control
system, anti�lock brake system, trac-
tion control system (two�wheel drive
models), active traction control system
(four�wheel drive models), vehicle sta-
bility control system, rear height control
air suspension, multiport fuel injection
system/s equential multiport fuel injec-
tion system, trailer brake controller,
trailer lights (tail lights)
Tires
Tire size Tire pressure
kPa (kgf/cm2 or bar, psi)
Front Rear
P265/70R16 111S
P265/65R17 110S 220 (2.2, 32) 220 (2.2, 32)
220 (2.2, 32) 220 (2.2, 32) Wheel size
16 �7J
∗
1
16 �7JJ∗
2
17 �71/2JJ
Tire size, pressure and wheel size:
∗
1: Vehicles with steel wheels∗2: Vehicles with aluminum wheels
NOTE: For a complete information on tires (e.g. replacing tires or replacing wheels), see “Checking tire pressure” through “Aluminum wheel precau-
tions”, pages 332 through 337 in Section 7�2.
Wheel nut torque, N·m (kgf·m, ft·lbf): 11 0 ( 11 . 5 , 8 3 )
Fuses