Page 229 of 373
’03 4Runner_U (L/O 0305)
223
2003 4RUNNER from Apr. ’03 Prod. (OM 35820U)
On some models, an auxiliary box is
located inside the glove box.
To increase the capacity of the glove box,
raise the lower panel of the aux iliary box.
The garage door opener (�
Universal Transceiver) is manufactured
under license from HomeLink� and can
be programmed to operate garage
doors, gates, entry doors, door locks,
home lighting systems, and security
systems, etc.
Garage door opener
Page 231 of 373

225
2003 4RUNNER from Apr. ’03 Prod. (OM 35820U)
The ceiling mounted garage door opener
motor should now recognize the
HomeLink
� unit and be able activate the
garage door")
’03 4Runner_U (L/O 0305)
225
2003 4RUNNER from Apr. ’03 Prod. (OM 35820U)
The ceiling mounted garage door opener
motor should now recognize the
HomeLink
� unit and be able activate the
garage door up/down.
4. Repeat steps 1 through 3 for each re- maining HomeLink
� button to program
another rolling code system.
Programming an entrance gate/program-
ming all devices in the Canadian market 1. Decide which of the 3 HomeLink
� but-
tons you want to program.
2. Place your hand�held gate/device transmitter 25 to 75 mm (1 to 3 in.)
away from the surface of the
HomeLink
�.
Keep the indicator light on the HomeLink
�
in view while programming. 3. Press and hold the selected HomeLink
� button.
4. Continuously press and release ( cycle)
the hand�held gate/device transmitter
button every two seconds until step 5
is complete.
5. When the indicator light on the HomeLink
� changes from a slow to a
rapid flash after 20 seconds, you can
release both buttons. 6. Test the operation of the HomeLink
� by
pressing the newly programmed button.
Check to see if the gate/device oper-
ates correctly.
7. Repeat steps 1 through 6 for each re- maining HomeLink
� button to program
another device.
Programming other devices
To program other devices such as home
security systems, home door locks or
lighting, contact your authorized Toyota
dealer for assistance.
Reprogramming a button
Individual HomeLink
� buttons cannot be
erased, however, to reprogram a single
button, follow the procedure “Programming
the HomeLink
�”.
(b) Operating the HomeLink
�
To operate the HomeLink�, press the
appropriate HomeLink� button to activate
the programmed device. The HomeLink�
indicator light should come on. The
HomeLink� continues to send the signal
for up to 20 seconds as long as the
button is pressed. (c) Erasing the entire HomeLink
�
memory (all three programs)
To erase all previously programmed codes
at one time, press and hold down the 2
outside buttons for 20 seconds until the
indicator light flashes.
If you sell your vehicle, be sure to erase
the programs stored in the HomeLink
�
memory.
Page 235 of 373
’03 4Runner_U (L/O 0305)
229
2003 4RUNNER from Apr. ’03 Prod. (OM 35820U)
CONSOLE BOX
To access the rear console box, pull up
the console box lid while pushing the
lock release button.
CAUTION
To reduce the chance of injury in
case of an accident or a sudden stop,
always keep the console box closed
while driving.
The rear console box is equipped with
a tissue box holder on the inside of the
rear console box lid.
To use the tissue box holder:
1. Pull up the console box lid while push- ing the lock release button.
2. Place a tissue box in the lid.
CAUTION
To reduce the chance of injury in
case of an accident or a sudden stop
while driving, keep the console box
lid closed when it is not in use.
Tissue box holder
Page 236 of 373
’03 4Runner_U (L/O 0305)
230
2003 4RUNNER from Apr. ’03 Prod. (OM 35820U)
The rear console box is equipped with
a coin holder.
To use the coin holder:
1. Pull up the console box lid while push- ing the lock release button.
2. Push coins down into the holder.
The coin holder is detachable.
Coin holder Trash holder
Page 242 of 373
’03 4Runner_U (L/O 0305)
236
2003 4RUNNER from Apr. ’03 Prod. (OM 35820U)
USING LUGGAGE COVER
To use the luggage cover:
1. Attach the front hooks of the lug- gage cover to the head restraint.
2. Pull out the rear luggage cover and hook it on the anchors.
CAUTION
Do not place anything on the luggage
cover. Such items may be thrown
about and possibly injure people in
the vehicle during sudden braking or
an accident.
REMOVING LUGGAGE COVER
To remove the luggage cover, detach its
hooks from the head restraint. Then,
retract and release both ends, and re-
move the luggage cover.
After you remove the luggage cover, place
it somewhere other than the passenger
compartment. This will prevent passengers
from injury in the event of a sudden stop
or accident.To use the double deck:
1. Turn the left and right knobs from the “LOCK” position to the
“UNLOCK” position.
Double deck
Page 243 of 373
’03 4Runner_U (L/O 0305)
237
2003 4RUNNER from Apr. ’03 Prod. (OM 35820U)
2. Hold the handle and raise the double
deck on the rear tire houses.3. Turn the left and right knobs fromthe “UNLOCK” position to the
“LOCK” position.
Make sure the double deck is securely
locked.
CAUTION
To reduce the chance of injury in
case of an accident or sudden stop,
make sure that the double deck
knobs are always in the “LOCK” posi-
tion when the double deck is in the
raised or lowered position.
NOTICE
When using the double deck at the
raised position, do not place any ob-
ject heavier than 30 kg (66 lb.).
Page 244 of 373

238
2003 4RUNNER from Apr. ’03 Prod. (OM 35820U)
The roof luggage carrier consists of
roof rails (1) attached to the roof and
sliding cross rails (2).
To adjust the positi")
’03 4Runner_U (L/O 0305)
238
2003 4RUNNER from Apr. ’03 Prod. (OM 35820U)
The roof luggage carrier consists of
roof rails (1) attached to the roof and
sliding cross rails (2).
To adjust the positions of cross rails, do
this.
1. Turn the knobs counterclockwise to loosen the cross rails.
2. Slide the cross rails to the desired position for loading the luggages of
various sizes.
3. After adjusting, be sure to tighten the cross rails by turning knobs clockwise.
Follow the manufacturer ’s instructions and
precautions when installing the attach-
ments or their equivalent.
Paint mark
When there is no luggage on the roof
luggage carrier, Toyota recommends that
the front and rear cross rails be secured
in the positions indicated in the illustra-
tion, according to the following procedure.
This may diminish wind noise during driv-
ing. 1. Turn the knobs counterclockwise to loosen the cross rails.
2. Slide the ends of the cross rails to the paint mark.
3. Be sure to tighten the cross rails by turning knobs clockwise.
CAUTION
When you load cargo on the roof lug-
gage carrier, observe the following:
�Place the cargo so that its weight
is distributed evenly between the
front and rear axles.
�If loading long or wide cargo, never
exceed the vehicle overall length or
width. (See “Dimensions and cargo
load” on page 352 in Section 8 for
information on your vehicle overall
length and width.)
�Before driving, make sure the cargo
is securely fastened on the roof
luggage carrier.
�Loading cargo on the roof luggage
carrier will make the center of the
vehicle gravity higher. Avoid high
speeds, sudden starts, sharp turns,
sudden braking or abrupt maneu-
vers, otherwise it may result in loss
of control or vehicle rollover due to
failure to operate this vehicle cor-
rectly.
Roof luggage carrier
Page 245 of 373
’03 4Runner_U (L/O 0305)
239
2003 4RUNNER from Apr. ’03 Prod. (OM 35820U)
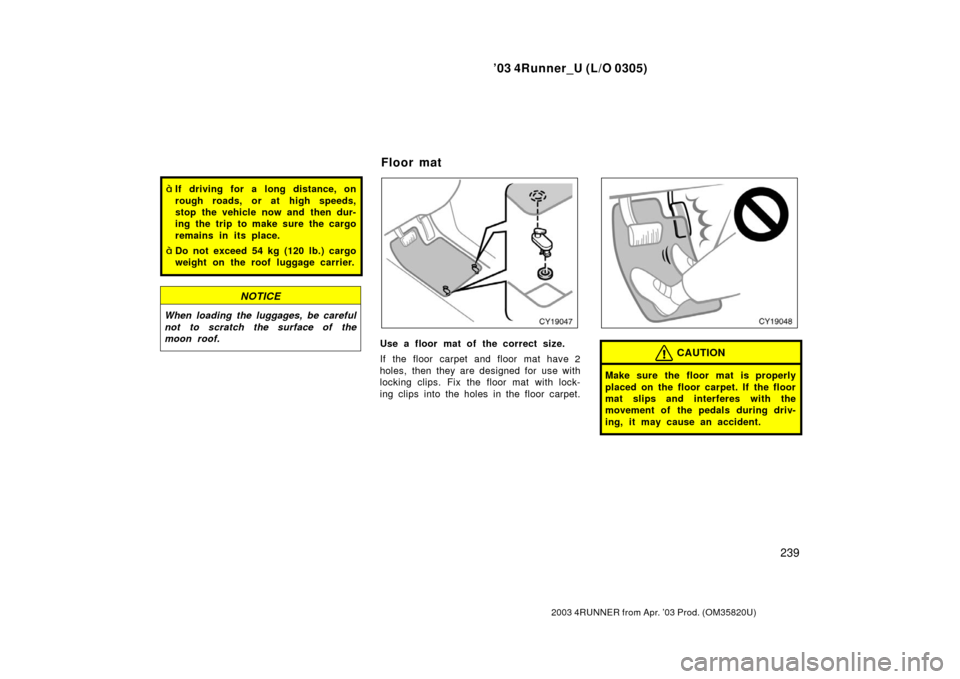
�If driving for a long distance, on
rough roads, or at high speeds,
stop the vehicle now and then dur-
ing the trip to make sure the cargo
remains in its place.
�Do not exceed 54 kg (120 lb.) cargo
weight on the roof luggage carrier.
NOTICE
When loading the luggages, be careful
not to scratch the surface of the
moon roof.
Use a floor mat of the correct size.
If the floor carpet and floor mat have 2
holes, then they are designed for use with
locking clips. Fix the floor mat with lock-
ing clips into the holes in the floor carpet.CAUTION
Make sure the floor mat is properly
placed on the floor carpet. If the floor
mat slips and interferes with the
movement of the pedals during driv-
ing, it may cause an accident.
Floor mat

223
2003 4RUNNER from Apr. ’03 Prod. (OM 35820U)
On some models, an auxiliary box is
located inside the glove box.
To increase the capacity of the glove box,
raise the low")

229
2003 4RUNNER from Apr. ’03 Prod. (OM 35820U)
CONSOLE BOX
To access the rear console box, pull up
the console box lid while pushing the
lock release button.
CAUTION
To")

230
2003 4RUNNER from Apr. ’03 Prod. (OM 35820U)
The rear console box is equipped with
a coin holder.
To use the coin holder:
1. Pull up the console box lid while push- in")

236
2003 4RUNNER from Apr. ’03 Prod. (OM 35820U)
USING LUGGAGE COVER
To use the luggage cover:
1. Attach the front hooks of the lug- gage cover to the head restraint.
2. P")

237
2003 4RUNNER from Apr. ’03 Prod. (OM 35820U)
2. Hold the handle and raise the double
deck on the rear tire houses.3. Turn the left and right knobs fromthe “UNLOCK�")