Page 413 of 472
11
Maintenance and service11-41
–
CONTINUED –
�
Correct tire pressure (tread worn evenly)
HGB033AA
Roadholding is good, and steering is responsive. Rolling resistance is
low, so fuel consumption is also lower.
� Abnormally low tire pressure (tread worn at shoulders)
HSB012AA
Rolling resistance is high, so fuel consumption is also higher.
Page 415 of 472

11
Maintenance and service11-43
–
CONTINUED –
NOTE Loss of correct wheel alignment* causes the tires to wear on one side and reduces the vehicle
’s running stability. Contact your
SUBARU dealer if you notice abnormal tire wear.
* : The suspension system is designed to hold each wheel at a certain alignment
(relative to the other wheels and to the road) for optimum straight-line stability and
cornering performance. � Wear indicators
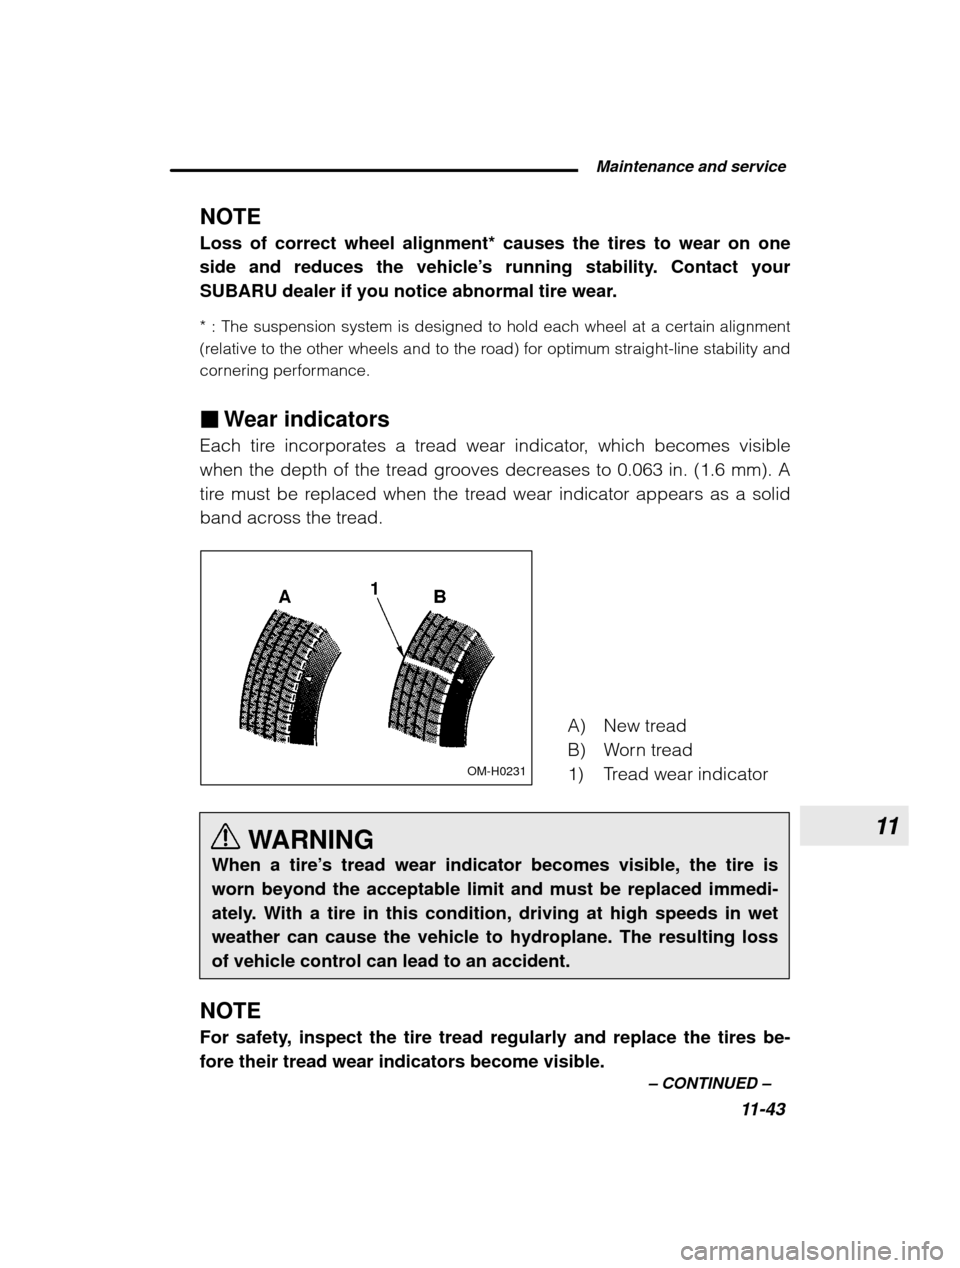
Each tire incorporates a tread wear indicator, which becomes visible
when the depth of the tread grooves decreases to 0.063 in. (1.6 mm). A
tire must be replaced when the tread wear indicator appears as a solid
band across the tread.
OM-H0231
WARNING
When a tire ’s tread wear indicator becomes visible, the tire is
worn beyond the acceptable limit and must be replaced immedi-
ately. With a tire in this condition, driving at high speeds in wetweather can cause the vehicle to hydroplane. The resulting lossof vehicle control can lead to an accident.
NOTE
For safety, inspect the tire tread regularly and replace the tires be- fore their tread wear indicators become visible. A) New tread
B) Worn tread
1) Tread wear indicator
Page 416 of 472

11-44�
Tire rotation
OM-H0230
Tire wear varies from wheel to wheel. To maximize the life of each tire
and ensure that the tires wear uniformly, it is best to rotate the tires every
7,500 miles (12,500 km). Rotating the tires involves switching the front
and rear tires on the right-hand side of the vehicle and similarly switching
the front and rear tires on the left-hand side of the vehicle. (Each tiremust be kept on its original side of the vehicle.)
Replace any damaged or unevenly worn tire at the time of rotation. After
tire rotation, adjust the tire pressures and make sure the wheel nuts are
correctly tightened.
After driving approximately 600 miles (1,000 km), check the wheel nuts
again and retighten any nut that has become loose. �Tire replacement
The wheels and tires are important and integral parts of your vehicle ’s
design; they cannot be changed arbitrarily. The tires fitted as standard
equipment are optimally matched to the characteristics of the vehicle
and were selected to give the best possible combination of running per-
formance, ride comfort, and service life. It is essential for every tire to
have a size and construction matching those shown on the tire placard
and to have a speed symbol and load index matching those shown on
the tire placard.
Using tires of a non-specified size detracts from controllability, ride com-
fort, braking performance, speedometer accuracy and odometer accu-
Page 417 of 472

11
Maintenance and service11-45
–
CONTINUED –
racy. It also creates incorrect body-to-tire clearances and inappropriately changes the vehicle
’s ground clearance.
All four tires must be the same in terms of manufacturer, brand (tread
pattern), construction, and size. You are advised to replace the tires with
new ones that are identical to those fitted as standard equipment.
For safe vehicle operation, SUBARU recommends replacing all four tires at the same time.
WARNING
� All four tires must be the same in terms of manufacturer, brand
(tread pattern), construction, degree of wear, speed symbol, loadindex and size. Mixing tires of different types, sizes or degrees ofwear can result in damage to the vehicle ’s power train. Use of dif-
ferent types or sizes of tires can also dangerously reduce con-trollability and braking performance and can lead to an accident.� Use only radial tires. Do not use radial tires together with
belted bias tires and/or bias-ply tires. Doing so can dangerously
reduce controllability, resulting in an accident.
� Wheel replacement
When replacing wheels due, for example, to damage, make sure the re-
placement wheels match the specifications of the wheels that are fitted
as standard equipment. Replacement wheels are available from
SUBARU dealers.
WARNING
Use only those wheels that are specified for your vehicle. Wheelsnot meeting specifications could interfere with brake caliper op-eration and may cause the tires to rub against the wheel wellhousing during turns. The resulting loss of vehicle control couldlead to an accident.
Page 419 of 472

11
Maintenance and service11-47
–
CONTINUED –
tighten it to the specified torque.
Aluminum wheels (if equipped)
Aluminum wheels can be scratched and damaged easily. Handle them
carefully to maintain their appearance, performance, and safety. �
When any of the wheels is removed and replaced for tire rotation or to
change a flat, always check the tightness of the wheel nuts after driving
approximatly 600 miles (1,000 km). If any nut is loose, tighten it to the
specified torque.� Never apply oil to the threaded parts, wheel nuts, or tapered surface
of the wheel.� Never let the wheel rub against sharp protrusions or curbs.
� Be sure to fit tire chains on uniformly and completely around the tire,
otherwise the chains may scratch the wheel.� When wheel nuts, balance weights, or the center cap is replaced, be
sure to replace them with genuine SUBARU parts designed for aluminumwheels.
Windshield washer fluid
CAUTION
Never use engine coolant as washer fluid because it could cause paint damage.
Check the level of the washer fluid at each fuel stop. If the level is low, fill
the fluid up to the neck of the reservoir.Use windshield washer fluid. If windshield washer fluid is unavailable use
clean water.
In areas where water freezes in winter, use an anti-freeze type windshield
washer fluid. SUBARU Windshield Washer Fluid contains 58.5% methyl
alcohol and 41.5% surfactant, by volume. Its freezing temperature varies
according to how much it is diluted, as indicated below.
Page 421 of 472
11
Maintenance and service11-49
–
CONTINUED –
1. Raise the wiper arm off the windshield.
2. Remove the wiper blade assembly by holding its pivot area and push-
ing it in the direction shown by the arrow while depressing the wiper
blade stopper.
HS0190
Stopper
3. Grasp the locked end of the blade rubber assembly and pull it firmly
until the stoppers on the rubber are free of the metal support.
HS0191
Metal support
Page 423 of 472

11
Maintenance and service11-51
–
CONTINUED –
Battery
WARNING
� Before beginning work on or near any battery, be sure to extin-
guish all cigarettes, matches, and lighters. Never expose a bat- tery to an open flame or electric sparks. Batteries give off a gaswhich is highly flammable and explosive.� For safety, in case an explosion does occur, wear eye protec-
tion or shield your eyes when working near any battery. Never
lean over a battery.� Do not let battery fluid contact eyes, skin, fabrics, or paint be-
cause battery fluid is a corrosive acid. If battery fluid gets on yourskin or in your eyes, immediately flush the area with water thor-
oughly. Seek medical help immediately if acid has entered theeyes.If battery fluid is accidentally swallowed, immediately drink a
large amount of milk or water, and seek medical attention
immediately.� To lessen the risk of sparks, remove rings, metal watchbands,
and other metal jewelry. Never allow metal tools to contact the
positive battery terminal and anything connected to it WHILE youare at the same time in contact with any other metallic portion ofthe vehicle because a short circuit will result.� Keep everyone including children away from the battery.
� Charge the battery in a well-ventilated area.
� Battery posts terminals and related accessories contain lead
and lead compounds, chemicals known to the State of California
to case cancer and reproductive harm. Wash hands after han-dling.
CAUTION
Never use more than 10 amperes when charging the battery be-
cause it will shorten battery life.
Page 425 of 472
11
Maintenance and service11-53
–
CONTINUED –
HSB011BB
HS0204
Good
Blown
1. Turn the ignition switch to the
“LOCK” position and turn off all electri-
cal accessories.
2. Remove the cover.(For behind the coin tray: open the coin tray and pull it horizontally to
remove it.)
3. Determine which fuse may be blown. The back side of each fuse boxcover and the “Fuse and circuits ” section in chapter 12 in this manual
show the circuit for each fuse.
HS0207
Fuse puller
4. Pull out the fuse with the fuse puller.
5. Inspect the fuse. If it has blown, replace it with a spare fuse of thesame rating.
6. If the same fuse blows again, this indicates that its system has a
problem. Contact your SUBARU dealer for repairs.