Page 96 of 420
2-5
Keys and doors
– CONTINUED –
Power door locking switches
1) Lock
2) Unlock
All doors and the rear gate can be locked and un-
locked by the power door locking switches located at
the driver’s side and the front passenger’s side doors.
To lock the doors, push the front side of the switch.
To unlock the doors, push the rear side of the switch.
When you close the doors after you set the door locks,
the doors remain locked.NOTE
Make sure that you do not leave the key inside the
vehicle before locking the doors from the outside
using power door locking switches.
1
2
HS2015BB
Page 97 of 420
2-6
Keys and doors
Remote keyless entry system (if
equipped)
Two transmitters are provided for your vehicle.
The remote keyless entry system has the following
functions. �
Locking and unlocking the doors and rear gate with-
out a key � Sounding a panic alarm
� Arming and disarming the security system (if your
vehicle is equipped with an optional security system).
See the next section “Security system (if equipped)”
for detailed information.
This device complies with Part 15 of the FCC
Rules and with RSS-210 of Industry Canada. Oper-
ation is subject to the follow ing two conditions: (1)
This device may not cause harmful interference,
and (2) this device must accept any interference
received, including interference that may cause
undesired operation.
Changes or modifications not expressly approved
by the party responsible for compliance could
void the user
Page 98 of 420

2-7
Keys and doors
– CONTINUED –
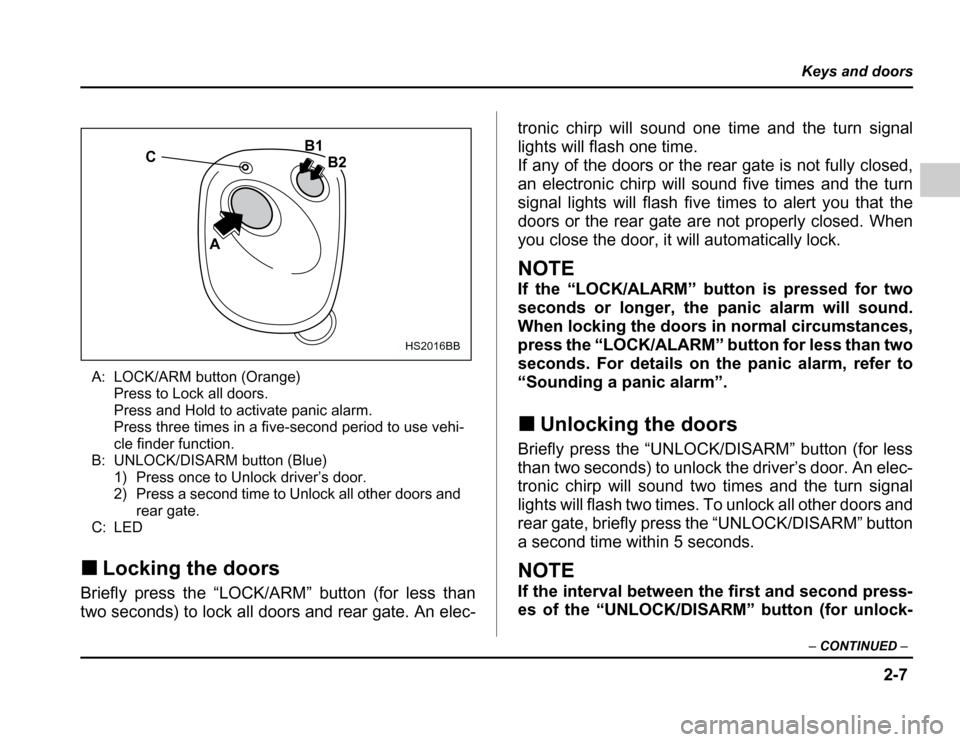
A: LOCK/ARM button (Orange)
Press to Lock all doors.
Press and Hold to activate panic alarm.
Press three times in a five-second period to use vehi-
cle finder function.
B: UNLOCK/DISARM button (Blue) 1) Press once to Unlock driver’s door.
2) Press a second time to Unlock all other doors and
rear gate.
C: LED
� Locking the doors
Briefly press the “LOCK/ARM” button (for less than
two seconds) to lock all doors and rear gate. An elec- tronic chirp will sound one time and the turn signal
lights will flash one time.
If any of the doors or the rear gate is not fully closed,
an electronic chirp will sound five times and the turn
signal lights will flash five times to alert you that the
doors or the rear gate are not properly closed. When
you close the door, it will automatically lock.
NOTE
If the “LOCK/ALARM” button is pressed for two
seconds or longer, the panic alarm will sound.
When locking the doors in normal circumstances,
press the “LOCK/ALARM” button for less than two
seconds. For details on the panic alarm, refer to
“Sounding a panic alarm”. �
Unlocking the doors
Briefly press the “UNLOCK/DISARM” button (for less
than two seconds) to unlock the driver’s door. An elec-
tronic chirp will sound two times and the turn signal
lights will flash two times. To unlock all other doors and
rear gate, briefly press the “UNLOCK/DISARM” button
a second time within 5 seconds.
NOTE
If the interval between the first and second press-
es of the “UNLOCK/DISARM” button (for unlock-
C
A B1
B2
HS2016BB
Page 99 of 420

2-8
Keys and doors
ing of all of the doors and the rear gate) is
extremely short, the system may not respond. �
Illuminated entry
The interior dome light and ignition switch light will illu-
minate when the “UNLOCK/DISARM” button is
pressed. These lights stay illuminated for approxi-
mately 30 seconds if any of the doors or the rear gate
is not opened.
Ifthe“LOCK/ARM”buttonispressedbefore30sec-
onds have elapsed, these lights will go out. Also, these
lights will go out if the key is inserted in the ignition
switch. The interior light must be set to the middle po-
sition in order for this function to operate.
� Vehicle finder function
Use this function to find your vehicle parked among
many vehicles in a large parking lot. Provided you are
within 30 feet (10 meters) of the vehicle, pressing the
“LOCK/ARM” button three times in a five-second peri-
od will cause your vehicle’s horn to sound one time
and its turn signal lights to flash three times. � Sounding a panic alarm
To activate the alarm, keep the “LOCK/ARM” button pressed for more than two seconds .The horn will sound and the turn signal lights will flash.
To deactivate it, press the “LOCK/ARM” button or
“UNLOCK/DISARM” button. Unless a button on the re-
mote is pressed, the alarm will be deactivated after ap-
proximately 30 seconds.
� Selecting audible signal operation
Using an electronic chirp, the system will give you an
audible signal when the doors lock and unlock. If de-
sired, you may turn the audible signal off.
To turn the audible signal off, unlock the door by
pressing the “UNLOCK/DISARM” button and then si-
multaneously depress “LOCK/ARM” and “UNLOCK/
DISARM” buttons for more than two seconds. An elec-
tronic chirp will sound two times and the turn signal
lights will flash two times to inform you that the audible
signal has been turned off.
To turn the audible signal on, unlock the door by
pressing the “UNLOCK/DISARM” button and then si-
multaneously depress “LOCK/ARM” and “UNLOCK/
DISARM” buttons for more than two seconds. An elec-
tronic chirp will sound one time and the turn signal
lights will flash one time to inform you that the audible
signal has been turned on.
Page 100 of 420
2-9
Keys and doors
– CONTINUED –
�Replacing the battery
When the transmitter battery begins to get weak,
transmitter range will begin to decrease and the LED
will not illuminate. Replace the battery as soon as pos-
sible.
To replace the battery:
0
1. Remove the two screws on the back of the trans-
mitter case by using a phillips screwdriver.
2. Separate the case.
3. Remove the old battery from the holder. 1) Positive (+) side facing up
4. Replace with a new battery (Type CR2032 or
equivalent) making sure to install the new battery with
the positive (+) side facing up.
5. Install the back half of the transmitter case.
6. Reinstall the two screws on the back of the trans-
mitter case.
After the battery is replaced, the transmitter must
be synchronized with the keyless entry system
Page 101 of 420

2-10
Keys and doors
�
Do not let dust, oil or water get on or in the
transmitter when replacing the battery. � Be careful not to damage the printed circuit
board in the transmitter when replacing the bat-
tery.
� Replacing lost transmitters
If you lose a transmitter or want to purchase additional
transmitters (up to four can be programmed), you
should re-program all of your transmitters for security
reasons. It is recommended that you have your dealer
program all of your transmitters into your system. � Programming the transmitters
The keyless entry system is equipped with a special
code learning feature that allows you to program new
transmitter codes into the system or to delete old
ones. The system can learn up to four unique transmit-
ter codes. The four transmitter codes may be the
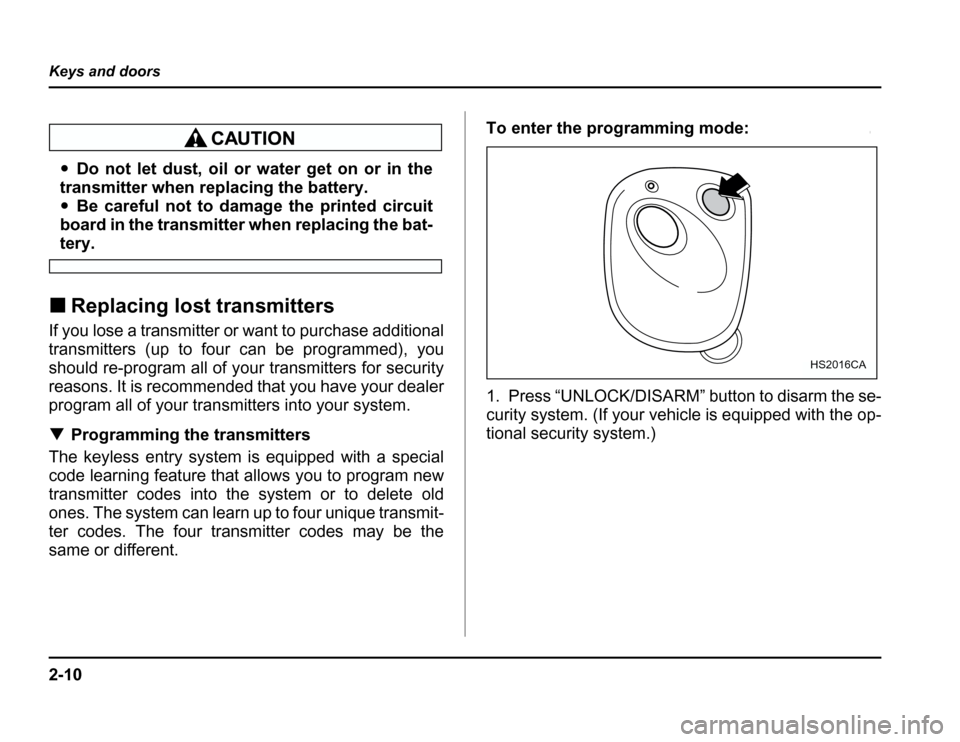
same or different. To enter the programming mode:
0
1. Press “UNLOCK/DISARM” button to disarm the se-
curity system. (If your vehicle is equipped with the op-
tional security system.)
HS2016CA
Page 102 of 420
2-11
Keys and doors
– CONTINUED –
2. Open the driver’s door and sit in the driver’s seat.
3. Close the driver’s door. 1) ON
2) LOCK
4. Place the ignition key into the ignition switch and
cycle the switch from LOCK to ON ten times within 15
seconds . Be sure to stop at the LOCK position. The
horn will sound once to indicate that you are in the
transmitter programming mode.
NOTE
You must finish the nex t step (opening the driver
Page 103 of 420
2-12
Keys and doors
To program the transmitters:0
1. Open the driver’s door.
2. Close the driver’s door.
1) Press any button.
3. Press and release any button on the transmitter
that you wish to program into the system. The horn will
sound two times to indicate that the transmitter has
been programmed.
Any additional transmitters can also be programmed
at this time. Repeat steps 1 through 3 for an additional transmitter.
To exit the programming mode:
1. After all of your transmitters are programmed, re-
move the key from the ignition switch.
The horn will sound three times to indicate that the
1
2
HS2019BC
1
HS2016DB