2003 SUBARU BAJA stop start
[x] Cancel search: stop startPage 201 of 400
Interior and exterior equipments6-25
–
CONTINUED –
NOTE Remember that the vehicle ’s center of gravity is altered with the
weight of the load on the roof, thus affecting the driving charac- teristics.
Drive carefully. Avoid rapid starts, hard cornering and abruptstops. Crosswind effects will be increased. � Removal and installation of the crossbars CAUTION
Do not carry cargo on the roof when the crossbars are removed. Luggage on the roof will be thrown forward or backward in sud-den stops or rapid accelerations, resulting in a dangerous roadhazard.
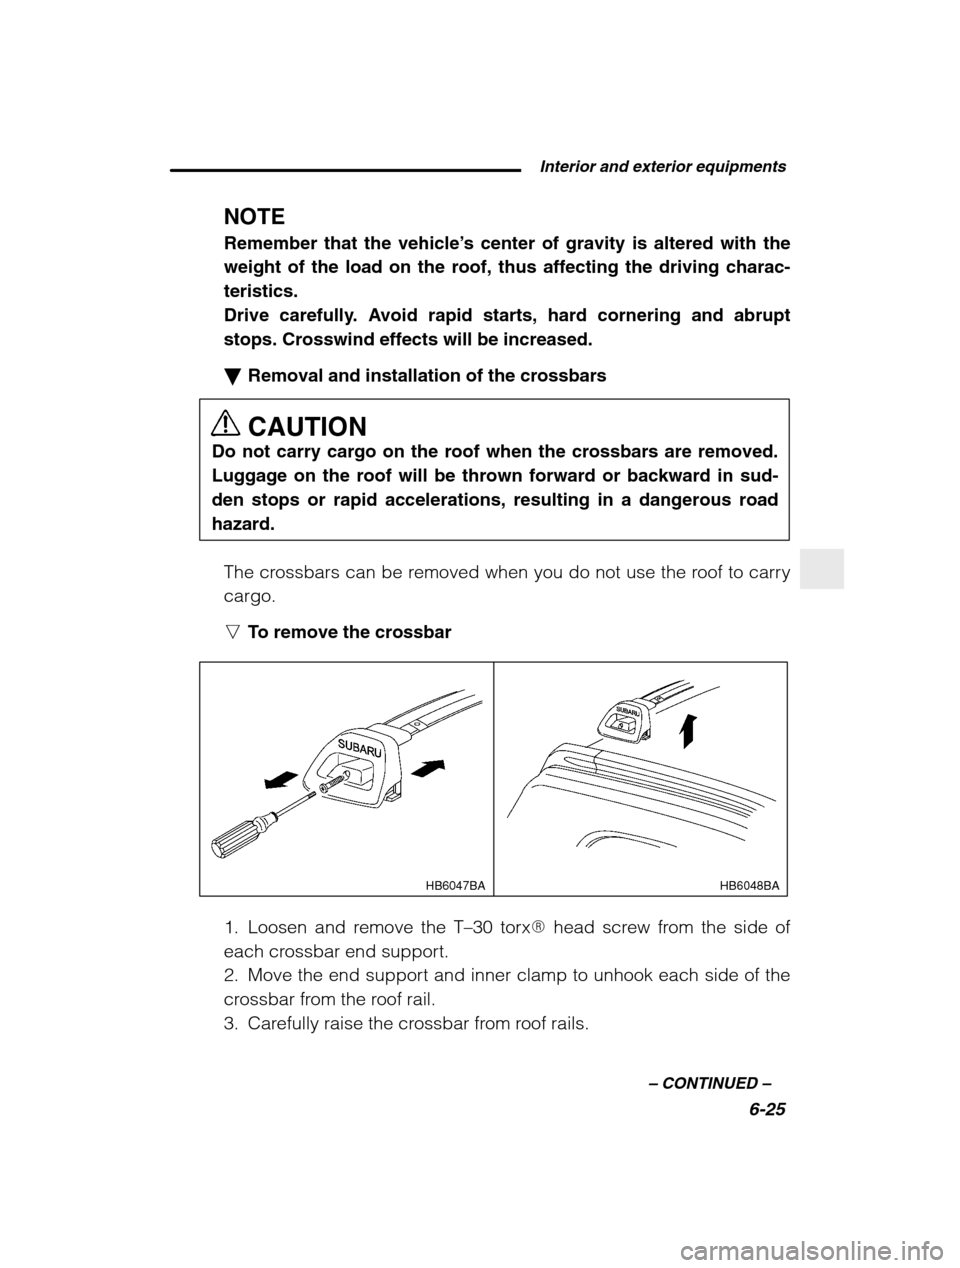
The crossbars can be removed when you do not use the roof to carrycargo. n To remove the crossbar
HB6047BAHB6048BA
1. Loosen and remove the T –30 torx � head screw from the side of
each crossbar end support.
2. Move the end support and inner clamp to unhook each side of the
crossbar from the roof rail.
3. Carefully raise the crossbar from roof rails.
Page 207 of 400

7
Starting and operating Fuel7-2
. . . . . . . . . . . . . . . . . . . . . . . . . . . . . . . . . . . . . . . . . . . . . . . . . . . . . . . . . . . . . . . . . . . . . . . . . . . .
Fuel requirements 7-2
. . . . . . . . . . . . . . . . . . . . . . . . . . . . . . . . . . . . . . . . . . . . . . . . . . . . . . .
Fuel filler door and cap 7-4
. . . . . . . . . . . . . . . . . . . . . . . . . . . . . . . . . . . . . . . . . . . . . . . . .
State emission testing (U.S. only) 7-6 . . . . . . . . . . . . . . . . . . . . . . . . . . . . . . . . . . .
Preparing to drive 7-8
. . . . . . . . . . . . . . . . . . . . . . . . . . . . . . . . . . . . . . . . . . . . . . . . . . . . . . . .
Starting the engine 7-9
. . . . . . . . . . . . . . . . . . . . . . . . . . . . . . . . . . . . . . . . . . . . . . . . . . . . . . .
Starting the engine for manual transmission vehicle 7-9 . . . . . . . . . . . . .
Starting the engine for automatic transmission vehicle 7-10 . . . . . . . . .
Starting the engine during cold weather below –4
°F (–20°C) 7-10 . . .
Starting a flooded engine 7-11
. . . . . . . . . . . . . . . . . . . . . . . . . . . . . . . . . . . . . . . . . . . . . .
Stopping the engine 7-11
. . . . . . . . . . . . . . . . . . . . . . . . . . . . . . . . . . . . . . . . . . . . . . . . . . . . .
Manual transmission 7-11
. . . . . . . . . . . . . . . . . . . . . . . . . . . . . . . . . . . . . . . . . . . . . . . . . . . .
Automatic transmission 7-14
. . . . . . . . . . . . . . . . . . . . . . . . . . . . . . . . . . . . . . . . . . . . . . . .
Selector lever 7-15
. . . . . . . . . . . . . . . . . . . . . . . . . . . . . . . . . . . . . . . . . . . . . . . . . . . . . . . . . . . . .
Shift lock release 7-20
. . . . . . . . . . . . . . . . . . . . . . . . . . . . . . . . . . . . . . . . . . . . . . . . . . . . . . . .
Rear viscous limited slip differential (LSD) (if equipped) 7-21 . . .
Power steering 7-21
. . . . . . . . . . . . . . . . . . . . . . . . . . . . . . . . . . . . . . . . . . . . . . . . . . . . . . . . . . . . .
Braking 7-22
. . . . . . . . . . . . . . . . . . . . . . . . . . . . . . . . . . . . . . . . . . . . . . . . . . . . . . . . . . . . . . . . . . . . . . .
Braking tips 7-22
. . . . . . . . . . . . . . . . . . . . . . . . . . . . . . . . . . . . . . . . . . . . . . . . . . . . . . . . . . . . . . .
Brake system 7-22
. . . . . . . . . . . . . . . . . . . . . . . . . . . . . . . . . . . . . . . . . . . . . . . . . . . . . . . . . . . . .
Disc brake pad wear warning indicators 7-23 . . . . . . . . . . . . . . . . . . . . . . . . . . . .
ABS (Anti-lock Brake System) 7-24 . . . . . . . . . . . . . . . . . . . . . . . . . . . . . . . . . . . . . . .
Parking your vehicle 7-26
. . . . . . . . . . . . . . . . . . . . . . . . . . . . . . . . . . . . . . . . . . . . . . . . . . . . .
Cruise control 7-28
. . . . . . . . . . . . . . . . . . . . . . . . . . . . . . . . . . . . . . . . . . . . . . . . . . . . . . . . . . . . . .
Page 211 of 400
Starting and operating7-5
–
CONTINUED –
tank and emission control system might be damaged.
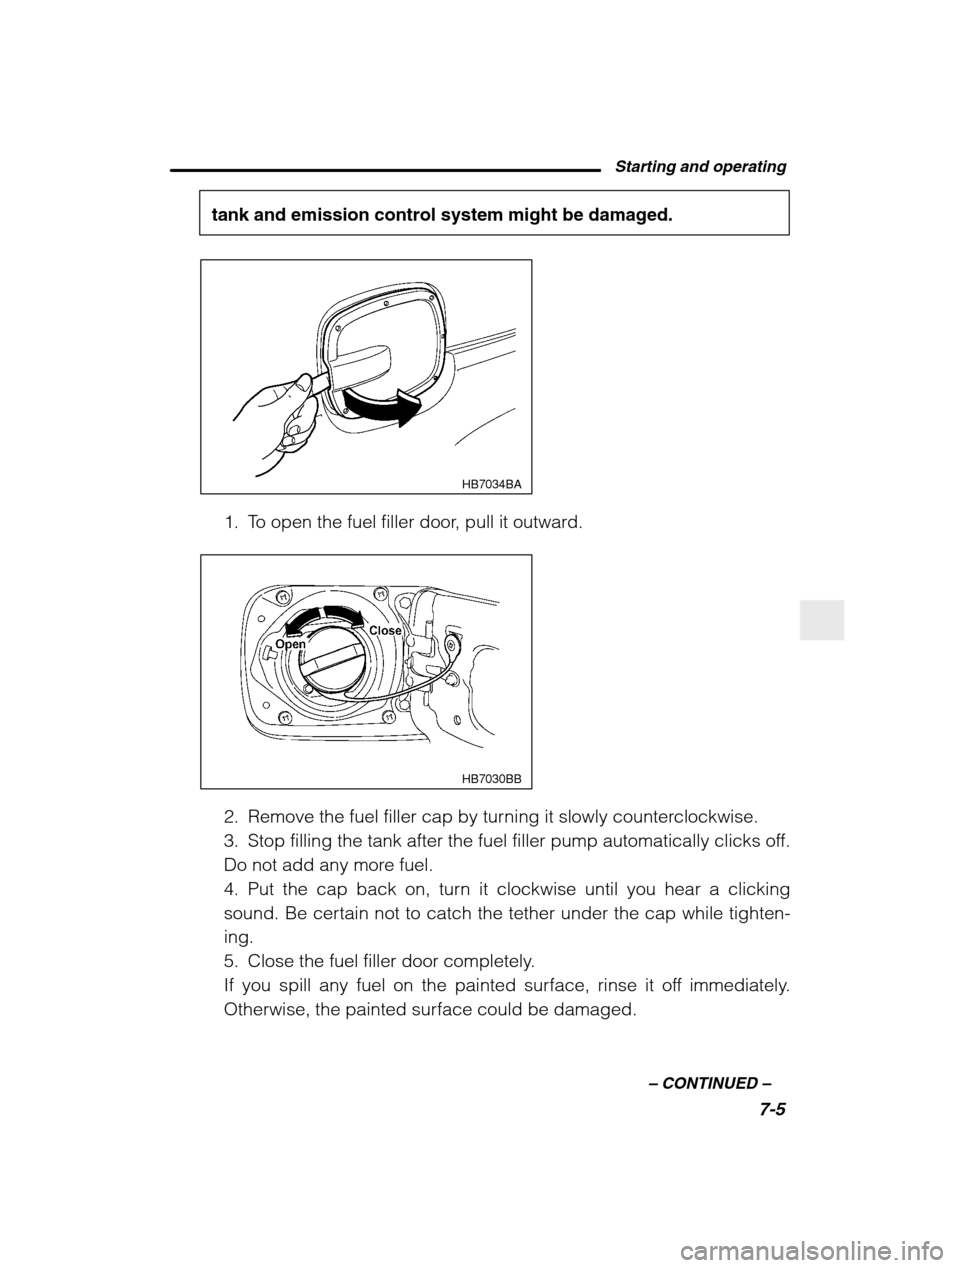
HB7034BA
1. To open the fuel filler door, pull it outward.
HB7030BB
2. Remove the fuel filler cap by turning it slowly counterclockwise.
3. Stop filling the tank after the fuel filler pump automatically clicks off.
Do not add any more fuel.
4. Put the cap back on, turn it clockwise until you hear a clicking
sound. Be certain not to catch the tether under the cap while tighten-ing.
5. Close the fuel filler door completely.
If you spill any fuel on the painted surface, rinse it off immediately.
Otherwise, the painted surface could be damaged.
Page 215 of 400
Starting and operating7-9
–
CONTINUED –
9. Check the gauges, indicator and warning lights after starting the en- gine. NOTE Engine oil, engine coolant, brake fluid, washer fluid and other fluid
levels should be checked daily, weekly or at fuel stops.
Starting the engine
CAUTION
Do not operate the starter motor continuously for more than ten
seconds. If the engine fails to start after operating the starter forfive to ten seconds, wait for ten seconds or more before tryingagain.
� Starting the engine for manual transmission vehicle
1. Apply the parking brake.
2. Turn off unnecessary lights and accessories.
3. Press the clutch pedal to the floor and shift the shift lever into neutral.
Hold the clutch pedal to the floor while starting the engine. The starter
motor will only operate when the clutch pedal is pressed fully to the floor.
4. Turn the ignition switch to the “ON” position and check the operation
of the warning and indicator lights. Refer to the “Warning and indicator
light” section (Chapter 3).
5. Turn the ignition switch to the “START” position without depressing
the accelerator pedal. Release the key immediately after the engine has
started.
If the engine does not start within ten seconds, wait a while and then turn the ignition switch to the “START” position again while depressing the ac-
celerator pedal half way down.
6. Confirm that all warning and indicator lights have gone off after the
engine has started. The fuel injection system automatically lowers the
idle speed as the engine warms up.
Page 217 of 400
Starting and operating7-11
–
CONTINUED –
�Starting a flooded engine
If the engine does not start, it may be flooded (excessive fuel in the en- gine).
In case of a flooded engine, turn the starter motor for five seconds with
the accelerator pedal fully depressed. Repeat this two or three times until
the engine starts. Release the ignition switch and accelerator pedal as
soon as the engine starts.
Stopping the engine
WARNING
Do not stop the engine when the vehicle is moving. This will
cause loss of power to the power steering and the brake booster,making steering and braking more difficult. It could also result in
accidental activation of the “LOCK” position on the ignition
switch, causing the steering wheel to lock.
The ignition switch should be turned off only when the engine is idling.
Manual transmission
WARNING
Do not drive the vehicle with the clutch disengaged (i.e., when the clutch pedal is depressed) or with the shift lever in the neutralposition. Engine braking has no effect in either of these condi-tions and the risk of an accident is consequently increased.
CAUTION
Shift into reverse ONLY when the vehicle has completelystopped. It may cause damage to the transmission to try shiftinginto reverse when the vehicle is moving.
Page 220 of 400
7-14
ing corners, or driving up steep hills, downshift to a lower gear before
the engine starts to labor.
On steep downgrades, downshift the transmission to 4th, 3rd or 2nd
gear as necessary; this helps to maintain a safe speed and to extendbrake pad life.
In this way, the engine provides a braking effect. Remember, if you
“ride” (over use) the brakes while descending a hill, they may over-
heat and not work properly.
The engine may, on rare occasions, knock when the vehicle rapidly
accelerates or rapidly pulls away from a standstill. This phenomenondoes not indicate a fault.
Automatic transmission
WARNING
Do not shift from the “P” or “N” position into the “D”, “3”, “2”,
“1” or “R” position while depressing the accelerator pedal. This
may cause the vehicle to jump forward or backward.
CAUTION
� Shift into the “P” or “R” position only after the vehicle is com-
pletely stopped. Shifting while the vehicle is moving may cause
damage to the transmission.� Do not race the engine for more than five seconds in any posi-
tion except the “N” or “P” position when the brake is set or the
tires are on blocks. This may cause the automatic transmissionfluid to overheat.� Avoid shifting from one of the forward driving positions into
the “R” position or vice versa until the vehicle has completely
stopped. Such shifting may cause damage to the transmission.
The automatic transmission is electronically controlled with 4-forward
Page 222 of 400
7-16
�P (Park)
This position is for parking the vehicle and starting the engine.
In this position, the transmission is mechanically locked to prevent the
vehicle from rolling freely.
When you park the vehicle, first set the parking brake fully, then shift
into the “P” position. Do not hold the vehicle with only the transmis-
sion. A shift interlock function is employed in the automatic transmission
system to ensure safe starting of the vehicle.
To shift the selector lever from the “P” to the any other position, you
have to depress the brake pedal fully when the ignition switch is in the
“ON” position. This prevents the vehicle from lurching when it is
started.
If the shift lever does not move from the “P” position with the brake
pedal depressed, refer to the “Shift lock release ” section in this Chap-
ter. � R (Reverse)
This position is for backing the vehicle.
To shift from “N” to “R” position, first stop the vehicle completely then
move the lever to “R” position.
� N (Neutral)
WARNING
Do not drive the vehicle with the selector lever in the “N” (neutral)
position. Engine braking has no effect in this condition and the risk of an accident is consequently increased.
This position is for restarting a stalled engine.
In this position the wheels and transmission are not locked. In this
position, the transmission is neutral; the vehicle will roll freely, even onthe slightest incline unless the parking brake or foot brake is on.
Avoid coasting with the transmission neutral.
Page 225 of 400
Starting and operating7-19
–
CONTINUED –
an accident increased.
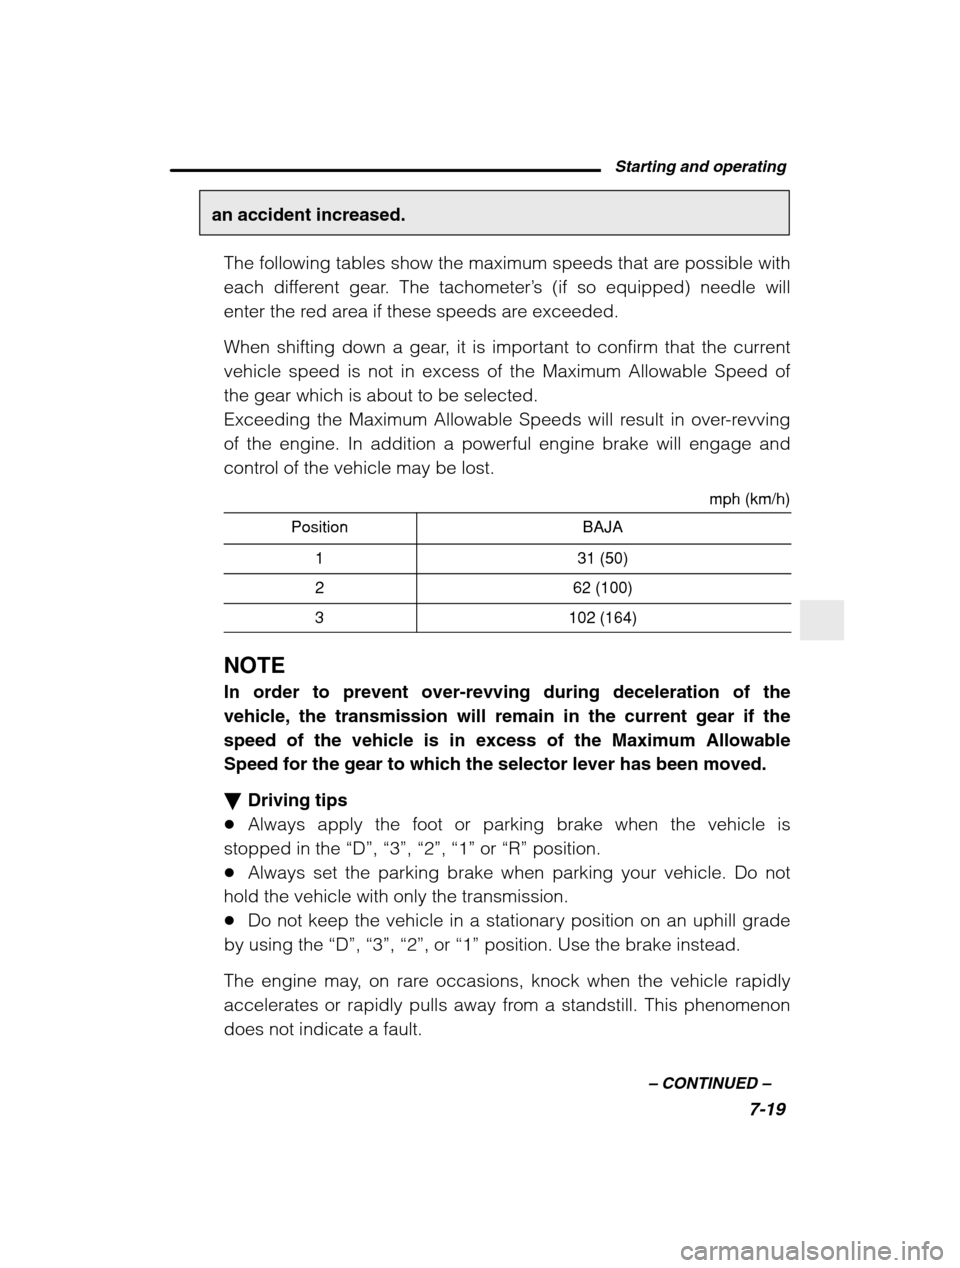
The following tables show the maximum speeds that are possible with
each different gear. The tachometer ’s (if so equipped) needle will
enter the red area if these speeds are exceeded.
When shifting down a gear, it is important to confirm that the current
vehicle speed is not in excess of the Maximum Allowable Speed ofthe gear which is about to be selected.
Exceeding the Maximum Allowable Speeds will result in over-revving
of the engine. In addition a powerful engine brake will engage and
control of the vehicle may be lost.
mph (km/h)
Position
BAJA
131 (50)
262 (100)
3102 (164)
NOTE In order to prevent over-revving during deceleration of the
vehicle, the transmission will remain in the current gear if thespeed of the vehicle is in excess of the Maximum AllowableSpeed for the gear to which the selector lever has been moved. � Driving tips
� Always apply the foot or parking brake when the vehicle is
stopped in the “D”, “3”, “2”, “1” or “R” position.
� Always set the parking brake when parking your vehicle. Do not
hold the vehicle with only the transmission. � Do not keep the vehicle in a stationary position on an uphill grade
by using the “D”, “3”, “2”, or “1” position. Use the brake instead.
The engine may, on rare occasions, knock when the vehicle rapidly
accelerates or rapidly pulls away from a standstill. This phenomenondoes not indicate a fault.