Page 245 of 1574

M161 ENGINE MECHANICAL 1B2-93
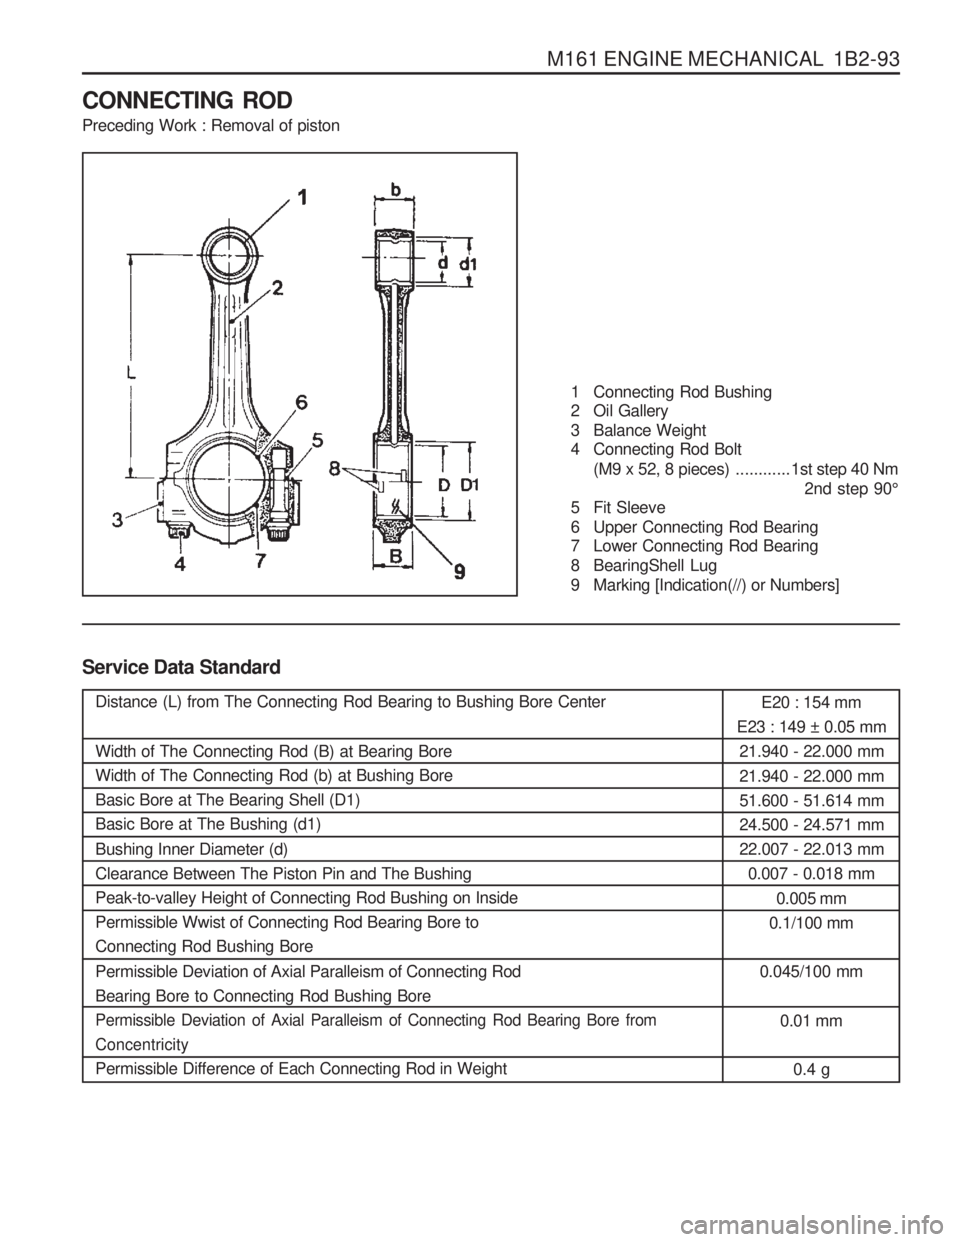
CONNECTING ROD Preceding Work : Removal of piston
1 Connecting Rod Bushing
2 Oil Gallery
3 Balance Weight
4 Connecting Rod Bolt(M9 x 52, 8 pieces) ............1st step 40 Nm
2nd step 90 °
5 Fit Sleeve
6 Upper Connecting Rod Bearing
7 Lower Connecting Rod Bearing
8 BearingShell Lug
9 Marking [Indication(//) or Numbers]
Service Data Standard
Distance (L) from The Connecting Rod Bearing to Bushing Bore Center Width of The Connecting Rod (B) at Bearing Bore Width of The Connecting Rod (b) at Bushing BoreBasic Bore at The Bearing Shell (D1)Basic Bore at The Bushing (d1) Bushing Inner Diameter (d) Clearance Between The Piston Pin and The BushingPeak-to-valley Height of Connecting Rod Bushing on InsidePermissible Wwist of Connecting Rod Bearing Bore toConnecting Rod Bushing Bore Permissible Deviation of Axial Paralleism of Connecting Rod Bearing Bore to Connecting Rod Bushing Bore
Permissible Deviation of Axial Paralleism of Connecting Rod Bearing Bore fromConcentricity
Permissible Difference of Each Connecting Rod in Weight E20 : 154 mm
E23 : 149 ± 0.05 mm 21.940 - 22.000 mm 21.940 - 22.000 mm 51.600 - 51.614 mm24.500 - 24.571 mm22.007 - 22.013 mm 0.007 - 0.018 mm
0.005 mm
0.1/100 mm
0.045/100 mm
0.01 mm0.4 g
Page 261 of 1574

M161 ENGINE MECHANICAL 1B2-109
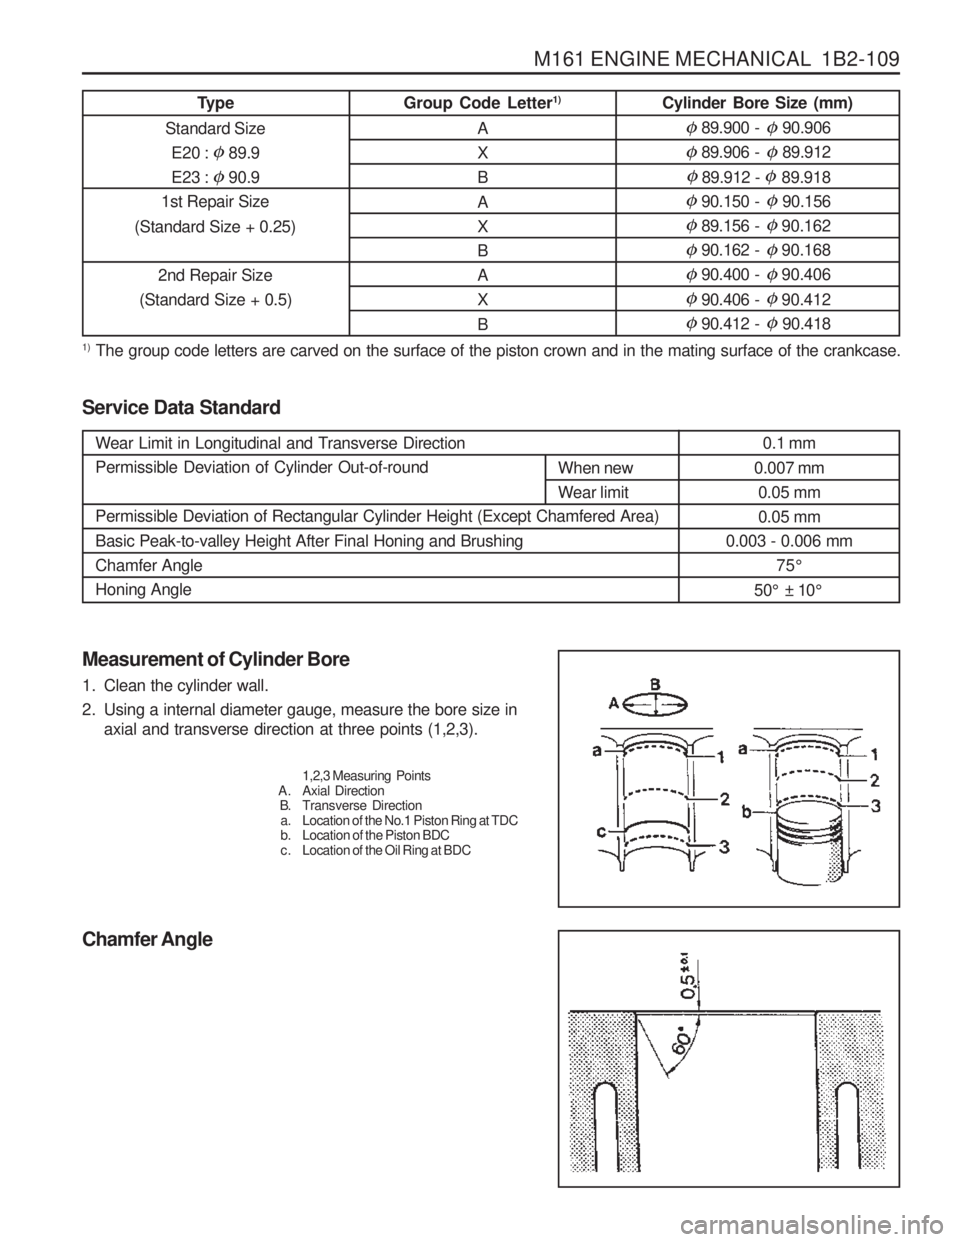
Service Data Standard Measurement of Cylinder Bore
1. Clean the cylinder wall.
2. Using a internal diameter gauge, measure the bore size inaxial and transverse direction at three points (1,2,3).
1,2,3 Measuring Points
A . Axial Direction B. Transverse Directiona. Location of the No.1 Piston Ring at TDC
b. Location of the Piston BDC
c . Location of the Oil Ring at BDC
Chamfer Angle
Wear Limit in Longitudinal and Transverse Direction Permissible Deviation of Cylinder Out-of-round Permissible Deviation of Rectangular Cylinder Height (Except Chamfered Area) Basic Peak-to-valley Height After Final Honing and Brushing Chamfer AngleHoning Angle When new
Wear limit
0.1 mm
0.007 mm 0.05 mm0.05 mm
0.003 - 0.006 mm
75°
50 ° ± 10 °
1)
The group code letters are carved on the surface of the piston crown and in the mating surface of the crankcase. Type
Standard Size E20 :
� 89.9
E23 :
� 90.9
1st Repair Size
(Standard Size + 0.25)
2nd Repair Size
(Standard Size + 0.5) Group Code Letter
1)
A XB A XBAX B Cylinder Bore Size (mm)
� 89.900 - � 90.906
� 89.906 - � 89.912
� 89.912 - � 89.918
� 90.150 - � 90.156
� 89.156 - �
90.162
� 90.162 - � 90.168
� 90.400 - � 90.406
� 90.406 - � 90.412
� 90.412 - � 90.418
Page 262 of 1574
1B2-110 M161 ENGINE MECHANICAL
CRANKCASE MATING SURFACE
Service Data StandardHeight of the Crankcase “H” (When New)
Minimum Height After Milling Flatness Permissible Deviation of Parallelism of the Upper to Lower Mating SurfacePeak-to-valley Height Crankcase Upper Mating SurfaceCrankcase Lower Mating SurfaceAxial Direction
Transverse Direction Crankcase Upper Mating SurfaceCrankcase Lower Mating Surface289.35 - 289.45mm
289.05mm0.03mm0.04mm0.1mm
0.05mm
0.012 - 0.009mm0.025 - 0.020mm
Page 264 of 1574
1B2-112 M161 ENGINE MECHANICAL
CYLINDER HEAD MATING SURFACE Preceding Work : Removal of valves
Service Data Standard Notice Do not exceed 0.4mm for the milling of the mating surface of crankcase and cylinder head.Overall Height of Cylinder HeadMinimum Height After MachiningFlatness Distance
‘T’
(Between Camshaft Bearing
and Valve Stem) Axial Direction
Transverse DirectionStandard Size Repair Size 135.9 - 136.0 mm
135.5 mm0.08 mm 0.0 mm
24.21 - 24.75 mm 22.21 - 22.75 mm 23.96 - 24.51 mm21.96 - 22.51 mm
Intake ExhaustIntakeExhaust
Page 265 of 1574
M161 ENGINE MECHANICAL 1B2-113
Measurement of Mating Surface
1. Measure the height (H) of the cylinder head (refer to Service
data standard ).
2. Check the mating surface of the cylinder head.
3. Mill the sharp edge of the combustion chamber.
4. Re-measure the height (H) of the cylinder head.
5. Seal the intake and exhaust valves.
6. Measure the dimension (T) between the camshaft bearing and the valve system (refer to Service data standard).
7. Mill the cylinder head valve seat (refer to Service data
standard ).
Universal Tool Surface Grinding Machine
Sceledum, Type RTYRoaro
Schio/Italy
Page 266 of 1574

SECTION 1B3
OM600 ENGINE MECHANICAL
CAUTION: Disconnect the negative battery cable before removing or installing any electrical unit or when a tool or equipment could easily come in contact with exposed electrical terminals. Disconnecting this cable will help prevent personal injury and damage to the vehicle. The ignition must also be in LOCK unless otherwisenoted.
Specifications . . . . . . . . . . . . . . . . . . . . . . . 1B3-2Fastener Tightening Specifications . . . . . . . . 1B3-2
Special Tools . . . . . . . . . . . . . . . . . . . . . . . 1B3-4 Special Tools Table . . . . . . . . . . . . . . . . . . . . 1B3-4
Maintenance and Repair . . . . . . . . . . . . . 1B3-12
On-Vehicle Service . . . . . . . . . . . . . . . . . . . . 1B3-12
Engine Assembly . . . . . . . . . . . . . . . . . . . . 1B3-12
Poly V-Belt . . . . . . . . . . . . . . . . . . . . . . . . . 1B3-21
Tensioning Device . . . . . . . . . . . . . . . . . . . . 1B3-23
Poly V-Belt Alignment & Inspection . . . . . . . 1B3-26
Prechamber . . . . . . . . . . . . . . . . . . . . . . . . 1B3-29
Milling of Prechamber Sealing Surface . . . . 1B3-32
TDC (TDC Sensor Bracket) Setting . . . . . . 1B3-35
Cylinder Head . . . . . . . . . . . . . . . . . . . . . . . 1B3-37
Timing Case Cover . . . . . . . . . . . . . . . . . . . 1B3-63
Crankshaft End Cover . . . . . . . . . . . . . . . . 1B3-71
Vibration Damper and Hub . . . . . . . . . . . . . 1B3-74
Crankshaft Front Radial Seal . . . . . . . . . . . 1B3-80
Crankshaft Ball Bearing . . . . . . . . . . . . . . . 1B3-82
Crankshaft . . . . . . . . . . . . . . . . . . . . . . . . . 1B3-83
Flywheel . . . . . . . . . . . . . . . . . . . . . . . . . . . 1B3-93
Machining of Flywheel . . . . . . . . . . . . . . . . 1B3-97
Flywheel Ring Gear . . . . . . . . . . . . . . . . . . 1B3-98
Hydraulic Valve Clearance Compensation
Element Check . . . . . . . . . . . . . . . . . . . . 1B3-101
Valve Tappets . . . . . . . . . . . . . . . . . . . . . . 1B3-103
Valve Spring Check . . . . . . . . . . . . . . . . . 1B3-105
Valve Springs (Cylinder Head Removed) . 1B3-106
TABLE OF CONTENTS
Valve Springs (Cylinder Head Installed) . . 1B3-109
Valve Stem Seals . . . . . . . . . . . . . . . . . . . 1B3-112
Check and Replacement of Valve Guides . . . . . . . . . . . . . . . . . . . . . 1B3-116
Valve Seat Rings . . . . . . . . . . . . . . . . . . . 1B3-122
Check and Machining of Valves . . . . . . . . 1B3-127
Machining of Valve Seat . . . . . . . . . . . . . . 1B3-132
Camshaft Timing Test . . . . . . . . . . . . . . . . 1B3-137
Camshaft . . . . . . . . . . . . . . . . . . . . . . . . . 1B3-139
Chain Tensioner . . . . . . . . . . . . . . . . . . . . 1B3-145
Timing Chain . . . . . . . . . . . . . . . . . . . . . . . 1B3-147
Tensioning Rail . . . . . . . . . . . . . . . . . . . . . 1B3-151
Cylinder Head Guide Rail . . . . . . . . . . . . . 1B3-152
Timing Case Cover Guide Rail . . . . . . . . . 1B3-156
Crankshaft Sprocket . . . . . . . . . . . . . . . . . 1B3-158
Piston . . . . . . . . . . . . . . . . . . . . . . . . . . . . 1B3-163
Oil Filter . . . . . . . . . . . . . . . . . . . . . . . . . . 1B3-169
Oil Pan . . . . . . . . . . . . . . . . . . . . . . . . . . . 1B3-171
Oil Spray Nozzle . . . . . . . . . . . . . . . . . . . . 1B3-174
Oil Pump . . . . . . . . . . . . . . . . . . . . . . . . . . 1B3-175
Unit Repair . . . . . . . . . . . . . . . . . . . . . . . 1B3-177
Cylinder Head Pressure Leakage Test . . . 1B3-177
Facing Cylinder Head Mating Surface . . . . 1B3-178
Replacement of Crankcase Core Plug . . . 1B3-180
Facing Crankcase Contacting Surface . . . 1B3-182
Oil Gallery Steel Ball . . . . . . . . . . . . . . . . . 1B3-183
Cylinder Bore Measurement . . . . . . . . . . . 1B3-187
Page 277 of 1574
1B3-12 OM600 ENGINE MECHANICALMAINTENANCE AND REPAIR
ON-VEHICLE SERVICE
ENGINE ASSEMBLY
Page 300 of 1574
OM600 ENGINE MECHANICAL 1B3-35
TDC (TDC SENSOR BRACKET) SETTING Preceding Work : Removal of No.1 cylinder prechamber
1 Measuring Device
2 Dial Gauge
3 Cylinder Head
4 Piston................................................ Set at TDC
Tools Service 001 589 32 21 00 Dial Gauge601 589 07 21 00 Deqth Gauge667 589 01 21 00 Fixing Device Notice
� The TDC sensor bra cket must be adjusted in case of
followings.
� When replacing the TDC sensor bracket.
� When replacing the crankshaft, the hub or the vibration
damper.
� When replacing or installing the timing case cover.
� After engine overhauling.
� If the cylinder head is removed, the measuring pin of the dial gauge can be positioned on the piston crown. This is done by placing the magnetic dial holder on the mating surface of the crankcase.