Page 218 of 263

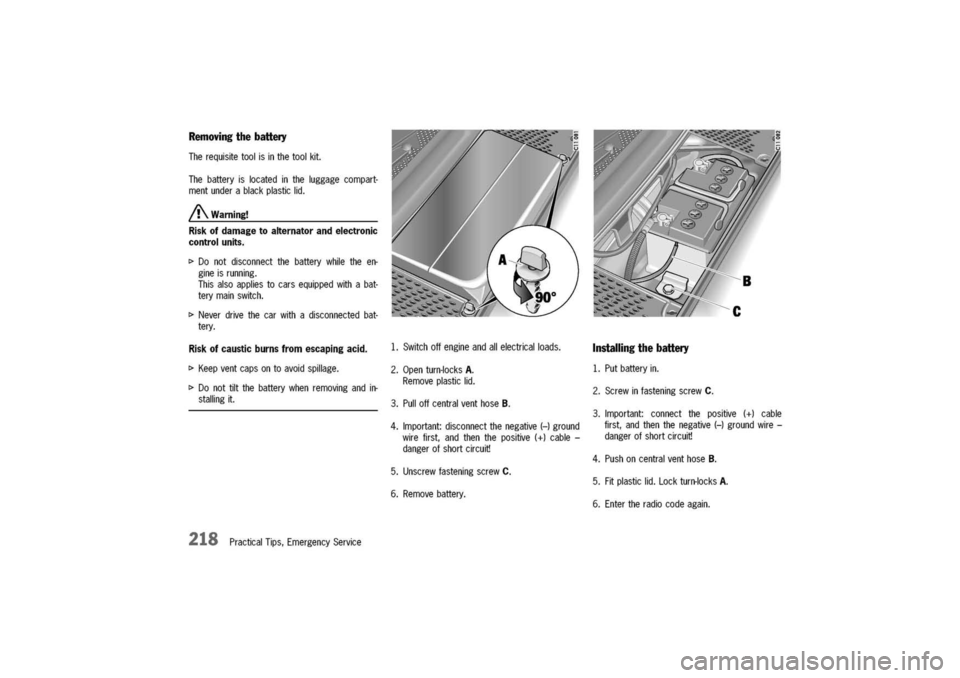
Removingthebattery
Therequisitetoolisinthetoolkit.
Thebatteryislocatedintheluggagecompart-
mentunderablackplasticlid.
/!\.Warning!
Riskofdamagetoalternatorandelectronic
controlunits.
I>Donotdisconnectthebatterywhiletheen-
gineisrunning.
Thisalsoappliestocarsequippedwithabat-
terymainswitch.
I>Neverdrivethecarwithadisconnectedbat-
tery.
Risk
of
caustic
burnsfromescapingacid.
I>Keepventcapsontoavoidspillage.
I>Donottiltthebatterywhenremovingandin-
stallingit.
218PracticalTips,EmergencyService
1.Switchoffengineandallelectricalloads.
2.Openturn-locksA.
Removeplasticlid.
3.PulloffcentralventhoseB.
4.Important:disconnectthenegative(-)ground
wirefirst,andthenthepositive(+)cable
-
dangerofshortcircuit!
5.UnscrewfasteningscrewC.
6.Removebattery.
Installingthebattery
1.Putbatteryin.
2.ScrewinfasteningscrewC.
3.Important:connectthepositive(+)cable
first,andthenthenegative(-)groundwire
-
dangerofshortcircuit!
4.PushoncentralventhoseB.
5.Fitplasticlid.Lockturn-locksA.
6.Entertheradiocodeagain.
Page 220 of 263

EmergencyStartingwithJumper
Cables
Ifthebatteryisdischarged,e.g.inwinteror
afterthecarhasbeenparkedforalongtime,
thebatteryofanothercarcanbeusedforstart-
ingwiththehelpofjumpercables.
Makesurethevoltageofbothbatteriesisthe
same.
Thecapacity(Amperehours,Ah)ofthebooster
batterymustnotbesubstantiallylessthanthat
ofthedischargedbattery.
Thedischargedbatterymustbecorrectlycon-
nectedtothevehicle'selectricalsystem.
Seethechapter"Battery"and"Emergencyun-
lockingoftheluggagecompartmentlidanden-
ginecompartmentlid".
Note
[>
Donottrytostartthecarbypushingortow-
ing.Damagetothecatalyticconvertersand
othercomponentsofthecarmayresult.
220PracticalTips,EmergencyService
/!\Warning!
Riskofdamageandseriouspersonalinjury
duetoshortcircuit.
[>
Useonlyjumpercablesofadequatediameter
cross-sectionandfittedwithcompletelyinsu-
latedalligatorclips.
[>
Followallwarningsandinstructionsofthe
jumpercablemanufacturer.
[>
Whenconnectingjumpercables,makesure
thattheycannotgetcaughtinanymoving
partsintheenginecompartment.
Thejumpercablesmustbelongenoughso
thatneithervehiclesnorcablestouchanother.
[>
Thevehiclesmustnotbeincontact,other-
wisecurrentmightflowassoonastheposi-
tiveterminalsareconnected.
[>
Thecableclampsmustnotbeallowedtocon-
tacteachotherwhenoneendofthejumper
cablesareconnectedtoabattery.
[>Ensurethattoolsorconductivejewellery
(rings,chains,watchstraps)donotcomeinto
contactwithlivepartsofthevehicle.
[>Improperhook-upofjumpercablescanruin
thealternator.
Dangerofcaustic
burns.
[>
Donotleanoverthebattery.
Dangerofgasexplosion.
[>Improperuseofboosterbatterytostartave-
hiclemaycauseanexplosion,resultingin
severepersonalinjuries.
[>Keepsourcesofignitionawayfromthebat-
tery,e.g.openflame,burningcigarettesor
sparkingduetocablecontactorwelding
work.
[>
Adischargedbatterycanfreezeevenat
-lOOCj14°F.
Beforeconnectingjumpercables,afrozen
batterymustbethawedout.
Page 221 of 263
Connectjumpercablesinthefollowingse-
quence:
1.Checkelectrolytelevelofeach
cell.If
necessary,fillwithdistilledwatertojust
aboveplates.
2.Onavehiclewithadischargedbattery:turn
offallconsumersandaccessories,movethe
gearshiftleverintotheneutralpositionand
settheparkingbrake.
3.Openthecapofthepositiveterminalfor
jumpstarting
(+).
+=
Positiveterminalforjumpstarting
-=
Groundingpointforjumpstarting
4.Attach
thepositivecable
firsttothepositive
terminalforjumpstarting(+).
thentothepositiveterminalofthebooster
battery.
5.Connect
thenegativecable
firsttothene-
gativeterminaloftheboosterbattery,
thentothegroundingpointforjumpstarting
H.
6.Runtheengineoftheboostercaratahigher
speed.
7.Starttheengine.
Anattemptedstartusingjumpercables
shouldnotlastmorethan
15
seconds.Then
allowawaitingperiodofatleastoneminute.
8.Withtheenginerunning,disconnectbothjum-
percablesinreverseorder.
Closethelidofthejumpstartbox.
PracticalTips,EmergencyService
221
Page 223 of 263
BulbChartSocketType,rating
Low
beam
PX26DH7,55W
Bi-XenonlowbeamPhilips,D2S35W
HighbeamPX26DH9,65W
Additionalhighbeam
(withBi-Xenonheadlights)PGJ19-2Hll,55W
FoglightsPK22SH3,55W
Rearfoglight,
ReversinglightBA15SP21W
Taillight,
brake
lightBAY15DP21/5W
Raised
brakelightW2.1x9.5DW3W
Turnsignal
lightBAU15SPY21W
ParkinglightfrontBAX9SH6W
Sidemarker
lightW2.1x9.5DWY5W
Doorguard/kerblightW2.1x9.5DW5W
LicenseplatelightSV8.5C5W
LuggagecompartmenVengine
compartment
light,
interiorlightSV8.5
KlOW
ReadinglightW2.1x9.5D6WXenon
PracticalTips,EmergencyService
223
Page 231 of 263
Tai/lightleft
TailLight
911Carrera,Carrera4,Targa
Changingbulb
1.Openlidofenginecompartment.
2.UnscrewboltAandpulltaillightback(arrow)
andout.
A-Tai/light,brakelight
B-Reversinglight
C-Turnsigna/light
D-Rearfoglight
E-Sidemarkerlight
3.Turnbulbholdercounterclockwiseand
removefromtaillight.
4.Replacedefectivebulb(bayonetmount).
5.Insertbulbholderandturnclockwise.
6.Inserttaillightinthefender.
Ensurethatlocatinglug(arrow)iscorrectly
positioned.
ScrewinboltA.
Checkoperationofthelight.
PracticalTips,EmergencyService
231
Page 232 of 263
Taillight,left
TailLight
CalTera
45
Changingbulb
1.Openenginecompartmentlid.
2.UnscrewfasteningscrewsAwithascrew-
driverandpulltaillightbackandout.
232PracticalTips,EmergencyService
A-Reversinglight
B-Turnsigna/light
C-Taillight;brakelight
D-Taillight
E-Rearfoglight
F-Sidemarkerlight
3.Turnbulbholderinthetaillighthousing
counter-clockwiseandpullitout.
4.Turndefectivebulbcounter-clockwise(bay-
onetlock)andreplaceit.
5.Insertbulbholderandturnitclockwise.
6.Inserttaillightinthewing.
Ensurethatlocatinglug(arrow)iscorrectly
positioned.
7.Slightlyscrewinbothfasteningscrewsofthe
taillight.
Alignthetaillightwiththevehiclecontours
andtightenthescrews.
8.Checkoperationofthelight.
Page 233 of 263
LicensePlateLights
Changingbulb
1.UndobothscrewsAandremovelight.
2.Pushrubbercoveringback,removedefective
bulbfrombetweenthecontactspringsand
replace.
3.Reassembleinreverseorder.
Checkoperationofthelight.
Luggage
CompartmentLight,
EngineCompartmentLight,
FootwellLights
Changingbulb
1.Withascrewdriver(arrow),carefullypress
lightoutofthecutoutinthelining.
2.Removedefectivebulbfrombetweenthe
contactspringsandreplace.
3.Insertthelightintothecutoutfirstfromone
sidethenfromtheother.Checkoperation.
DoorGuard/KerbLight
Changingbulb
1.Withascrewdriver(arrow),carefullypushout
thelight.
2.Pullbulbholderoutoflighthousing.
Removedefectivebulbandreplace.
3.Installbulbholderandinsertlight.
PracticalTips,EmergencyService
233
Page 242 of 263
VehicleIdentification
Whenorderingsparepartsormakingin-
quiries,pleasealwaysquotethevehicle
identificationnumber.
Vehicleidentificationlabel
Vehicleidentificationlabelisattachedtothe
innersideoftheluggagecompartmenthood
belowthehoodlock.Itcontainsallimportant
dataaboutyourcar.
242VehicleIdentification,TechnicalData
Thislabelcontainsthefollowinginformation:
1.VehicleIdentificationNo.
2.Typejfypedescription
3.Enginecodejfransmissioncode
4.PaintNo.jlnterior
5.Optionalequipment
AduplicateofthislabelisinyourMaintenance
Booklet.
Note
Thisdatabankcannotbere-orderedifitislost
ordamaged.
Vehicleidentificationnumber
InaccordancewithFederalSafetyRegulations,
thevehicleidentificationnumberofyourcaris
locatedatthebottomleftofthewindshield
frameandcanbeseenfromtheoutside.
Thevehicleidentificationnumberisalsointhe
luggagecompartmentontherightnexttothe
battery(arrow).