Page 76 of 381
 gas can come into your vehicle. You cant
see or smell CO. It can cause unco")
2-12
Liftgate/Liftglass
CAUTION:
It can be dangerous to drive with the
liftgate/liftglass open because carbon monoxide
(CO) gas can come into your vehicle. You can't
see or smell CO. It can cause unconsciousness
and even death.
If you must drive with the liftgate/liftglass open
or if electrical wiring or other cable connections
must pass through the seal between the body and
the liftgate/liftglass:
�Make sure all other windows are shut.
�Turn the fan on your heating or cooling
system to its highest speed and select the
control setting that will force outside air
into your vehicle. See ªComfort Controlsº
in the Index.
�If you have air outlets on or under the
instrument panel, open them all the way.
See ªEngine Exhaustº in the Index.
Liftgate/Liftglass Release
To open the liftgate using your key do the following:
�To unlock the liftgate, insert the key into the keyhole
and turn it counterclockwise.
When closing the liftgate, you can use the handle to
pull it down.
�To lock the liftgate, turn the key clockwise to the
first position.
Page 77 of 381
2-13
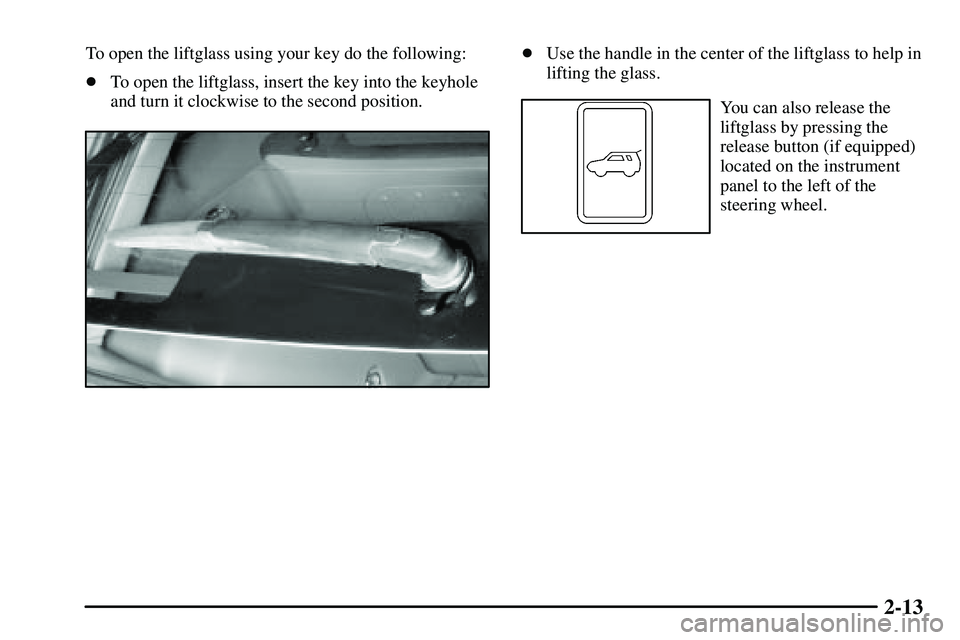
To open the liftglass using your key do the following:
�To open the liftglass, insert the key into the keyhole
and turn it clockwise to the second position.�Use the handle in the center of the liftglass to help in
lifting the glass.
You can also release the
liftglass by pressing the
release button (if equipped)
located on the instrument
panel to the left of the
steering wheel.
Page 116 of 381

2-52
To adjust the position of the crossrails, do the following:
1. Turn the eight knobs counterclockwise to loosen the
crossrails.
2. Slide the crossrails to the desired position for loading
the luggage.
3. After adjusting the crossrails, be sure to tighten all
the knobs by turning the knobs clockwise.
NOTICE:
Loading cargo that weighs more than 75 lbs.
(34 kg) on the luggage carrier may damage your
vehicle. When you carry large things, never let
them hang over the rear or the sides of your
vehicle. When loading cargo, be sure it rests on
the crossrails and does not scratch or damage
the vehicle.
Put the cargo against the side rails and fasten it
securely to the luggage carrier. Put the main
weight as far forward as you can and move the
rear crossrail forward as far as possible to keep
the load from shifting.
Don't exceed the maximum vehicle capacity when
loading your vehicle. For more information on vehicle
capacity and loading, see ªLoading Your Vehicleº in
the Index.
To prevent damage or loss of cargo as you're driving,
check now and then to make sure the luggage carrier and
cargo are still securely fastened.
Page 143 of 381

3-3
Temperature Knob
Turn the knob to change the temperature of the air
flowing from the system. Turn the knob clockwise to
increase the temperature. Turn the knob
counterclockwise to decrease the temperature.
(Recirculate): Press this button, located in the
center of the instrument panel to the left of the audio
system, to recirculate inside air through the comfort
control system. An indicator light in the button will
come on to let you know the feature is in use. Press the
button again to turn off recirculate and to circulate
outside air through the system. The indicator light will
go off. Recirculate is automatically turned off when the
climate control system mode knob is turned to defog or
defrost or is between modes.
Air Conditioning
A/C (Air Conditioning): Press the A/C button, located
in the center of the instrument panel to the left of the
audio system, to change your comfort control system to
air conditioning. An indicator light will come on when
the air conditioning is on. Air conditioning can also
control the humidity in your vehicle. The incoming air is
cooled and dehumidified.
The air conditioner works best if you keep your
windows closed. On very hot days, open the windows
just long enough for the hot air to escape.
For normal cooling, press the A/C button and make sure
to use outside air. For faster cooling, also press the
recirculate button. Then move the mode knob to vent
and turn the temperature control knob counterclockwise.
Turn the fan knob to HI.
On days when it is raining or the humidity is high,
follow these dehumidifying steps instead of the cooling
directions. It will help clean windows that are cloudy
with moisture.
1. Press the A/C button.
2. Turn the mode knob to defrost. Recirculate will be off.
3. Turn the fan knob to HI and adjust the temperature
knob to a comfortable setting.
Page 144 of 381

3-4 Heating
For the quickest results, press the recirculate button
and move the mode knob to the floor setting. Turn the
temperature knob clockwise for warmer air and turn the
fan knob toward HI. You should switch to outside air
once in a while to avoid stale air and fogging windows.
To prevent cold air from blowing in and to increase
air flow to the floor area, you may close the outer
instrument panel vents.
You may want to use bi
-level mode on cool but sunny
days. This setting directs outside air toward your body
and warmer air toward your feet. Using outside air, turn
the mode knob to bi
-level. Turn the temperature knob
counterclockwise and the fan knob toward HI.
Defogging and Defrosting
When the mode knob is turned to either the defog or
defrost mode, outside air will be selected automatically.
Outside air will clear the windshield more quickly.
Turn the temperature knob clockwise and the fan knob
toward HI. When the windshield is clear, turn down
the fan speed.
If you wish to return to the recirculate mode, the
recirculate button can be set when the mode knob is
set on full defog or full defrost. The indicator light will
come on.
�Recirculate cannot be set partway between floor and
defog, and
�recirculate cannot be set partway between defog
and defrost.
When the mode knob is turned to another position,
outside air will be selected automatically. To defog the
windshield and side windows, use outside air and turn
the mode knob to defog.
Page 179 of 381

4-11
Try to adjust your speed so you can ªdriveº through the
curve. Maintain a reasonable, steady speed. Wait to
accelerate until you are out of the curve, and then
accelerate gently into the straightaway.
Steering in Emergencies
There are times when steering can be more effective
than braking. For example, you come over a hill and
find a truck stopped in your lane, or a car suddenly pulls
out from nowhere, or a child darts out from between
parked cars and stops right in front of you. You can
avoid these problems by braking
-- if you can stop
in time. But sometimes you can't; there isn't room.
That's the time for evasive action
-- steering around
the problem.
Your vehicle can perform very well in emergencies like
these. First apply your brakes
-- but, unless you have
anti
-lock, not enough to lock your wheels. See ªBraking
in Emergenciesº earlier in this section. It is better to
remove as much speed as you can from a possible
collision. Then steer around the problem, to the left or
right depending on the space available.
An emergency like this requires close attention and a
quick decision. If you are holding the steering wheel at
the recommended 9 and 3 o'clock positions, you can
turn it a full 180 degrees very quickly without removing
either hand. But you have to act fast, steer quickly, and
just as quickly straighten the wheel once you have
avoided the object.
The fact that such emergency situations are always
possible is a good reason to practice defensive driving at
all times and wear safety belts properly.
Page 227 of 381
5-16 How to Add Coolant to the Radiator
1. You can remove the radiator pressure cap when the
cooling system, including the radiator pressure cap and
upper radiator hose, is no longer hot. Turn the pressure
cap slowly counterclockwise until it first stops. (Don't
press down while turning the pressure cap.)
If you hear a hiss, wait for that to stop. A hiss means
there is still some pressure left.
2. Then keep turning the pressure cap, but now push
down as you turn it. Remove the pressure cap.
3. Fill the radiator with the proper coolant mixture, up
to the base of the filler neck. See ªEngine Coolantº
in the Index for more information about the proper
coolant mixture.
Page 233 of 381
5-22
The tools you'll be using include the jack (A), jack
handle (B) and wheel wrench (C).
6. Attach the jack handle to the jack.
7. Turn the jack handle clockwise to raise the lift head.
Removing the Flat Tire and Installing the
Spare Tire
1. Using the wheel wrench, loosen all the wheel nuts.
Don't remove them yet.

, jack
handle (B) and wheel wrench (C).
6. Attach the jack handle to the jack.
7. Turn the jack handle clockwise to raise the lift head.
Removing the")