2003 PONTIAC GRAND PRIX change time
[x] Cancel search: change timePage 223 of 378
Turn Signals When Towing a Trailer
When you tow a trailer, your vehicle may need a
different turn signal flasher and/or extra wiring. Check
with your dealer. The arrows on your instrument
panel will flash whenever you signal a turn or lane
change. Properly hooked up, the trailer lamps will also
flash, telling other drivers you’re about to turn,
change lanes or stop.
When towing a trailer, the arrows on your instrument
panel will flash for turns even
if the bulbs on the trailer
are burned out. Thus, you may think drivers behind
you are seeing your signal when they are not. It’s
important to check occasionally to be sure the trailer
bulbs are still working.
Your vehicle has bulb warning lights. When you plug a
trailer lighting system into your vehicle’s lighting
system, its bulb warning lights may not let you know
if
one of your lamps goes out. So, when you have a trailer
lighting system plugged in, be sure to check your
vehicle and trailer lamps from time to time to be sure
they’re all working. Once you disconnect the trailer
lamps, the bulb warning lights again can tell you
if one
of your vehicle lamps is out.
Driving On Grades
Reduce speed and shift to a lower gear before you start
down a long or steep downgrade.
If you don’t shift
down, you might have to use your brakes
so much that
they would get hot and no longer work well.
On a long uphill grade, shift down and reduce your
speed to around
45 mph (70 km/h) to reduce the
possibility of engine and transaxle overheating.
If you have overdrive, you may have to drive in
THIRD (3) instead of AUTOMATIC OVERDRIVE (D).
Parking on Hills
1 -J really should not ,,rk yo^, wG,kle, with a
trailer attached, on a hill.
If something goes
wrong, your rig could start to move. People
can be injured, and both your vehicle and the
trailer can be damaged.
4-42
Page 248 of 378
When to Change Engine Oil (GM Oil
Life SystemTM)
Your vehicle has a computer system that lets you know
when to change the engine
oil and filter. This is
based on engine revolutions and engine temperature,
and not on mileage. Based on driving conditions,
the mileage at which an oil change will be indicated
can vary considerably. For the oil life system to
work properly, you must reset the system every time
the oil is changed.
When the system has calculated that oil life has been
diminished, it will indicate that an oil change is
necessary.
A CHANGE OIL SOON light will come on.
Change your
oil as soon as possible within the next two
times you stop for fuel.
It is possible that, if you are
driving under the best conditions, the oil life system may
not indicate that an oil change is necessary for over a
year. However, your engine oil and filter must be
changed at least once a year and at this time the system
must be reset. It is also important to check your oil
regularly and keep it at the proper level.
If the system is ever reset accidentally, you must
change your oil at
3,000 miles (5 000 km) since your
last oil change. Remember
to reset the oil life system
whenever the oil is changed.
How to Reset the GM Oil Life System
The GM Oil Life SystemTM calculates when to change
your engine oil and filter based on vehicle use. Anytime
your oil is changed, reset the system
so it can calculate
when the next oil change is required.
If a situation occurs
where you change your oil prior to a CHANGE
OIL SOON
light being turned on, reset the system.
To reset the GM Oil Life SystemTM after the oil has
been changed, use one of the following two procedures:
Using the Driver Information Center (DIC)
1.
2.
3.
With the ignition key in RUN but the engine off, fully
push and release the accelerator pedal slowly three
times within five seconds.
If the CHANGE OIL SOON light flashes, the system
is resetting.
Turn the key to OFF after the light stops flashing,
then start the vehicle.
If the CHANGE OIL SOON light comes back on, the
engine oil life monitor has not reset. Repeat the
procedure.
Using the Trip Computer (If Equipped)
1. Press the MODE button until the light appears lit
2. Press and hold the RESET button for three seconds.
next to
OIL LIFE.
The
oil life percentage should change to 100%.
5-23
Page 252 of 378
Automatic Transaxle Fluid
When to Check and Change
A good time to check your automatic transaxle fluid
level is when the engine oil is changed.
Change both the fluid and filter every 50,000 miles
(83
000 km) if the vehicle is mainly driven under one or
more of these conditions:
In heavy city traffic where the outside temperature
0 In hilly or mountainous terrain.
0 When doing frequent trailer towing.
0 Uses such as found in taxi, police or delivery service.
regularly reaches
90°F (32°C)
or higher.
If you do not use your vehicle under any of these
conditions, change the fluid and filter at
100,000 miles (166 000 km).
See Part
A: Scheduled Maintenance Services on
page
6-4.
How to Cheek
Because this operation can be a little difficult, you may
choose to have this done at the dealership service
department.
If you do it yourself, be sure to follow all the instructions
here, or you could get a false reading on the dipstick.
Nofice: Too much or too little fluid can damage
your transaxle.
Too much can mean that some of the
fluid could come out and fall on hot engine or
exhaust system parts, starting a fire.
Too little fluid
could cause the transaxle to overheat. Be sure
to get an accurate reading
if you check your
transaxle fluid.
Wait at least 30 minutes before checking the transaxle
fluid level
if you have been driving:
When outside temperatures are above
90°F (32°C).
At high speed for quite a while.
In heavy traffic
- especially in hot weather.
While pulling a trailer.
5-27
Page 277 of 378
Replacing Brake System Parts
The braking system on a vehicle is complex. Its many
parts have to be of top quality and work well together
if
the vehicle is to have really good braking. Your
vehicle was designed and tested with top-quality
GM
brake parts. When you replace parts of your braking
system
- for example, when your brake linings
wear down and you need new ones put in
- be sure
you get new approved
GM replacement parts. If
you don’t, your brakes may no longer work properly.
For example,
if someone puts in brake linings that are
wrong for your vehicle, the balance between your
front and rear brakes can change
- for the worse.
The braking performance you’ve come to expect can
change in many other ways
if someone puts in the
wrong replacement brake parts.
Battery
Your new vehicle comes with a maintenance free
ACDelco@ battery. When it’s time for a new battery, get
one that has the replacement number shown on the
original battery’s label. We recommend an ACDelco@
battery. See Engine Compartment Overview on
page
5- 12 for battery location.
Warning: Battery posts, terminals and related
accessories contain lead and lead compounds,
chemicals known to the State of California to cause
cancer and reproductive harm. Wash hands after
handling.
If your battery has a very low charge or is dead, you
may not be able to remove the ignition key from
the ignition switch or shift out of Park (P). Refer to
Shifting Out of Park
(P) on page 2-30.
5-52
Page 295 of 378
Don’t include the compact spare tire in your tire rotation.
After the tires have been rotated, adjust the front and
rear inflation pressures as shown on the Tire-Loading
Information label. Make certain that all wheel nuts
are properly tightened. See “Wheel Nut Torque” under
Capacities and Snncifjcations
on page 5- 102.
Rust or dirt on a wheel, or on ,,le parts to
which it is fastened, can make wheel nuts
become loose after a time. The wheel could
come
off and cause an accident. When you
change a wheel, remove any rust or dirt from
places where the wheel attaches to the vehicle.
In an emergency, you can use a cloth or a
paper towel to do this; but be sure to use a
scraper or wire brush later, if you need to, to
get all the rust or
dirt off. See “Changing a Flat
Tire”
in the Index.
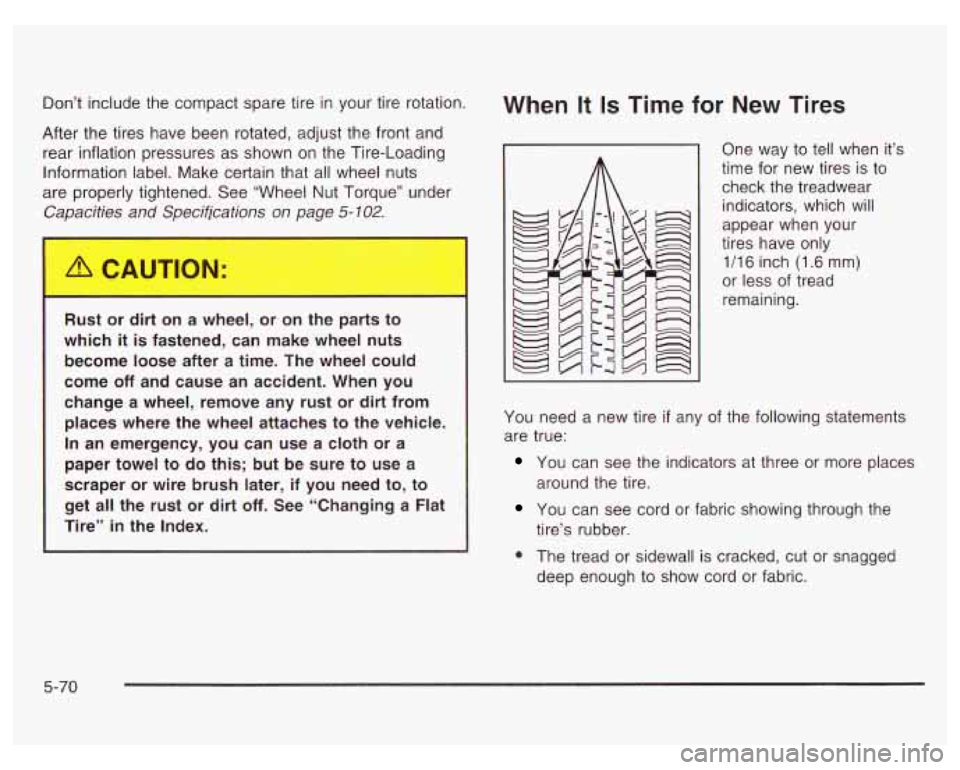
When It Is Time for New Tires
One way to tell when it’s
time for new tires is to
check the treadwear
indicators, which will
appear when your
tires have only
1/16 inch (1.6 mm)
or less of tread
remaining.
You need a new tire
if any of the following statements
are true:
You can see the indicators at three or more places
around the tire.
You can see cord or fabric showing through the
0 The tread or sidewall is cracked, cut or snagged
tire’s rubber.
deep enough to show cord or fabric.
5-70
Page 307 of 378
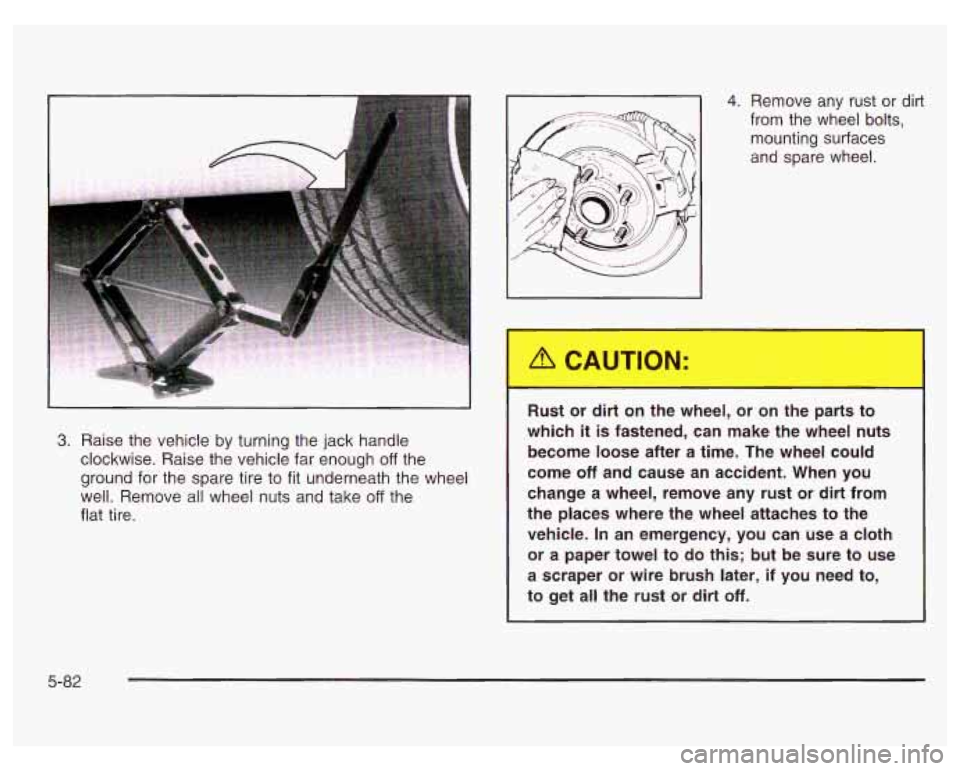
4. Remove any rust or dirt
from the wheel bolts,
mounting surfaces
and spare wheel.
3. Raise the vehicle by turning the jack handle
clockwise. Raise the vehicle far enough
off the
ground for the spare tire to fit underneath the wheel
well. Remove all wheel nuts and take
off the
flat tire.
I
Rust or dirt or. -.le 1 eel, or o parts to
which
it is fastened, can make the wheel nuts
become loose after a time. The wheel could
come
off and cause an accident. When you
change
a wheel, remove any rust or dirt from
the places where the wheel attaches to the
vehicle. In an emergency, you can use a cloth
or a paper towel to do this; but be sure to use
a scraper or wire brush later, if you need to,
to get all the rust
or dirt off.
5-82
Page 333 of 378

Part A: Scheduled Maintenance
Services
This part contains engine oil scheduled maintenance
which explains the engine oil life system and how
it indicates when to change the engine oil and filter.
Also, listed are scheduled maintenance services which
are to be performed at the mileage intervals specified.
Using Your Maintenance Schedule
We at General Motors want to keep your vehicle in good
working condition. But we don’t know exactly how
you’ll drive it. You may drive short distances only a few
times a week. Or you may drive long distances all
the time in very hot, dusty weather. You may use your
vehicle
in making deliveries. Or you may drive it to
work, to do errands or in many other ways.
Because of the different ways people use their vehicles,
maintenance needs may vary. You may need more
frequent checks and replacements.
So please read the
following and note how you drive.
If you have
questions on how to keep your vehicle in good condition,
see your dealer. This part tells
you the maintenance services you
should have done and when you should schedule them.
When you go to your dealer for your service needs,
you’ll know that GM-trained and supported service
people will perform the work using genuine GM parts.
The proper fluids and lubricants to use are listed in
Part D. Make sure whoever services your vehicle uses
these.
All parts should be replaced and all necessary
repairs done before you or anyone else drives the
vehicle.
This schedule is for vehicles that:
carry passengers and cargo within recommended
limits. You will find these on your vehicle’s
Tire-Loading Information label. See Loading
Your
Vehicle on page 4-35.
are driven on reasonable road surfaces within legal
use the recommended fuel. See Gasoline Octane
driving limits.
on page 5-5.
6-4
Page 334 of 378
Scheduled Maintenance
The services shown in this schedule up to 100,000 miles
(1 66
000 km) should be repeated after 100,000 miles
(1 66 000 km) at the same intervals for the life of
this vehicle. The services shown at 150,000 miles
(240
000 km) should be repeated at the same interval
after 150,000 miles
(240 000 km) for the life of this
vehicle.
See Part B: Owner Checks and Services on page
6-9
and Part C: Periodic Maintenance Inspections on
page
6- 13.
Footnotes
t The U.S. Environmental Protection Agency or the
California Air Resources Board has determined that the
failure to perform this maintenance item will not nullify
the emission warranty or limit recall liability prior to
the completion of the vehicle’s useful life. We, however,
urge that all recommended maintenance services be
performed at the indicated intervals and the
maintenance be recorded.
+A good time to check your brakes is during tire
rotation. See Brake System Inspection on page
6-14,
Engine Oil Scheduled Maintenance
Change engine oil and filter as indicated by the GM
Oil Life SystemTM (or every 12 months, whichever
occurs first). Reset the system.
Your vehicle has a computer system that lets you know
when to change the engine oil and filter. This is
based on engine revolutions and engine temperature,
and not on mileage. Based on driving conditions,
the mileage at which an oil change will be indicated can
vary considerably. For the oil life system to work
properly, you must reset the system every time the oil is
changed.
When the system has calculated that oil life has been
diminished,
it will indicate that an oil change is
necessary.
A CHANGE OIL SOON light will come on.
Change your oil as soon as possible within the next two
times you stop for fuel. It is possible that,
if you are
driving under the best conditions, the oil life system may
not indicate that an oil change is necessary for over a
year. However, your engine oil and filter must be
changed at least once a year and at this time the system
must be reset.
It is also important to check your oil
regularly and keep it at the proper level.
6-5