Page 136 of 183

10-02-2003
YOUR 607 IN DETAIL127
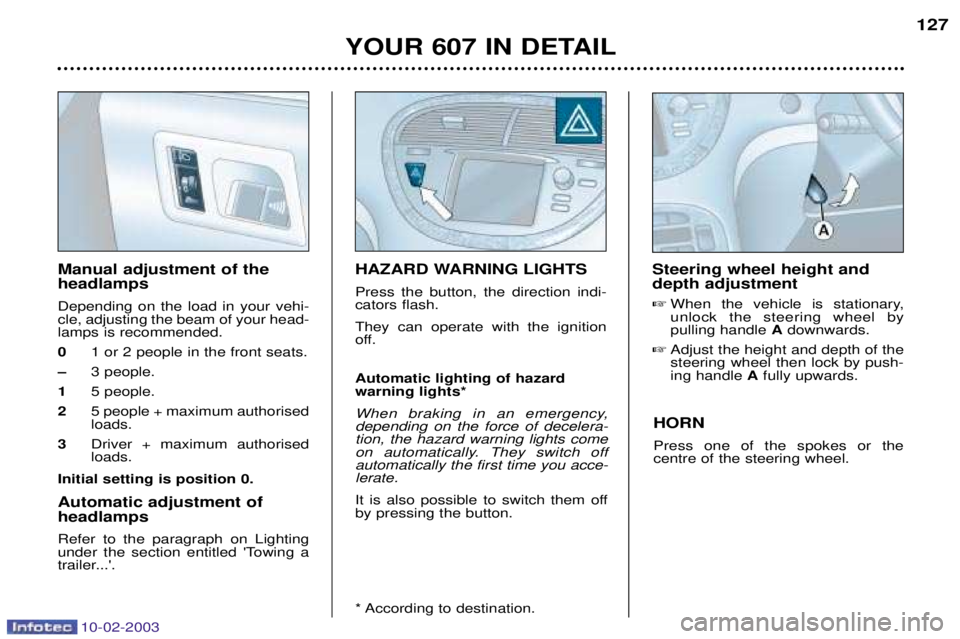
HORN Press one of the spokes or the centre of the steering wheel.
Manual adjustment of the headlamps Depending on the load in your vehi- cle, adjusting the beam of your head-lamps is recommended. 0 1 or 2 people in the front seats.
Ð 3 people.
1 5 people.
2 5 people + maximum authorisedloads.
3 Driver + maximum authorisedloads.
Initial setting is position 0.
Automatic adjustment of headlamps Refer to the paragraph on Lighting
under the section entitled 'Towing a
trailer...'. HAZARD WARNING LIGHTS Press the button, the direction indi- cators flash. They can operate with the ignition
off.
Steering wheel height and depth adjustment �
When the vehicle is stationary, unlock the steering wheel bypulling handle Adownwards.
� Adjust the height and depth of thesteering wheel then lock by push-ing handle Afully upwards.
Automatic lighting of hazard warning lights*
When braking in an emergency, depending on the force of decelera-tion, the hazard warning lights come
on automatically. They switch offautomatically the first time you acce-lerate.
It is also possible to switch them off by pressing the button.
* According to destination.
Page 152 of 183
10-02-2003
PRACTICAL INFORMATION141
2 litre 16 V petrol engine 1 -
Windscreen / headlamp wash
reservoir.
2 - Power steering reservoir. 3 -
Coolant reservoir.
4 - Dipstick.
5 - Engine oil filler cap.
6 - Air filter. 7 -
Battery.
8 - Fuse box.
9 - Brake and clutch fluid reservoir.
Page 153 of 183
10-02-2003
PRACTICAL INFORMATION
142
2.2 litre 16 V petrol engine 1 -
Windscreen / headlamp wash
reservoir.
2 - Power steering.
3 - Coolant reservoir. 4 -
Dipstick.
5 - Engine oil filler cap.
6 - Air filter. 7 -
Battery.
8 - Fuse box.
9 - Brake and clutch fluid reservoir.
Page 154 of 183
10-02-2003
PRACTICAL INFORMATION143
24V V6 petrol injection engine 1 -
Windscreen / headlamp wash
reservoir.
2 - Power steering.
3 - Coolant reservoir. 4 -
Dipstick.
5 - Engine oil filler cap.
6 - Air filter. 7 -
Battery.
8 - Fuse box.
9 - Brake and clutch fluid reservoir.
Page 155 of 183
10-02-2003
PRACTICAL INFORMATION
144
2 litre 16V turbo diesel HDI 1 -
Windscreen / headlamp wash
reservoir.
2 - Power steering.
3 - Coolant reservoir. 4 -
Dipstick.
5 - Engine oil filler cap.
6 - Air filter. 7 -
Battery.
8 - Fuse box.
9 - Brake and clutch fluid reservoir.
Page 156 of 183
10-02-2003
PRACTICAL INFORMATION145
2.2 litre 16V turbo diesel HDI 1 -
Windscreen / headlamp wash
reservoir.
2 - Power steering. 3 -
Coolant reservoir.
4 - Dipstick.
5 - Engine oil filler cap.
6 - Air filter. 7 -
Battery.
8 - Fuse box.
9 - Brake and clutch fluid reservoir.
Page 157 of 183

10-02-2003
CHECKING THE LEVELS Oil level� Check the level regularly and top up between changes. Maximumconsumption is 0.5 l per 600 miles(1000 km). Carry out this check with the vehicle level, engine cold, usingthe oil level gauge on the instru-ment panel or the dipstick.
Dipstick There are two markson the dipstick: A= maximum
Never fill past this mark. B = minimum
To maintain the reliabi- lity of engines andemission control sys-tems, the use of addi-tives in engine oil isprohibited.
Oil change According to the information given in
'PEUGEOT SERVICING'.
PRACTICAL INFORMATION
146
Viscosity selection In all cases, the oil selected must meet the manufacturer's require-ments. Brake and clutch fluid level:
Ð The level must always be between
the DANGER and MAXIMUM
marks in the reservoir.
Ð If the level drops substantially, contact a PEUGEOT dealer imme-
diately.
Fluid change:
Ð must be carried out according to the manufacturer's servicing schedule,
Ð use fluids approved by the manu- facturer, which fulfil DOT4 stan- dards.
WARNING: brake and clutch fluid is
harmful to health and very corrosive. Used oil Prevent used oil from coming into prolonged contact with the skin. Do not dispose of used oil, brake and clutch fluid or coolant into drains oronto the ground. Power steering reservoir
� Open the reservoir, with the engi-
ne cold. The level should alwaysbe above the MINI mark and closeto the MAXI mark.
Windscreen and headlamp wash reservoir For best quality cleaning and for your
safety, we recommend that you useproducts approved by PEUGEOT(reservoir capacity 4 litres or 6.5litres with headlamp wash).
Page 163 of 183

10-02-2003
PRACTICAL INFORMATION
152
CHANGING A BULB Front lights
In the engine compartment, remove the style cover secured by one or two butterfly screws, a plastic retainer clip andtwo screws. Note:
handle the bulbs with a dry cloth.
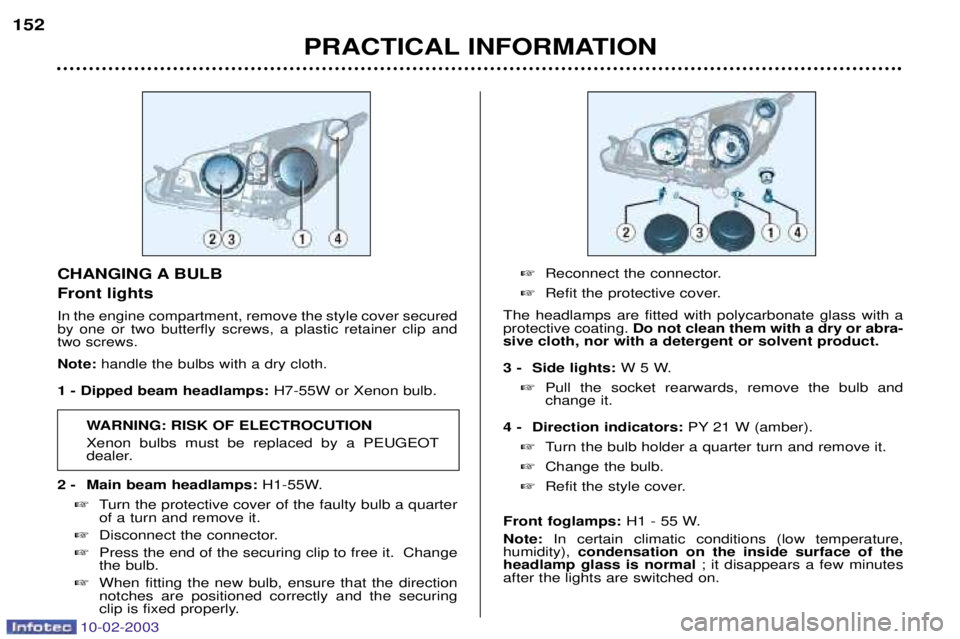
1 - Dipped beam headlamps: H7-55W or Xenon bulb.
WARNING: RISK OF ELECTROCUTION Xenon bulbs must be replaced by a PEUGEOT
dealer.
2 - Main beam headlamps: H1-55W.
� Turn the protective cover of the faulty bulb a quarterof a turn and remove it.
� Disconnect the connector.
� Press the end of the securing clip to free it. Changethe bulb.
� When fitting the new bulb, ensure that the directionnotches are positioned correctly and the securing
clip is fixed properly. �
Reconnect the connector.
� Refit the protective cover.
The headlamps are fitted with polycarbonate glass with aprotective coating. Do not clean them with a dry or abra-
sive cloth, nor with a detergent or solvent product.
3 - Side lights: W 5 W.
� Pull the socket rearwards, remove the bulb and change it.
4 - Direction indicators: PY 21 W (amber).
� Turn the bulb holder a quarter turn and remove it.
� Change the bulb.
� Refit the style cover.
Front foglamps: H1 - 55 W.
Note: In certain climatic conditions (low temperature,
humidity), condensation on the inside surface of the
headlamp glass is normal ; it disappears a few minutes
after the lights are switched on.