Page 3 of 177

17-02-2003
11 -Driver's air bag. Horn.
12 - Windscreen wash-wipe stalk.
Trip computer stalk.
13 - Radio remote control stalk.
14 - Steering lock and ignition.
15 - Electric mirror controls.Window controls.Rear window locking control.
16 - Electronic Stability Programme (ASR/ESP)switch.
17 - Headlamp height adjustment.
18 - Fuse box.
19 - Steering wheel adjustment.
20 - Cruise control.
21 - Rear ashtray. 22 -
Cup-holder.
23 - Handbrake.
24 - Heated seat switches. Passenger air bag disarming switch. Alarm button.
25 - Lighter.
26 - Rear footwell heating vent.
27 - Front ashtray.
28 - Gear lever.
29 - Radio.
30 - Heating/ventilation controls.
31 - Multifunction display.
YOUR 406 AT A GLANCE
3
1 - Speaker (tweeter) location.
2 - Window demisting vent.
3 - Side adjustable heating/ ventilation vent and air flowregulation.
4 - Glove box.
5 - Passenger air bag.
6 - Windscreen demistingvents.
7 - Central adjustable heating/ventilation vents and air flowregulation.
8 - Hazard warning lightsswitch.
9 - Lights and directionindicators stalk. Arming/disarming of automatic switching on oflights.
10 - Instrument dials.
Page 4 of 177
17-02-2003
THE KEYS The keys allow you to switch on the ignition and to independentlyoperate the locks on the frontdoors, the glove box and the pas-senger air bag disarming switch.
Central locking
From the driver's door, the keysallow you to lock and unlock thedoors and the boot. If one of the front doors is open, the central locking does not work. The remote control performs the same functions at adistance.The remote control LockingPressing button
Alocks the vehicle.
This is confirmed by the fixed lighting of the direction indicatorsfor approximately two seconds. Unlocking Pressing button Bunlocks the
vehicle.This is confirmed by the rapid flashing of the direction indicators. STARTING
STOP position:
The ignition is off.
1st notch, Accessories position:
The ignition is off but the acces- sories can be used. 2nd notch, Running position: The ignition is on. Starting position:
Operates the starter.
YOUR 406 AT A GLANCE
4
Key without
remote control Key with
remote control
103
Page 6 of 177
17-02-2003
THE SEATS Manual front seats 1 -Forwards/backwards adjustment.
2 - Seat angle adjustment.
3 - Seat height adjustment.
4 - Seat back angle adjustment.
Electric front seats A-Forwards/backwards adjust- ment.
B - Seat angle adjustment.
C - Seat height adjustment.
D - Seat back angle adjustment.
M - Memorises the settings. Switch on the ignition and adjust the seat and mirrors. Press button "M"together
with button "1", for the first
driving position, or "M"and
"2" , for the second driving
position.
1 - Recalls first memo rised position.
2 - Recalls second memorised position.
11111 2
YOUR 406 AT A GLANCE
6
Page 7 of 177

YOUR 406 AT A GLANCE
8SIDE AIR BAGS
Side air bags are incorporated into the backs of the front seats,on the door side.
They are triggered individually, on whichever side the collisionoccurs.
Operating check
This is by means of the warninglight on the instrument panel. It comes on for 6 seconds when the ignition is switched on. If the warning light:
Ð does not come on when the ignition is switched on or,
Ð does not go out after six se- conds,
Contact a PEUGEOT dealer.
Passenger air bag precautions For a vehicle fitted with a disar- ming switch:
Ð disarm the airbag if you install a rear-facing childseat.
Ð arm the air bag for anadult passen-
ger.
For a vehicle not fitted with a dis-arming switch: Ð do not install rear-facing child seatson the front pas-senger seat.
Never place your feet or anyobject on the fascia.
FRONT AIR BAGS Disarming the passenger air bag
� Insert the ignition key in switch1and turn it:
Ð to the " ON" position, the pas-
senger air bag is armed,
Ð to the " OFF" position, the pas-
senger air bag is disarmed.
Operating check This symbol lights for approximately six sec-
onds when the ignition isswitched on. With the ignition on (2nd notch), illumination of this warning lightaccompanied by an audible signaland the message "Passenger air
bag disarmed" on the multifunc-
tion display indicates that the pas-senger air bag is disarmed(switch in the "OFF"position).
The warning light remains onthroughout the disarming process.
149
17-02-2003
Page 8 of 177
141
YOUR 406 AT A GLANCE
9
COURTESY LIGHTOff. Lights when one of the doors is opened.
Permanently lit, withthe key in the acces-sories position or withthe ignition on.
Manual operation:
press or pull
the switch gently. The windowstops as soon as the switch isreleased. Automatic operation: press or
pull the switch fully. One touch completely opens or closes the
window. Safety auto-reverse: when the window on the driver's side risesand meets an obstacle, it stopsand lowers again.
1 - Driver's electric window.
2 - Passenger's electric
window.
3 - Rear right electric window.
4 - Rear left electric window.
5 - Disarming the rear window switches.
145
ELECTRIC WINDOWS
17-02-2003
Page 9 of 177
SEAT BELTS Front seat belt height adjustment Pinch control 1and slide it.
To lock the seat beltsPull the strap, then insert the end into the buckle.
YOUR 406 AT A GLANCE
7
144123
STEERING WHEEL
HEIGHT AND DEPTHADJUSTMENT � Pull handle Ato unlock the
steering wheel.Adjust the height and depth of the steering wheel then lock itby pushing handle Ain fully.
142
ELECTRIC MIRRORS
Turn knob 6to the right or left to
select the corresponding mirror.Then move the knob in all four directions to adjust. Fold-back electric mirrors With the ignition switched on, turn knob 6to position A.
17-02-2003
Page 12 of 177

17-02-2003
Memorising a speed As soon as you reach the chosen speed, press button 2 or 3. This
memorises the speed, which will be maintained automatically. Note: It is possible to accelerate momentarily without disarming the
cruise control. Cancelling the memorised speed If you wish to cancel the memorised speed:
� Press button 4or the brake or clutch pedal.
Recalling the memorised speedAfter cancelling, press button 4. Your vehicle will return to the
last memorised speed.
YOUR 406 AT A GLANCE
13
151
Do not use cruise control on slippery roads or inheavy traffic.
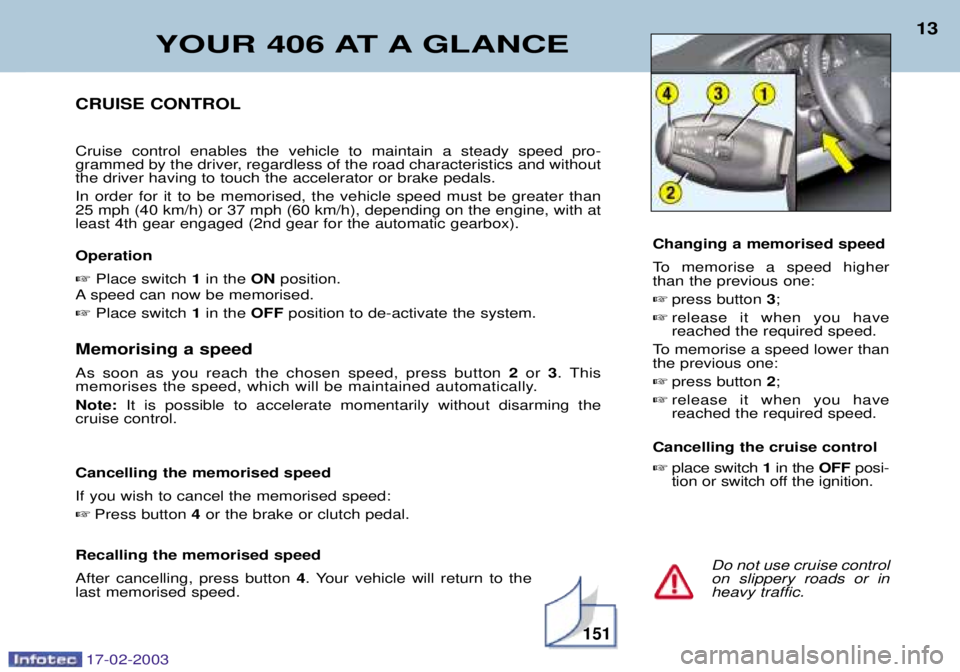
CRUISE CONTROL Cruise control enables the vehicle to maintain a steady speed pro-
grammed by the driver, regardless of the road characteristics and withoutthe driver having to touch the accelerator or brake pedals. In order for it to be memorised, the vehicle speed must be greater than
25 mph (40 km/h) or 37 mph (60 km/h), depending on the engine, with atleast 4th gear engaged (2nd gear for the automatic gearbox). Operation
� Place switch 1 in the ON position.
A speed can now be memorised.
� Place switch 1 in the OFF position to de-activate the system. Changing a memorised speed
To memorise a speed higher than the previous one:
� press button 3;
� release it when you havereached the required speed.
To memorise a speed lower thanthe previous one: � press button 2;
� release it when you havereached the required speed.
Cancelling the cruise control � place switch 1in the OFFposi-
tion or switch off the ignition.
Page 18 of 177

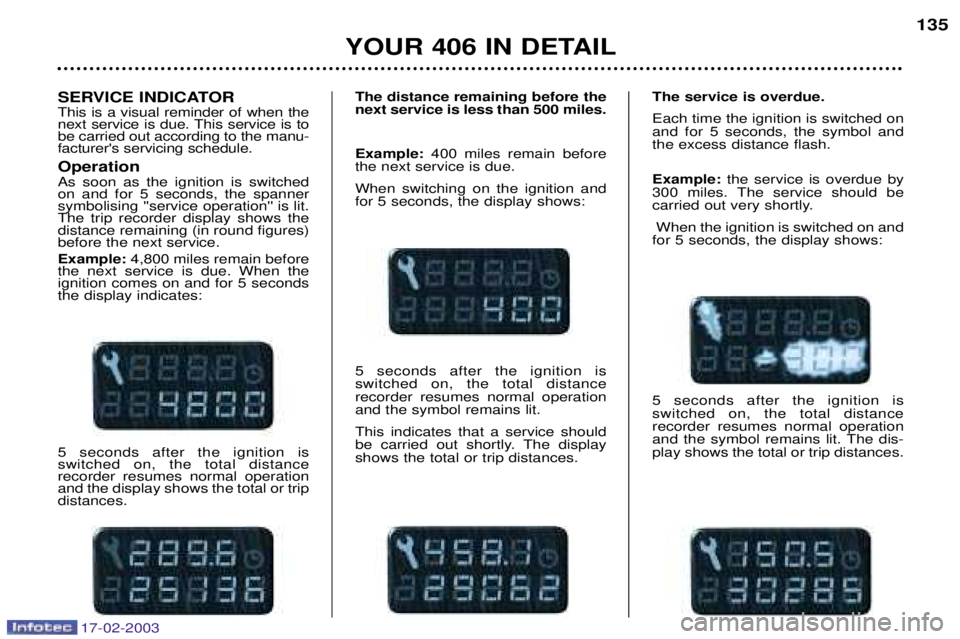
SERVICE INDICATOR This is a visual reminder of when the
next service is due. This service is tobe carried out according to the manu-facturer's servicing schedule. Operation As soon as the ignition is switched on and for 5 seconds, the spannersymbolising ''service operation'' is lit.The trip recorder display shows thedistance remaining (in round figures)before the next service. Example:4,800 miles remain before
the next service is due. When the ignition comes on and for 5 secondsthe display indicates: 5 seconds after the ignition is switched on, the total distancerecorder resumes normal operationand the display shows the total or tripdistances. The distance remaining before the
next service is less than 500 miles. Example:
400 miles remain before
the next service is due. When switching on the ignition and for 5 seconds, the display shows: 5 seconds after the ignition is switched on, the total distancerecorder resumes normal operationand the symbol remains lit. This indicates that a service should
be carried out shortly. The displayshows the total or trip distances. The service is overdue. Each time the ignition is switched on and for 5 seconds, the symbol andthe excess distance flash. Example:
the service is overdue by
300 miles. The service should be
carried out very shortly.
When the ignition is switched on and
for 5 seconds, the display shows: 5 seconds after the ignition is switched on, the total distancerecorder resumes normal operation
and the symbol remains lit. The dis-play shows the total or trip distances.
YOUR 406 IN DETAIL
135
17-02-2003