2003 Oldsmobile Bravada seats
[x] Cancel search: seatsPage 34 of 410

Child Restraints
Older Children
Q: What is the proper way to wear safety belts?
A: If possible, an older child should wear a
lap-shoulder belt and get the additional restraint
a
shoulder belt can provide. The shoulder belt
should not cross the face or neck. The lap belt
should fit snugly below the hips, just touching the
top of the thighs.
It should never be worn over
the abdomen, which could cause severe even fatal
internal injuries in
a crash.
Accident statistics show that children are safer
if they
are restrained in the rear seat.
In a crash, children who are not buckled up can strike
other people who are buckled up, or can be thrown
out of the vehicle. Older children need
to use safety
belts properly.
Older children who have outgrown booster seats should
wear the vehicle's safety belts.
1-27
Page 41 of 410

A booster seat (F-G) is a child restraint designed to
improve the fit of the vehicle’s safety belt system. Some
booster seats have a shoulder belt positioner, and
some high-back booster seats have a five-point harness.
A booster seat can also help a child to see out the window.
Q: How do child restraints work?
A: A child restraint system is any device designed for
use in a motor vehicle to restrain, seat, or position
children. A built-in child restraint system is a
permanent part of the motor vehicle. An add-on
child restraint system is a portable one, which
is purchased by the vehicle’s owner.
For many years, add-on child restraints have used
the adult belt system in the vehicle. To help
reduce the chance of injury, the child also has
to be
secured within the restraint. The vehicle’s belt
system secures the add-on child restraint in the
vehicle, and the add-on child restraint’s harness
system holds the child in place within the restraint.
One system, the three-point harness, has straps that
come down over each of the infant’s shoulders and
buckle together at the crotch. The five-point harness
system has two shoulder straps, two hip straps and a
crotch strap. A shield may take the place of hip
straps. A T-shaped shield has shoulder straps that
are attached
to a flat pad which rests low against the
child’s body. A shelf- or armrest-type shield has
straps that are attached
to a wide, shelf-like shield
that swings up or
to the side.
1 -34
Page 50 of 410

Your vehicle has a right front passenger air bag. Never
put a rear facing child restraint in this seat. Here's whl-
A child in a rear-facing child restraint can be
seriously injured or killed
if the right front
passenger's air bag inflates. This is because
the back of the rear-facing child restraint
would be very close to the inflating air bag.
Always secure a rear-facing child restraint in a
rear seat.
Although a rear seat is a safer place, you can secure a
forward-facing child restraint in the right front seat.
You'll be using the lap-shoulder belt. See
Top Strap on
page 7-36 if the child restraint has one. Be sure to
follow the instructions that came with the child restraint.
Secure the child in the child restraint when and as
the instructions say.
1. Because your vehicle has a right front passenger's
air bag, always move the seat as far back as it will
go before securing a forward-facing child restraint.
See
Power Seats on page 7-2.
3. Pick up the latch plate, and run the lap and shoulder
portions of the vehicle's safety belt through
or
around the restraint. The child restraint instructions
will show you how.
4. Buckle the belt. Make sure the release button is
positioned
so you would be able to unbuckle the
safety belt quickly
if you ever had to.
2. Put the restraint on the seat.
1-43
Page 138 of 410

Operation Tips
e
e
e
Keep the hood and front air inlets free of ice, snow,
or any other obstruction (such
as leaves). The
heater and defroster will work far better, reducing
the chance of fogging the inside of your windows.
When you enter a vehicle in cold weather, turn the
fan knob all the way
to the right for a few moments
before driving. This helps clear the intake ducts
of snow and moisture, and reduces the chance of
fogging the inside of your window.
Keep the air path under the front seats clear of
objects. This helps air
to circulate throughout
your vehicle.
Adding outside equipment
to the front of your
vehicle, such as hood-air deflectors, may affect the
performance of the heating and air conditioning
system. Check with your dealer before adding
equipment
to the outside of your vehicle.
Rear Climate Control System
The lower buttons on the rear seat audio are used to
adjust the rear seat comfort controls. The temperature of
the air coming through the rear outlets is determined
by the front passenger’s temperature setting. The button
with the up and down arrows on
it regulates the fan
speed. The mode button is used
to change the direction
of airflow (upper, bi-level or floor) to the rear seat
area. To turn the rear comfort controls off, press the
lower
PWR button.
3-25
Page 247 of 410

The CertificationDire label also tells you the maximum
weights for the front and rear axles, called Gross
Axle Weight Rating (GAWR). To find out the actual loads
on your front and rear axles, you need to go to a
weigh station and weigh your vehicle. Your dealer can
help you with this. Be sure to spread out your load
equally on both sides of the centerline.
Never exceed the GVWR for your vehicle, or the GAWR
for either the front or rear axle.
If you do have
a heavy load, you should spread it out.
Similar appearing vehicles may have different GVWRs
and payloads. Please note your vehicle’s
CertificationDire label or consult your dealer for
additional details. Using heavier suspension
components to get added
durability might not change your vehicle’s weight ratings.
Ask your dealer to help you load your vehicle the
right way.
Notice: Your warranty does not cover parts or
components that fail because
of overloading.
If you put things inside your vehicle-like suitcases, tools,
packages, or anything else-they will go as fast as the
vehicle goes.
If you have to stop or turn quickly, or
if there’s a crash, they’ll keep going.
Do not load your vehicle any heavier than the
GVWR, or either the maximum front or rear
GAWR. If you do, parts on your vehicle can
break, and
it can change the way your vehicle
handles. These could cause you to lose
control and crash. Also, overloading can
shorten the life of your vehicle.
1 ... ngs yV- p~. .nsi,, your vehicle can strike
and injure people in
a sudden stop or turn, or
in a crash.
Put things in the cargo area of your
vehicle. Try to spread the weight evenly.
Never stack heavier things, like suitcases,
inside the vehicle
so that some of them
are above the tops of the seats.
CAUTION: (Continued)
4-42
Page 350 of 410

Fuses
01 02
03
04
05
06
07
08 09
10
11
12
13
14
15
16
Usage
Right Door Control Module
Left Door Control Module
Liftgate Module 2
Truck Body Controller 3
Rear Fog Lamps
Liftgate Module/Driver Seat Module
Truck Body Controller 2
Power Seats
Blank
Driver Door Module
Amplifier
Passenger Door Module
Rear Climate Controls
Left Rear Parking Lamps
Auxiliary Power
2
Vehicle Center High-Mounted Stop
Lamp
Fuses
17
18
19
20 21 23
24 25
26 27
29
30
31
32
33 34
Usage
Right Rear Parking Lamps
LOCKS
Blank
Sunroof LOCK
Blank
UNLOCK
Blank Blank
OH Battery/OnStar@ System
RainsenseTM Wipers
Parking Lamps
Truck Body Controller 4 Cruise
Control
Truck Body Controller
5
Front Wipers
Vehicle STOP
5-9 1
Page 371 of 410

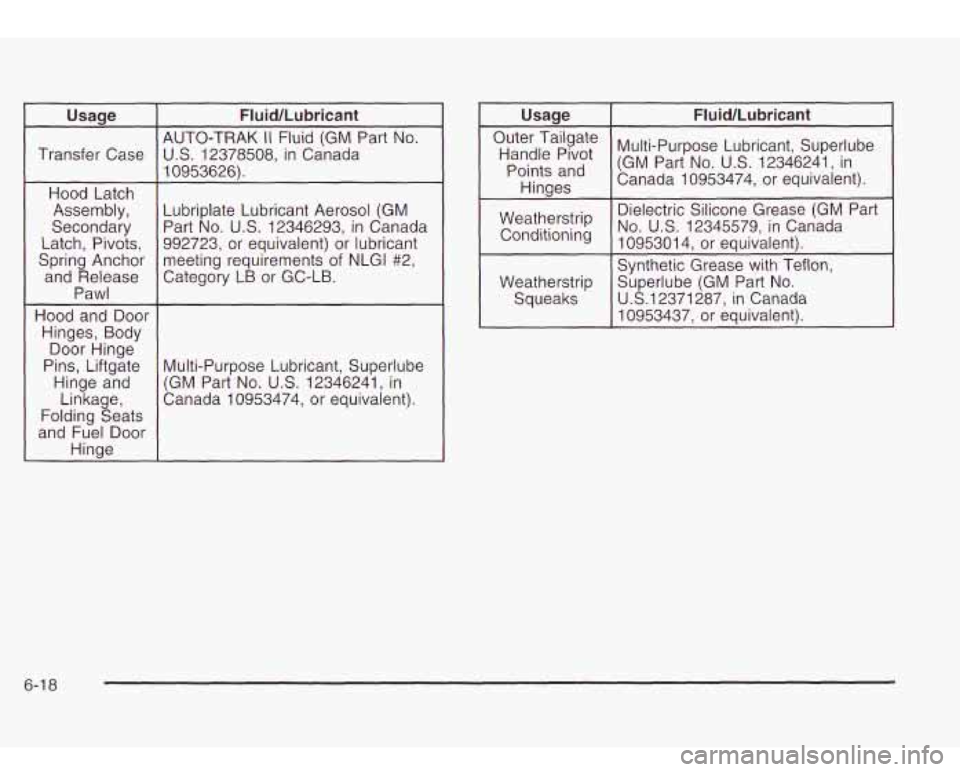
Usage
Transfer Case Hood Latch Assembly,
Secondary
Latch, Pivots,
Spring Anchor and Release
Pawl
Hood and Door
Hinges, Body
Door Hinge
Pins, Liftgate
Hinge and
Linkage,
Folding Seats
and Fuel Door
Hinge
Fluid/Lubricant
AUTO-TRAK I1 Fluid (GM Part No.
U.S. 12378508, in Canada
1 0953626).
Lubriplate Lubricant Aerosol (GM Part
No. U.S. 12346293, in Canada
992723, or equivalent) or lubricant
meeting requirements
of NLGl #2,
Category LB or GC-LB.
Multi-Purpose Lubricant, Superlube
(GM Part
No. U.S. 12346241, in
Canada 10953474, or equivalent). Hinaes
Dielectric Silicone Grease (GM Part
Weatherstrip
Superlube (GM Part No. Weatherstrip 1095301 4, or equivalent).
‘Onditioning No. U.S. 12345579,
in Canada
Synthetic Grease with Teflon,
Squeaks U.S.12371287, in
Canada
10953437,
or equivalent).
6-1 8
Page 394 of 410

Headphones ................................................... 3-77
Heated Seats
................................................... 1-3
Highway Hypnosis
........................................... 4-34
Hill and Mountain Roads
.................................. 4-34
Hitches
.......................................................... 4-49
HomeLink@ Transmitter, Programming
................ 2-37
HomeLink@ Transmitter
................................... 2-37
Hood Checking Things Under
................................ 5-10
Release ..................................................... 5-1 0
Horn ............................................................... 3-6
Recovery Tank
............................................ 5-28
How to Add Fluid ............................................ 5-22
How to Check ........................................ 5-20, 5-53
How to Check Lubricant
................................... 5-46
How to Check Power Steering Fluid
.................. 5-33
How
to Wear Safety Belts Properly ................... 1-13
Hydroplaning
.................................................. 4-30
How
to Add
Coolant to the Coolant
How
to Add Coolant to the Radiator .................. 5-30
How to Use This Manual ...................................... ii
I
ICE POSSIBLE .............................................. 3-54
If No Steam Is Coming From Your Engine .......... 5-25
If Steam Is Coming From Your Engine ............... 5-25
If the Light Is On Steady ................................. 3-37
If the
Light
Is Flashing ..................................... 3-36
If You Are Stuck in Sand. Mud. Ice or Snow ....... 4-40
If You Do Decide To Pull A Trailer ..................... 4-46
If You’re Caught in a Blizzard
........................... 4-38
Ignition Positions ............................................. 2-18
Inflation -- Tire Pressure .................................. 5-53
Brake System
............................................. 6-16
Engine Cooling System
................................ 6-15
Fuel System
............................................... 6-15
Part C
- Periodic Maintenance ....................... 6-15
Boot and Seal
......................................... 6-15
(All-Wheel Drive)
...................................... 6-16
Cluster
....................................................... 3-29
Overview
..................................................... 3-4
Instrument Panel Brightness
............................. 3-17
Interior Lamps
................................................ 3-17
Interior Plastic Components
.............................. 5-79
Ignition Transmission
Lock Check
...................... 6-13
Infants and Young Children, Restraints
............... 1-29
inspection
Exhaust System
.......................................... 6-15
Steering, Suspension and Front Drive Axle
Transfer Case and Front Axle
Instrument Panel
J
Jump Starting ................................................. 5-39
7