2003 Oldsmobile Bravada parking brake
[x] Cancel search: parking brakePage 146 of 410
Readings in the low warning zone may occur when a
large number of electrical accessories are operating in
the vehicle and the engine is left idling for an
extended period. This condition is normal since the
charging system is not able
to provide full power
at engine idle. As engine speeds are increased, this
condition should correct itself as higher engine speeds
allow the charging system
to create maximum power.
You can only drive for a short time with the reading
in either warning zone. If you must drive, turn
off
all unnecessary accessories.
Readings in either warning zone indicate a possible
problem in the electrical system. Have the vehicle
serviced as soon as possible. Your
vehicle’s hydraulic brake system
is divided into two
parts.
If one part isn’t working, the other part can still
work and stop you. For good braking, though, you need
both parts working well.
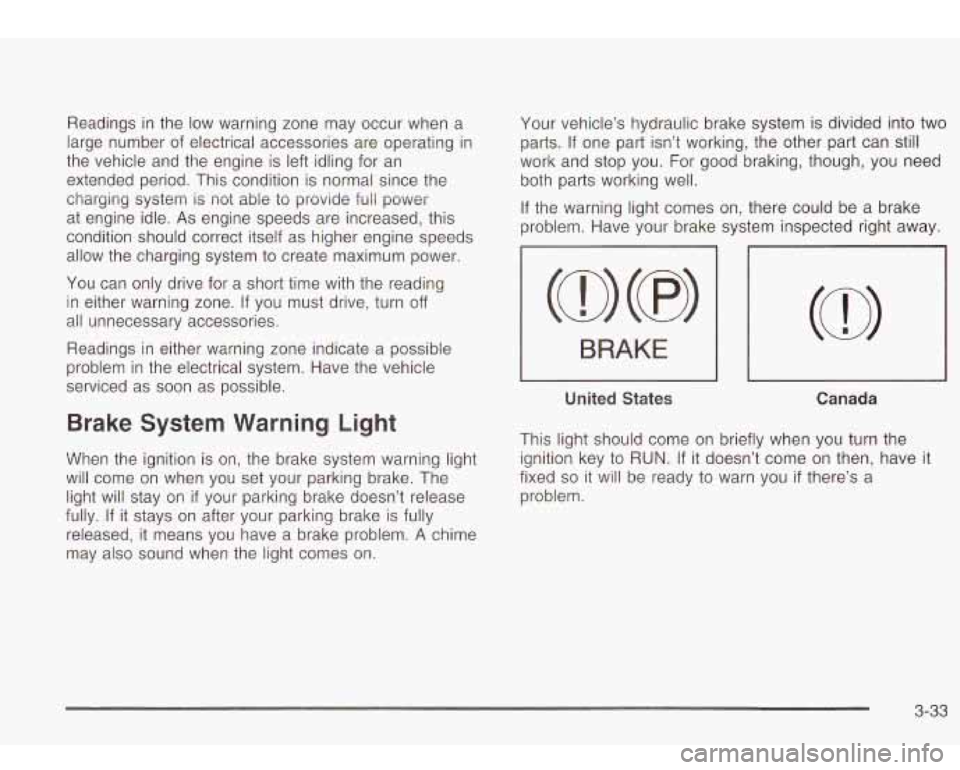
If the warning light comes on, there could be a brake
problem. Have your brake system inspected right away.
-7
I BRAKE I I
I I I
United States Canada
Brake System Warning Light
When the ignition is on, the brake system warning light
will come on when you set your parking brake. The
light will stay on
if your parking brake doesn’t release
fully. If it stays on after your parking brake is fully
released, it means you have a brake problem.
A chime
may also sound when the light comes on. This light should come on briefly when you turn the
ignition key
to RUN. If it doesn’t come on then, have it
fixed
so it will be ready to warn you if there’s a
problem.
3-33
Page 226 of 410

Driving to the top (crest) of a hill at full speed
can cause an accident. There could be a
drop-off, embankment, cliff, or even another
vehicle. You could be seriously injured or
killed.
As you near the top of a hill, slow down
and stay alert.
Q: What should I do if my vehicle stalls, or is
about to stall, and
I can’t make it up the hill?
A: If this happens, there are some things you should
do, and there are some things you must not do?
First, here’s what you should do:
Push the brake pedal to stop the vehicle and keep
it from rolling backwards. Also, apply the parking
brake.
If your engine is still running, shift the transmission
to REVERSE (R), release the parking brake, and
slowly back down the hill in REVERSE (R).
0 If your engine has stopped running, you’ll need to
restart it. With the brake pedal pressed and the
parking brake still applied, shift the transmission to
PARK (P) and restart the engine. Then shift to REVERSE
(R), release the parking brake, and
slowly back down the hill as straight as possible
in
REVERSE (R).
As you are backing down the hill, put your left hand
on the steering wheel at the
12 o’clock position.
This way you’ll be able to tell
if your wheels
are straight and maneuver as you back down. It’s
best that you back down the hill with your
wheels straight rather than in the left or right
direction. Turning the wheel too far to the left or
right will increase the possibility of a rollover.
Here are some things you
must not do if you stall, or
are about to stall, when going up a hill.
Never attempt to prevent a stall by shifting into
NEUTRAL (N) to “rev-up” the engine and regain
forward momentum. This won’t work. Your vehicle
will roll backwards very quickly and you could
go out of control.
Instead, apply the regular brake to stop the vehicle.
Then apply the parking brake. Shift to
REVERSE (R), release the parking brake, and
slowly back straight down.
0 Never attempt to turn around if you are about to stall
when going up a hill. If the hill is steep enough to stall
your vehicle, it’s steep enough to cause you to roll
over
if you turn around. If you can’t make it up the hill
you must back straight down the hill.
4-21
Page 227 of 410

Q: Suppose, after stalling, I try to back down the
hill and decide
I just can’t do it. What
should
I do?
A: Set the parking brake, put your transmission in
PARK (P) and turn
off the engine. Leave the
vehicle and go get some help. Exit on the uphill
side and stay clear of the path the vehicle would
take
if it rolled downhill.
Driving Downhill
When off-roading takes you downhill, you’ll want to
consider a number of things:
How steep is the downhill? Will I be able to maintain
vehicle control?
What’s the surface like? Smooth? Rough? Slippery?
Are there hidden surface obstacles? Ruts? Logs?
Hard-packed dirt? Gravel?
Boulders?
What’s at the bottom of the hill? Is there a there a
hidden creek bank or even a river bottom with
large rocks?
If you decide you can go down a hill safely, then
try to
keep your vehicle headed straight down, and use a
low gear. This way, engine drag can help your brakes
and they won’t have
to do all the work. Descend slowly,
keeping your vehicle under control at all times.
4-22
Heavy braki.., when going down a hill can
cause your brakes to overheat and fade. This
could cause
loss of control and a serious
accident. Apply the brakes lightly when
descending a hill and use a low gear to keep
vehicle speed under control.
Q: Are there some things I should not do when
driving down
a hill?
A: Yes! These are important because if you ignore
them you could
lose control and have a serious
accident.
When driving downhill, avoid turns that take you
across the incline
of the hill. A hill that’s not too
steep to drive down may be too steep to drive
across. You could roll over
if you don’t drive straight
down.
Never go downhill with the transmission in
NEUTRAL (N). This is called “free wheeling”. Your
brakes will have to do all the work and could
overheat and fade.
Page 228 of 410

Q: Am I likely to stall when going downhill?
A: It’s much more likely to happen going uphill. But if it
happens going downhill, here’s what to do.
Apply the parking brake.
engine.
and drive straight down.
Stop your vehicle by applying the regular brakes.
Shift to PARK (P) and, while still braking, restart the
Shift back to a low gear, release the parking brake,
If the engine won’t start, get out and get help.
Driving Across an Incline
Sooner or later, an off-road trail will probably go across
the incline of a hill. If this happens, you have to
decide whether to try to drive across the incline. Here
are some things to consider:
A hill that can be driven straight up or down may be
too steep to drive across. When you go straight up
or down a hill, the length of the wheel base (the distance from
the front wheels to the rear wheels)
reduces the likelihood the vehicle will tumble
end over end. But when you drive across an incline,
the much more narrow track width (the distance
between the left and right wheels) may not prevent
the vehicle from tilting and rolling over.
Also,
driving across an incline puts more weight on the
downhill wheels. This could cause
a downhill
slide or a rollover.
Surface conditions can be a problem when you
drive across a hill. Loose gravel, muddy spots,
or even wet grass can cause your tires to slip
sideways, downhill.
If the vehicle slips sideways, it
can hit something that will trip it (a rock, a rut,
etc.) and roll over.
Hidden obstacles can make the steepness of the
incline even worse.
If you drive across a rock with the
uphill wheels, or it the downhill wheels drop into a rut
or depression, your vehicle can tilt even more.
4-23
Page 257 of 410

Par1 . on Hills
You really should not park your vehicle, with a
trailer attached,
on a hill. If something goes
wrong, your
rig could start to move. People
can be injured, and both your vehicle and the
trailer can be damaged.
When You Are Ready to Leave After
Parking on a
Hill
1. Apply your regular brakes and hold the pedal down
while you:
But
if you ever have to park your rig on a hill, here’s
how to do it:
1. Apply your regular brakes, but don’t shift into
PARK (P) yet. When parking uphill, turn your wheels
away from the curb. When parking downhill, turn
your wheels into the curb.
2. Have someone place chocks under the trailer
wheels.
3. When the wheel chocks are in place, release the
4. Reapply the regular brakes. Then apply your
regular brakes until
the chocks absorb the load.
parking brake, and then shift into PARK
(P).
5. Release the regular brakes.
start your engine,
shift into a gear, and
release the parking brake.
2. Let up on the brake pedal.
3. Drive slowly until the trailer is clear of the chocks.
4. Stop and have someone pick up and store the
chocks.
Maintenance When Trailer Towing
Your vehicle will need service more often when you’re
pulling a trailer. See the Maintenance Schedule for more
on this. Things that are especially important in trailer
operation are automatic transmission fluid (don’t overfill),
engine oil, axle lubricant, belt, cooling system and
brake system. Each
of these is covered in this manual,
and the Index will help you find them quickly.
If
you’re trailering, it’s a good idea to review these sections
before you start your trip.
Check periodically
to see that all hitch nuts and bolts
are tight.
4-52
Page 280 of 410

Get the vehicle warmed up by driving about 15 miles
(24 km) when outside temperatures are above 50°F
(10OC). If it's colder than 50°F (IOOC), drive the vehicle
in
THIRD (3) until the engine temperature gage
moves and then remains steady for
10 minutes.
A cold fluid check can be made after the vehicle has
been sitting for eight hours or more with the engine
off,
but this is used only as a reference. Let the engine
run at idle for five minutes
if outside temperatures are
50°F (10°C) or more. If it's colder than 50°F (IOOC), you
may have to idle the engine longer. Should the fluid
level be low during this cold check, you
must check the
fluid hot before adding fluid. Checking the fluid hot
will give you a more accurate reading of the fluid level.
Checking the Fluid Level
Prepare your vehicle as follows:
0 Park your vehicle on a level place. Keep the engine
running.
With the parking brake applied, place the shift lever
in PARK (P).
With your foot on the brake pedal, move the shift
lever through each gear range, pausing for about
three seconds in each range. Then, position the shift
lever in PARK
(P).
Let the engine run at idle for three minutes or more. Then,
without shutting
off the engine, follow these steps:
-1 The automatic
transmission dipstick
handle with the
transmission and lock
symbol is located in the
engine compartment
I I on the passenger's side of
the vehicle.
See
Engine Compartment Overview on page 5-12 for
more information on location.
1. Flip the handle up and then pull out the dipstick
and wipe it with a clean rag or paper towel.
2. Push it back in all the way, wait three seconds and
then pull it back out again.
3. If the fluid level is in the acceptable range, push the
dipstick back
in all the way; then flip the handle
down to lock the dipstick in place.
5-21
Page 298 of 410

Jump Starting
If your battery has run down, you may want to use
another vehicle and some jumper cables to start your
vehicle. But please use the following steps
to do it
safely.
can be dangerous
* They contain acid that can burn you.
0 They contain gas that can explode or
* They contain enough electricity to
If you don’t follow these steps exactly, some
Notice: Ignoring these steps could result in costly
damage to your vehicle that wouldn’t be covered
by your warranty.
Trying to start your vehicle by pushing or pulling
it
won’t work, and it could damage your vehicle.
1. Check the other vehicle. It must have a 12-volt
battery with
a negative ground system.
Notice: If the other system isn’t a 12-volt system
with a negative ground, both vehicles can be damaged.
2. Get the vehicles close enough so the jumper cables
can reach, but be sure the vehicles aren’t touching
each other. If they are, it could cause a ground
connection you don’t want.
You wouldn’t be able to
start your vehicle, and the bad grounding could
damage the electrical systems.
To avoid the possibility of the vehicles rolling, set
the parking brake firmly on both vehicles involved in
the jump start procedure. Put an automatic
transmission in
PARK (P) or a manual transmission
in NEUTRAL before setting the parking brake. If
you have a four- wheel-drive vehicle, be sure
the transfer case is not in NEUTRAL.
Notice: If you leave your radio on, it could be badly
damaged. The repairs wouldn’t be covered by
your warranty.
3. Turn off the ignition on both vehicles. Unplug
unnecessary accessories plugged into the cigarette
lighter or accessory power outlets (if equipped).
Turn
off the radio and all lamps that aren’t needed.
This will avoid sparks and help
to save both
batteries. And it could save your radio!
5-39
Page 321 of 410

A rear blowout, particularly on a curve, acts much like a
skid and may require the same correction you’d use
in a skid. In any rear blowout, remove your foot from the
accelerator pedal. Get the vehicle under control by
steering the way you want the vehicle
to go. It may be
very bumpy and noisy, but you can still steer. Gently
brake
to a stop - well off the road if possible.
If
a tire goes flat, the next part shows how to use your
jacking equipment
to change a flat tire safely.
Changing a Flat Tire
If a tire goes flat, avoid further tire and wheel damage
by driving slowly
to a level place. Turn on your
hazard warning flashers. Cha..,ing
a tire can ca-.-e an injc.
,. The
vehicle can slip
off the jack and roll over you
or other people. You and they could be badly
injured. Find a level place to change your tire.
To help prevent the vehicle from moving:
1. Set the parking brake firmly.
2. Put the shift lever in PARK (P).
3. Turn off the engine.
4. Put the wheel blocks at the front and rear
of the tire farthest away from the one
being changed. That would be the tire on
the other side of the vehicle,
at the
opposite end.
5-62