2003 Oldsmobile Bravada air conditioning
[x] Cancel search: air conditioningPage 135 of 410

Automatic Operation Manual Operation
AUTO
(Automatic): When automatic operation is
active, the system will control the inside temperature,
the air delivery mode, and the fan speed.
Use the steps below to place the entire system in
automatic mode:
1. Press the AUTO button.
When AUTO is selected, the air conditioning
operation and air inlet will be automatically
controlled. The air conditioning compressor will run
when the outside temperature is over approximately
40°F (4°C). The air inlet will normally be set to
outside air. If it’s hot outside, the air inlet will
automatically switch to recirculate inside air to help
quickly cool down your vehicle.
2. Set the driver’s and passenger’s temperature.
To find your comfort setting, start with a 72°F (22°C)
temperature setting and allow about 20 minutes
for the system to regulate. Turn the driver’s or
passenger’s side temperature knob to adjust the
temperature setting as necessary. If you choose the
temperature setting
of 60°F (15”C), the system
will remain at the maximum cooling setting.
If you
choose the temperature setting of 90°F
(32”C),
the system will remain at the maximum heat setting.
Choosing either maximum setting may not cause
the vehicle to heat or cool any faster. To change
the current setting, select one of the
following:
v (Fan): This button allows you to manually
adjust the fan speed. Press the up arrow to increase fan
speed and the down arrow to decrease fan speed.
The display will change to show you the selected fan
speed and the driver’s side temperature setting for five
seconds.
@* *d (Mode): Press this button to manually change the
direction of the airflow in your vehicle. Keep pressing the
button until the desired mode appears on the display.
The display will change to show you the selected
air delivery mode and the driver’s temperature setting
for five seconds.
2 (Vent): This mode directs air to the instrument
panel outlets.
+2 (Bi-Level): This mode directs approximately half of
the air to the instrument panel outlets, then directs
the remaining air to the floor outlets. A little air is
directed toward the windshield and the side window
outlets. Cooler air is directed to the upper outlets and
warmer air to the floor outlets.
3-22
Page 136 of 410

4; (Floor): This mode directs most of the air to the
floor outlets. Some air also comes out of the defroster
and side window outlets. The recirculation button cannot
be selected in floor mode.
&I (Recirculation): Press this button to turn
recirculation mode on or
off. When this button is
pressed, an indicator light in the button will also come
on
to let you know that it is activated. Recirculation
mode is used
to recirculate the air inside of your vehicle.
Use this mode to help prevent outside odors and/or
dust from entering your vehicle or to help cool the air
inside of your vehicle more quickly. Recirculation
mode can be used with vent and bi-level modes, but it
cannot be used with floor, defog or defrost modes.
If the weather
is cold and damp, the system may cause
the windows to fog while using recirculation mode. If the
windows do start to fog, select defog or defrost mode.
)#t A/C (Air Conditioning): Press this button to
manually turn the air conditioning system on or
off.
When the system is on, the system will automatically
begin to cool and dehumidify the air inside of your
vehicle.
If you select air conditioning off while in front defrost or
defog mode, the air conditioning
off symbol will flash
to let you know this is not allowed. You
may notice a slight change in engine performance
when the air-conditioning compressor shuts
off and
turns on again. This is normal.
(Air Conditioning Off): When you turn the air
conditioning
off, this symbol will appear on the display.
When the air conditioning is selected or in AUTO mode,
the system will run the air conditioning automatically.
Defogging and Defrosting
Fog on the inside of windows is a result of high humidity
(moisture) condensing on the cool window glass. This
can be minimized
if the climate control system is
used properly. You can use either defog or front defrost
to clear fog or frost from your windshield.
+3 (Defog): Use this setting to clear the windows of fog
or moisture. This setting will deliver air
to the floor
and windshield outlets.
@ (Front Defrost): Press the front defrost button to
defrost the windshield. The system will automatically
control the fan speed
if you select defrost from AUTO
mode. If the outside temperature is
40°F (4°C) or
warmer, your air conditioning compressor will
automatically run to help dehumidify the air and dry the
windshield.
Do not drive the vehicle until all the
windows are clear.
3-23
Page 137 of 410

Rear Window Defogger
The rear window defogger uses a warming grid to
remove fog from the rear window.
Press this button
to turn
the rear window defogger
on or
off
An indicator light in the button will come on to let you
know that the rear window defogger is activated.
The rear window defogger will turn
off approximately 10
minutes after the button is pressed. If you need
additional warming time, press the button again.
Notice: Don’t use a razor blade or something else
sharp on the inside
of the rear window. If you
do, you could cut or damage the defogger and the
repairs would not be covered by your warranty.
Do not attach a temporary vehicle license, tape, a
decal or anything similar to the defogger grid.
Do not attach a temporary vehicle license, tape, a decal
or anything similar
to the defogger grid.
Outlet Adjustment
Use the air outlets located in the center and on the side
of your instrument panel
to direct the airflow.
Ventilation System
For mild outside temperatures when little heating or
cooling is needed, use the vent setting
to direct outside
air through your vehicle.
Your vehicle’s ventilation system supplies outside air
to
the inside of your vehicle when it is moving. With the
side windows closed, air will flow into the front air inlet
grilles, through the vehicle and out the air exhaust
valves.
Outside air will also enter the vehicle when the heater
or the air conditioning compressor is running, unless you
have the recirculation button pushed in.
3-24
Page 138 of 410

Operation Tips
e
e
e
Keep the hood and front air inlets free of ice, snow,
or any other obstruction (such
as leaves). The
heater and defroster will work far better, reducing
the chance of fogging the inside of your windows.
When you enter a vehicle in cold weather, turn the
fan knob all the way
to the right for a few moments
before driving. This helps clear the intake ducts
of snow and moisture, and reduces the chance of
fogging the inside of your window.
Keep the air path under the front seats clear of
objects. This helps air
to circulate throughout
your vehicle.
Adding outside equipment
to the front of your
vehicle, such as hood-air deflectors, may affect the
performance of the heating and air conditioning
system. Check with your dealer before adding
equipment
to the outside of your vehicle.
Rear Climate Control System
The lower buttons on the rear seat audio are used to
adjust the rear seat comfort controls. The temperature of
the air coming through the rear outlets is determined
by the front passenger’s temperature setting. The button
with the up and down arrows on
it regulates the fan
speed. The mode button is used
to change the direction
of airflow (upper, bi-level or floor) to the rear seat
area. To turn the rear comfort controls off, press the
lower
PWR button.
3-25
Page 348 of 410

Fuses
10
11 12
13 14
15 16
17
18
19
20
21 22
23
24
25
26
27
28
29
30
31
Usage
Powertrain Control Module B
Fog Lamps
Stop Lamp
Cigarette Lighter
Ignition Coils
Air Suspension Ride
TBD-Ignition
1
Crank
Air Bag
Electric Brake
Cooling Fan
Horn Ignition
E
Electronic Throttle Control
Instrument Panel Cluster, Driver
Information Center
Automatic Shift Lock Control System
Engine 1
Back-up Powertrain Control Module 1
Oxygen Sensor
Air Conditioning
Truck Body Controller
Fuses
32
33
34
35
36
50
51
52
Relays
37
38
39
40
41
42
43
44
45
46 47
Usage
Trailer
Anti-Lock Brakes (ABS) Ignition A
Blower Motor Ignition B Passenger’s Side Trailer Turn
Driver’s Side Trailer Turn
Hazard Flashers
Usage
Blank Rear Window Washer
Fog Lamps
Horn Fuel Pump
Windshield WipersNasher
High-Beam Headlamp
Air Conditioning
Cooling Fan
Headlamp Driver Module
Starter
Miscellaneous Usage
48 Instrument Panel Battery
49 Fuse Puller
5-89
Page 351 of 410

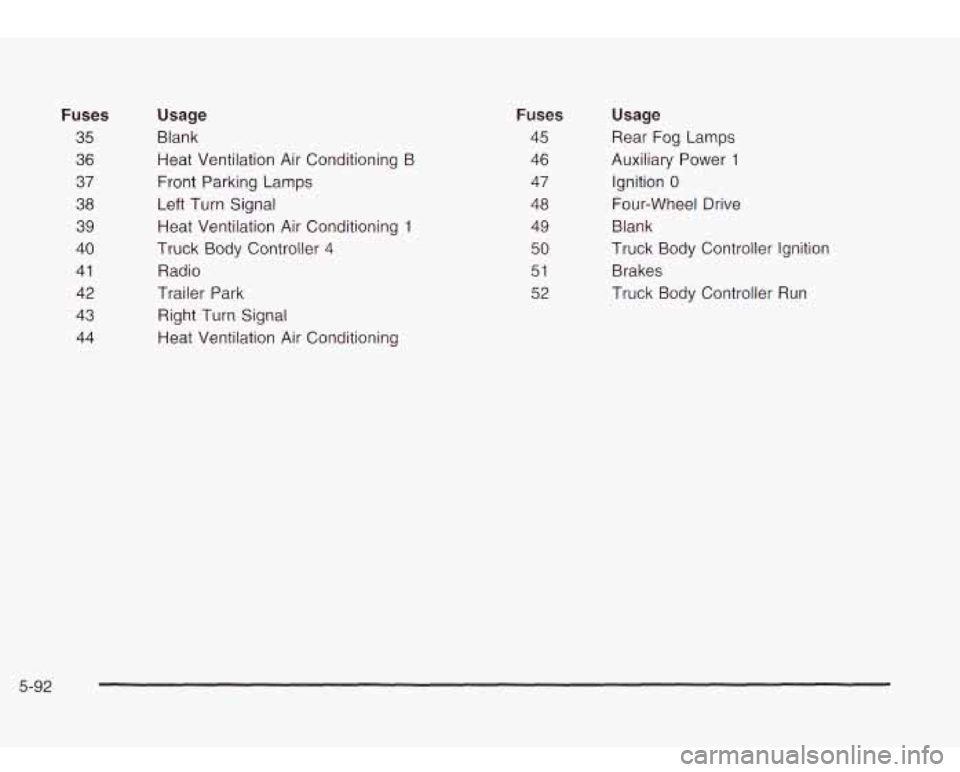
Fuses
35
36
37
38
39
40
41
42
43
44
Usage
Blank Heat Ventilation Air Conditioning B
Front Parking Lamps
Left Turn Signal Heat Ventilation Air Conditioning
1
Truck Body Controller 4
Radio
Trailer Park
Right Turn Signal
Heat Ventilation Air Conditioning
Fuses
45
46
47
48
49
50
51
52
Usage
Rear Fog Lamps
Auxiliary Power
1
Ignition 0
Four-wheel Drive
Blank
Truck Body Controller Ignition Brakes
Truck Body Controller Run
5-92
Page 368 of 410

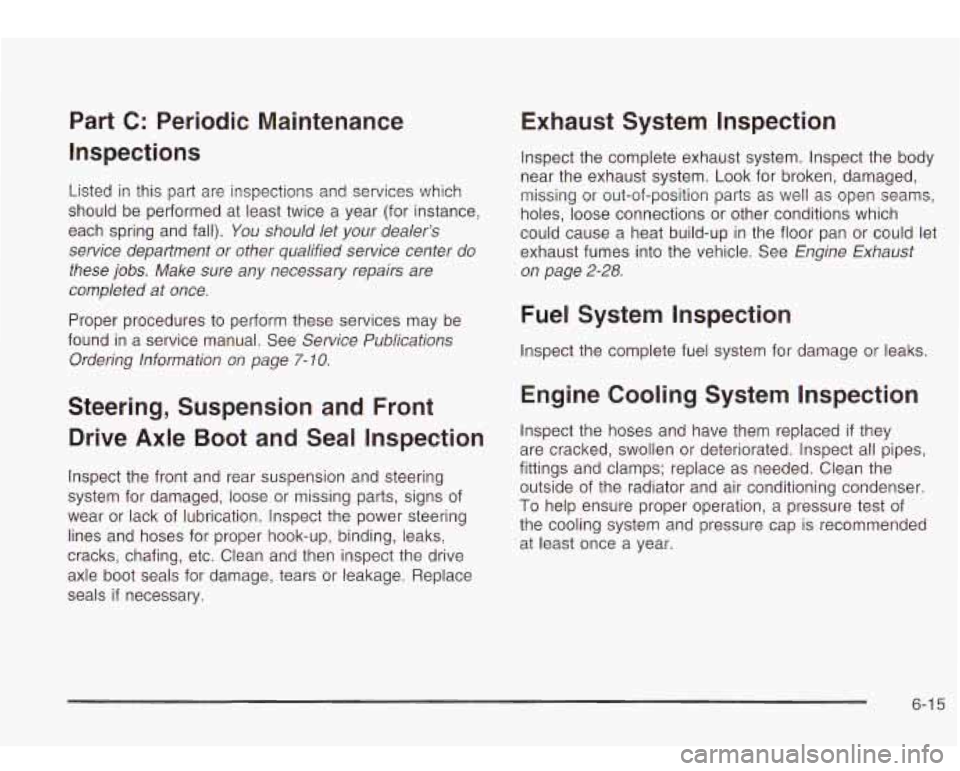
Part C: Periodic Maintenance
Inspections
Listed in this part are inspections and services which
should be performed at least twice a year (for instance,
each spring and fall).
You should let your dealer’s
service department or other qualified service center do
these jobs. Make sure any necessary repairs are
completed at once.
Proper procedures to perform these services may be
found in a service manual. See
Service Publications
Ordering Information
on page 7- 10.
Steering, Suspension and Front
Drive Axle
Boot and Seal Inspection
Inspect the front and rear suspension and steering
system for damaged, loose or missing parts, signs of
wear or lack of lubrication. Inspect the power steering
lines and hoses for proper hook-up, binding, leaks,
cracks, chafing, etc. Clean and then inspect the drive
axle boot seals for damage, tears or leakage. Replace
seals
if necessary.
Exhaust System Inspection
Inspect the complete exhaust system. Inspect the body
near the exhaust system. Look for broken, damaged,
missing or out-of-position parts as well as open seams,
holes, loose connections or other conditions which
could cause a heat build-up in the floor pan or could let
exhaust fumes into the vehicle. See
Engine Exhaust
on page 2-28.
Fuel System Inspection
Inspect the complete fuel system for damage or leaks.
Engine Cooling System Inspection
Inspect the hoses and have them replaced if they
are cracked, swollen or deteriorated. Inspect all pipes,
fittings and clamps; replace as needed. Clean the
outside of the radiator and air conditioning condenser.
To help ensure proper operation, a pressure test
of
the cooling system and pressure cap is recommended
at least once a year.
6-1 5