2003 NISSAN XTERRA Break in
[x] Cancel search: Break inPage 134 of 272
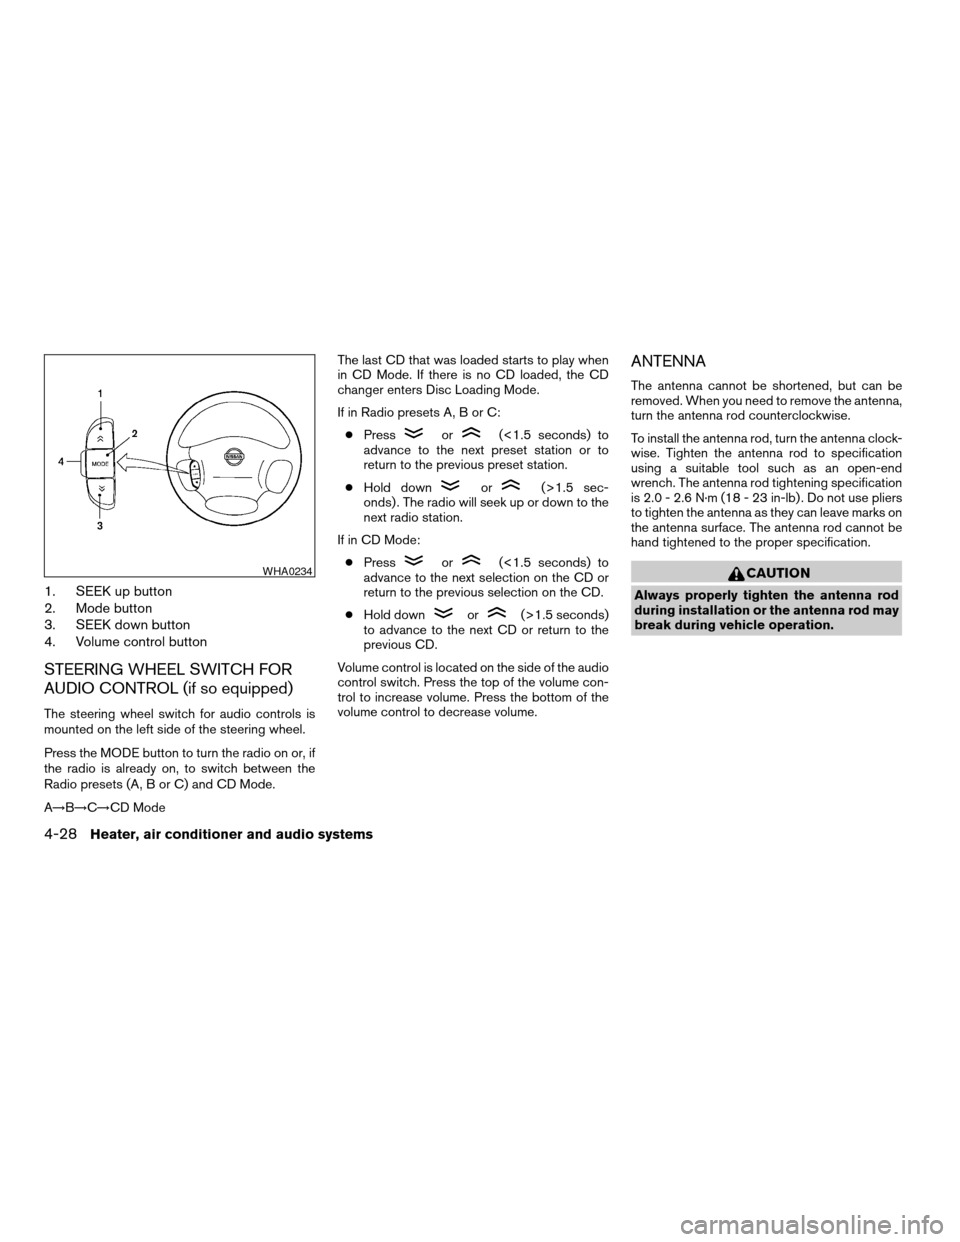
1. SEEK up button
2. Mode button
3. SEEK down button
4. Volume control button
STEERING WHEEL SWITCH FOR
AUDIO CONTROL (if so equipped)
The steering wheel switch for audio controls is
mounted on the left side of the steering wheel.
Press the MODE button to turn the radio on or, if
the radio is already on, to switch between the
Radio presets (A, B or C) and CD Mode.
A!B!C!CD ModeThe last CD that was loaded starts to play when
in CD Mode. If there is no CD loaded, the CD
changer enters Disc Loading Mode.
If in Radio presets A, B or C:
cPress
or(<1.5 seconds) to
advance to the next preset station or to
return to the previous preset station.
cHold down
or(>1.5 sec-
onds) . The radio will seek up or down to the
next radio station.
If in CD Mode:
cPress
or(<1.5 seconds) to
advance to the next selection on the CD or
return to the previous selection on the CD.
cHold down
or(>1.5 seconds)
to advance to the next CD or return to the
previous CD.
Volume control is located on the side of the audio
control switch. Press the top of the volume con-
trol to increase volume. Press the bottom of the
volume control to decrease volume.
ANTENNA
The antenna cannot be shortened, but can be
removed. When you need to remove the antenna,
turn the antenna rod counterclockwise.
To install the antenna rod, turn the antenna clock-
wise. Tighten the antenna rod to specification
using a suitable tool such as an open-end
wrench. The antenna rod tightening specification
is 2.0 - 2.6 N·m (18 - 23 in-lb) . Do not use pliers
to tighten the antenna as they can leave marks on
the antenna surface. The antenna rod cannot be
hand tightened to the proper specification.
CAUTION
Always properly tighten the antenna rod
during installation or the antenna rod may
break during vehicle operation.
WHA0234
4-28Heater, air conditioner and audio systems
ZREVIEW COPY:Ð2003 Xterra(xtr)
Owners Manual(owners)ÐUSA English(nna)
02/24/03Ðtbrooks
X
Page 137 of 272

5 Starting and driving
Precautions when starting and driving................5-2
Exhaust gas (carbon monoxide)..................5-2
Three-way catalyst..............................5-2
Low tire pressure warning system
(if so equipped)................................5-3
On-pavement and off-road driving
precautions....................................5-4
Avoiding collision and rollover....................5-4
Drinking alcohol/drugs and driving................5-5
Driving safety precautions.......................5-5
Ignition switch.....................................5-7
Automatic transmission..........................5-7
Manual transmission............................5-8
Key positions..................................5-8
Before starting the engine..........................5-9
Starting the engine................................5-9
Driving the vehicle................................5-10
Automatic transmission (if so equipped)..........5-10
Manual transmission...........................5-13
Parking brake....................................5-15
Cruise control (if so equipped).....................5-16
Precautions on cruise control...................5-16Cruise control operations.......................5-17
Break-in schedule................................5-18
Increasing fuel economy...........................5-18
Using four wheel drive (4WD)......................5-19
Transfer case shifting procedures...............5-19
Auto-lock free-running hubs............5-20
Parking/parking on hills............................5-22
Power steering...................................5-23
Brake system....................................5-23
Brake precautions.............................5-23
Anti-lock Brake System (ABS)..................5-24
Vehicle dynamic control (VDC) system
(if so equipped)..................................5-25
Cold weather driving..............................5-27
Freeing a frozen door lock......................5-27
Anti-freeze....................................5-27
Battery.......................................5-27
Draining of coolant water.......................5-27
Tire equipment................................5-27
Special winter equipment.......................5-28
Driving on snow or ice.........................5-28
Engine block heater (if so equipped).............5-28
ZREVIEW COPY:Ð2003 Xterra(xtr)
Owners Manual(owners)ÐUSA English(nna)
02/24/03Ðtbrooks
X
Page 154 of 272

During the first 1,200 miles (2,000 km) , follow
these recommendations to obtain maximum en-
gine performance and ensure the future reliability
and economy of your new vehicle. Failure to
follow these recommendations may result in
shortened engine life and reduced engine perfor-
mance.
cAvoid driving for long periods at constant
speed, either fast or slow, and do not run the
engine over 4,000 rpm.
cDo not accelerate at full throttle in any gear.
cAvoid quick starts.
cAvoid hard braking as much as possible.
cDo not tow a trailer for the first 500 miles
(800 km) .cAccelerate slowly and smoothly. Maintain
cruising speeds with a constant accelerator
position.
cDrive at moderate speeds on the highway.
Driving at high speed lowers fuel economy.
cAvoid unnecessary stopping and braking.
Maintain a safe distance behind other ve-
hicles.
cUse a proper gear range which suits road
conditions. On level roads, shift into high
gear as soon as possible.
cAvoid unnecessary engine idling.
cKeep your engine tuned up.
cFollow the recommended periodic mainte-
nance schedule.
cKeep the tires inflated to the correct pres-
sure. Low tire pressure increases tire wear
and lowers fuel economy.
cKeep the front wheels in correct alignment.
Improper alignment increases tire wear and
lowers fuel economy.
c
Air conditioner operation lowers fuel economy.
Use the air conditioner only when necessary.
cWhen cruising at highway speeds, it is more
economical to use the air conditioner and
leave the windows closed to reduce drag.c
Use 4H or 4L position only when
necessary. Four-wheel drive operation low-
ers fuel economy.
BREAK-IN SCHEDULE INCREASING FUEL ECONOMY
5-18Starting and driving
ZREVIEW COPY:Ð2003 Xterra(xtr)
Owners Manual(owners)ÐUSA English(nna)
02/24/03Ðtbrooks
X
Page 159 of 272
2.Manual transmission models:
Place the shift lever in the R (Reverse) posi-
tion. When parking on an uphill grade, place
the shift lever in 1st gear.
Automatic transmission models:
Move the shift selector lever to the P (Park)
position.
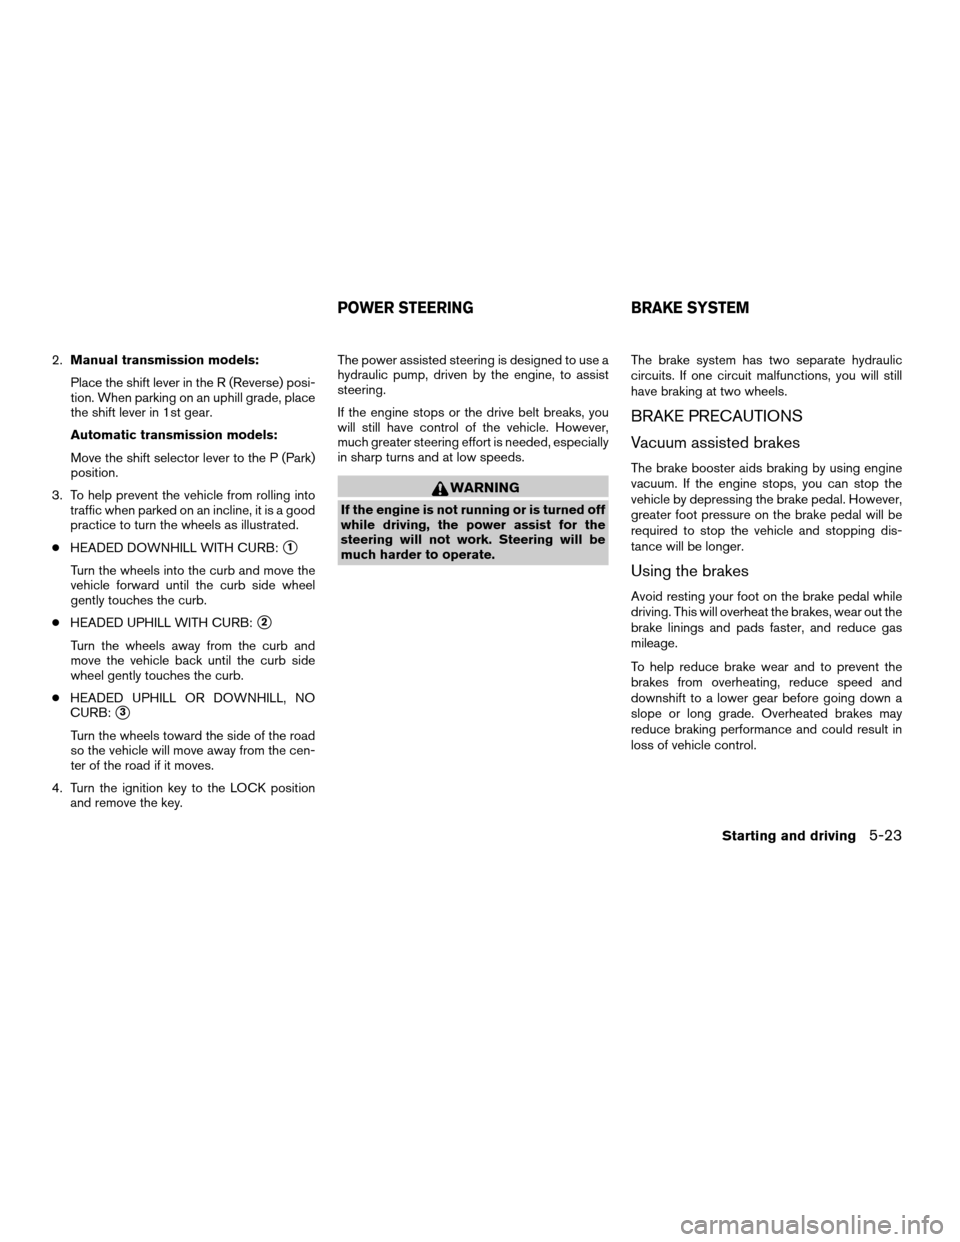
3. To help prevent the vehicle from rolling into
traffic when parked on an incline, it is a good
practice to turn the wheels as illustrated.
cHEADED DOWNHILL WITH CURB:
s1
Turn the wheels into the curb and move the
vehicle forward until the curb side wheel
gently touches the curb.
cHEADED UPHILL WITH CURB:
s2
Turn the wheels away from the curb and
move the vehicle back until the curb side
wheel gently touches the curb.
cHEADED UPHILL OR DOWNHILL, NO
CURB:
s3
Turn the wheels toward the side of the road
so the vehicle will move away from the cen-
ter of the road if it moves.
4. Turn the ignition key to the LOCK position
and remove the key.The power assisted steering is designed to use a
hydraulic pump, driven by the engine, to assist
steering.
If the engine stops or the drive belt breaks, you
will still have control of the vehicle. However,
much greater steering effort is needed, especially
in sharp turns and at low speeds.
WARNING
If the engine is not running or is turned off
while driving, the power assist for the
steering will not work. Steering will be
much harder to operate.The brake system has two separate hydraulic
circuits. If one circuit malfunctions, you will still
have braking at two wheels.
BRAKE PRECAUTIONS
Vacuum assisted brakes
The brake booster aids braking by using engine
vacuum. If the engine stops, you can stop the
vehicle by depressing the brake pedal. However,
greater foot pressure on the brake pedal will be
required to stop the vehicle and stopping dis-
tance will be longer.
Using the brakes
Avoid resting your foot on the brake pedal while
driving. This will overheat the brakes, wear out the
brake linings and pads faster, and reduce gas
mileage.
To help reduce brake wear and to prevent the
brakes from overheating, reduce speed and
downshift to a lower gear before going down a
slope or long grade. Overheated brakes may
reduce braking performance and could result in
loss of vehicle control.
POWER STEERING BRAKE SYSTEM
Starting and driving5-23
ZREVIEW COPY:Ð2003 Xterra(xtr)
Owners Manual(owners)ÐUSA English(nna)
03/05/03Ðtmchalpi
X
Page 197 of 272
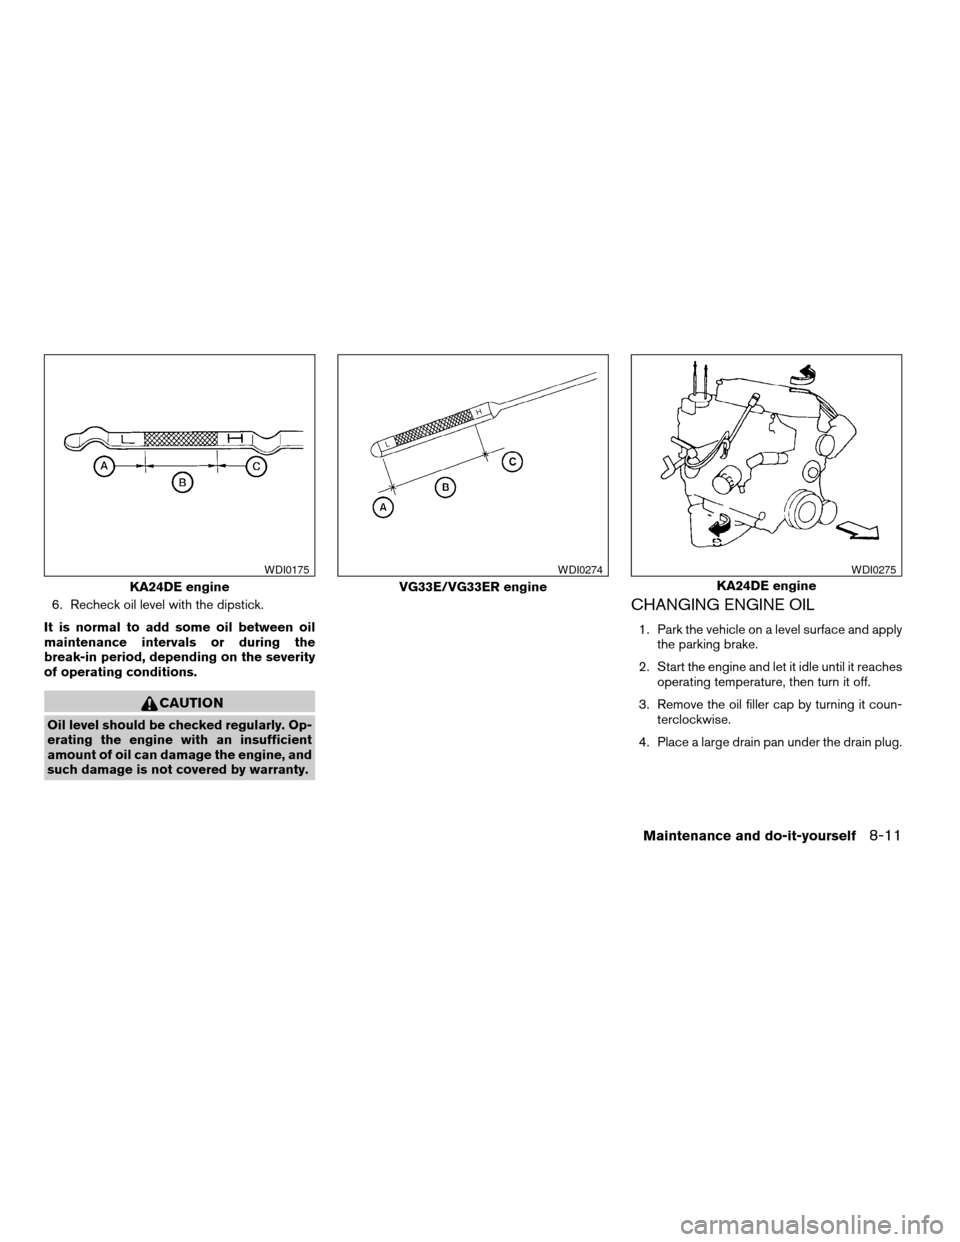
6. Recheck oil level with the dipstick.
It is normal to add some oil between oil
maintenance intervals or during the
break-in period, depending on the severity
of operating conditions.
CAUTION
Oil level should be checked regularly. Op-
erating the engine with an insufficient
amount of oil can damage the engine, and
such damage is not covered by warranty.
CHANGING ENGINE OIL
1. Park the vehicle on a level surface and apply
the parking brake.
2. Start the engine and let it idle until it reaches
operating temperature, then turn it off.
3. Remove the oil filler cap by turning it coun-
terclockwise.
4. Place a large drain pan under the drain plug.
KA24DE engine
WDI0175
VG33E/VG33ER engine
WDI0274
KA24DE engine
WDI0275
Maintenance and do-it-yourself8-11
ZREVIEW COPY:Ð2003 Xterra(xtr)
Owners Manual(owners)ÐUSA English(nna)
02/24/03Ðtbrooks
X
Page 219 of 272
5. Press thebutton, then thebutton two or three times to check the key-
fob operation.
If the battery is removed for any reason
other than replacement, perform step 5.
cAn improperly disposed battery can
hurt the environment. Always confirm
local regulations for battery disposal.
cThe keyfob is water-resistant; how-
ever, if it does get wet, immediately
wipe completely dry.
cThe operational range of the keyfob
extends to approximately 33 ft (10 m)
from the vehicle. This range may vary
with conditions.
FCC Notice:
Changes or modifications not expressly ap-
proved by the manufacturer for compliance
could void the user’s authority to operate
the equipment.
This device complies with Part 15 of the
FCC Rules and RSS-210 of Industry
Canada.Operation is subject to the following two
conditions: (1) This device may not cause
harmful interference, and (2) this device
must accept any interference received, in-
cluding interference that may cause undes-
ired operation of the device.HEADLIGHTS
The headlight is a semi-sealed beam type which
uses a replaceable headlight (halogen) bulb. A
bulb can be replaced from inside the engine
compartment without removing the headlight as-
sembly.
CAUTION
cHigh pressure halogen gas is sealed
inside the halogen bulb. The bulb may
break if the glass envelope is scratched
or the bulb is dropped.
cWhen handling the bulb, do not touch
the glass envelope.
cDO NOT TOUCH THE BULB
cUse the same number and wattage as
originally installed:
Wattage 65/55Bulb No. HB5/9007*
*: Always check with the Parts Depart-
ment at a NISSAN dealer for the latest
parts information.
cDo not leave the bulb out of the head-
light reflector for a long period of time
as dust, moisture and smoke may enter
the headlight body and affect the per-
formance of the headlight.
LIGHTS
Maintenance and do-it-yourself8-33
ZREVIEW COPY:Ð2003 Xterra(xtr)
Owners Manual(owners)ÐUSA English(nna)
02/24/03Ðtbrooks
X
Page 220 of 272
cAiming is not necessary after replacing
the bulb. When aiming adjustment is
necessary, contact a NISSAN dealer.
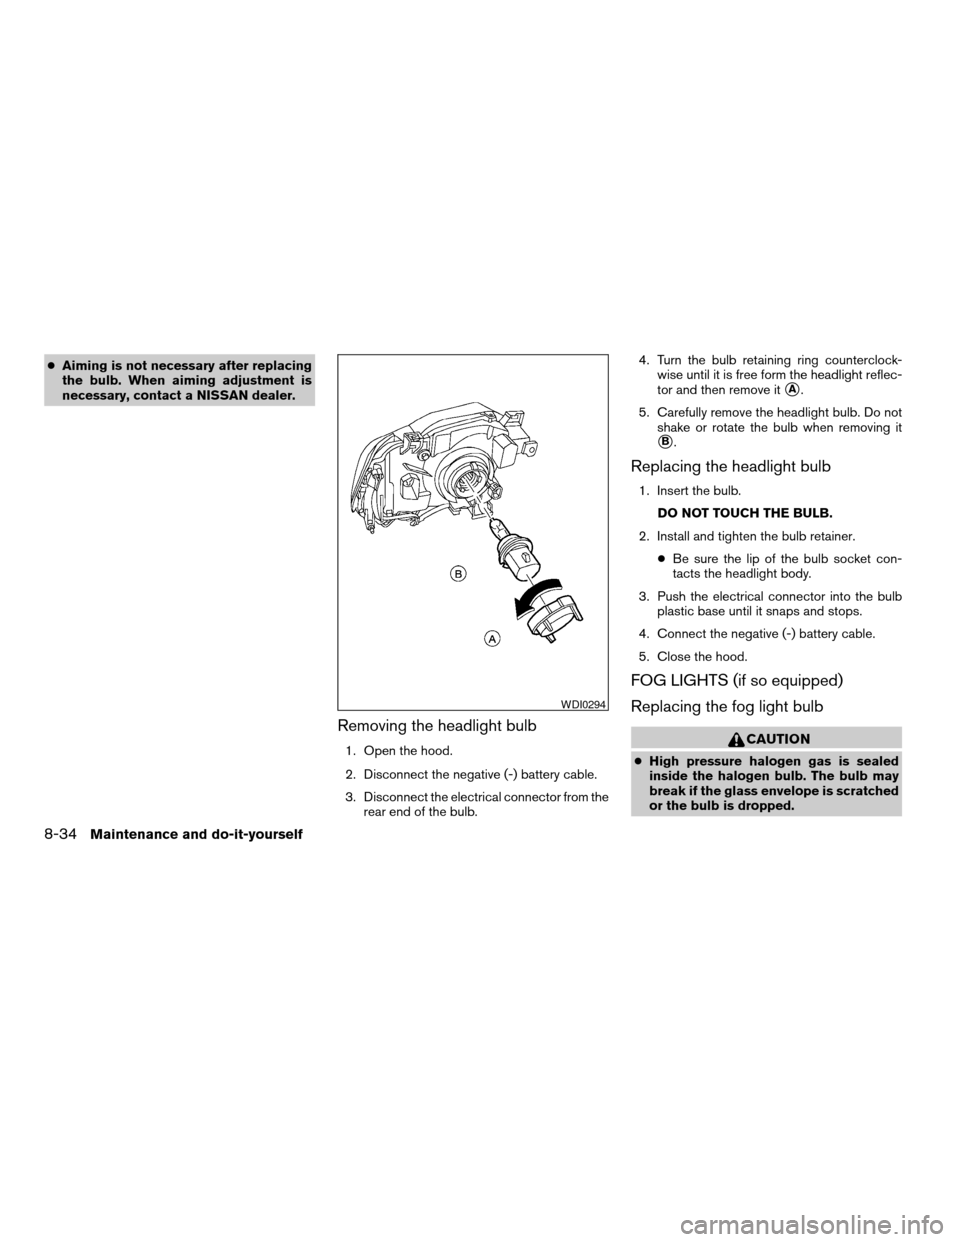
Removing the headlight bulb
1. Open the hood.
2. Disconnect the negative (-) battery cable.
3. Disconnect the electrical connector from the
rear end of the bulb.4. Turn the bulb retaining ring counterclock-
wise until it is free form the headlight reflec-
tor and then remove it
sA.
5. Carefully remove the headlight bulb. Do not
shake or rotate the bulb when removing it
sB.
Replacing the headlight bulb
1. Insert the bulb.
DO NOT TOUCH THE BULB.
2. Install and tighten the bulb retainer.
cBe sure the lip of the bulb socket con-
tacts the headlight body.
3. Push the electrical connector into the bulb
plastic base until it snaps and stops.
4. Connect the negative (-) battery cable.
5. Close the hood.
FOG LIGHTS (if so equipped)
Replacing the fog light bulb
CAUTION
cHigh pressure halogen gas is sealed
inside the halogen bulb. The bulb may
break if the glass envelope is scratched
or the bulb is dropped.
WDI0294
8-34Maintenance and do-it-yourself
ZREVIEW COPY:Ð2003 Xterra(xtr)
Owners Manual(owners)ÐUSA English(nna)
02/24/03Ðtbrooks
X
Page 245 of 272
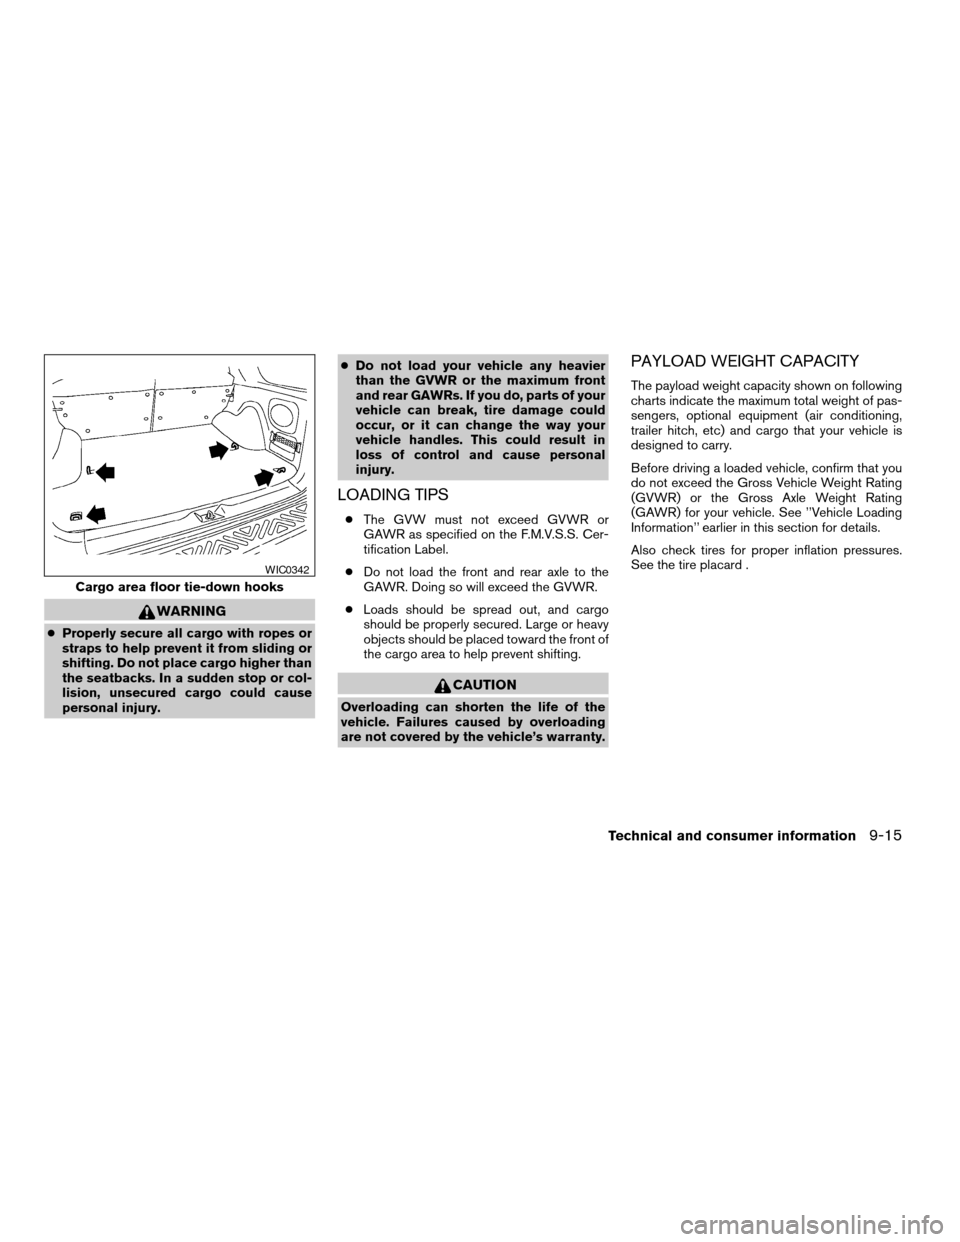
WARNING
cProperly secure all cargo with ropes or
straps to help prevent it from sliding or
shifting. Do not place cargo higher than
the seatbacks. In a sudden stop or col-
lision, unsecured cargo could cause
personal injury.cDo not load your vehicle any heavier
than the GVWR or the maximum front
and rear GAWRs. If you do, parts of your
vehicle can break, tire damage could
occur, or it can change the way your
vehicle handles. This could result in
loss of control and cause personal
injury.
LOADING TIPS
cThe GVW must not exceed GVWR or
GAWR as specified on the F.M.V.S.S. Cer-
tification Label.
cDo not load the front and rear axle to the
GAWR. Doing so will exceed the GVWR.
cLoads should be spread out, and cargo
should be properly secured. Large or heavy
objects should be placed toward the front of
the cargo area to help prevent shifting.
CAUTION
Overloading can shorten the life of the
vehicle. Failures caused by overloading
are not covered by the vehicle’s warranty.
PAYLOAD WEIGHT CAPACITY
The payload weight capacity shown on following
charts indicate the maximum total weight of pas-
sengers, optional equipment (air conditioning,
trailer hitch, etc) and cargo that your vehicle is
designed to carry.
Before driving a loaded vehicle, confirm that you
do not exceed the Gross Vehicle Weight Rating
(GVWR) or the Gross Axle Weight Rating
(GAWR) for your vehicle. See ’’Vehicle Loading
Information’’ earlier in this section for details.
Also check tires for proper inflation pressures.
See the tire placard .
Cargo area floor tie-down hooks
WIC0342
Technical and consumer information9-15
ZREVIEW COPY:Ð2003 Xterra(xtr)
Owners Manual(owners)ÐUSA English(nna)
02/24/03Ðtbrooks
X