Page 901 of 4179
TROUBLE DIAGNOSIS
EC-523
[QR (WITHOUT EURO-OBD)]
C
D
E
F
G
H
I
J
K
L
MA
EC
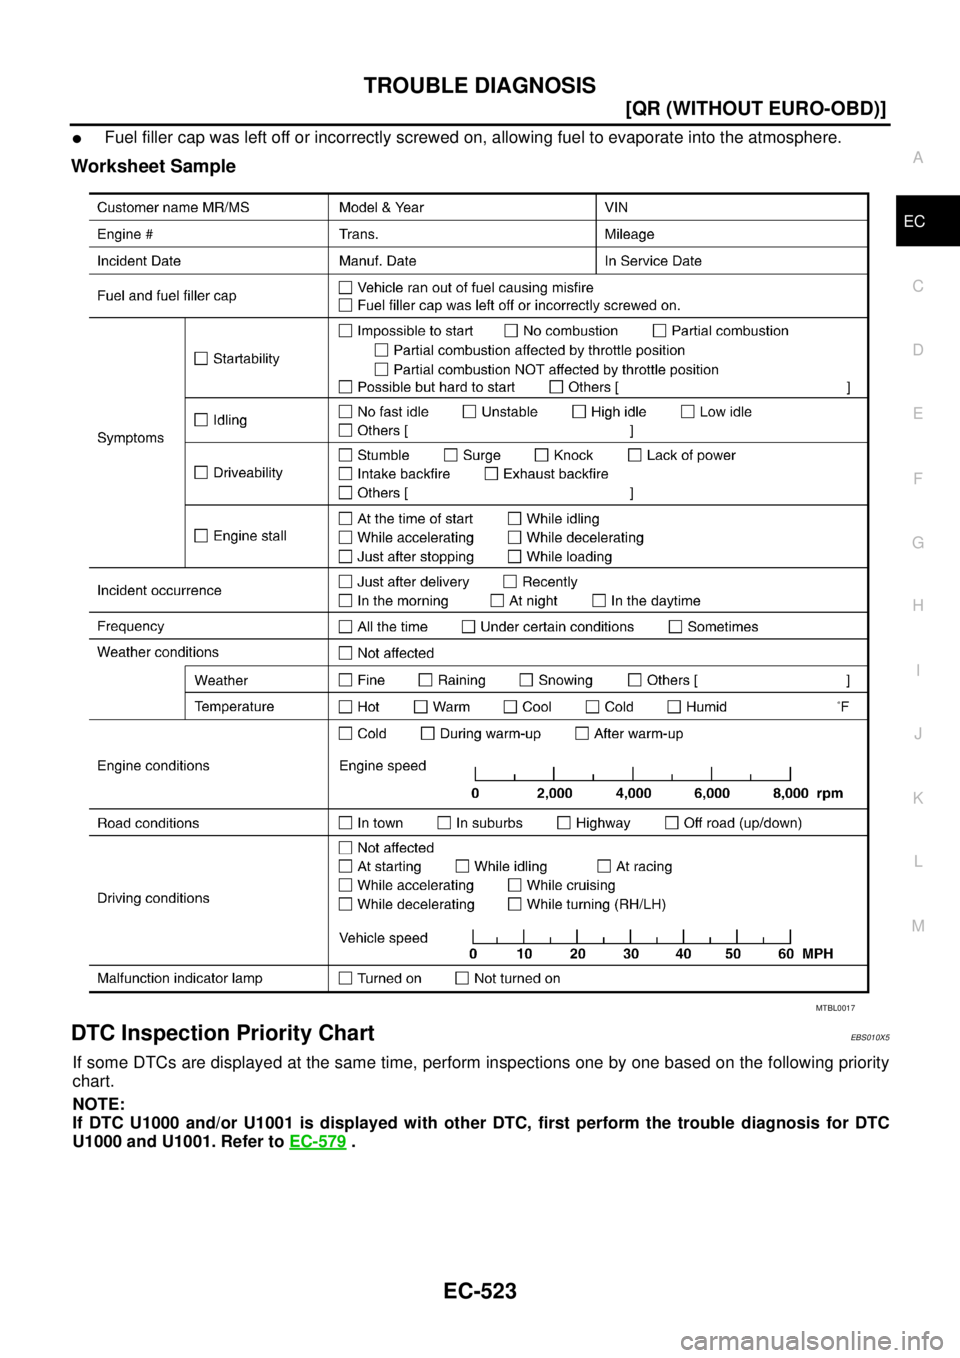
�Fuel filler cap was left off or incorrectly screwed on, allowing fuel to evaporate into the atmosphere.
Worksheet Sample
DTC Inspection Priority ChartEBS010X5
If some DTCs are displayed at the same time, perform inspections one by one based on the following priority
chart.
NOTE:
If DTC U1000 and/or U1001 is displayed with other DTC, first perform the trouble diagnosis for DTC
U1000 and U1001. Refer to EC-579
.
MTBL0017
Page 913 of 4179

TROUBLE DIAGNOSIS
EC-535
[QR (WITHOUT EURO-OBD)]
C
D
E
F
G
H
I
J
K
L
MA
EC
1 - 6: The numbers refer to the order of inspection.Va l v e
mecha-
nismTiming chain
55555 55 5EM-44
CamshaftEM-53
Intake valve timing controlEM-44
Intake valve
3EM-67
Exhaust valve
Exhaust Exhaust manifold/Tube/Muffler/
Gasket
55555 55 5EM-23
, EX-
2Three way catalyst
Lubrica-
tionOil pan/Oil strainer/Oil pump/Oil
filter/Oil gallery
55555 55 52EM-25
, LU-
13 , LU-10 ,
LU-5
Oil level (Low)/Filthy oilLU-7
Cooling Radiator/Hose/Radiator filler cap
55555 55 25CO-12
Thermostat 5CO-22
Water pumpCO-20
Water galleryCO-7
Cooling fan 5CO-18
Coolant level (low)/Contaminated
coolantCO-9
NATS (Nissan Anti-theft System) 1 1EC-515 or
BL-108
SYMPTOM
Reference
page
HARD/NO START/RESTART (EXCP. HA)
ENGINE STALL
HESITATION/SURGING/FLAT SPOT
SPARK KNOCK/DETONATION
LACK OF POWER/POOR ACCELERATION
HIGH IDLE/LOW IDLE
ROUGH IDLE/HUNTING
IDLING VIBRATION
SLOW/NO RETURN TO IDLE
OVERHEATS/WATER TEMPERATURE HIGH
EXCESSIVE FUEL CONSUMPTION
EXCESSIVE OIL CONSUMPTION
BATTERY DEAD (UNDER CHARGE)
Warranty symptom code AA AB AC AD AE AF AG AH AJ AK AL AM HA
Page 1246 of 4179

EC-868
[QR (WITHOUT EURO-OBD)]
EVAPORATIVE EMISSION SYSTEM
Component InspectionEBS01155
EVAP CANISTER
Check EVAP canister as follows:
1. Block port B . Orally blow air through port A .
Check that air flows freely through port C .
2. Block port A . Orally blow air through port B .
Check that air flows freely through port C .
FUEL CHECK VALVE
1. Blow air through connector on fuel tank side.
A considerable resistance should be felt and a portion of air flow
should be directed toward the EVAP canister side.
2. Blow air through connector on EVAP canister side.
Air flow should be smoothly directed toward fuel tank side.
3. If fuel check valve is suspected of not properly functioning in
steps 1 and 2 above, replace it.
FUEL TANK VACUUM RELIEF VALVE (BUILT INTO FUEL FILLER CAP)
1. Wipe clean valve housing.
2. Check valve opening pressure and vacuum.
3. If out of specification, replace fuel filler cap as an assembly.
PBIB0663E
SEF552Y
SEF989X
Pres-
sure:15.3 - 20.0 kPa (0.153 - 0.200 bar,
0.156 - 0.204 kg/cm
2 , 2.22 - 2.90 psi)
Va c u u m :−6.0 to −3.4 kPa (−0.060 to −0.034 bar,
−0.061 to −0.035 kg/cm
2 , −0.87 to −0.49 psi)
SEF943S
Page 1339 of 4179

DTC P0093 FUEL SYSTEM
EC-961
[YD (WITH EURO-OBD)]
C
D
E
F
G
H
I
J
K
L
MA
EC
6. REPLACE FUEL PUMP
1. Replace fuel pump.
2. Perform Fuel Pump Learning Value Clearing. Refer to EC-890, "
Fuel Pump Learning Value Clearing" .
>>INSPECTION END
Component InspectionEBS011V0
FUEL RAIL PRESSURE RELIEF VALVE
With CONSULT-II
WARNING:
�Confirm that the engine is cooled down and there are no fire hazards near the vehicle.
�Prepare pans or saucers under the disconnected fuel line because the fuel may spill out.
1. Turn ignition switch OFF.
2. Remove fuel hose from fuel rail pressure relief valve.
3. Attach a blind cap or plug to removed hose.
4. Turn ignition switch ON.
5. Select “PRES REGULATOR” in “ACTIVE TEST MODE” with
CONSULT-II.
6. Start engine and keep engine speed 2,000 rpm.
7. Raise fuel pressure to 160 MPa with touching “UP” or “Qu” on
the CONSULT-II screen.
8. Confirm that the fuel does not come out from the fuel rail pres-
sure relief valve.
WARNING:
�Be careful not to allow leaked fuel to contaminate engine
compartment. Especially, ensure to keep engine mount
insulator clear of fuel.
�If the fuel comes out, stop the engine immediately.
Without CONSULT-II
WARNING:
�Confirm that the engine is cooled down and there are no fire hazards near the vehicle.
�Prepare pans or saucers under the disconnected fuel line because the fuel may spill out.
1. Turn ignition switch OFF.
2. Remove fuel hose from fuel rail pressure relief valve.
3. Attach a blind cap or plug to removed hose.
4. Start engine and keep engine speed more than 4,000 rpm for at
least 5 seconds.
5. Confirm that the fuel does not come out from the fuel rail pres-
sure relief valve.
WARNING:
�Be careful not to allow leaked fuel to contaminate engine
compartment. Especially, ensure to keep engine mount
insulator clear of fuel.
�If the fuel comes out, stop the engine immediately.
PBIB1941E
PBIB0587E
PBIB1941E
Page 1656 of 4179

EC-1278
[YD (WITHOUT EURO-OBD)]
DTC P0093 FUEL SYSTEM
3. CHECK FUEL LINE FOR LEAK
1. Start engine.
2. Visually check the following for fuel leak.
–Fuel tube from fuel pump to fuel rail
–Fuel rail
–Fuel tube from fuel rail to fuel injector
3. Also check for improper connection or pinches.
OK or NG
OK >> GO TO 4.
NG >> Repair malfunctioning part.
4. CHECK FUEL RAIL PRESSURE RELIEF VALVE
Refer to EC-1278, "
Component Inspection" .
OK or NG
OK >> GO TO 5.
NG >> Replace fuel rail.
5. CHECK INTERMITTENT INCIDENT
Refer to EC-1260, "
TROUBLE DIAGNOSIS FOR INTERMITTENT INCIDENT" .
OK or NG
OK >> GO TO 6.
NG >> Repair or replace.
6. REPLACE FUEL PUMP
1. Replace fuel pump.
2. Perform Fuel Pump Learning Value Clearing. Refer to EC-1221, "
Fuel Pump Learning Value Clearing" .
>>INSPECTION END
Component InspectionEBS0123V
FUEL RAIL PRESSURE RELIEF VALVE
With CONSULT-II
WARNING:
�Confirm that the engine is cooled down and there are no fire hazards near the vehicle.
�Prepare pans or saucers under the disconnected fuel line because the fuel may spill out.
1. Turn ignition switch OFF.
2. Remove fuel hose from fuel rail pressure relief valve.
3. Attach a blind cap or plug to removed hose.
4. Turn ignition switch ON.
PBIB1941E
Page 1881 of 4179

FUEL SYSTEM
FL-3
[QR]
C
D
E
F
G
H
I
J
K
L
MA
FL
FUEL SYSTEMPFP:17503
Checking Fuel LinesEBS00KOS
Inspect fuel lines, filler cap and tank for improper attachment, leaks,
cracks, damage, loose connections, chafing or deterioration.
If necessary, repair or replace damaged parts.
General PrecautionsEBS011T7
WARNING:
When replacing fuel line parts, be sure to observe the following.
�Put a “CAUTION: INFLAMMABLE” sign in the workshop.
�Be sure to work in a well ventilated area and furnish workshop with a CO2 fire extinguisher.
�Do not smoke while servicing fuel system. Keep open flames and sparks away from the work area.
CAUTION:
�Before removing fuel line parts, perform the following procedures:
–Put drained fuel in an explosion-proof container and put the lid on securely. Keep the container in
safe area.
–Release fuel pressure from the fuel lines. Refer to EC-48, "FUEL PRESSURE RELEASE" (WITH
EURO-OBD) or EC-510, "
FUEL PRESSURE RELEASE" (WITHOUT EURO-OBD).
–Disconnect negative battery terminal.
�Always replace O-rings and clamps with new ones.
�Do not kink or twist tubes when they are being installed.
�Do not tighten hose clamps excessively to avoid damaging hoses.
�After connecting fuel tube quick connectors, make sure
quick connectors are secure.
Ensure that connector and resin tube do not contact any
adjacent parts.
�After installing tubes, check if there are no fuel leaks at con-
nections in the following steps.
–Apply fuel pressure to fuel lines with turning ignition switch
“ON” (with engine stopped). Then check for fuel leaks at
connections.
–Start engine and rev it up and check for fuel leaks at con-
nections.
�For servicing “Evaporative Emission System” parts, refer to
EC-473, "
EVAPORATIVE EMISSION SYSTEM" (WITH EURO-
ODB) or EC-865, "
EVAPORATIVE EMISSION SYSTEM"
(WITHOUT EURO-OBD).
SMA803A
SBIA0504E
Page 1882 of 4179

FL-4
[QR]
FUEL LEVEL SENSOR UNIT, FUEL FILTER AND FUEL PUMP ASSEMBLY
FUEL LEVEL SENSOR UNIT, FUEL FILTER AND FUEL PUMP ASSEMBLYPFP:17042
Removal and InstallationEBS00KOU
REMOVAL
WARNING:
Be sure to read “General Precautions” when working on the fuel system. Refer to FL-3, "
General Pre-
cautions" .
1. Check fuel level on fuel gauge. If gauge indicates more than the
level as shown in the figure (full or almost full), drain fuel from
fuel tank until gauge indicates level as shown in the figure or
below.
NOTE:
Fuel will be spilled when removing main and sub fuel level sen-
sor units for the top of the fuel is above the main and sub fuel
level sensor units installation surface.
�As a guide, fuel level becomes the position as shown in the
figure or below when approximately 15 (13-1/4 Imp qt) of
fuel are drained from fuel tank.
�In case fuel pump does not operate, perform the following
procedure.
a. Insert fuel tube of less than 25 mm (0.98 in) in diameter into fuel filler tube through fuel filler opening to
draw fuel from fuel filler tube.
b. Disconnect fuel filler hose from fuel filler tube. Refer to FL-11, "
FUEL TANK" .
c. Insert fuel tube into fuel tank through fuel filler hose to draw fuel from fuel tank.
2. Release the fuel pressure from the fuel lines. Refer to EC-48, "
FUEL PRESSURE RELEASE" (WITH
EURO-OBD) or EC-510, "
FUEL PRESSURE RELEASE" (WITHOUT EURO-OBD).
3. Open fuel filler lid.
4. Open fuel filler cap and release the pressure inside fuel tank.
5. Lift to hold rear seat cushion up. Refer to SE-31, "
REAR SEAT" .
1. Lock ring 2.Main fuel level sensor unit, fuel filter
and fuel pump assembly3.Jet pump, fuel hose and jet pump
inlet assembly
4. Chamber 5. Seal packing 6. Sub fuel level sensor unit
PBIC2257E
FEL0403D
Page 1889 of 4179
FUEL TANK
FL-11
[QR]
C
D
E
F
G
H
I
J
K
L
MA
FL
FUEL TANKPFP:17202
Removal and InstallationEBS00KOW
REMOVAL
WARNING:
Be sure to read “General Precautions” when working on the fuel system. Refer to FL-3, "
General Pre-
cautions" .
1. Perform the steps 1 to 7 of “REMOVAL” in “ FUEL LEVEL SENSOR UNIT, FUEL FILTER AND FUEL
PUMP ASSEMBLY”. Refer to FL-4, "
REMOVAL" .
2. Drain fuel more from fuel tank if necessary.
CAUTION:
Because fuel tank forwardly inclines and becomes unstable when installing/removing, fuel should
be drained if found the remaining quantity.
3. Remove exhaust center tube and insulator. Refer to EX-2, "
EXHAUST SYSTEM" .
4. Remove propeller shaft. Refer to PR-3, "
REAR PROPELLER SHAFT" .
PBIC0246E
1. Fuel filler cap 2. Grommet 3. Fuel filler tube
4. Vent hose 5. Vent tube 6. Fuel tank
7. Fuel filler hose 8. Fuel tank band 9. Fuel tank protector