2003 NISSAN MAXIMA key
[x] Cancel search: keyPage 103 of 247

During this step, do not turn the ignition to
any positions other than ON.
4. Push the SET switch and, within 5 seconds,
push the memory switch 1 or 2 fully for at
least 1 second.
The indicator light for the pushed memory
switch will come on and stay on for approxi-
mately 5 seconds after pushing the switch.
After the indicator light goes off, the se-
lected positions are stored in the selected
memory (1 or 2).
If memory is stored in the same memory
switch, the previous memory will be de-
leted.
Confirming memory storageITurn the ignition ON and push the SET
switch. If the main memory has not been
stored, the indicator light will come on for
approximately 0.5 seconds. When the
memory has stored the position, the indica-
tor light will stay on for approximately 5
seconds.
IIf the battery cable is disconnected, or if the
fuse blows, the memory will be canceled. In
such a case, reset the desired positions
using the following procedures.
1. Open and close the driver's door more thantwo times with the ignition key in the LOCK
position.
2. Reset the desired position using the previ-
ous procedure.
Selecting the memorized position1. A/T models:
Set the automatic transmission selector le-
ver to the P (Park) position.
M/T models:
Apply the parking brake securely when the
vehicle is stopped.
2. Turn the ignition ON.
3. Push the memory switch 1 or 2 fully for at
least 1 second.
The driver's seat will move to the memo-
rized position with the indicator light flash-
ing. Then the light will stay on for approxi-
mately 5 seconds.
When memory switch 1 or 2 is pushed with the
driver's door open and then the key inserted
into the ignition switch within approximately 1
minute, the driver's seat will move to the
memorized position. Ð A/T models only
System operationThe automatic drive positioner system will not
work or will stop operating under the following
conditions:
Iwhen the vehicle speed is above 4 MPH (7
km/h).
Iwhen any two or more of the memory
switches are simultaneously pressed while
the automatic drive positioner is operating.
Iwhen the adjusting switch for the driver's
seat is turned on while the automatic drive
positioner is operating.
Iwhen the cancel switch located on the
instrument panel is pushed to cancel.
Iwhen the memory switch 1 or 2 is not
pushed for at least 1 second.
Iwhen the seat has already been moved to
the memorized position.
Iwhen no seat position is stored in the
memory switch.
Iwhen the parking brake is not applied. Ð
M/T models
Iwhen the vehicle speed is above 4 MPH (7
km/h) while the parking brake is applied. Ð
M/T models
To restart the drive positioner system,
3-18
Pre-driving checks and adjustments
Z
02.7.12/A33-D/V5.0
X
Page 117 of 247
The air conditioning system in your NISSAN
vehicle is charged with a refrigerant designed
with the environment in mind.This refrigerant
will not harm the earth's ozone layer.How-
ever, special charging equipment and lubricant
are required when servicing your NISSAN air
conditioner. Using improper refrigerants or lu-
bricants will cause severe damage to your air
conditioning system. See ªCapacities and rec-
ommended fuel/lubricantsº in the ª9. Technical
and consumer informationº section for air con-
ditioning system refrigerant and lubricant rec-
ommendations.
Your NISSAN dealer will be able to service
your environmentally friendly air conditioning
system.
WARNING
The air conditioner system contains re-
frigerant under high pressure. To avoid
personal injury, any air conditioner ser-
vice should be done only by an experi-
enced technician with proper equip-
ment.Turn the ignition key to ACC or ON and press
the power on switch to turn on the radio. If you
listen to the radio with the engine not running,
the key should be turned to the ACC position.
Radio reception is affected by station signal
strength, distance from radio transmitter, build-
ings, bridges, mountains and other external
influences. Intermittent changes in reception
quality normally are caused by these external
influences.
Using a cellular phone in or near the ve-
hicle may influence radio reception quality.
Radio receptionYour radio system is equipped with state-of-
the-art electronic circuits to enhance radio
reception. These circuits are designed to ex-
tend reception range, and to enhance the
quality of that reception.
However there are some general characteris-
tics of both FM and AM radio signals that can
affect radio reception quality in a moving ve-
hicle, even when the finest equipment is used.
These characteristics are completely normal in
a given reception area, and do not indicate any
malfunction in your radio system.
Remember that a moving vehicle is not the
ideal place to listen to a radio. Because of the
movement, reception conditions will constantlychange. Buildings, terrain, signal distance and
interference from other vehicles can work
against ideal reception. Described below are
some of the factors that can affect your radio
reception.
SERVICING AIR CONDITIONER AUDIO SYSTEM4-12
Heater, air conditioner and audio systems
Z
02.7.12/A33-D/V5.0
X
Page 121 of 247

FM-AM RADIO WITH CASSETTE
PLAYER AND COMPACT DISC
(CD) PLAYER/CD CHANGER
Audio main operationHead unit:
The radio has an FM diversity reception sys-
tem, which employs two antennas printed on
the rear window. This system automatically
switches to the antenna which is receiving less
interference.
The tape deck employs a permalloy head
which allows for improved reproduction of high
frequency ranges. Noise is also greatly re-
duced by the combined use of the Dolby NR
(Noise Reduction) system. The auto loudness
circuit enhances the low frequency range au-
tomatically in both radio reception and tape
and CD playback.
ON×OFF/Volume control:
Turn the ignition key to ACC or ON, and then
push the ON×OFF/VOL control knob while the
system is off to call up the mode (radio, tape or
CD) which was playing immediately before the
system was turned off. When no CD or tape is
loaded, the radio will come on. While the
system is on, pushing the ON×OFF/VOL con-
trol knob turns the system off.To turn the radio off, press the ON×OFF/VOL
control knob.
Turn the ON×OFF/VOL control knob to adjust
the volume.
This vehicle hasSpeed sensitive Control
Volume (SCV) for audio (type B only). The
audio volume changes as the driving speed
changes.
AUDIO button (BASS, TREBLE, FADER,
BALANCE, (SCV and NR (Dolby) Ð type B
only)):
Press the AUDIO button to change the select-
ing mode as follows.
BASS,TREBLE,FADER,BALANCE,
SCV (type B only),NR (when cassette
playing Ð type B only),BASS
To adjust BASS, Treble, Fader and Balance,
press the AUDIO button until the desired mode
BASS, TREBLE, FADER or BALANCE ap-
pears in the display. Press the TUNE (
)
or (
) button to adjust Bass and Treble to
the desired level. Use the
or
button
also to adjust Fader or Balance modes. Fader
adjusts the sound level between the front and
rear speakers and Balance adjusts the sound
between the right and left speakers.
To change the SCV mode to OFF, LOW, MIDor HIGH, press the
or
(TUNE) but-
ton (type B only).
To change the NR (Dolby) mode to OFF or
ON, press the
or
(TUNE) button
while cassette tape is playing. When Dolby is
ON, the display indicates the
mark.
After 10 seconds, the radio, cassette tape or
CD display reappears. Once the sound quality
is set to the desired level, press the AUDIO
button repeatedly until the radio, cassette tape
or CD display appears.
FM-AM radio operation
FM/AM band select:
Pushing the FM/AM band select button will
change the band as follows:
AM,FM1,FM2,AM
When FM/AM band select button is pushed
while the ignition switch is in the ACC or ON,
the radio will come on at the station last
played.
The last station played will also come on when
the power knob is turned to ON.
If a compact disc or tape is playing when the
FM/AM band select button is turned to ON, the
compact disc or tape will automatically be
4-16
Heater, air conditioner and audio systems
Z
02.7.12/A33-D/V5.0
X
Page 123 of 247
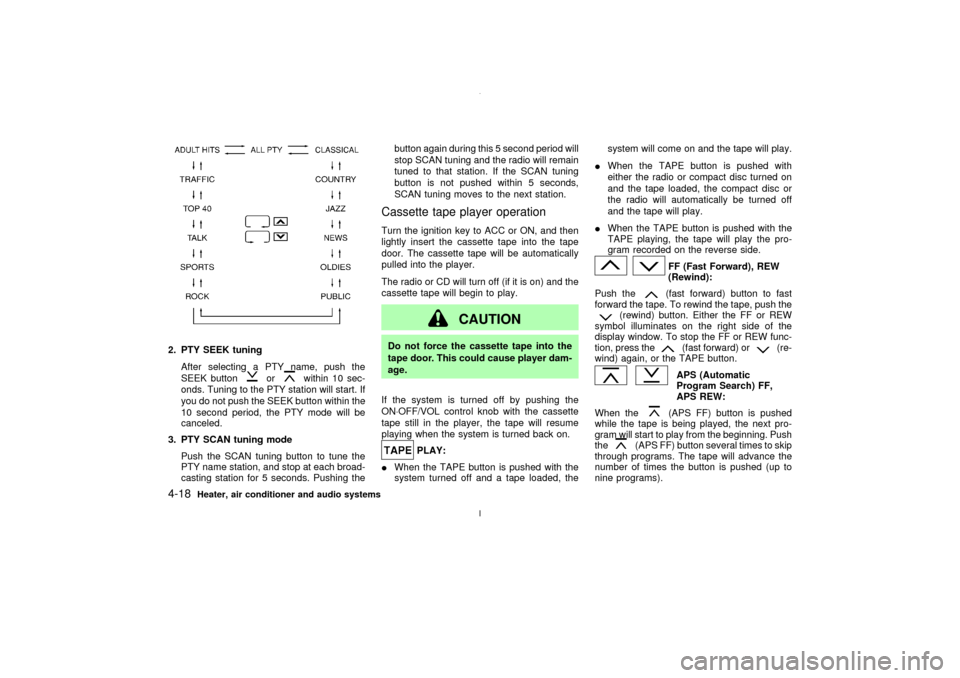
2. PTY SEEK tuning
After selecting a PTY name, push the
SEEK button
or
within 10 sec-
onds. Tuning to the PTY station will start. If
you do not push the SEEK button within the
10 second period, the PTY mode will be
canceled.
3. PTY SCAN tuning mode
Push the SCAN tuning button to tune the
PTY name station, and stop at each broad-
casting station for 5 seconds. Pushing thebutton again during this 5 second period will
stop SCAN tuning and the radio will remain
tuned to that station. If the SCAN tuning
button is not pushed within 5 seconds,
SCAN tuning moves to the next station.
Cassette tape player operationTurn the ignition key to ACC or ON, and then
lightly insert the cassette tape into the tape
door. The cassette tape will be automatically
pulled into the player.
The radio or CD will turn off (if it is on) and the
cassette tape will begin to play.
CAUTION
Do not force the cassette tape into the
tape door. This could cause player dam-
age.
If the system is turned off by pushing the
ON×OFF/VOL control knob with the cassette
tape still in the player, the tape will resume
playing when the system is turned back on.
PLAY:
IWhen the TAPE button is pushed with the
system turned off and a tape loaded, thesystem will come on and the tape will play.
IWhen the TAPE button is pushed with
either the radio or compact disc turned on
and the tape loaded, the compact disc or
the radio will automatically be turned off
and the tape will play.
IWhen the TAPE button is pushed with the
TAPE playing, the tape will play the pro-
gram recorded on the reverse side.
FF (Fast Forward), REW
(Rewind):
Push the(fast forward) button to fast
forward the tape. To rewind the tape, push the
(rewind) button. Either the FF or REW
symbol illuminates on the right side of the
display window. To stop the FF or REW func-
tion, press the
(fast forward) or
(re-
wind) again, or the TAPE button.
APS (Automatic
Program Search) FF,
APS REW:
When the(APS FF) button is pushed
while the tape is being played, the next pro-
gram will start to play from the beginning. Push
the
(APS FF) button several times to skip
through programs. The tape will advance the
number of times the button is pushed (up to
nine programs).
4-18
Heater, air conditioner and audio systems
Z
02.7.12/A33-D/V5.0
X
Page 124 of 247
When the
(APS REW) button is pushed
once, the program being played starts over
from the beginning. Push the
(APS
REW) button several times to skip back sev-
eral selections. The tape will go back the
number of times the button is pushed. Either
the FF or REW symbol flashes on the right
side of the display window while searching for
the selection.
This system searches for the blank intervals
between selections. If there is a blank interval
within one program or there is no interval
between programs, the system may not stop in
the desired or expected location.
SCAN tuning:
Push the SCAN tuning button while playing
tape, and it stops at the next tape program for
5 seconds. Pushing the button again during
this 5 second period will stop SCAN tuning and
the tape program is continued. If the SCAN
tuning button is not pushed within 5 seconds,
SCAN tuning moves to the next tape program.Dolby NR (Noise Reduction) (Type
A only):
Push the Dolby NR
button for Dolby NR
encoded tapes to reduce high frequency tape
noise. The indicator will come on.
Dolby noise reduction manufactured under li-cense from Dolby Laboratories Licensing Cor-
poration. Dolby NR and the double-D symbol
are trademarks of Dolby Laboratories
Licensing Corporation.
Metal or chrome tape usage:
The cassette player will be automatically set to
high performance play when playing a metal or
chrome cassette tape.TAPE EJECT:
When this button is pushed with the tape
loaded, the tape will be ejected.
When the tape is ejected while it is being
played, the system will be turned off.
Compact disc (CD) player operation
(Type A)Turn the ignition key to the ACC or ON position
and insert the compact disc into the slot with
the label side facing up. The compact disc will
be guided automatically into the slot and start
playing.
After loading the disc, the number of tracks on
the disc and the play time will appear on the
display.
If the radio or tape is already operating, it will
automatically turn off and the compact disc will
play.
CAUTION
Do not force the compact disc into the
slot. This could damage the player.
If the system has been turned off while the
compact disc was playing, pushing the
ON×OFF/VOL control knob will start the com-
pact disc.
8 cm diameter compact discs can also be used
without an adapter.
PLAY:
When the CD button is pushed with the system
off and the compact disc loaded, the system
will turn on and the compact disc will start to
play.
When the CD button is pushed with the com-
pact disc loaded but the tape or the radio
playing, the tape or radio will automatically be
turned off and the compact disc will start to
play.
FF (Fast Forward), REW
(Rewind):
When the(fast forward) or
(rewind)
button is pushed while the compact disc is
being played, the compact disc will play while
Heater, air conditioner and audio systems
4-19
Z
02.7.12/A33-D/V5.0
X
Page 125 of 247

fast forwarding or rewinding. When the button
is released, the compact disc will return to
normal play speed.
APS (Automatic Program
Search) FF, APS REW:
When the(APS FF) button is pushed
while the compact disc is being played, the
program next to the present one will start to
play from its beginning. Push several times to
skip through programs. The compact disc will
advance the number of times the button is
pushed. (When the last program on the com-
pact disc is skipped through, the first program
will be played.) When the
(APS REW)
button is pushed, the program being played
returns to its beginning. Push several times to
skip back through programs. The compact disc
will go back the number of times the button is
pushed.
SCAN tuning:
Push the SCAN tuning button while playing
CD, and it stops the CD program for 5 sec-
onds. Pushing the button again during this 5
second period will stop SCAN tuning and the
CD program is continued. If the SCAN tuning
button is not pushed within 5 seconds, SCAN
tuning moves to the next CD program.
REPEAT (RPT):
When the RPT play button is pushed while the
compact disc is being played, the play pattern
can be changed as follows:1CDRPT
¯
1CDMIX
¬
1 TR (Track) RPT
CD EJECT:
When the CD EJECT button is pushed with the
compact disc loaded, the compact disc will be
ejected.
When this button is pushed while the compact
disc is being played, the compact disc will
come out and the system will turn off.
If the compact disc comes out and is not
removed, it will be pulled back into the slot
to protect it. (except 8 cm diameter com-
pact discs)
CD IN indicator:
CD IN indicator appears on the display when
the CD is loaded with the system on.
Compact disc (CD) changer
operation (Type B)Turn the ignition key to the ACC or ON position
and insert the compact disc into the slot with
the label side facing up. The compact disc willbe guided automatically into the slot and start
playing.
After loading the disc, the number of tracks on
the disc and the play time will appear on the
display.
If the radio or tape is already operating, it will
automatically turn off and the compact disc will
play.
4-20
Heater, air conditioner and audio systems
Z
02.7.12/A33-D/V5.0
X
Page 128 of 247
FM-AM RADIO WITH CASSETTE
PLAYER Ð for navigation system
equipped modelsRefer to the separate Owner's Manual for
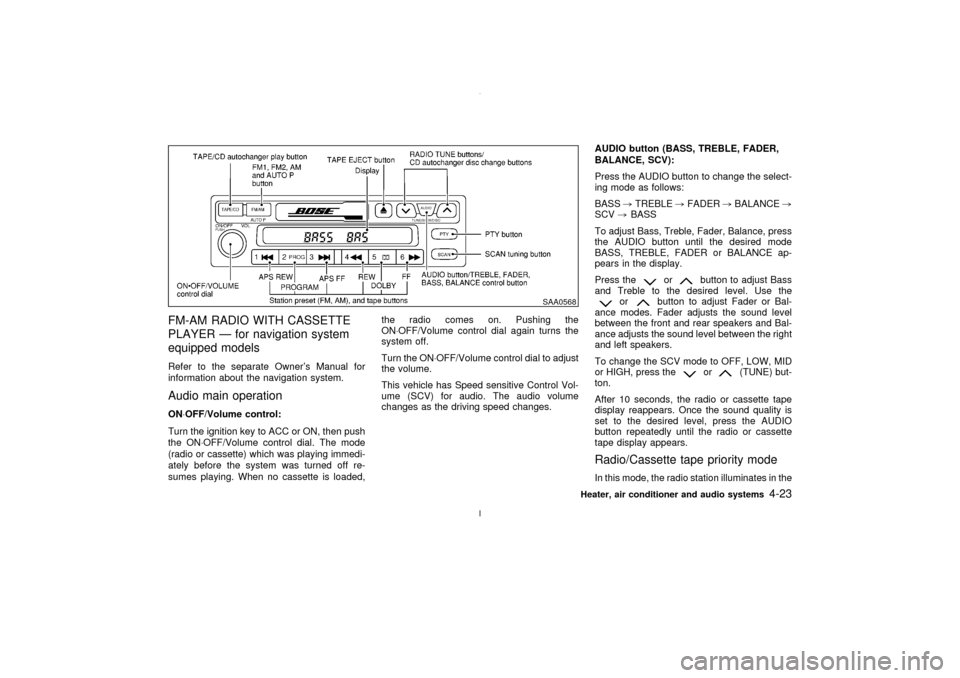
information about the navigation system.Audio main operationON×OFF/Volume control:
Turn the ignition key to ACC or ON, then push
the ON×OFF/Volume control dial. The mode
(radio or cassette) which was playing immedi-
ately before the system was turned off re-
sumes playing. When no cassette is loaded,the radio comes on. Pushing the
ON×OFF/Volume control dial again turns the
system off.
Turn the ON×OFF/Volume control dial to adjust
the volume.
This vehicle has Speed sensitive Control Vol-
ume (SCV) for audio. The audio volume
changes as the driving speed changes.AUDIO button (BASS, TREBLE, FADER,
BALANCE, SCV):
Press the AUDIO button to change the select-
ing mode as follows:
BASS,TREBLE,FADER,BALANCE,
SCV,BASS
To adjust Bass, Treble, Fader, Balance, press
the AUDIO button until the desired mode
BASS, TREBLE, FADER or BALANCE ap-
pears in the display.
Press the
or
button to adjust Bass
and Treble to the desired level. Use the
or
button to adjust Fader or Bal-
ance modes. Fader adjusts the sound level
between the front and rear speakers and Bal-
ance adjusts the sound level between the right
and left speakers.
To change the SCV mode to OFF, LOW, MID
or HIGH, press the
or
(TUNE) but-
ton.
After 10 seconds, the radio or cassette tape
display reappears. Once the sound quality is
set to the desired level, press the AUDIO
button repeatedly until the radio or cassette
tape display appears.
Radio/Cassette tape priority modeIn this mode, the radio station illuminates in the
SAA0568
Heater, air conditioner and audio systems
4-23
Z
02.7.12/A33-D/V5.0
X
Page 130 of 247
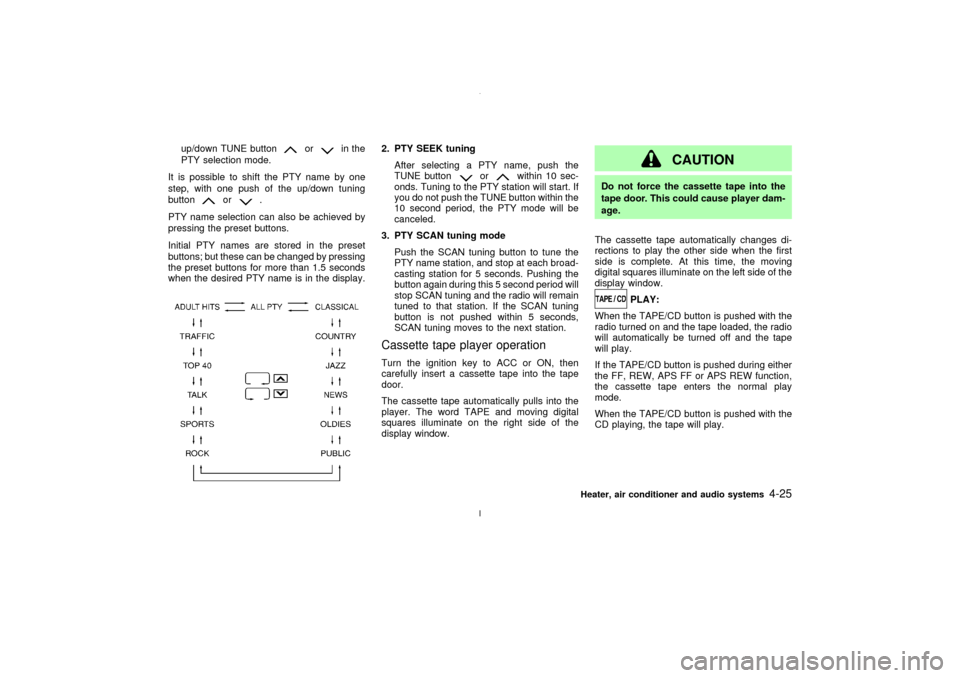
up/down TUNE button
or
in the
PTY selection mode.
It is possible to shift the PTY name by one
step, with one push of the up/down tuning
button
or
.
PTY name selection can also be achieved by
pressing the preset buttons.
Initial PTY names are stored in the preset
buttons; but these can be changed by pressing
the preset buttons for more than 1.5 seconds
when the desired PTY name is in the display.
2. PTY SEEK tuning
After selecting a PTY name, push the
TUNE button
or
within 10 sec-
onds. Tuning to the PTY station will start. If
you do not push the TUNE button within the
10 second period, the PTY mode will be
canceled.
3. PTY SCAN tuning mode
Push the SCAN tuning button to tune the
PTY name station, and stop at each broad-
casting station for 5 seconds. Pushing the
button again during this 5 second period will
stop SCAN tuning and the radio will remain
tuned to that station. If the SCAN tuning
button is not pushed within 5 seconds,
SCAN tuning moves to the next station.
Cassette tape player operationTurn the ignition key to ACC or ON, then
carefully insert a cassette tape into the tape
door.
The cassette tape automatically pulls into the
player. The word TAPE and moving digital
squares illuminate on the right side of the
display window.
CAUTION
Do not force the cassette tape into the
tape door. This could cause player dam-
age.
The cassette tape automatically changes di-
rections to play the other side when the first
side is complete. At this time, the moving
digital squares illuminate on the left side of the
display window.
PLAY:
When the TAPE/CD button is pushed with the
radio turned on and the tape loaded, the radio
will automatically be turned off and the tape
will play.
If the TAPE/CD button is pushed during either
the FF, REW, APS FF or APS REW function,
the cassette tape enters the normal play
mode.
When the TAPE/CD button is pushed with the
CD playing, the tape will play.
Heater, air conditioner and audio systems
4-25
Z
02.7.12/A33-D/V5.0
X