2003 NISSAN MAXIMA parking brake
[x] Cancel search: parking brakePage 164 of 247
IThe booster battery must be rated at
12 volts. Use of an improperly rated
battery can damage your vehicle.
IWhenever working on or near a bat-
tery, always wear suitable eye protec-
tors (for example, goggles or indus-
trial safety spectacles) and remove
rings, metal bands, or any other jew-
elry. Do not lean over the battery
when jump starting.
IDo not attempt to jump start a frozen
battery. It could explode and cause
serious injury.
IYour vehicle has an automatic engine
cooling fan. It could come on at any
time. Keep hands and other objects
away from it.
WARNING
Always follow the instructions below.
Failure to do so could result in damage
to the charging system and cause per-
sonal injury.
1. If the booster battery is in another vehicle,
position the two vehicles to bring their bat-
teries into close proximity to each other.
Do not allow the two vehicles to touch.
2. Apply parking brake. Move the shift lever tothe N (Neutral) position (On automatic
transmission models, move the selector
lever to the P (Park) position). Switch off all
unnecessary electrical systems (light,
heater, air conditioner, etc.).
3. Remove vent caps on the battery (if so
equipped). Cover the battery with an old
cloth to reduce explosion hazard.
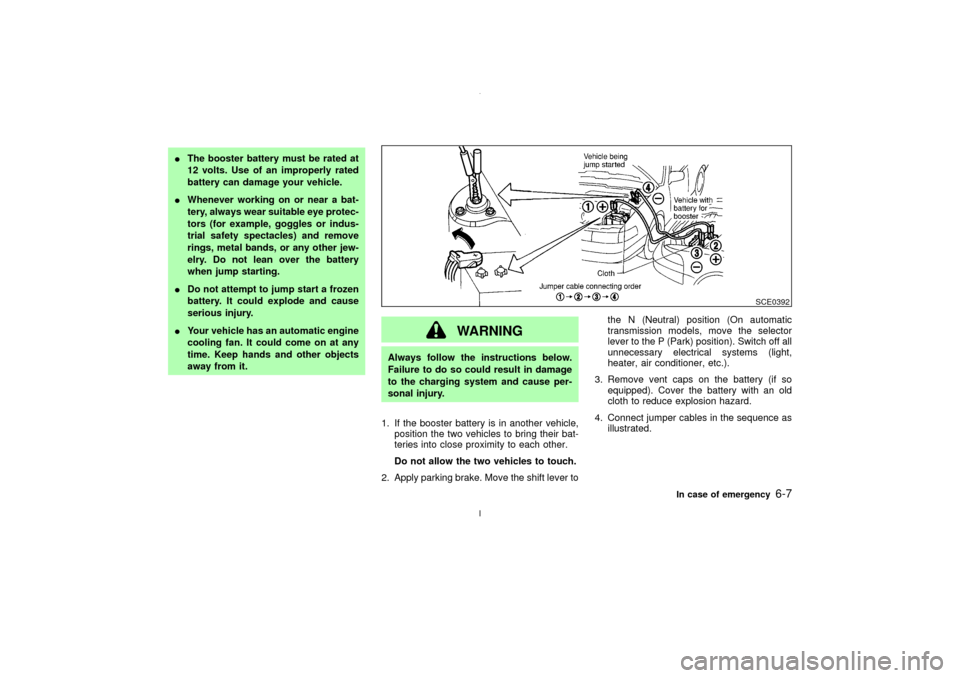
4. Connect jumper cables in the sequence as
illustrated.
SCE0392
In case of emergency
6-7
Z
02.7.12/A33-D/V5.0
X
Page 166 of 247
WARNING
IDo not continue to drive if your ve-
hicle overheats. Doing so could
cause a vehicle fire.
ITo avoid the danger of being scalded,
never remove the radiator cap while
the engine is still hot. When the radia-
tor cap is removed, pressurized hot
water will spurt out, possibly causing
serious injury.
IDo not open the hood if steam is
coming out.
If your vehicle is overheating (indicated by an
extremely high temperature gauge reading), or
if you feel a lack of engine power, detect
abnormal noise, etc., take the following steps:
1. Move the vehicle safely off the road, apply
the parking brake and move the shift lever
to the N (Neutral) position (automatic trans-
mission to the P (Park) position).
Do not stop the engine.
2. Turn off the air conditioner switch. Open all
the windows, move the heater or air condi-tioner temperature control to maximum hot
and fan control to high speed.
3. Get out of the vehicle. Look and listen for
steam or coolant escaping from the radiator
before opening the hood. Wait until no
steam or coolant can be seen before pro-
ceeding.
4. Open the engine hood.
WARNING
If steam or water is coming from the
engine, stand clear to prevent getting
burned.
5. Visually check if the cooling fan is running.
The radiator hoses and radiator should not
leak water.
If coolant is leaking or the cooling fan does
not run, stop the engine.
WARNING
IBe careful not to allow your hands,
hair, jewelry or clothing to come intocontact with, or to get caught in the
cooling fan, or drive belt.
IThe engine cooling fan can start at
any time when the coolant tempera-
ture is high.
6. After the engine cools down, check the
coolant level in the reservoir tank with the
engine running. Add coolant to the reservoir
tank if necessary. Have your vehicle re-
paired at the nearest NISSAN dealer.
IF YOUR VEHICLE OVERHEATS
In case of emergency
6-9
Z
02.7.12/A33-D/V5.0
X
Page 168 of 247
CAUTION
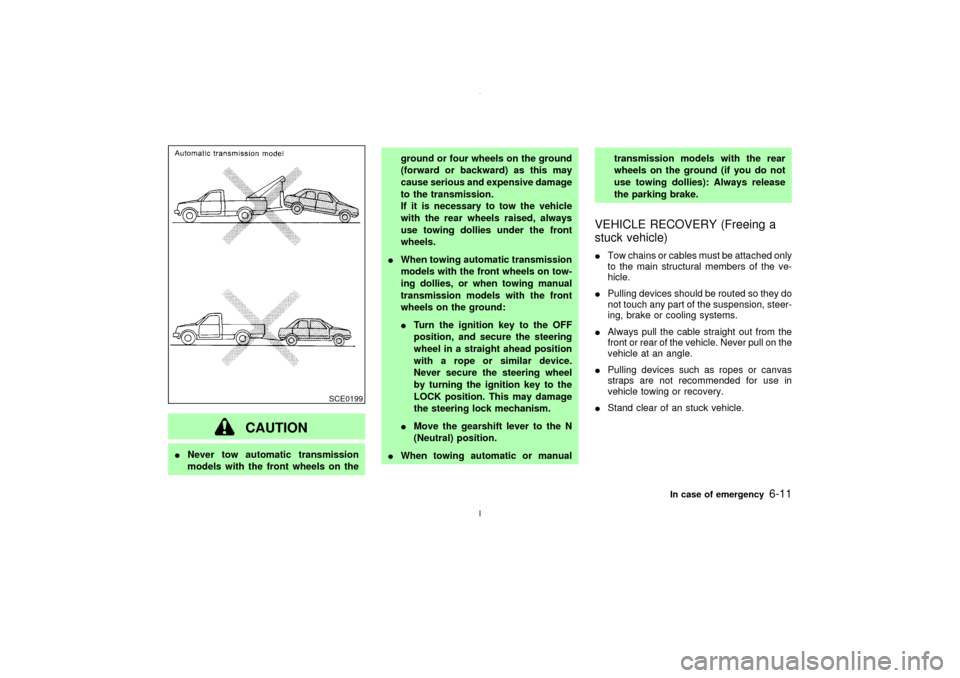
INever tow automatic transmission
models with the front wheels on theground or four wheels on the ground
(forward or backward) as this may
cause serious and expensive damage
to the transmission.
If it is necessary to tow the vehicle
with the rear wheels raised, always
use towing dollies under the front
wheels.
IWhen towing automatic transmission
models with the front wheels on tow-
ing dollies, or when towing manual
transmission models with the front
wheels on the ground:
ITurn the ignition key to the OFF
position, and secure the steering
wheel in a straight ahead position
with a rope or similar device.
Never secure the steering wheel
by turning the ignition key to the
LOCK position. This may damage
the steering lock mechanism.
IMove the gearshift lever to the N
(Neutral) position.
IWhen towing automatic or manualtransmission models with the rear
wheels on the ground (if you do not
use towing dollies): Always release
the parking brake.
VEHICLE RECOVERY (Freeing a
stuck vehicle)ITow chains or cables must be attached only
to the main structural members of the ve-
hicle.
IPulling devices should be routed so they do
not touch any part of the suspension, steer-
ing, brake or cooling systems.
IAlways pull the cable straight out from the
front or rear of the vehicle. Never pull on the
vehicle at an angle.
IPulling devices such as ropes or canvas
straps are not recommended for use in
vehicle towing or recovery.
IStand clear of an stuck vehicle.
SCE0199
In case of emergency
6-11
Z
02.7.12/A33-D/V5.0
X
Page 176 of 247

8 Maintenance and do-it-yourselfMaintenance requirements ........................................ 8-2
General maintenance ................................................ 8-2
Explanation of general maintenance items .......... 8-2
Maintenance precautions .......................................... 8-5
Engine compartment check locations ....................... 8-7
Engine cooling system .............................................. 8-8
Checking engine coolant level ............................. 8-8
Changing engine coolant ..................................... 8-9
Engine oil ................................................................ 8-10
Checking engine oil level ................................... 8-10
Changing engine oil ........................................... 8-11
Changing engine oil filter ................................... 8-12
Automatic transmission fluid ................................... 8-12
Temperature conditions for checking ................. 8-13
Power steering fluid ................................................ 8-14
Brake and clutch fluid ............................................. 8-14
Window washer fluid ............................................... 8-15
Battery ..................................................................... 8-15
Drive belts ............................................................... 8-17
Spark plugs ............................................................. 8-17
Replacing spark plugs ........................................ 8-18Air cleaner ............................................................... 8-18
Windshield wiper blades ......................................... 8-19
Cleaning ............................................................. 8-19
Replacing............................................................ 8-20
Parking brake and brake pedal ............................... 8-21
Checking parking brake ..................................... 8-21
Checking brake pedal ........................................ 8-21
Brake booster ..................................................... 8-22
Fuses....................................................................... 8-22
Engine compartment .......................................... 8-22
Passenger compartment .................................... 8-24
Keyfob battery replacement .................................... 8-24
Lights ....................................................................... 8-26
Headlights........................................................... 8-27
Exterior and interior lights .................................. 8-28
Wheels and tires ..................................................... 8-33
Tire pressure ...................................................... 8-33
Types of tires...................................................... 8-33
Tire chains .......................................................... 8-34
Changing wheels and tires ................................. 8-35
Z
02.7.12/A33-D/V5.0
X
Page 179 of 247

keep floor mats away from the pedal.
Parking brake*:Check that the lever has the
proper travel and make sure that the vehicle is
held securely on a fairly steep hill when only
the parking brake is applied.
Automatic transaxle P (Park) position
mechanism:On a fairly steep hill check that
the vehicle is held securely with the selector
lever in the P (Park) position without applying
any brakes.Under the hood and the vehicleThe maintenance items listed here should be
checked periodically (for example, each time
you check the engine oil or refuel).
Windshield washer fluid*:Check that there
is adequate fluid in the tank.
Engine coolant level*:Check the coolant
level when the engine is cold.
Radiator and hoses:Check the front of the
radiator and clean off any dirt, insects, leaves,
etc., that may have accumulated. Make sure
the hoses have no cracks, deformation, dete-
rioration or loose connections.
Brake and clutch fluid levels*:Make sure
that the brake and clutch fluid levels are be-
tween the MAX and MIN lines on the reservoir.Battery*:Check the fluid level in each cell. It
should be between the MAX and MIN lines.
Vehicles operated in high temperatures or
under severe conditions require frequent
checks of the battery fluid level.
Engine drive belts*:Make sure that no belt is
frayed, worn, cracked or oily.
Engine oil level*:Check the level on the
dipstick after parking the vehicle on a level
spot and turning off the engine.
Power steering fluid level* and lines:Check
the level in the reservoir tank with the engine
off. Check the lines for proper attachment,
leaks, cracks, etc.
Automatic transaxle fluid level*:Check the
level on the dipstick after putting the selector
lever in P (Park) position with the engine idling.
Exhaust system:Make sure there are no
loose supports, cracks or holes. If the sound of
the exhaust seems unusual or there is a smell
of exhaust fumes, immediately locate the
trouble and correct it. (See ªPrecautions when
starting and drivingº in the ª5. Starting and
drivingº section for exhaust gas (carbon mon-
oxide).)
Underbody:The underbody is frequently ex-
posed to corrosive substances such as those
used on icy roads or to control dust. It is veryimportant to remove these substances, other-
wise rust will form on the floor pan, frame, fuel
lines and around the exhaust system. At the
end of winter, the underbody should be thor-
oughly flushed with plain water, being careful
to clean those areas where mud and dirt may
accumulate. For additional information, see
ªCleaning exteriorº in the ª7. Appearance and
careº section.
Fluid leaks:Check under the vehicle for fuel,
oil, water or other fluid leaks after the vehicle
has been parked for a while. Water dripping
from the air conditioner after use is normal. If
you should notice any leaks or if gasoline
fumes are evident, check for the cause and
have it corrected immediately.8-4
Maintenance and do-it-yourself
Z
02.7.12/A33-D/V5.0
X
Page 180 of 247
When performing any inspection or mainte-
nance work on your vehicle, always take care
to prevent serious accidental injury to yourself
or damage to the vehicle. The following are
general precautions which should be closely
observed.
WARNING
IPark the vehicle on a level surface,
apply the parking brake securely and
block the wheels to prevent the ve-
hicle from moving. For a manual
transmission, move the shift lever to
N (Neutral) position. For an automatic
transmission, move the selector lever
to P (Park) position.
IBe sure the ignition key is OFF or
LOCK when performing any parts re-
placement or repairs.
IYour vehicle is equipped with an au-
tomatic engine cooling fan. It may
come on at any time without warning,
even if the ignition key is in the OFF
position and the engine is not run-
ning. To avoid injury, always discon-nect the negative battery cable before
working near the fan.
IIf you must work with the engine
running, keep your hands, clothing,
hair and tools away from moving
fans, belts and any other moving
parts.
IIt is advisable to secure or remove
any loose clothing and any jewelry,
such as rings, watches, etc. before
working on your vehicle.
IAlways wear eye protection when-
ever you work on your vehicle.
IIf you must run the engine in an
enclosed space such as a garage, be
sure there is proper ventilation for
exhaust gases to escape.
INever get under the vehicle while it is
supported only by a jack. If it is nec-
essary to work under the vehicle,
support it with safety stands.
IKeep smoking materials, flame and
sparks away from fuel and the bat-tery.
IOn gasoline engine models with the
Multiport Fuel Injection (MFI) System,
the fuel filter or fuel lines should be
serviced by a NISSAN dealer because
the fuel lines are under high pressure
even when the engine is off.
CAUTION
IDo not work under the hood while the
engine is hot. Turn off the engine and
wait until it cools down.
INever connect or disconnect either
the battery or any transistorized com-
ponent connector while the ignition
key is on.
INever leave the engine or the auto-
matic transmission related compo-
nent harness connector discon-
nected while the ignition key is on.
IAvoid direct contact with used engine
oil and coolant. Improperly disposed
MAINTENANCE PRECAUTIONS
Maintenance and do-it-yourself
8-5
Z
02.7.12/A33-D/V5.0
X
Page 185 of 247
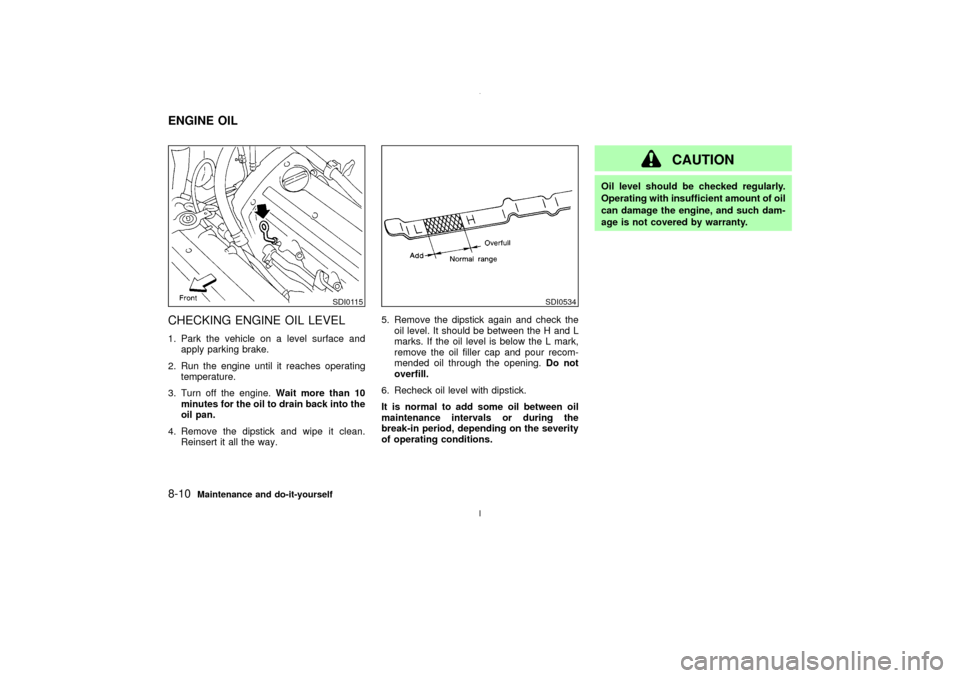
CHECKING ENGINE OIL LEVEL1. Park the vehicle on a level surface and
apply parking brake.
2. Run the engine until it reaches operating
temperature.
3. Turn off the engine.Wait more than 10
minutes for the oil to drain back into the
oil pan.
4. Remove the dipstick and wipe it clean.
Reinsert it all the way.5. Remove the dipstick again and check the
oil level. It should be between the H and L
marks. If the oil level is below the L mark,
remove the oil filler cap and pour recom-
mended oil through the opening.Do not
overfill.
6. Recheck oil level with dipstick.
It is normal to add some oil between oil
maintenance intervals or during the
break-in period, depending on the severity
of operating conditions.
CAUTION
Oil level should be checked regularly.
Operating with insufficient amount of oil
can damage the engine, and such dam-
age is not covered by warranty.
SDI0115
SDI0534
ENGINE OIL8-10
Maintenance and do-it-yourself
Z
02.7.12/A33-D/V5.0
X
Page 186 of 247
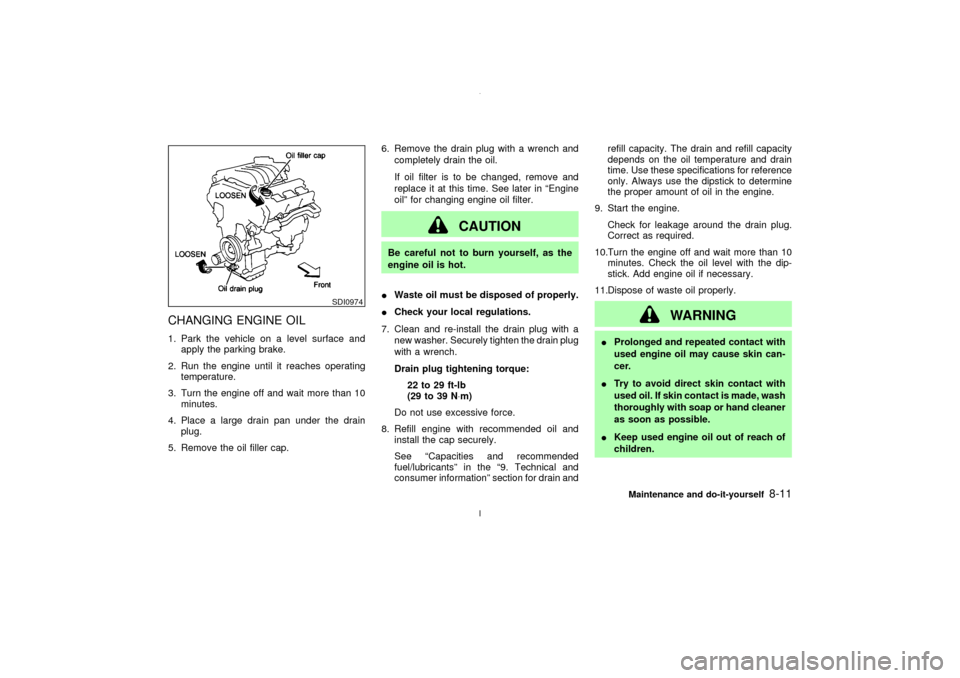
CHANGING ENGINE OIL1. Park the vehicle on a level surface and
apply the parking brake.
2. Run the engine until it reaches operating
temperature.
3. Turn the engine off and wait more than 10
minutes.
4. Place a large drain pan under the drain
plug.
5. Remove the oil filler cap.6. Remove the drain plug with a wrench and
completely drain the oil.
If oil filter is to be changed, remove and
replace it at this time. See later in ªEngine
oilº for changing engine oil filter.
CAUTION
Be careful not to burn yourself, as the
engine oil is hot.
IWaste oil must be disposed of properly.
ICheck your local regulations.
7. Clean and re-install the drain plug with a
new washer. Securely tighten the drain plug
with a wrench.
Drain plug tightening torque:
22 to 29 ft-lb
(29 to 39 N×m)
Do not use excessive force.
8. Refill engine with recommended oil and
install the cap securely.
See ªCapacities and recommended
fuel/lubricantsº in the ª9. Technical and
consumer informationº section for drain andrefill capacity. The drain and refill capacity
depends on the oil temperature and drain
time. Use these specifications for reference
only. Always use the dipstick to determine
the proper amount of oil in the engine.
9. Start the engine.
Check for leakage around the drain plug.
Correct as required.
10.Turn the engine off and wait more than 10
minutes. Check the oil level with the dip-
stick. Add engine oil if necessary.
11.Dispose of waste oil properly.
WARNING
IProlonged and repeated contact with
used engine oil may cause skin can-
cer.
ITry to avoid direct skin contact with
used oil. If skin contact is made, wash
thoroughly with soap or hand cleaner
as soon as possible.
IKeep used engine oil out of reach of
children.
SDI0974
Maintenance and do-it-yourself
8-11
Z
02.7.12/A33-D/V5.0
X