2003 NISSAN FRONTIER open hood
[x] Cancel search: open hoodPage 70 of 272

How to arm the vehicle security sys-
tem
1. Close all windows.(The system can be
armed even if the windows are open.)
2. Remove the key from the ignition switch.
3. Close the hood and all doors. Lock all doors.
The doors can be locked with the key, power
door lock switch or with the keyfob.
Keyfob operation:
cPush the
button on the keyfob.
All doors lock. The hazard lights flash
twice and the horn beeps once to indicate
all doors are locked.
cWhen the
button is pushed with
all doors locked, the hazard lights flash
twice and the horn beeps once as a re-
minder that the doors are already locked.
The horn may or may not beep once.
Refer to “Silencing the horn beep fea-
ture” later in this section.
cIf a door is open and you push
the
button the doors lock but the
horn does not chirp and the hazard lights
do not flash.
cConfirm that the SECURITY indicator light
comes on. The SECURITY light stays on forabout 30 seconds and then begins to flash
once every 3 seconds. The system is now
armed. If, during this 30-second time period, a
door is unlocked by the key or the keyfob, or
the ignition key is turned to ACC or ON, the
system will not arm.
cIf the key is turned slowly when locking
the door, the system may not arm. Fur-
thermore, if the key is turned excessively
to the unlock position, the system may
be disarmed when the key is removed. If
the indicator light fails to glow for 30
seconds, unlock the door once and lock
it again.
cEven when the driver and/or passengers
are in the vehicle, the system will arm
with all doors and the hood closed and
locked and the ignition key in the OFF
position. Turn the ignition key to the ACC
or ON to turn the security system off.
The vehicle security system is NOT armed if 1 of
the following occurs:
cA door is unlocked or the ignition key is turned
to the ACC or ON position during the 30 sec-
onds in which the SECURITY light stays on.
cThe SECURITY light blinks at a steady 1/2
second on - 1/2 second off rate (a door or the
hood is open and the key is not in the ACC or
LIC0053
2-16Instruments and controls
ZREVIEW COPY:Ð2003 Truck/Frontier(d22)
Owners Manual(owners)ÐUSA English(nna)
01/14/03Ðarosenma
X
Page 71 of 272

ON position) . When the ignition key is turned
to the ACC or ON position, the SECURITY
light turns off.
Vehicle security system activation
The vehicle security system will give the following
alarm:
cThe headlights blink and the horn sounds in-
termittently. In addition, the starter motor does
not operate.
cThe alarm automatically turns off after about
50 seconds. However, the alarm reactivates if
the vehicle is tampered with again. The alarm
can be shut off by unlocking a door with the
key, or by pressing the
button on the
keyfob.
The alarm is activated by:
copening a door without using the key or keyfob
(even if the door is unlocked by releasing the
inside lock knob) .
copening the hood.
How to stop an activated alarm
The alarm stops only by unlocking a door with the
key or by pressing thebutton on the keyfob.
The alarm does not stop if the ignition
switch is turned to ACC or ON.
Silencing the horn beep feature
If desired, the horn beep feature can be deacti-
vated using the keyfob.
To deactivate:Press and hold both the
andbuttons at the same timefor at least
2 seconds.
The hazard lights will quickly flash 3 times to
confirm that the horn beep feature has been
deactivated.
To activate:Press and hold both the
andbuttons at the same timefor at least
2 seconds once more.The hazard lights will quickly flash once and the
horn will sound once to confirm that the horn
beep feature has been reactivated.
Deactivating the horn feature does not silence
the horn if the alarm is triggered.
If the system does not operate as described
above, have it checked by a NISSAN dealer.
WIC0325
Instruments and controls2-17
ZREVIEW COPY:Ð2003 Truck/Frontier(d22)
Owners Manual(owners)ÐUSA English(nna)
01/14/03Ðarosenma
X
Page 90 of 272
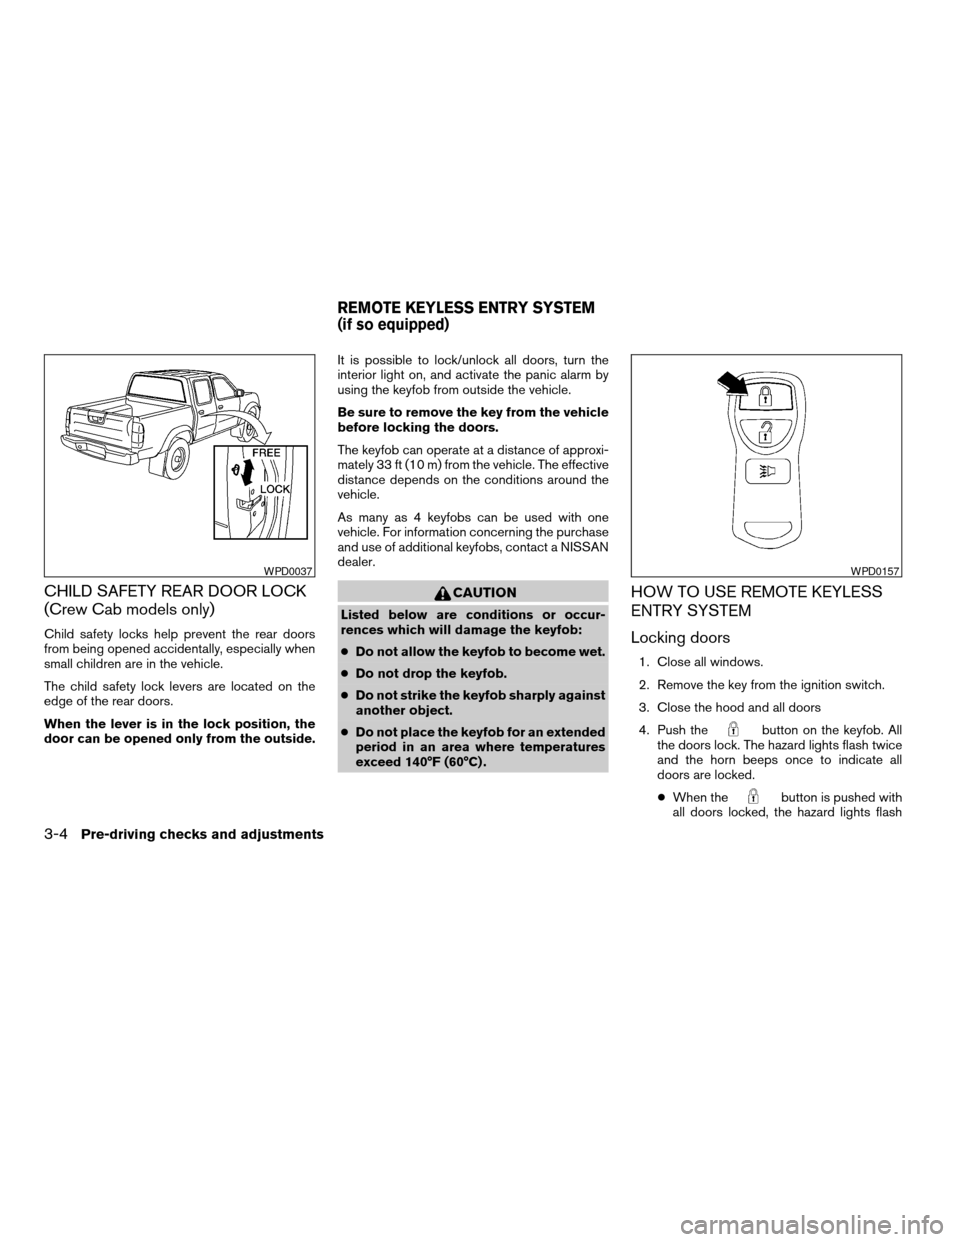
CHILD SAFETY REAR DOOR LOCK
(Crew Cab models only)
Child safety locks help prevent the rear doors
from being opened accidentally, especially when
small children are in the vehicle.
The child safety lock levers are located on the
edge of the rear doors.
When the lever is in the lock position, the
door can be opened only from the outside.It is possible to lock/unlock all doors, turn the
interior light on, and activate the panic alarm by
using the keyfob from outside the vehicle.
Be sure to remove the key from the vehicle
before locking the doors.
The keyfob can operate at a distance of approxi-
mately 33 ft (10 m) from the vehicle. The effective
distance depends on the conditions around the
vehicle.
As many as 4 keyfobs can be used with one
vehicle. For information concerning the purchase
and use of additional keyfobs, contact a NISSAN
dealer.
CAUTION
Listed below are conditions or occur-
rences which will damage the keyfob:
cDo not allow the keyfob to become wet.
cDo not drop the keyfob.
cDo not strike the keyfob sharply against
another object.
cDo not place the keyfob for an extended
period in an area where temperatures
exceed 140°F (60°C) .
HOW TO USE REMOTE KEYLESS
ENTRY SYSTEM
Locking doors
1. Close all windows.
2. Remove the key from the ignition switch.
3. Close the hood and all doors
4. Push the
button on the keyfob. All
the doors lock. The hazard lights flash twice
and the horn beeps once to indicate all
doors are locked.
cWhen the
button is pushed with
all doors locked, the hazard lights flash
WPD0037WPD0157
REMOTE KEYLESS ENTRY SYSTEM
(if so equipped)
3-4Pre-driving checks and adjustments
ZREVIEW COPY:Ð2003 Truck/Frontier(d22)
Owners Manual(owners)ÐUSA English(nna)
01/15/03Ðarosenma
X
Page 94 of 272
WARNING
cMake sure the hood is completely
closed and latched before driving. Fail-
ure to do so could cause the hood to fly
open and result in an accident.
cIf you see steam or smoke coming from
the engine compartment, to avoid injury
do not open the hood.
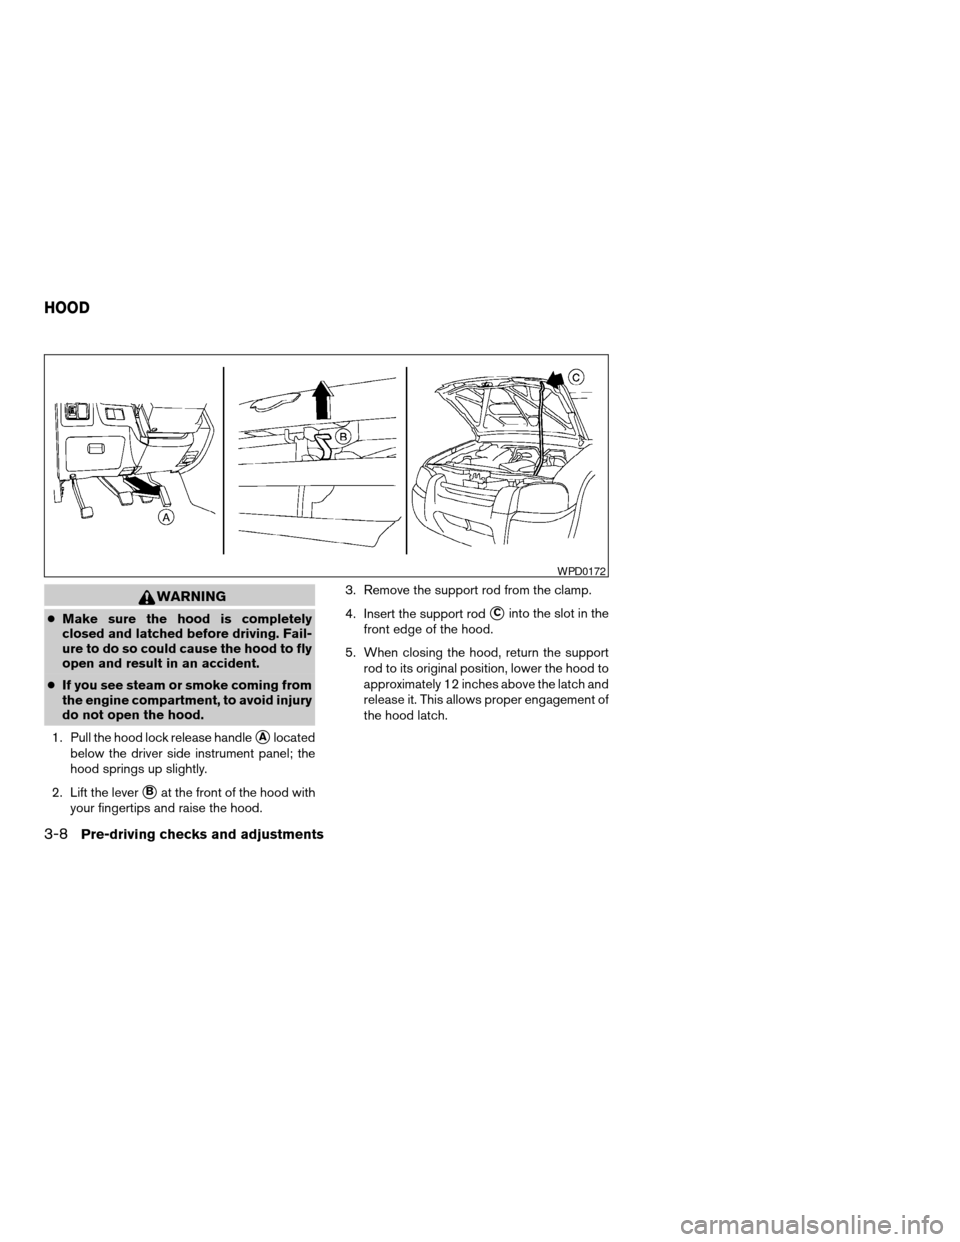
1. Pull the hood lock release handle
sAlocated
below the driver side instrument panel; the
hood springs up slightly.
2. Lift the lever
sBat the front of the hood with
your fingertips and raise the hood.3. Remove the support rod from the clamp.
4. Insert the support rod
sCinto the slot in the
front edge of the hood.
5. When closing the hood, return the support
rod to its original position, lower the hood to
approximately 12 inches above the latch and
release it. This allows proper engagement of
the hood latch.
WPD0172
HOOD
3-8Pre-driving checks and adjustments
ZREVIEW COPY:Ð2003 Truck/Frontier(d22)
Owners Manual(owners)ÐUSA English(nna)
01/15/03Ðarosenma
X
Page 177 of 272
WARNING
cAutomatic transmission models cannot
be push-started or tow-started. This
may cause transmission or other ve-
hicle damage.
cThree-way catalyst equipped models
should not be started by pushing. The
three-way catalyst may be damaged.
cNever try to start the vehicle by towing
it. When the engine starts, the forward
surge could cause the vehicle to collide
with the tow vehicle.If your vehicle is overheating (indicated by an
extremely high temperature gauge reading) , or if
you feel a lack of engine power, detect abnormal
noise, etc. take the following steps.
WARNING
cDo not continue to drive if your vehicle
overheats. Doing so could cause a ve-
hicle fire.
cTo avoid the danger of being scalded,
never remove the radiator cap while the
engine is still hot. When the radiator
cap is removed, pressurized hot water
will spurt out, possibly causing serious
injury.
cDo not open the hood if steam is com-
ing out.
1. Move the vehicle safely off the road, apply
the parking brake and move the shift lever to
N (Neutral) (manual transmission) or to P
(Park) (automatic transmission) .
Do not stop the engine.
2. Turn off the air conditioner (if so equipped) .
Open all the windows, move the heater or air
conditioner temperature control to maximum
hot and fan control to high speed.3. If engine overheating is caused by climbing a
long hill on a hot day, run the engine at a fast
idle (approximately 1,500 r/min) until the
temperature gauge indicator returns to nor-
mal.
4. Get out of the vehicle. Look and listen for
steam or coolant escaping from the radiator
before opening the hood. Wait until no
steam or coolant can be seen before pro-
ceeding.
5. Open the engine hood.
WARNING
If steam or water is coming from the en-
gine, stand clear to prevent getting
burned.
6. Visually check drive belts for damage or
looseness. Also check if the cooling fan is
running. The radiator hoses and radiator
should not leak water. If coolant is leaking,
the water pump belt is missing or loose, or
the cooling fan does not run, stop the en-
gine.
PUSH STARTING IF YOUR VEHICLE OVERHEATS
In case of emergency6-11
ZREVIEW COPY:Ð2003 Truck/Frontier(d22)
Owners Manual(owners)ÐUSA English(nna)
01/15/03Ðarosenma
X
Page 184 of 272
In order to maintain the appearance of your ve-
hicle, it is important to take proper care of it.
In the following cases, please wash your vehicle
as soon as possible to protect the paint surface:
cafter a rainfall to prevent possible damage from
acid rain.
cafter driving on coastal roads.
cwhen contaminants such as soot, bird drop-
pings, tree sap, metal particles or bugs get on
the paint surface.
cwhen dust or mud builds up on the surface.
Whenever possible, store or park your vehicle
inside a garage or in a covered area.
When it is necessary to park outside, park in a
shady area or protect the vehicle with a body
cover.
Be careful not to scratch the paint surface
when putting on or removing the body
cover.
WASHING
Wash dirt off with a wet sponge and plenty of
water. Clean the vehicle thoroughly using a mild
soap, a special vehicle soap or general purpose
dishwashing liquid mixed with clean, lukewarm
(never hot) water.
CAUTION
cDo not wash the vehicle with strong
household soap, strong chemical deter-
gents, gasoline or solvents.
cDo not wash the vehicle in direct sun-
light or while the vehicle body is hot, as
the surface may become water-spotted.
cAvoid using tight-napped or rough
cloths, such as washing mitts. Care
must be taken when removing
caked-on dirt or other foreign sub-
stances so the paint surface is not
scratched or damaged.
Rinse the vehicle thoroughly with plenty of clean
water.
Inside flanges, seams and folds on the doors,
hatches and hood are particularly vulnerable to
the effects of road salt. Therefore, these areas
must be cleaned regularly. Take care that the
drain holes in the lower edge of the door are
open. Spray water under the body and in the
wheel wells to loosen the dirt and wash away
road salt.
A damp chamois can be used to dry the vehicle to
avoid water spots.
WAXING
Regular waxing protects the paint surface and
helps retain new vehicle appearance. After wax-
ing, polishing is recommended to remove
built-up residue and to avoid a “weathered” ap-
pearance.
A NISSAN dealer can assist you in choosing the
proper product.
cWax your vehicle only after a thorough wash-
ing. Follow the instructions supplied with the
wax.
cDo not use a wax containing any abrasives,
cutting compounds or cleaners that may dam-
age the vehicle finish.
cIf the surface does not polish easily, use a
“road tar” remover and wax again.
Machine compounding or aggressive polishing
on a base coat/clear coat paint finish may dull the
finish or leave swirl marks.
REMOVING SPOTS
Remove tar and oil spots, industrial dust, insects,
and tree sap as quickly as possible from the
surface of the paint to avoid lasting damage or
staining. Special cleaning products are available
at a NISSAN dealer or any automotive accessory
store.
CLEANING EXTERIOR
7-2Appearance and care
ZREVIEW COPY:Ð2003 Truck/Frontier(d22)
Owners Manual(owners)ÐUSA English(nna)
01/15/03Ðarosenma
X
Page 191 of 272

Wheel nuts*When checking the tires, make
sure no wheel nuts are missing, and check for any
loose wheel nuts. Tighten if necessary.
Tire rotation*Tires should be rotated every
7,500 miles (12,000 km) .
Wheel alignment and balanceIf the vehicle
should pull to either side while driving on a
straight and level road, or if you detect uneven or
abnormal tire wear, there may be a need for wheel
alignment.
If the steering wheel or seat vibrates at normal
highway speeds, wheel balancing may be
needed.
cFor additional information regarding tires, refer
to “Important Tire Safety Information” (US) or
“Tire Safety Information” (Canada) in the War-
ranty Information Booklet .
WindshieldClean the windshield on a regular
basis. Check the windshield at least every six
months for cracks or other damage. Have a dam-
aged windshield repaired by a qualified repair
facility.
Windshield wiper blades*Check for cracks or
wear if they do not wipe properly.
Doors, hood and tailgateCheck that the
doors, hood and tailgate operate properly. Also
ensure that all latches lock securely. Lubricatehinges, latches, latch pins, rollers and links as
necessary. Make sure that the secondary latch
keeps the hood from opening when the primary
latch is released.
When driving in areas using road salt or other
corrosive materials, check lubrication frequently.
Lights*Clean the headlights on a regular basis.
Make sure that the headlights, stop lights, tail
lights, turn signal lights, and other lights are all
operating properly and installed securely. Also
check headlight aim.
Inside the vehicle
The maintenance items listed here should be
checked on a regular basis, such as when per-
forming periodic maintenance, cleaning the ve-
hicle, etc.
Additional information on the following
items with an “*” is found later in this sec-
tion.
Warning lights and chimesMake sure all
warning lights and chimes are operating properly.
Windshield wiper and washer*Check that
the wipers and washer operate properly and that
the wipers do not streak.Windshield defrosterCheck that the air
comes out of the defroster outlets properly and in
sufficient quantity when operating the heater or
air conditioner.
Steering wheelCheck for changes in the steer-
ing system, such as excessive freeplay, hard
steering or strange noises.
SeatsCheck seat position controls such as seat
adjusters, seatback recliner, etc. to ensure they
operate smoothly and all latches lock securely in
every position. Check that the head restraints
move up and down smoothly and the locks (if so
equipped) hold securely in all latched positions.
Seat beltsCheck that all parts of the seat belt
system (for example, buckles, anchors, adjusters
and retractors) operate properly and smoothly,
and are installed securely. Check the belt web-
bing for cuts, fraying, wear or damage.
Accelerator pedalCheck the pedal for smooth
operation and make sure the pedal does not bind
or require uneven effort. Keep the floor mat away
from the pedal.
Clutch pedal*Make sure the pedal operates
smoothly and check that it has the proper free
travel.
BrakesCheck that the brakes do not pull the
vehicle to one side when applied.
Maintenance and do-it-yourself8-3
ZREVIEW COPY:Ð2003 Truck/Frontier(d22)
Owners Manual(owners)ÐUSA English(nna)
01/15/03Ðarosenma
X
Page 214 of 272
CLEANING
If your windshield is not clear after using the
windshield washer or if a wiper blade chatters
when running, wax or other material may be on
the blade or windshield.
Clean the outside of the windshield with a washer
solution or a mild detergent. Your windshield is
clean if beads do not form when rinsing with clear
water.
Clean each blade by wiping it with a cloth soaked
in a washer solution or a mild detergent. Then
rinse the blades with clear water. If your wind-
shield is still not clear after cleaning the blades
and using the wiper, replace the blades.
CAUTION
Worn windshield wiper blades can dam-
age the windshield and impair driver
vision.
REPLACING
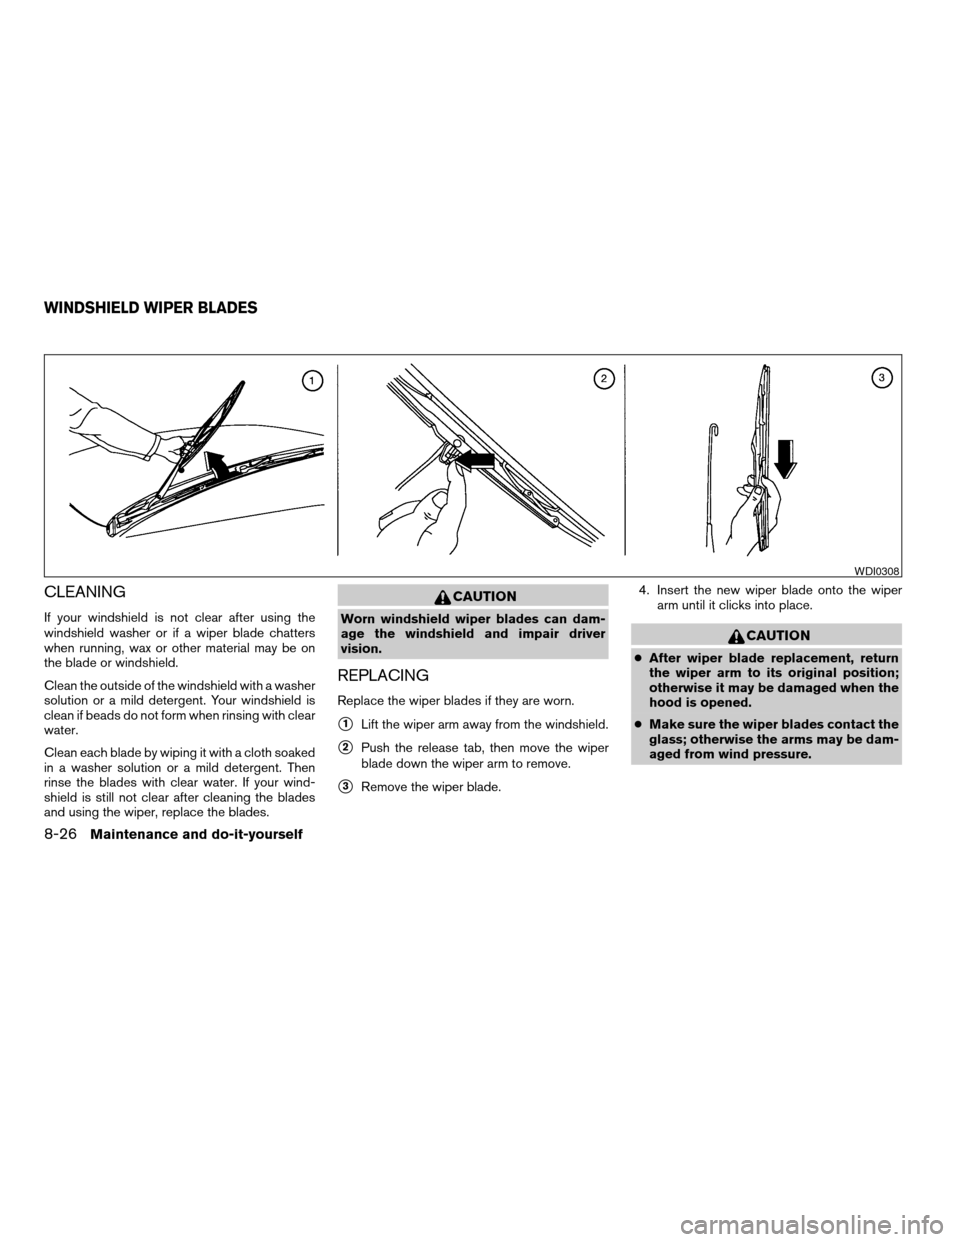
Replace the wiper blades if they are worn.
s1Lift the wiper arm away from the windshield.
s2Push the release tab, then move the wiper
blade down the wiper arm to remove.
s3Remove the wiper blade.4. Insert the new wiper blade onto the wiper
arm until it clicks into place.
CAUTION
cAfter wiper blade replacement, return
the wiper arm to its original position;
otherwise it may be damaged when the
hood is opened.
cMake sure the wiper blades contact the
glass; otherwise the arms may be dam-
aged from wind pressure.
WDI0308
WINDSHIELD WIPER BLADES
8-26Maintenance and do-it-yourself
ZREVIEW COPY:Ð2003 Truck/Frontier(d22)
Owners Manual(owners)ÐUSA English(nna)
01/15/03Ðarosenma
X