2003 NISSAN FRONTIER brake light
[x] Cancel search: brake lightPage 176 of 272
WARNING
Always follow the instructions below.
Failure to do so could result in damage to
the charging system and cause personal
injury.
1. If the booster battery is in another vehicle,
position the two vehicles to bring their bat-
teries near each other.
Do not allow the two vehicles to touch.2. Apply the parking brake. Move the shift lever
to N (Neutral) (manual transmission) or to P
(Park) (automatic transmission) . Switch off
all unnecessary electrical systems (lights,
heater, air conditioner, etc.) .
3. Remove vent caps on the battery (if so
equipped) . Cover the battery with an old
cloth to reduce explosion hazard.
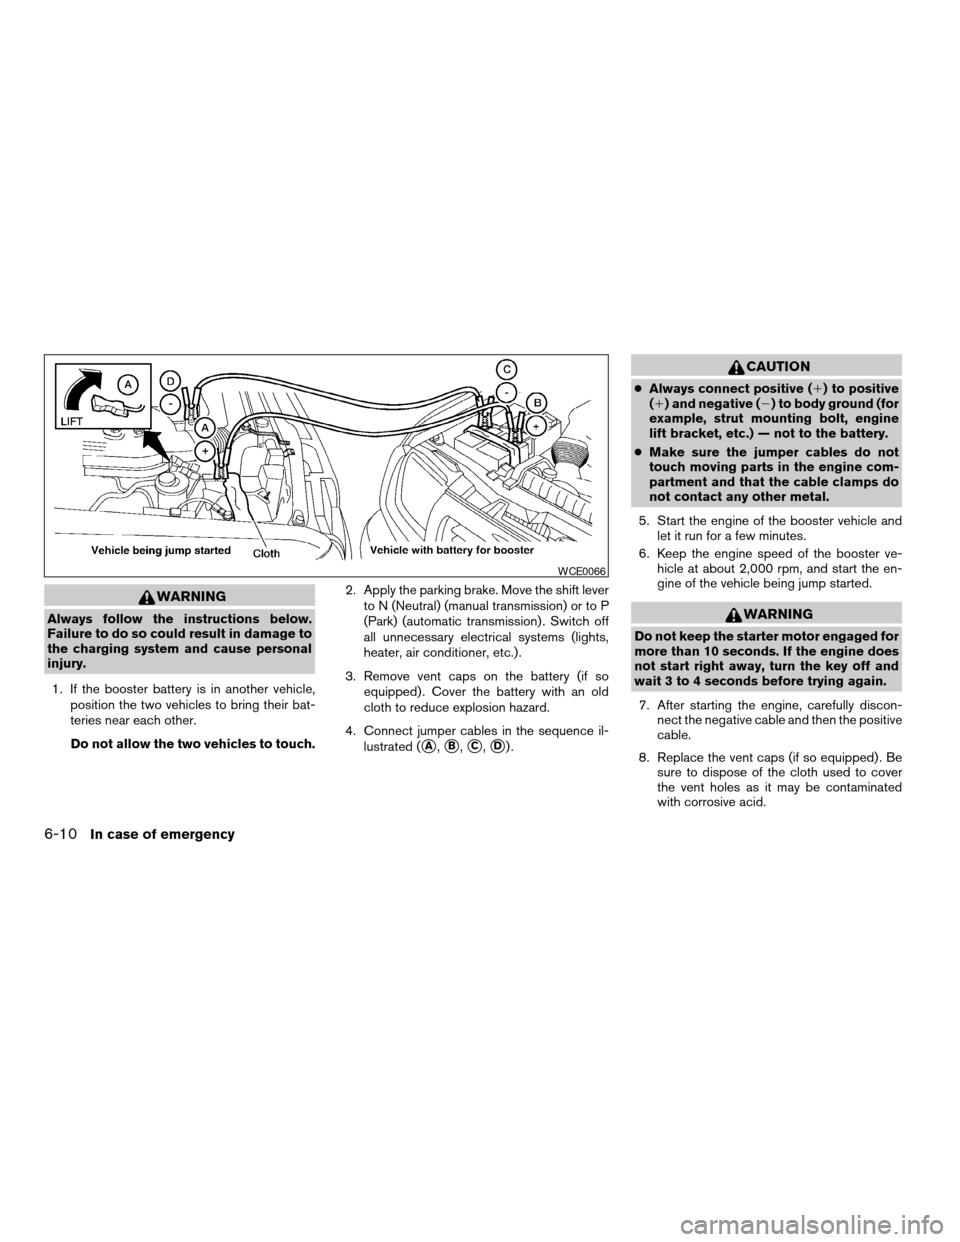
4. Connect jumper cables in the sequence il-
lustrated (
sA,sB,sC,sD).
CAUTION
cAlways connect positive (1) to positive
(1) and negative (2) to body ground (for
example, strut mounting bolt, engine
lift bracket, etc.) — not to the battery.
cMake sure the jumper cables do not
touch moving parts in the engine com-
partment and that the cable clamps do
not contact any other metal.
5. Start the engine of the booster vehicle and
let it run for a few minutes.
6. Keep the engine speed of the booster ve-
hicle at about 2,000 rpm, and start the en-
gine of the vehicle being jump started.
WARNING
Do not keep the starter motor engaged for
more than 10 seconds. If the engine does
not start right away, turn the key off and
wait 3 to 4 seconds before trying again.
7. After starting the engine, carefully discon-
nect the negative cable and then the positive
cable.
8. Replace the vent caps (if so equipped) . Be
sure to dispose of the cloth used to cover
the vent holes as it may be contaminated
with corrosive acid.
WCE0066
6-10In case of emergency
ZREVIEW COPY:Ð2003 Truck/Frontier(d22)
Owners Manual(owners)ÐUSA English(nna)
01/15/03Ðarosenma
X
Page 189 of 272

8 Maintenance and do-it-yourself
Maintenance requirements..........................8-2
General maintenance..............................8-2
Explanation of general maintenance items.........8-2
Maintenance precautions...........................8-5
Engine compartment check locations................8-6
Engine cooling system.............................8-9
Checking engine coolant level...................8-9
Changing engine coolant.......................8-10
Engine oil........................................8-10
Checking engine oil level.......................8-10
Changing engine oil...........................8-11
Changing engine oil filter.......................8-13
Automatic transmission fluid.......................8-14
Temperature conditions for checking.............8-14
Power steering fluid...............................8-15
Brake and clutch fluid.............................8-16
Brake fluid....................................8-16
Clutch fluid...................................8-17
Window washer fluid.............................8-17
Window washer fluid reservoir..................8-17
Battery..........................................8-18
Jump starting.................................8-19
Drive belts.......................................8-20Spark plugs......................................8-21
Replacing spark plugs.........................8-21
Air cleaner.......................................8-23
In-cabin Microfilter (if so equipped)..............8-23
Windshield wiper blades..........................8-26
Cleaning.....................................8-26
Replacing....................................8-26
Parking brake and brake pedal.....................8-27
Checking parking brake........................8-27
Checking brake pedal..........................8-27
Brake booster.................................8-28
Fuses...........................................8-29
Passenger compartment.......................8-29
Keyfob battery replacement........................8-30
Lights...........................................8-31
Headlights....................................8-31
Fog lights (if so equipped)......................8-32
Exterior and interior lights.......................8-34
Wheels and tires.................................8-37
Tire pressure..................................8-37
Types of tires..................................8-37
Tire chains....................................8-38
Changing wheels and tires.....................8-39
ZREVIEW COPY:Ð2003 Truck/Frontier(d22)
Owners Manual(owners)ÐUSA English(nna)
01/15/03Ðarosenma
X
Page 191 of 272

Wheel nuts*When checking the tires, make
sure no wheel nuts are missing, and check for any
loose wheel nuts. Tighten if necessary.
Tire rotation*Tires should be rotated every
7,500 miles (12,000 km) .
Wheel alignment and balanceIf the vehicle
should pull to either side while driving on a
straight and level road, or if you detect uneven or
abnormal tire wear, there may be a need for wheel
alignment.
If the steering wheel or seat vibrates at normal
highway speeds, wheel balancing may be
needed.
cFor additional information regarding tires, refer
to “Important Tire Safety Information” (US) or
“Tire Safety Information” (Canada) in the War-
ranty Information Booklet .
WindshieldClean the windshield on a regular
basis. Check the windshield at least every six
months for cracks or other damage. Have a dam-
aged windshield repaired by a qualified repair
facility.
Windshield wiper blades*Check for cracks or
wear if they do not wipe properly.
Doors, hood and tailgateCheck that the
doors, hood and tailgate operate properly. Also
ensure that all latches lock securely. Lubricatehinges, latches, latch pins, rollers and links as
necessary. Make sure that the secondary latch
keeps the hood from opening when the primary
latch is released.
When driving in areas using road salt or other
corrosive materials, check lubrication frequently.
Lights*Clean the headlights on a regular basis.
Make sure that the headlights, stop lights, tail
lights, turn signal lights, and other lights are all
operating properly and installed securely. Also
check headlight aim.
Inside the vehicle
The maintenance items listed here should be
checked on a regular basis, such as when per-
forming periodic maintenance, cleaning the ve-
hicle, etc.
Additional information on the following
items with an “*” is found later in this sec-
tion.
Warning lights and chimesMake sure all
warning lights and chimes are operating properly.
Windshield wiper and washer*Check that
the wipers and washer operate properly and that
the wipers do not streak.Windshield defrosterCheck that the air
comes out of the defroster outlets properly and in
sufficient quantity when operating the heater or
air conditioner.
Steering wheelCheck for changes in the steer-
ing system, such as excessive freeplay, hard
steering or strange noises.
SeatsCheck seat position controls such as seat
adjusters, seatback recliner, etc. to ensure they
operate smoothly and all latches lock securely in
every position. Check that the head restraints
move up and down smoothly and the locks (if so
equipped) hold securely in all latched positions.
Seat beltsCheck that all parts of the seat belt
system (for example, buckles, anchors, adjusters
and retractors) operate properly and smoothly,
and are installed securely. Check the belt web-
bing for cuts, fraying, wear or damage.
Accelerator pedalCheck the pedal for smooth
operation and make sure the pedal does not bind
or require uneven effort. Keep the floor mat away
from the pedal.
Clutch pedal*Make sure the pedal operates
smoothly and check that it has the proper free
travel.
BrakesCheck that the brakes do not pull the
vehicle to one side when applied.
Maintenance and do-it-yourself8-3
ZREVIEW COPY:Ð2003 Truck/Frontier(d22)
Owners Manual(owners)ÐUSA English(nna)
01/15/03Ðarosenma
X
Page 201 of 272
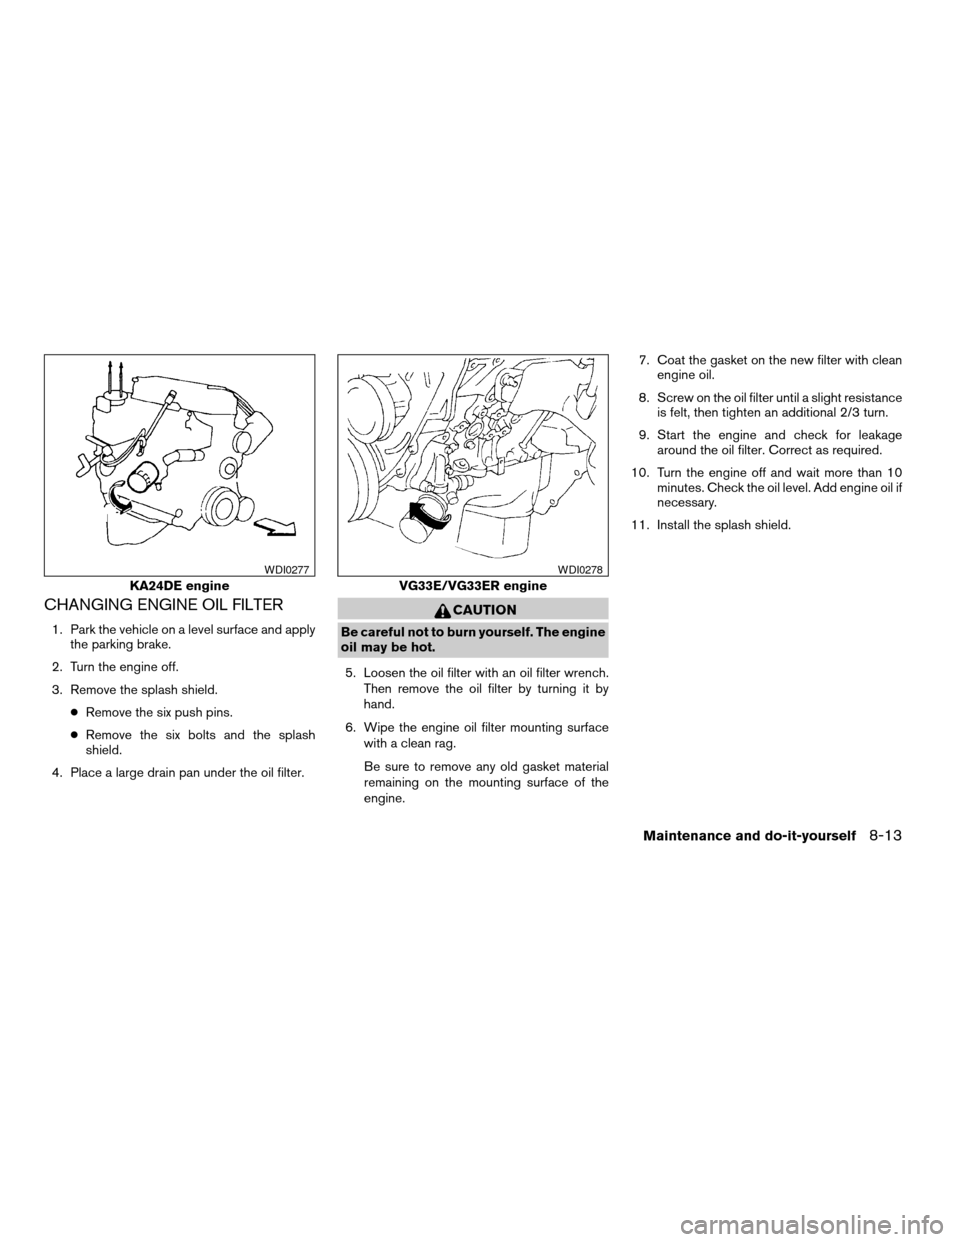
CHANGING ENGINE OIL FILTER
1. Park the vehicle on a level surface and apply
the parking brake.
2. Turn the engine off.
3. Remove the splash shield.
cRemove the six push pins.
cRemove the six bolts and the splash
shield.
4. Place a large drain pan under the oil filter.
CAUTION
Be careful not to burn yourself. The engine
oil may be hot.
5. Loosen the oil filter with an oil filter wrench.
Then remove the oil filter by turning it by
hand.
6. Wipe the engine oil filter mounting surface
with a clean rag.
Be sure to remove any old gasket material
remaining on the mounting surface of the
engine.7. Coat the gasket on the new filter with clean
engine oil.
8. Screw on the oil filter until a slight resistance
is felt, then tighten an additional 2/3 turn.
9. Start the engine and check for leakage
around the oil filter. Correct as required.
10. Turn the engine off and wait more than 10
minutes. Check the oil level. Add engine oil if
necessary.
11. Install the splash shield.
KA24DE engine
WDI0277
VG33E/VG33ER engine
WDI0278
Maintenance and do-it-yourself8-13
ZREVIEW COPY:Ð2003 Truck/Frontier(d22)
Owners Manual(owners)ÐUSA English(nna)
01/15/03Ðarosenma
X
Page 204 of 272
CAUTION
cDO NOT OVERFILL.
cRecommended fluid is Genuine
NISSAN PSF or equivalent.For further brake and clutch fluid specification
information, refer to “Capacities and recom-
mended fuel/lubricants” in the “Technical and
consumer information” section of this manual.
WARNING
Use only new fluid from a sealed con-
tainer. Old, inferior or contaminated fluid
may damage the brake and clutch sys-
tems. The use of improper fluids can dam-
age the brake system and affect the vehi-
cle’s stopping ability.
CAUTION
Do not spill the fluid on any painted sur-
faces. This will damage the paint. If fluid is
spilled, immediately wash the surface
with water.BRAKE FLUID
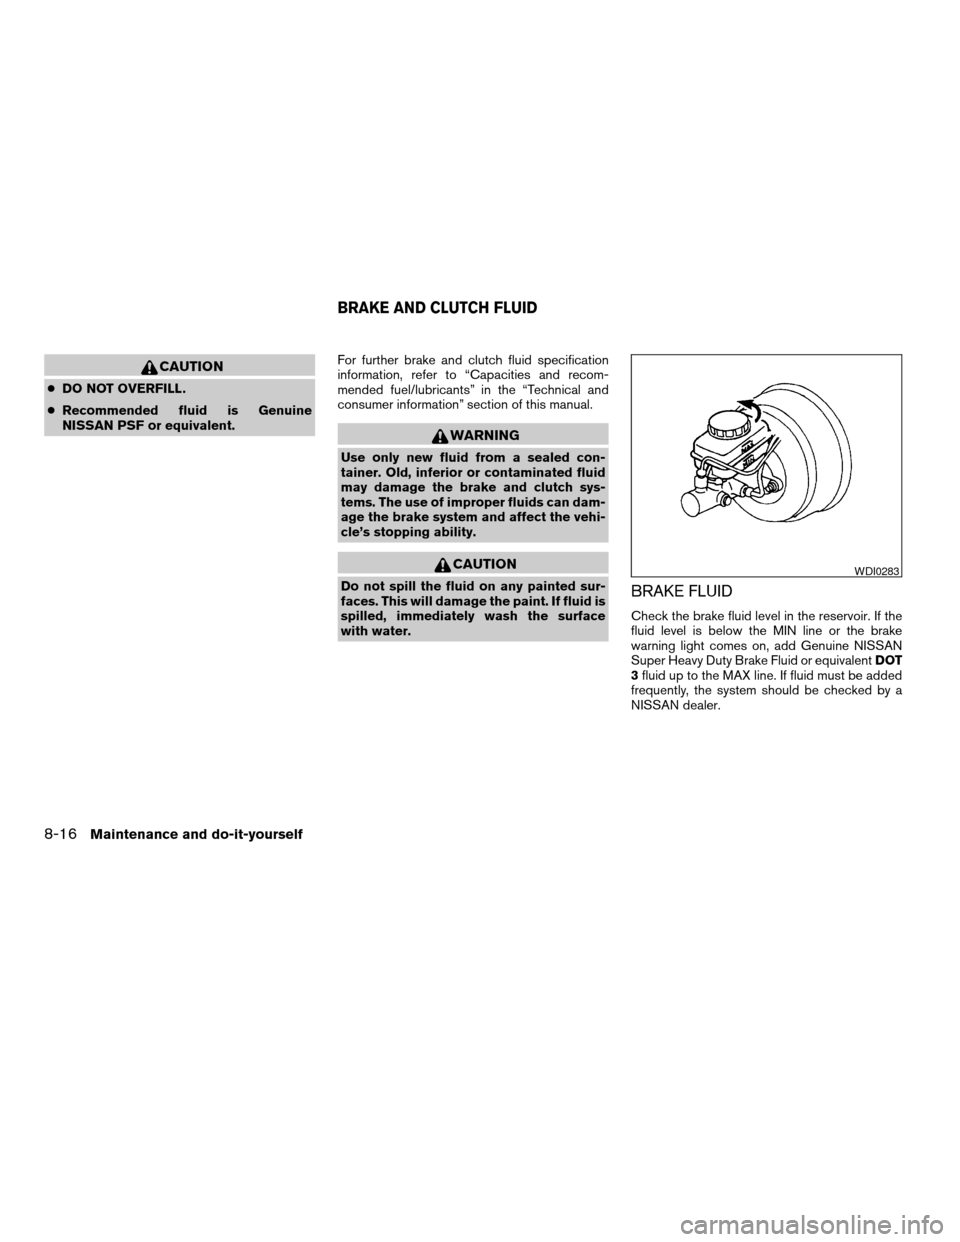
Check the brake fluid level in the reservoir. If the
fluid level is below the MIN line or the brake
warning light comes on, add Genuine NISSAN
Super Heavy Duty Brake Fluid or equivalentDOT
3fluid up to the MAX line. If fluid must be added
frequently, the system should be checked by a
NISSAN dealer.
WDI0283
BRAKE AND CLUTCH FLUID
8-16Maintenance and do-it-yourself
ZREVIEW COPY:Ð2003 Truck/Frontier(d22)
Owners Manual(owners)ÐUSA English(nna)
01/16/03Ðskoniecz
X
Page 205 of 272
CLUTCH FLUID
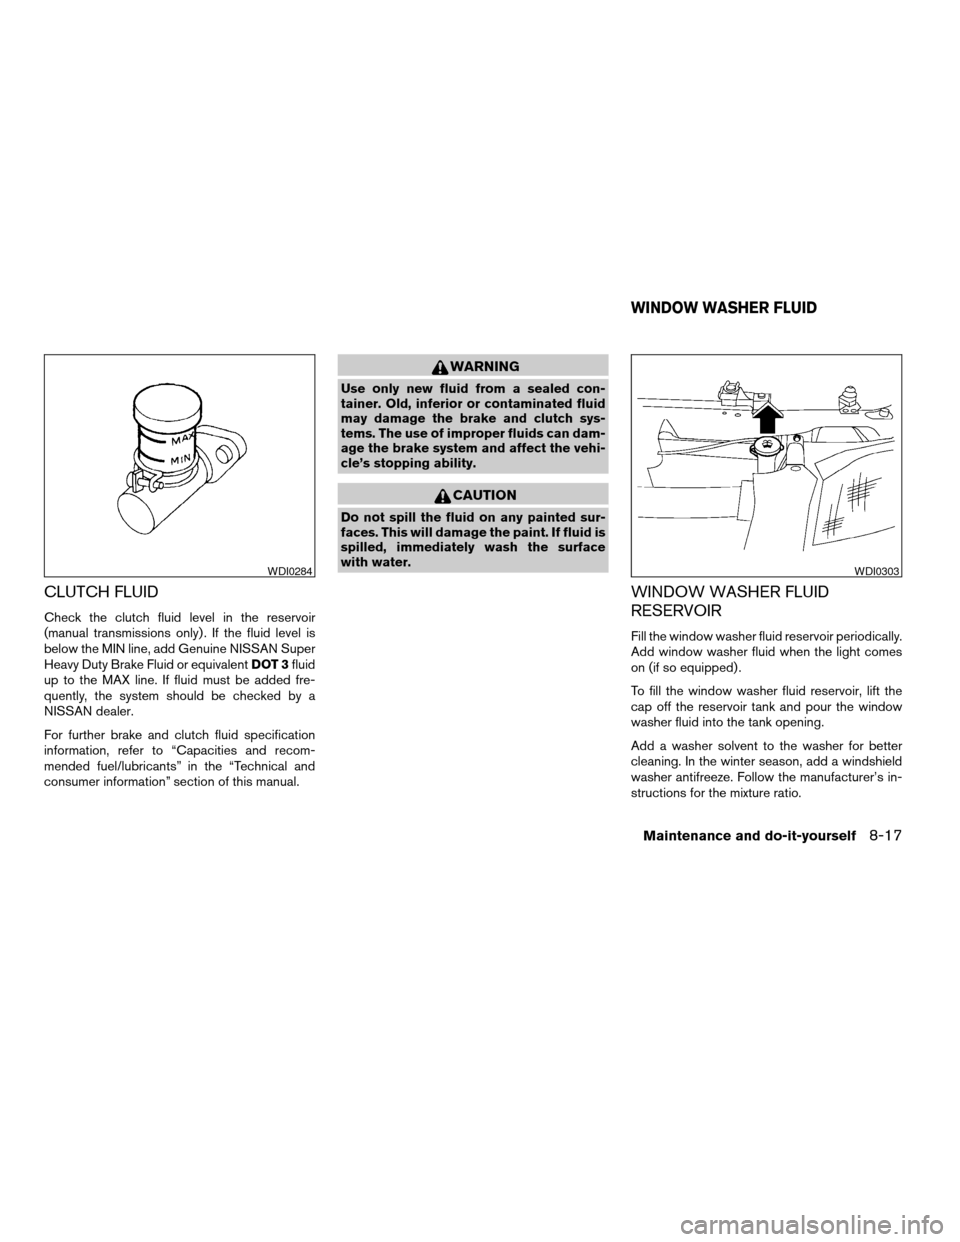
Check the clutch fluid level in the reservoir
(manual transmissions only) . If the fluid level is
below the MIN line, add Genuine NISSAN Super
Heavy Duty Brake Fluid or equivalentDOT 3fluid
up to the MAX line. If fluid must be added fre-
quently, the system should be checked by a
NISSAN dealer.
For further brake and clutch fluid specification
information, refer to “Capacities and recom-
mended fuel/lubricants” in the “Technical and
consumer information” section of this manual.
WARNING
Use only new fluid from a sealed con-
tainer. Old, inferior or contaminated fluid
may damage the brake and clutch sys-
tems. The use of improper fluids can dam-
age the brake system and affect the vehi-
cle’s stopping ability.
CAUTION
Do not spill the fluid on any painted sur-
faces. This will damage the paint. If fluid is
spilled, immediately wash the surface
with water.
WINDOW WASHER FLUID
RESERVOIR
Fill the window washer fluid reservoir periodically.
Add window washer fluid when the light comes
on (if so equipped) .
To fill the window washer fluid reservoir, lift the
cap off the reservoir tank and pour the window
washer fluid into the tank opening.
Add a washer solvent to the washer for better
cleaning. In the winter season, add a windshield
washer antifreeze. Follow the manufacturer’s in-
structions for the mixture ratio.
WDI0284WDI0303
WINDOW WASHER FLUID
Maintenance and do-it-yourself8-17
ZREVIEW COPY:Ð2003 Truck/Frontier(d22)
Owners Manual(owners)ÐUSA English(nna)
01/16/03Ðskoniecz
X
Page 216 of 272
Self-adjusting brakes
Your vehicle is equipped with self-adjusting
brakes.
The front disc-type brakes self-adjust every time
the brake pedal is applied. The rear drum-type
brakes on two-wheel drive vehicles self-adjust
every time the parking brake is applied. The rear
drum-type brakes on four-wheel drive vehicles
self-adjust every time the brake pedal is applied.
If the brake pedal goes down farther than normal,
it may be due to lack of adjustment of the rear
drum brakes. Apply the parking brake several
times.
WARNING
If the brake pedal height does not return
to normal, see a NISSAN dealer and have
it checked.
Brake pad wear indicators
The disc brake pads on your vehicle have audible
wear indicators. When a brake pad requires re-
placement, a high pitched scraping or screech-
ing sound will be heard when the vehicle is in
motion. The noise will be heard whether or not the
brake pedal is depressed. Have the brakes
checked as soon as possible if the wear indicator
sound is heard.Under some driving or climate conditions, occa-
sional brake squeak, squeal or other noise may
be heard. Occasional brake noise during light to
moderate stops is normal and does not affect the
function or performance of the brake system.
The rear drum brakes (if so equipped) do not
have audible wear indicators. Should you ever
hear an unusually loud noise from the rear drum
brakes, have them inspected as soon as possible
by a NISSAN dealer.
Proper brake inspection intervals should
be followed.For more information regarding
brake inspections, see the appropriate mainte-
nance schedule information in the “NISSAN Ser-
vice and Maintenance Guide”.
BRAKE BOOSTER
Check the brake booster function as follows:
1. With the engine off, press and release the
brake pedal several times. When brake
pedal movement (distance of travel) remains
the same from one pedal application to the
next, continue on to the next step.
2. While depressing the brake pedal, start the
engine. The pedal height should drop a little.3. With the brake pedal depressed, stop the
engine. Keep the pedal depressed for about
30 seconds. The pedal height should not
change.
4. Run the engine for one minute without de-
pressing the brake pedal, then turn it off.
Depress the brake pedal several times. The
pedal travel distance will decrease gradually
with each depression as the vacuum is re-
leased from the booster.
If the brakes do not operate properly, have the
brakes checked by a NISSAN dealer.
8-28Maintenance and do-it-yourself
ZREVIEW COPY:Ð2003 Truck/Frontier(d22)
Owners Manual(owners)ÐUSA English(nna)
01/15/03Ðarosenma
X
Page 228 of 272
cThe original tires have built-in tread
wear indicators. When the wear indica-
tors are visible, the tire(s) should be
replaced.
cImproper service of the spare tire may
result in serious personal injury. If it is
necessary to repair the spare tire, con-
tact a NISSAN dealer.
cFor additional information regarding
tires, refer to Important Tire Safety In-
formation (US) or Tire Safety Informa-
tion (Canada) in the Warranty Informa-
tion Booklet.
Replacing wheels and tires
When replacing a tire, use the same size, tread
design, speed rating and load carrying capacity
as originally equipped. Recommended types and
sizes are shown in “Wheels/tire size” in the
“Technical and consumer information” section of
this manual.
WARNING
cThe use of tires other than those recom-
mended or the mixed use of tires of
different brands, construction (bias,
bias-belted or radial) , or tread patterns
can adversely affect the ride, braking,
handling, ground clearance, body-to-
tire clearance, tire chain clearance,
speedometer calibration, headlight aim
and bumper height. Some of these ef-
fects may lead to accidents and could
result in serious personal injury.
cIf the wheels are changed for any rea-
son, always replace with wheels which
have the same off-set dimension.
Wheels of a different off-set could
cause premature tire wear, degrade ve-
hicle handling characteristics and/or
interference with the brake
discs/drums. Such interference can
lead to decreased braking efficiency
and/or early brake pad/shoe wear. Re-
fer to “Wheel/tire size” in the “Techni-
cal and consumer information” section
of this manual for wheel off-set
dimensions.cWhen a spare tire is mounted or a wheel
is replaced, the low tire pressure warn-
ing system will not function. Contact
your NISSAN dealer as soon as pos-
sible for tire replacement and/or sys-
tem resetting (for models with the low
tire pressure warning system) .
cDo not install a deformed wheel or tire
even if it has been repaired. Such
wheels or tires could have structural
damage and could fail without warning.
cThe use of retread tires is not
recommended.
cFor additional information regarding
tires, refer to Important Tire Safety In-
formation (US) or Tire Safety Informa-
tion (Canada) in the Warranty Informa-
tion Booklet.
8-40Maintenance and do-it-yourself
ZREVIEW COPY:Ð2003 Truck/Frontier(d22)
Owners Manual(owners)ÐUSA English(nna)
01/15/03Ðarosenma
X