2003 NISSAN FRONTIER ECO mode
[x] Cancel search: ECO modePage 61 of 272

OUTSIDE TEMPERATURE DISPLAY
Push the MODE buttons1when the ignition key
is in the ACC or ON position. The outside tem-
perature will be displayed
s2in °F.
cPush the MODE button to change from °F to
°C.
cWhen the outside temperature is be-
tween 130°F (55°C) and 158°F (70°C) , the
display shows 130°F (55°C) .
cWhen the outside temperature is lower
than -40°F (-40°C) or higher than 158°F
(70°C) , the display shows only———though it is operating. This is not a mal-
function.
cThe outside temperature sensor is lo-
cated in front of the radiator. The sensor
may be affected by road or engine heat,
wind direction and other driving condi-
tions. The display may differ from the
actual outside temperature or the tem-
perature displayed on various signs or
billboards.
cTemperature display will not update un-
less the vehicle is moving faster than 12
mph (20 km/h) , or the ignition switch has
been OFF for 4 hours.
COMPASS DISPLAY
Push the MODE buttons1when the ignition key
is in the ACC or ON position. The direction will be
displayed
s2.
Zone variation change procedure
The difference between magnetic north and geo-
graphical north is known as variance. In some
areas, this difference can sometimes be great
enough to cause false compass readings. Follow
these instructions to set the variance for your
particular location if this happens:1. Establish your location on the zone map.
Refer to the illustration. Record your zone
number.
2. Turn the ignition switch to the ON position.
3. Push the MODE button in for 5 seconds until
the current zone entry number and the
“VAR” icon is displayed.
4. Press the MODE button repeatedly until the
desired zone entry number is displayed.
Once the desired zone number is displayed, stop
pressing the MODE button and the display will
show compass direction within a few seconds.
NOTE:
Use zone number 5 for Hawaii.
WIC0324
Instruments and controls2-7
ZREVIEW COPY:Ð2003 Truck/Frontier(d22)
Owners Manual(owners)ÐUSA English(nna)
01/13/03Ðarosenma
X
Page 66 of 272
cIf the light comes on while driving,
avoid sudden steering maneuvers or
abrupt braking, reduce vehicle speed,
pull off the road to a safe location and
stop the vehicle as soon as possible.
Serious vehicle damage could occur
and may lead to an accident and result
in serious personal injury. Check the
tire pressure for all 4 wheels and adjust
the pressure to the COLD tire pressure
shown on the tire placard. If the light
still comes on while driving after adjust-
ing the tire pressure, a tire may be flat. If
you have a flat tire, replace it with a
spare tire as soon as possible.
cWhen a spare tire is mounted or a wheel
is replaced, tire pressure will not be
indicated and the low tire pressure
warning system will not function. Con-
tact your NISSAN dealer as soon as
possible for tire replacement and/or
system resetting.
CAUTION
cThe low tire pressure warning system is
not a substitute for the regular tire pres-
sure check. Be sure to check the tire
pressure regularly.cIf the vehicle is being driven at speeds
of less than 20 MPH (32 km/h) , the low
tire pressure warning system may not
operate correctly.
cBe sure to install the specified size of
tires to the 4 wheels correctly.
Low washer fluid warning light
(if so equipped)
This light comes on when the washer fluid is at a
low level. Add washer fluid as necessary. See the
“Maintenance and do-it-yourself” section of this
manual.
Passenger supplemental air
bag OFF indicator light (except
Crew Cab models)
The passenger supplemental air bag is equipped
with an ON/OFF switch. The switch is located in
the center of the instrument panel. When the
switch is turned to the ON position, the passen-
ger supplemental air bag is enabled and could
inflate in a frontal collision. When the switch is
turned to the OFF position, the passenger
supplemental air bag is disabled and will not
inflate in a frontal collision. The passenger
supplemental air bag OFF indicator light on the
instrument panel illuminates when the passenger
supplemental air bag ON/OFF switch is turned tothe OFF position. The driver’s side supplemental
air bag always remains enabled and is not af-
fected by the passenger supplemental air bag
ON/OFF switch. The key for the passenger
supplemental air bag ON/OFF switch should not
be left in the switch. Remove the key after turning
the switch in the desired position. Do not leave a
key in the switch. See “Passenger supplemental
air bag ON/OFF switch and light” in the “Seats,
restraints and supplemental air bag systems”
section for details.
Seat belt warning light and
chime
The light and chime remind you to fasten your
seat belts. The light illuminates whenever the
ignition key is turned to the ON or START position
and remains illuminated until the driver’s seat belt
is fastened. At the same time, the chime sounds
for about 7 seconds unless the driver’s seat belt
is securely fastened.
Refer to “Seat belts” in the “Seats, restraints and
supplemental air bag systems” section for pre-
cautions on seat belt usage.
Supplemental air bag warning
light
When the ignition key is in the ON or START
position, the supplemental air bag warning light
2-12Instruments and controls
ZREVIEW COPY:Ð2003 Truck/Frontier(d22)
Owners Manual(owners)ÐUSA English(nna)
01/14/03Ðarosenma
X
Page 73 of 272
cPre-mix washer fluid concentrates with
water to the manufacturer’s recom-
mended levels before pouring the fluid
into the window washer reservoir tank.
Do not use the window washer reservoir
tank to mix the washer fluid concen-
trate and water.
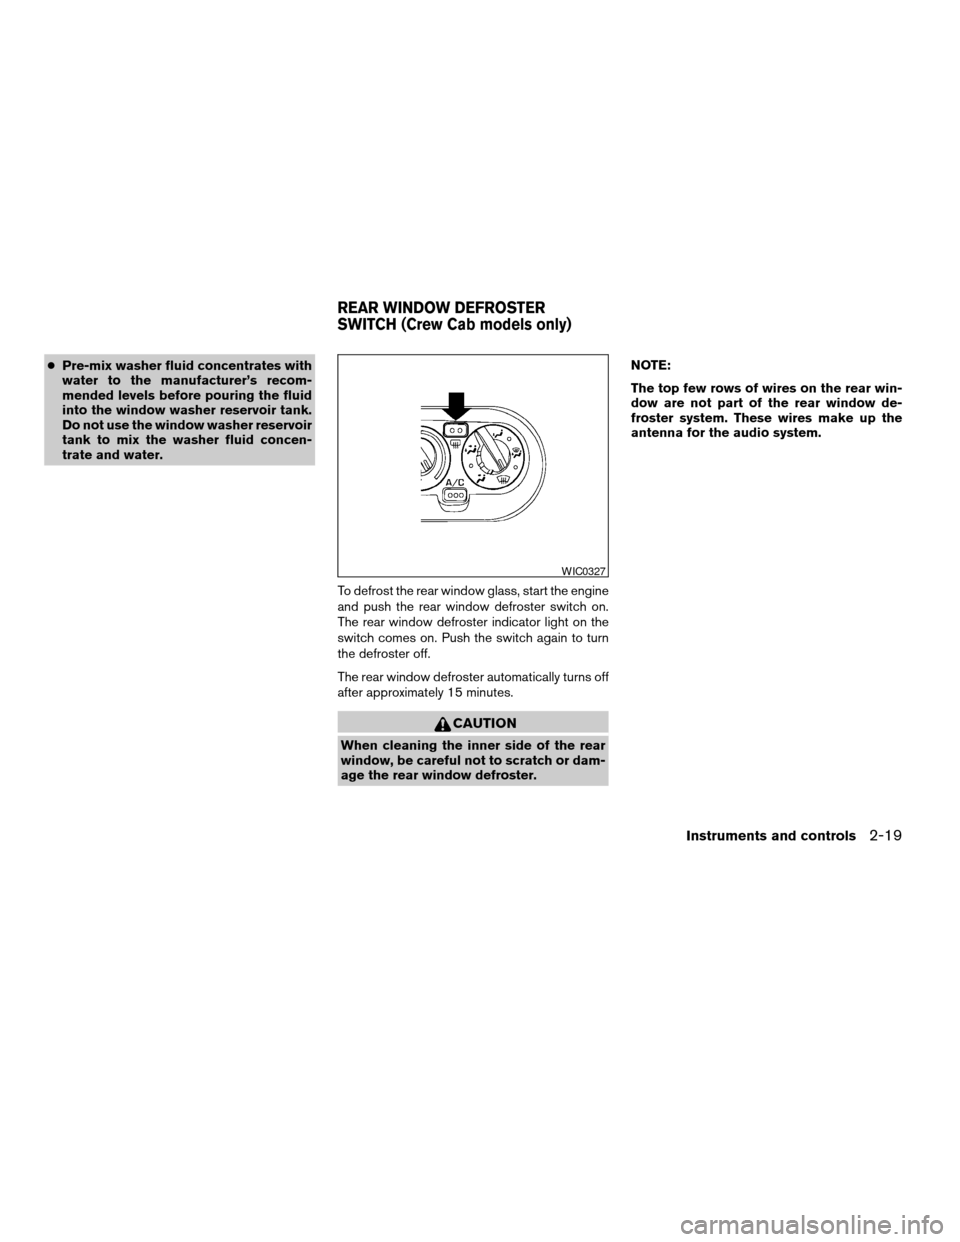
To defrost the rear window glass, start the engine
and push the rear window defroster switch on.
The rear window defroster indicator light on the
switch comes on. Push the switch again to turn
the defroster off.
The rear window defroster automatically turns off
after approximately 15 minutes.
CAUTION
When cleaning the inner side of the rear
window, be careful not to scratch or dam-
age the rear window defroster.NOTE:
The top few rows of wires on the rear win-
dow are not part of the rear window de-
froster system. These wires make up the
antenna for the audio system.
WIC0327
REAR WINDOW DEFROSTER
SWITCH (Crew Cab models only)
Instruments and controls2-19
ZREVIEW COPY:Ð2003 Truck/Frontier(d22)
Owners Manual(owners)ÐUSA English(nna)
01/14/03Ðarosenma
X
Page 83 of 272

Front passenger power window switch
The passenger window switch operates only the
corresponding passenger window. To open the
window push the switch and hold it down
s1.To
close the window, pull the switch up
s2.
Rear power window switch (Crew
Cab models only)
The rear power window switches open or close
only the corresponding window. To open the
window, push the switch and hold it down
s1.To
close the window, push the switch up
s2.
Locking passengers’ windows
When the window lock button is depressed, only
the driver side window can be opened or closed.
Push it again to cancel the window lock function.
Automatic operation
To fully open the driver window, press the driver
window switch down to the second detent and
release it; it need not be held. The window auto-
matically opens all the way. To stop the window,
lift the switch up while the window is opening.
WIC0343WIC0357WIC0345
Instruments and controls2-29
ZREVIEW COPY:Ð2003 Truck/Frontier(d22)
Owners Manual(owners)ÐUSA English(nna)
01/15/03Ðarosenma
X
Page 90 of 272
CHILD SAFETY REAR DOOR LOCK
(Crew Cab models only)
Child safety locks help prevent the rear doors
from being opened accidentally, especially when
small children are in the vehicle.
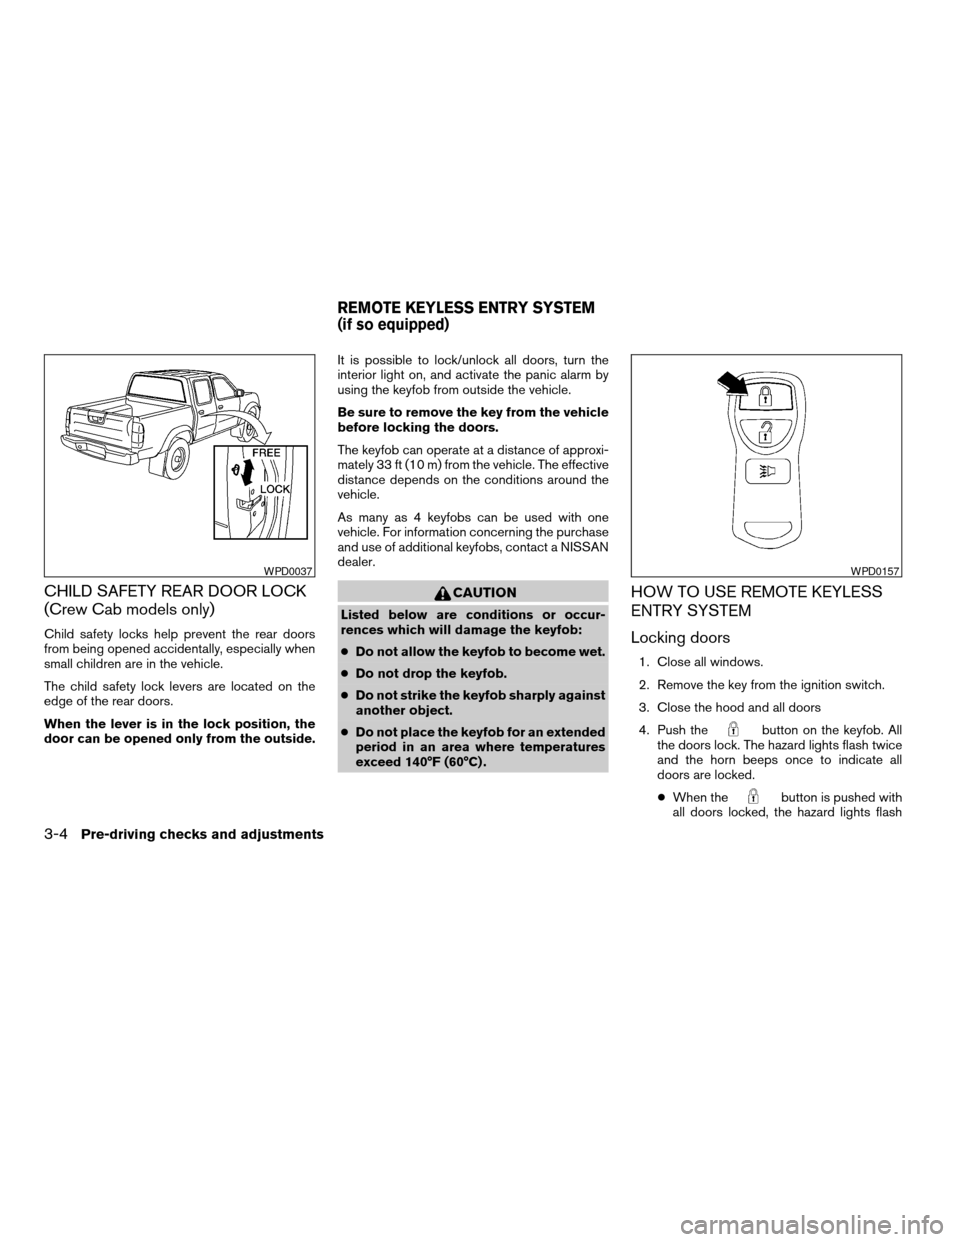
The child safety lock levers are located on the
edge of the rear doors.
When the lever is in the lock position, the
door can be opened only from the outside.It is possible to lock/unlock all doors, turn the
interior light on, and activate the panic alarm by
using the keyfob from outside the vehicle.
Be sure to remove the key from the vehicle
before locking the doors.
The keyfob can operate at a distance of approxi-
mately 33 ft (10 m) from the vehicle. The effective
distance depends on the conditions around the
vehicle.
As many as 4 keyfobs can be used with one
vehicle. For information concerning the purchase
and use of additional keyfobs, contact a NISSAN
dealer.
CAUTION
Listed below are conditions or occur-
rences which will damage the keyfob:
cDo not allow the keyfob to become wet.
cDo not drop the keyfob.
cDo not strike the keyfob sharply against
another object.
cDo not place the keyfob for an extended
period in an area where temperatures
exceed 140°F (60°C) .
HOW TO USE REMOTE KEYLESS
ENTRY SYSTEM
Locking doors
1. Close all windows.
2. Remove the key from the ignition switch.
3. Close the hood and all doors
4. Push the
button on the keyfob. All
the doors lock. The hazard lights flash twice
and the horn beeps once to indicate all
doors are locked.
cWhen the
button is pushed with
all doors locked, the hazard lights flash
WPD0037WPD0157
REMOTE KEYLESS ENTRY SYSTEM
(if so equipped)
3-4Pre-driving checks and adjustments
ZREVIEW COPY:Ð2003 Truck/Frontier(d22)
Owners Manual(owners)ÐUSA English(nna)
01/15/03Ðarosenma
X
Page 106 of 272
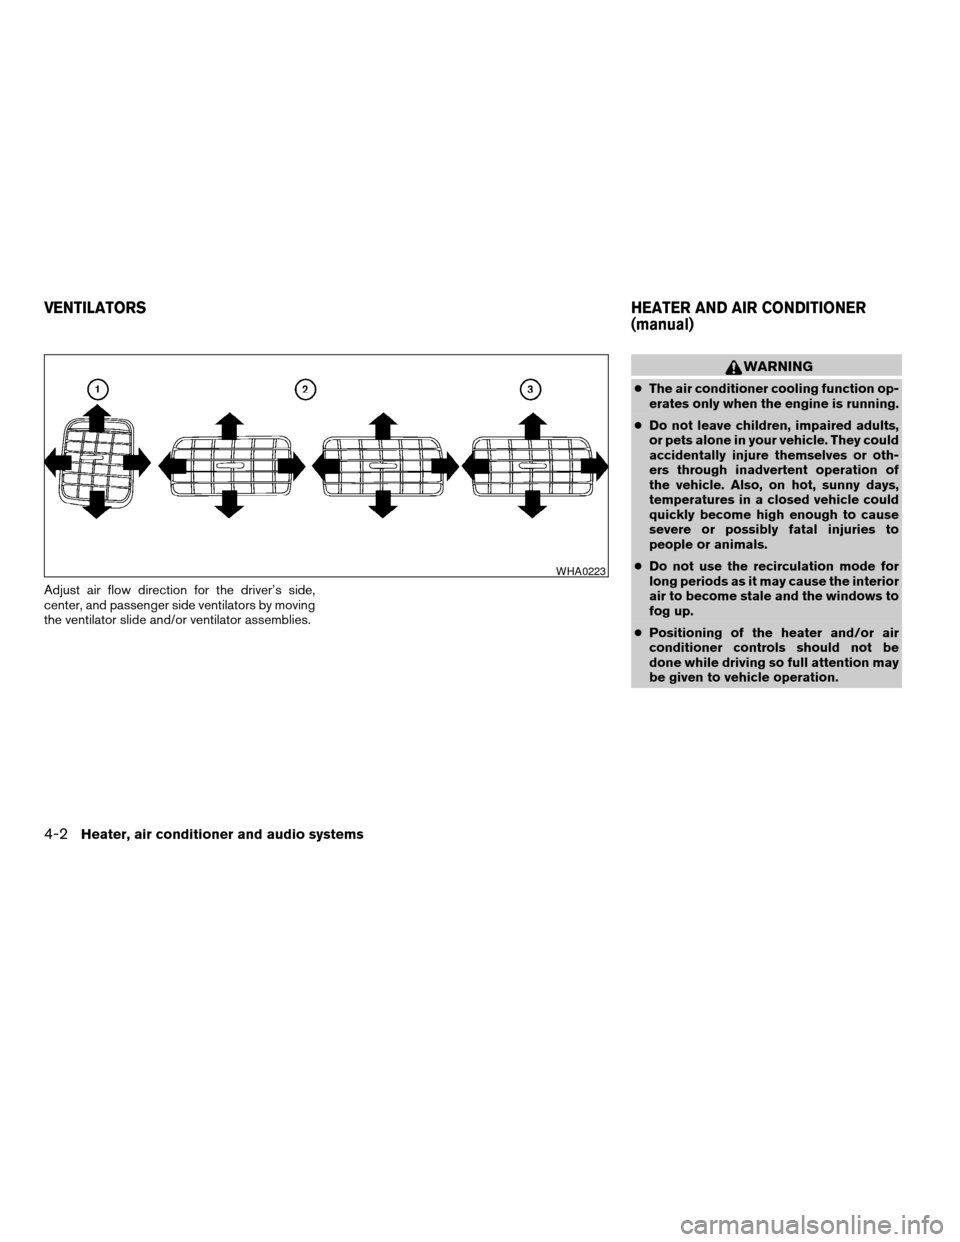
Adjust air flow direction for the driver’s side,
center, and passenger side ventilators by moving
the ventilator slide and/or ventilator assemblies.
WARNING
cThe air conditioner cooling function op-
erates only when the engine is running.
cDo not leave children, impaired adults,
or pets alone in your vehicle. They could
accidentally injure themselves or oth-
ers through inadvertent operation of
the vehicle. Also, on hot, sunny days,
temperatures in a closed vehicle could
quickly become high enough to cause
severe or possibly fatal injuries to
people or animals.
cDo not use the recirculation mode for
long periods as it may cause the interior
air to become stale and the windows to
fog up.
cPositioning of the heater and/or air
conditioner controls should not be
done while driving so full attention may
be given to vehicle operation.
WHA0223
VENTILATORSHEATER AND AIR CONDITIONER
(manual)
4-2Heater, air conditioner and audio systems
ZREVIEW COPY:Ð2003 Truck/Frontier(d22)
Owners Manual(owners)ÐUSA English(nna)
01/15/03Ðarosenma
X
Page 117 of 272
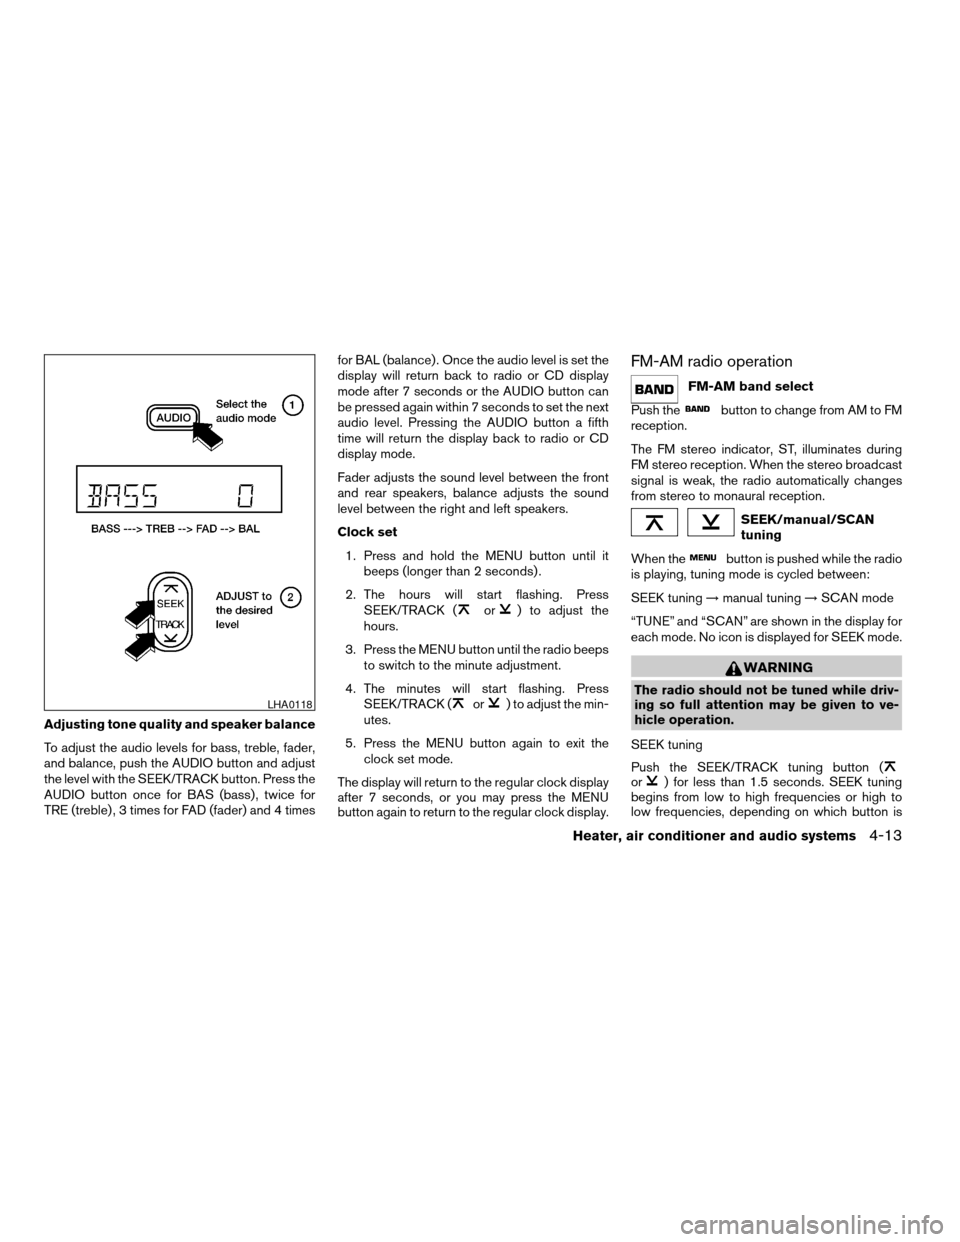
Adjusting tone quality and speaker balance
To adjust the audio levels for bass, treble, fader,
and balance, push the AUDIO button and adjust
the level with the SEEK/TRACK button. Press the
AUDIO button once for BAS (bass) , twice for
TRE (treble) , 3 times for FAD (fader) and 4 timesfor BAL (balance) . Once the audio level is set the
display will return back to radio or CD display
mode after 7 seconds or the AUDIO button can
be pressed again within 7 seconds to set the next
audio level. Pressing the AUDIO button a fifth
time will return the display back to radio or CD
display mode.
Fader adjusts the sound level between the front
and rear speakers, balance adjusts the sound
level between the right and left speakers.
Clock set
1. Press and hold the MENU button until it
beeps (longer than 2 seconds) .
2. The hours will start flashing. Press
SEEK/TRACK (
or) to adjust the
hours.
3. Press the MENU button until the radio beeps
to switch to the minute adjustment.
4. The minutes will start flashing. Press
SEEK/TRACK (
or) to adjust the min-
utes.
5. Press the MENU button again to exit the
clock set mode.
The display will return to the regular clock display
after 7 seconds, or you may press the MENU
button again to return to the regular clock display.
FM-AM radio operation
FM-AM band select
Push the
button to change from AM to FM
reception.
The FM stereo indicator, ST, illuminates during
FM stereo reception. When the stereo broadcast
signal is weak, the radio automatically changes
from stereo to monaural reception.
SEEK/manual/SCAN
tuning
When the
button is pushed while the radio
is playing, tuning mode is cycled between:
SEEK tuning!manual tuning!SCAN mode
“TUNE” and “SCAN” are shown in the display for
each mode. No icon is displayed for SEEK mode.
WARNING
The radio should not be tuned while driv-
ing so full attention may be given to ve-
hicle operation.
SEEK tuning
Push the SEEK/TRACK tuning button (
or) for less than 1.5 seconds. SEEK tuning
begins from low to high frequencies or high to
low frequencies, depending on which button is
LHA0118
Heater, air conditioner and audio systems4-13
ZREVIEW COPY:Ð2003 Truck/Frontier(d22)
Owners Manual(owners)ÐUSA English(nna)
01/15/03Ðarosenma
X
Page 118 of 272

pressed, and stops at the next broadcasting sta-
tion. If using thebutton, once the highest
broadcasting station is reached, the radio contin-
ues in the SEEK mode at the lowest broadcasting
station. If using the
button, once the lowest
broadcasting station is reached, the radio contin-
ues in the SEEK mode at the highest broadcast-
ing station.
Manual tuning
Use the
andbuttons for manual
tuning. To move quickly through the channels,
hold either of the tuning buttons down.
SCAN tuning
Push and hold the SEEK/TRACK tuning button
(
or) for more than 1.5 seconds.
SCAN illuminates in the display window, and the
radio station blinks. SCAN tuning begins from
low to high frequencies or high to low frequen-
cies, depending on which button is pressed.
SCAN tuning stops at each broadcasting station
for 5 seconds. When scanning, SCAN is solid
and the radio station blinks. When temporarily
stopped on a station, SCAN blinks and the sta-
tion display is solid. Pushing the button again
during this 5 second period stops SCAN tuning
and the radio remains tuned to that station.
0
Station memory operations
Each preset mode (A, B or C) has 6 presets,
capable of storing any combination of AM and FM
stations.Press the PRESET ABC button to change be-
tween the presets:
A!B!C
The radio displays icon A, B or C to indicate
which set of presets is active.
To store a radio station in a preset:
1. Select the desired preset by pressing PRE-
SET ABC.
2. Tune to the desired station.
3. Press the desired station select button for
more than 3 seconds. For example, in the
illustrations, ch2 is to be memorized. The
radio mutes when the select button is
pushed.
4. When the indicator illuminates in the display
and the sound resumes, memorizing is com-
plete.
5. Other station select buttons can be set in
the same manner.
If the battery cable is disconnected, or if the radio
fuse opens, the radio memory is canceled. In that
case, reset the desired stations.
LHA0119
4-14Heater, air conditioner and audio systems
ZREVIEW COPY:Ð2003 Truck/Frontier(d22)
Owners Manual(owners)ÐUSA English(nna)
01/15/03Ðarosenma
X