Page 217 of 272
1. Fuse box
2. Spare fuses
3. Fuse puller
PASSENGER COMPARTMENT
CAUTION
Never use a fuse of a higher amperage
rating than specified on the fuse box
cover. This could damage the electrical
system or cause a fire.
If any electrical equipment does not operate,
check for an open fuse.1. Be sure the ignition switch and the headlight
switch are OFF.
2. Pull the fuse box cover to remove
sA.
3. Remove the fuse with the fuse puller
sB.
WDI0304
FUSES
Maintenance and do-it-yourself8-29
ZREVIEW COPY:Ð2003 Truck/Frontier(d22)
Owners Manual(owners)ÐUSA English(nna)
01/15/03Ðarosenma
X
Page 219 of 272

5. Press thebutton, then thebutton two or three times to check the key-
fob operation.
If the battery is removed for any reason
other than replacement, perform step 5.
cAn improperly disposed battery can hurt
the environment. Always confirm local
regulations for battery disposal.
cThe keyfob is water-resistant; however,
if it does get wet, immediately wipe com-
pletely dry.
cThe operational range of the keyfob ex-
tends to approximately 33 ft (10 m) from
the vehicle. This range may vary with
conditions.
FCC Notice:
Changes or modifications not expressly ap-
proved by the manufacturer for compliance
could void the user’s authority to operate
the equipment.
This device complies with Part 15 of the FCC
Rules and RSS-210 of Industry Canada.
Operation is subject to the following two
conditions: (1) This device may not cause
harmful interference, and (2) this device
must accept any interference received, in-
cluding interference that may cause undes-
ired operation of the device.
HEADLIGHTS
The headlight is a semi-sealed beam type which
uses a replaceable headlight (halogen) bulb. A
bulb can be replaced from inside the engine
compartment without removing the headlight as-
sembly.
CAUTION
cHigh pressure halogen gas is sealed
inside the halogen bulb. The bulb may
break if the glass envelope is scratched
or the bulb is dropped.
cWhen handling the bulb, do not touch
the glass envelope.
cDO NOT TOUCH THE BULB
cUse the same number and wattage as
originally installed:
Wattage 65/55Bulb No. HB5/9007*
*: Always check with the Parts Depart-
ment at a NISSAN dealer for the latest
parts information.
cDo not leave the bulb out of the head-
light reflector for a long period of time
as dust, moisture and smoke may enter
the headlight body and affect the per-
formance of the headlight.cAiming is not necessary after replacing
the bulb. When aiming adjustment is
necessary, contact a NISSAN dealer.
LIGHTS
Maintenance and do-it-yourself8-31
ZREVIEW COPY:Ð2003 Truck/Frontier(d22)
Owners Manual(owners)ÐUSA English(nna)
01/15/03Ðarosenma
X
Page 220 of 272

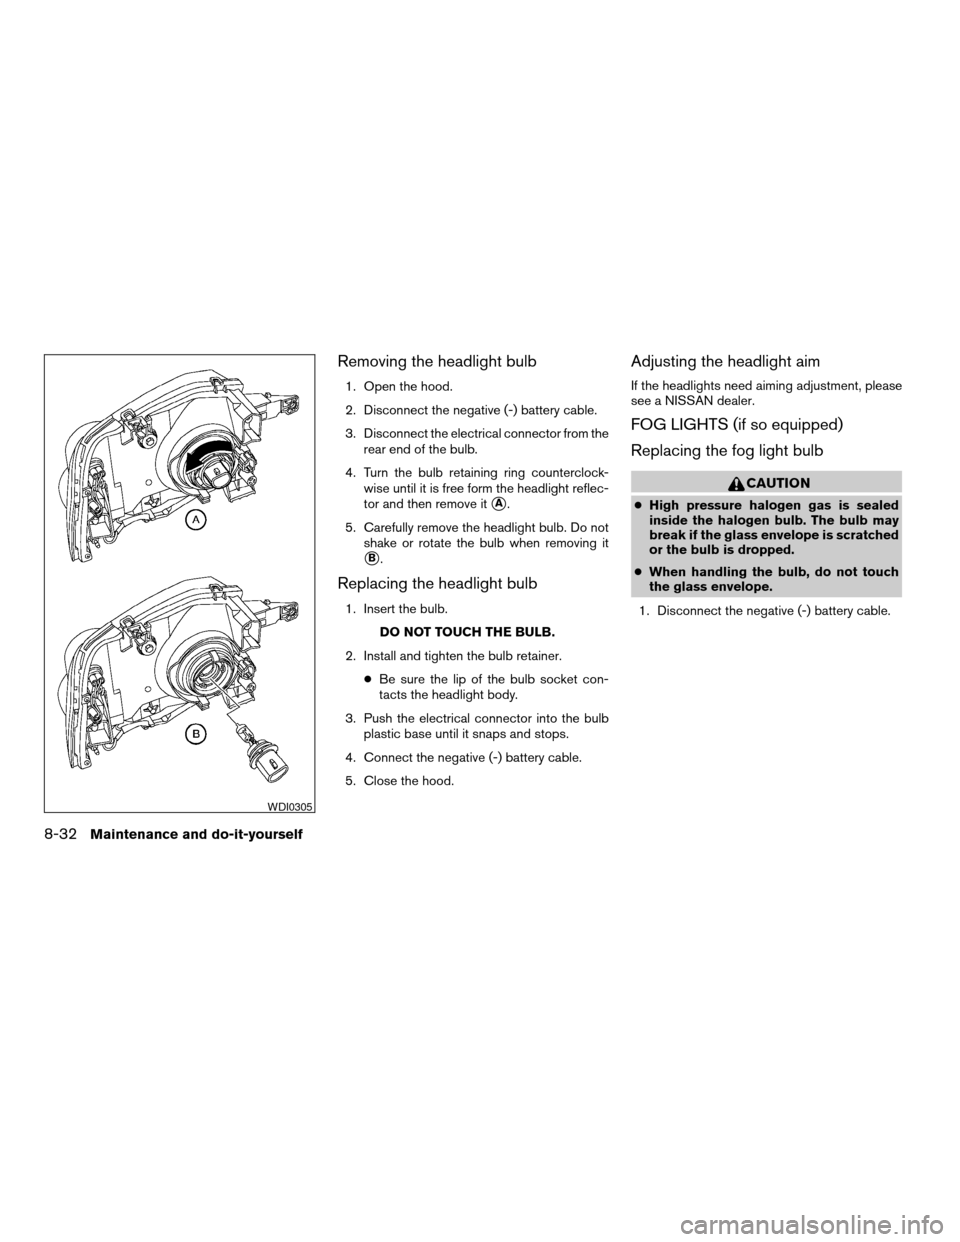
Removing the headlight bulb
1. Open the hood.
2. Disconnect the negative (-) battery cable.
3. Disconnect the electrical connector from the
rear end of the bulb.
4. Turn the bulb retaining ring counterclock-
wise until it is free form the headlight reflec-
tor and then remove it
sA.
5. Carefully remove the headlight bulb. Do not
shake or rotate the bulb when removing it
sB.
Replacing the headlight bulb
1. Insert the bulb.
DO NOT TOUCH THE BULB.
2. Install and tighten the bulb retainer.
cBe sure the lip of the bulb socket con-
tacts the headlight body.
3. Push the electrical connector into the bulb
plastic base until it snaps and stops.
4. Connect the negative (-) battery cable.
5. Close the hood.
Adjusting the headlight aim
If the headlights need aiming adjustment, please
see a NISSAN dealer.
FOG LIGHTS (if so equipped)
Replacing the fog light bulb
CAUTION
cHigh pressure halogen gas is sealed
inside the halogen bulb. The bulb may
break if the glass envelope is scratched
or the bulb is dropped.
cWhen handling the bulb, do not touch
the glass envelope.
1. Disconnect the negative (-) battery cable.
WDI0305
8-32Maintenance and do-it-yourself
ZREVIEW COPY:Ð2003 Truck/Frontier(d22)
Owners Manual(owners)ÐUSA English(nna)
01/15/03Ðarosenma
X
Page 221 of 272
2. Remove screw.
3. Disconnect connector.
4. Push the fog light assembly toward the front
of the vehicle and pull out to expose the rear
of the assembly.5. Rotate the bulb cover counterclockwise and
remove.
6. Lift the spring retainer.
7. Remove the fog light bulb from housing.
8. Disconnect the electrical connector.
9. Install the new bulb in the reverse order of
removal. DO NOT TOUCH THE BULB.
WDI0307
WDI0204
Maintenance and do-it-yourself8-33
ZREVIEW COPY:Ð2003 Truck/Frontier(d22)
Owners Manual(owners)ÐUSA English(nna)
01/15/03Ðarosenma
X
Page 222 of 272
EXTERIOR AND INTERIOR LIGHTS
Item Wattage (W) Bulb No.*
Front combination light
Headlight 55/65 9007
Turn signal light 28.5 3456k
Parking light side front 5 168
Side marker 5 168
Rear combination light
Turn signal 27 3157NA
Stop/Tail 27/7 315k
Back-up 27 3156k
License plate light 3.8 168
Fog light 55 H3
Dome light type A — 83
Dome light type B — —
Dome light type C — —
Cargo light 10 DE3175
Map light 8 578
High-mounted stop lightSee a NISSAN dealer for
assistance.
*: Always check with the Parts Department at a NISSAN dealer for the latest parts information.
Replacement procedures
All other lights are either type A, B, C or D. When
replacing a bulb, first remove the lens and/or cover.
: Indicates bulb removal
: Indicates bulb installation
WDI0306
8-34Maintenance and do-it-yourself
ZREVIEW COPY:Ð2003 Truck/Frontier(d22)
Owners Manual(owners)ÐUSA English(nna)
01/15/03Ðarosenma
X
Page 223 of 272
Map light
WDI0296
Dome and cargo light
WDI0297
Map/compass light
WDI0298
Maintenance and do-it-yourself8-35
ZREVIEW COPY:Ð2003 Truck/Frontier(d22)
Owners Manual(owners)ÐUSA English(nna)
01/15/03Ðarosenma
X
Page 224 of 272
See a NISSAN dealer for assistance.
Cargo light - Crew Cab
WDI0299
Rear combination light
WDI0300
License plate light
WDI0301
8-36Maintenance and do-it-yourself
ZREVIEW COPY:Ð2003 Truck/Frontier(d22)
Owners Manual(owners)ÐUSA English(nna)
01/15/03Ðarosenma
X
Page 228 of 272

cThe original tires have built-in tread
wear indicators. When the wear indica-
tors are visible, the tire(s) should be
replaced.
cImproper service of the spare tire may
result in serious personal injury. If it is
necessary to repair the spare tire, con-
tact a NISSAN dealer.
cFor additional information regarding
tires, refer to Important Tire Safety In-
formation (US) or Tire Safety Informa-
tion (Canada) in the Warranty Informa-
tion Booklet.
Replacing wheels and tires
When replacing a tire, use the same size, tread
design, speed rating and load carrying capacity
as originally equipped. Recommended types and
sizes are shown in “Wheels/tire size” in the
“Technical and consumer information” section of
this manual.
WARNING
cThe use of tires other than those recom-
mended or the mixed use of tires of
different brands, construction (bias,
bias-belted or radial) , or tread patterns
can adversely affect the ride, braking,
handling, ground clearance, body-to-
tire clearance, tire chain clearance,
speedometer calibration, headlight aim
and bumper height. Some of these ef-
fects may lead to accidents and could
result in serious personal injury.
cIf the wheels are changed for any rea-
son, always replace with wheels which
have the same off-set dimension.
Wheels of a different off-set could
cause premature tire wear, degrade ve-
hicle handling characteristics and/or
interference with the brake
discs/drums. Such interference can
lead to decreased braking efficiency
and/or early brake pad/shoe wear. Re-
fer to “Wheel/tire size” in the “Techni-
cal and consumer information” section
of this manual for wheel off-set
dimensions.cWhen a spare tire is mounted or a wheel
is replaced, the low tire pressure warn-
ing system will not function. Contact
your NISSAN dealer as soon as pos-
sible for tire replacement and/or sys-
tem resetting (for models with the low
tire pressure warning system) .
cDo not install a deformed wheel or tire
even if it has been repaired. Such
wheels or tires could have structural
damage and could fail without warning.
cThe use of retread tires is not
recommended.
cFor additional information regarding
tires, refer to Important Tire Safety In-
formation (US) or Tire Safety Informa-
tion (Canada) in the Warranty Informa-
tion Booklet.
8-40Maintenance and do-it-yourself
ZREVIEW COPY:Ð2003 Truck/Frontier(d22)
Owners Manual(owners)ÐUSA English(nna)
01/15/03Ðarosenma
X