2003 NISSAN FRONTIER tire type
[x] Cancel search: tire typePage 32 of 272
WARNING
cAfter adjustment, release the adjust-
ment button and try to move the shoul-
der belt anchor up and down to make
sure it is securely fixed in position.
cThe shoulder belt anchor height should
be adjusted to the position best for you.
Failure to do so may reduce the effec-
tiveness of the entire restraint system
and increase the chance or severity of
injury in an accident.
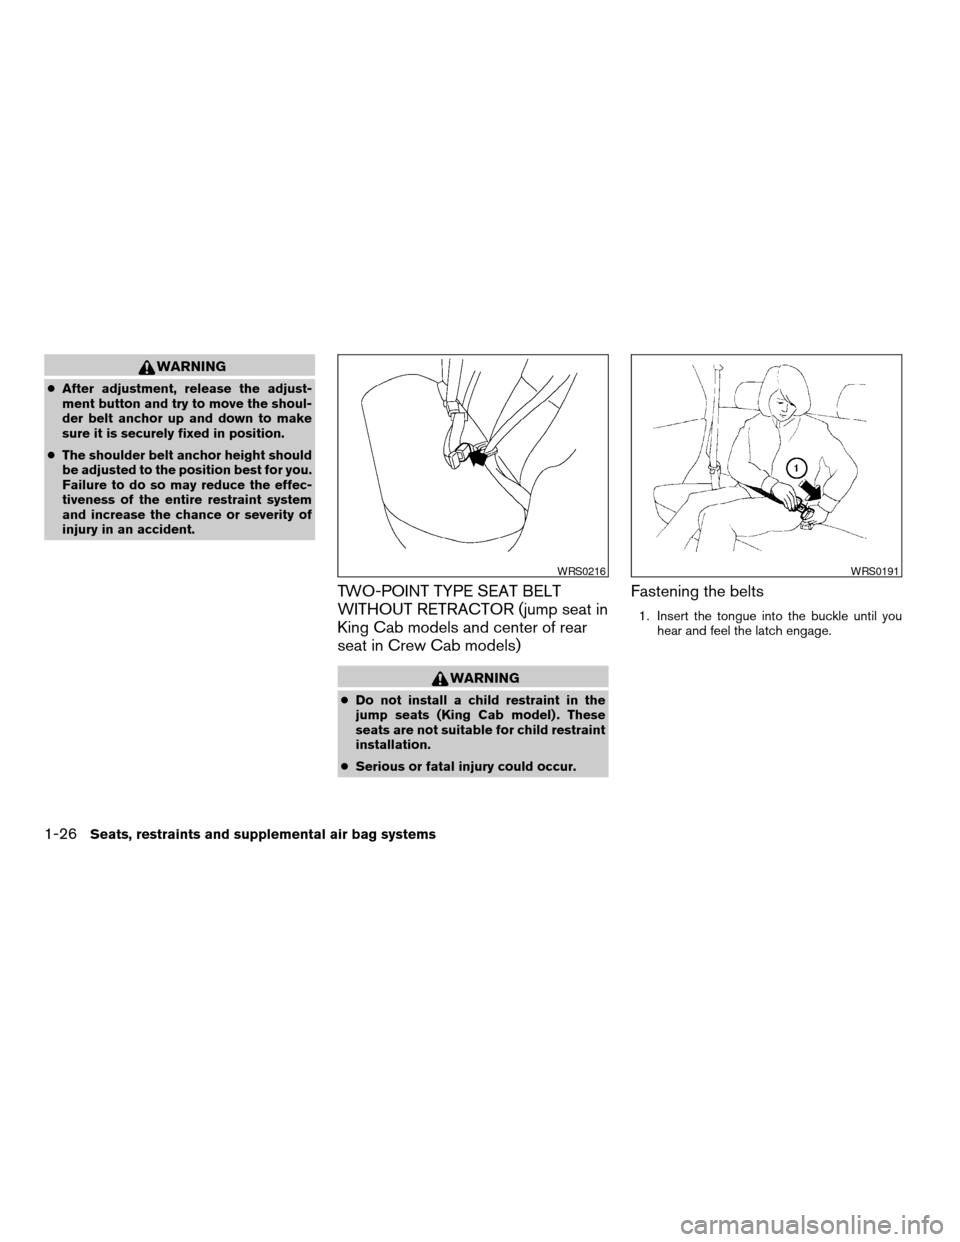
TWO-POINT TYPE SEAT BELT
WITHOUT RETRACTOR (jump seat in
King Cab models and center of rear
seat in Crew Cab models)
WARNING
cDo not install a child restraint in the
jump seats (King Cab model) . These
seats are not suitable for child restraint
installation.
cSerious or fatal injury could occur.
Fastening the belts
1. Insert the tongue into the buckle until you
hear and feel the latch engage.
WRS0216WRS0191
1-26Seats, restraints and supplemental air bag systems
ZREVIEW COPY:Ð2003 Truck/Frontier(d22)
Owners Manual(owners)ÐUSA English(nna)
01/13/03Ðarosenma
X
Page 100 of 272

OUTSIDE MIRRORS
The outside mirrors can be moved in any direc-
tion for a better rear view.
Type A: Adjust to the desired position by moving
the entire mirror assembly.
Type B: Adjust to the desired position by press-
ing directly on the mirror surface.
Foldable outside mirrors
Push the mirrors backward to fold them.
Type A
WPD0169
Type B
WPD0170WPD0056
3-14Pre-driving checks and adjustments
ZREVIEW COPY:Ð2003 Truck/Frontier(d22)
Owners Manual(owners)ÐUSA English(nna)
01/15/03Ðarosenma
X
Page 138 of 272
CAUTION
Do not place metalized film or any metal
parts (antenna, etc.) on the windows. This
may cause poor reception of the signals
from the tire pressure sensors, and the
low tire pressure warning system will not
function properly.
FCC Notice:
Changes or modifications not expressly ap-
proved by the manufacturer compliance
could void the user’s authority to operate
the environment.
This device complies with Part 15 of the
FCC Rules and RSS-210 of Industry
Canada.
Operation is subject to the following two
conditions: (1) This device may not cause
harmful interface, and (2) this device must
accept any interference received, including
interference that may cause undesired op-
eration of the device.
ON-PAVEMENT AND OFF-ROAD
DRIVING PRECAUTIONS
Utility vehicles have a significantly higher
rollover rate than other types of vehicles.
They have higher ground clearance than passen-
ger cars to make them capable of performing in a
variety of on-pavement and off-road applications.
This gives them a higher center of gravity than
ordinary cars. An advantage of higher ground
clearance is a better view of the road, allowing
you to anticipate problems. However, they are not
designed for cornering at the same speeds as
conventional two-wheel drive vehicles any more
than low-slung sports cars are designed to per-
form satisfactorily under off-road conditions. If at
all possible, avoid sharp turns at high speeds. As
with other vehicles of this type, failure to operate
this vehicle correctly may result in loss of control
or vehicle rollover.
Be sure to read the driving safety precautions
later in this section.
AVOIDING COLLISION AND
ROLLOVER
WARNING
Failure to operate this vehicle in a safe
and prudent manner may result in loss of
control or an accident.
Be alert and drive defensively at all times. Obey
all traffic regulations. Avoid excessive speed,
high speed cornering, or sudden steering ma-
neuvers, because these driving practices could
cause you to lose control of your vehicle.As with
any vehicle, loss of control could result in a
collision with other vehicles or objects, or
cause the vehicle to roll over, particularly if
the loss of control causes the vehicle to
slide sideways.Be attentive at all times, and
avoid driving when tired. Never drive when under
the influence of alcohol or drugs (including pre-
scription or over-the-counter drugs which may
cause drowsiness) . Always wear your seat belt
as outlined in the “Seats, restraints and supple-
mental air bag systems” section of this manual,
and also instruct your passengers to do so.
Seat belts help reduce the risk of injury in colli-
sions and rollovers.In a rollover crash, an
unbelted person is significantly more likely
to die than a person wearing a seat belt.
5-4Starting and driving
ZREVIEW COPY:Ð2003 Truck/Frontier(d22)
Owners Manual(owners)ÐUSA English(nna)
01/15/03Ðarosenma
X
Page 140 of 272
cUnsecured cargo can be thrown around
when driving over rough terrain. Prop-
erly secure all cargo so it will not be
thrown forward and cause injury to you
or your passengers.
cTo avoid raising the center of gravity
excessively, do not exceed the rated
capacity of the roof rack (if so
equipped) and evenly distribute the
load. Secure heavy loads in the cargo
area as far forward and as low as pos-
sible. Do not equip the vehicle with tires
larger than specified in this manual.
This could cause your vehicle to roll
over.
cDo not grip the inside or spokes of the
steering wheel when driving off-road.
The steering wheel could move sud-
denly and injure your hands. Instead
drive with your fingers and thumbs on
the outside of the rim.
cBefore operating the vehicle, ensure
that the driver and all passengers have
their seat belts fastened.
cAlways drive with the floor mats in
place as the floor may become hot.cLower your speed when encountering
strong crosswinds. With a higher center
of gravity, your NISSAN is more af-
fected by strong side winds. Slower
speeds ensure better vehicle control.
cDo not drive beyond the performance of
the tires, even with 4WD engaged.
cAccelerating quickly, sharp steering
maneuvers or sudden braking may
cause loss of control.
cIf at all possible, avoid sharp turning
maneuvers, particularly at high speeds.
Your NISSAN four-wheel drive vehicle
has a higher center of gravity than a
two-wheel drive vehicle. The vehicle is
not designed for cornering at the same
speeds as conventional two-wheel
drive vehicles. Failure to operate this
vehicle correctly could result in loss of
control and/or a rollover accident.
cAlways use tires of the same type, size,
brand, construction (bias, bias-belted,
or radial) , and tread pattern on all four
wheels. Install tire chains on the rear
wheels when driving on slippery roads
and drive carefully.cBe sure to check the brakes immedi-
ately after driving in mud or water. See
“Brake system” later in this section for
“Wet brakes”.
cAvoid parking your vehicle on steep
hills. If you get out of the vehicle and it
rolls forward, backward or sideways,
you could be injured.
cWhenever you drive off-road through
sand, mud or water as deep as the
wheel hub, more frequent maintenance
may be required. See “Periodic mainte-
nance” in the “NISSAN Service and
Maintenance Guide.”
5-6Starting and driving
ZREVIEW COPY:Ð2003 Truck/Frontier(d22)
Owners Manual(owners)ÐUSA English(nna)
01/15/03Ðarosenma
X
Page 162 of 272
WARNING
cThe anti-lock brake system is a sophis-
ticated device, but it cannot prevent ac-
cidents resulting from careless or dan-
gerous driving techniques. It can help
maintain vehicle control during braking
on slippery surfaces, but remember that
the stopping distance on slippery sur-
faces will be longer than on normal
surfaces even with the anti-lock brake
system. Stopping distances may also
be longer on rough, gravel or snow cov-
ered roads, or if you are using tire
chains. Tire type and condition may also
affect braking effectiveness. Always
maintain a safe distance from the ve-
hicle in front of you. Ultimately, the re-
sponsibility for safety of self and others
rests in the hands of the driver.
cTire type and condition of tires may also
affect braking effectiveness.
cWhen replacing tires, install the speci-
fied size of tires on all four wheels.cWhen installing a spare tire, make sure
it is the proper size and type as speci-
fied on the tire placard. For tire placard
location information, refer to “Tire plac-
ard” in the “Technical and consumer
information” section of this manual.
cRefer to “Wheels and tires” in the
“Maintenance and do-it-yourself” sec-
tion of this manual.When driving on slippery surfaces or suddenly
avoiding obstacles on roads, the vehicle might
swerve or slip. With the Vehicle Dynamic Control
(VDC) system, sensors detect these movements
and control the braking and engine output to help
improve vehicle stability while driving.
cWhen the vehicle dynamic control system is
operating, the slip indicator in the instrument
panel blinks.
cWhen only the traction control system portion
of the vehicle dynamic control system is oper-
ating, the slip indicator will also blink.
cIf the slip indicator blinks, the vehicle is under
slippery conditions. Be sure to drive carefully.
See “Slip indicator light”, and “Vehicle dy-
namic control off indicator light” in the “Instru-
ments and controls” section.
cIndicator light
If malfunction occurs in the system, the
andindicator lights come on in the in-
strument panel.
As long as these warning lights are on, the
traction control function is canceled.
The VDC system uses a Brake Limited Slip Dif-
ferential (LSD) system to improve vehicle trac-
tion. The brake LSD system works when one of
the driving wheels is spinning on a slippery sur-
face. The brake LSD system brakes the spinning
VEHICLE DYNAMIC CONTROL (VDC)
SYSTEM (if so equipped)
5-28Starting and driving
ZREVIEW COPY:Ð2003 Truck/Frontier(d22)
Owners Manual(owners)ÐUSA English(nna)
01/15/03Ðarosenma
X
Page 163 of 272
wheel which distributes the driving power to the
other drive wheel. If the vehicle is operated with
the vehicle dynamic control system off, all VDC
and TCS functions will be turned off. The brake
LSD system and ABS will still operate with the
VDC system OFF. If the brake LSD system or the
ABS is activated, the slip indicator light will blink
and you may hear a clunk noise and/or feel a
pulsation in the brake pedal. This is normal.
While the VDC system is operating, you may feel
a pulsation in the brake pedal and hear a noise or
vibration from under the hood. This is normal and
indicates that the VDC system is working prop-
erly.
The computer has a built in diagnostic feature
that tests the system each time you start the
engine and move the vehicle forward or in reverse
at a slow speed. When the self-test occurs, you
may hear a clunk noise and/or feel a pulsation in
the brake pedal. This is normal and is not an
indication of a malfunction.WARNING
cThe vehicle dynamic control system is
designed to help improve driving stabil-
ity but does not prevent accidents due
to abrupt steering operation at high
speeds or by careless or dangerous
driving techniques. Reduce vehicle
speed and be especially careful when
driving and cornering on slippery sur-
faces and always drive carefully.
cIf suspension parts such as shock ab-
sorbers, struts, springs and bushings
are not standard equipment or are ex-
tremely deteriorated, the vehicle dy-
namic control off indicator light may
come on.
cWhen driving on extremely inclined sur-
faces such as higher banked corners,
the vehicle dynamic control system may
not operate properly or the vehicle dy-
namic control off indicator light may
come on. Do not drive on these types of
roads.
cIf the tires other than the recommended
ones are used, the vehicle dynamic con-
trol system may not operate properly or
the vehicle dynamic control off indica-
tor light may come on.cThe vehicle dynamic control system is
not a substitute for winter tires or tire
chains on a snow covered road.
Starting and driving5-29
ZREVIEW COPY:Ð2003 Truck/Frontier(d22)
Owners Manual(owners)ÐUSA English(nna)
01/15/03Ðarosenma
X
Page 164 of 272

FREEING A FROZEN DOOR LOCK
To prevent a door lock from freezing, apply de-
icer through the key hole. If the lock becomes
frozen, heat the key before inserting it into the key
hole.
ANTI-FREEZE
In the winter when it is anticipated that the tem-
perature will drop below 32°F (0°C) , check the
anti-freeze (ethylene glycol base) to assure
proper winter protection. For details, see ‘‘Engine
cooling system’’ in the ‘‘Maintenance and do-it-
yourself’’ section of this manual.
BATTERY
If the battery is not fully charged during extremely
cold weather conditions, the battery fluid may
freeze and damage the battery. To maintain maxi-
mum efficiency, the battery should be checked
regularly. For details, see ‘‘Battery’’ in the ‘‘Main-
tenance and do-it-yourself’’ section of this
manual.
DRAINING OF COOLANT WATER
If the vehicle is to be left outside without anti-
freeze, drain the cooling system, including the
engine block. Refill before operating the vehicle.For details, see ‘‘Changing engine coolant’’ in the
‘‘Maintenance and do-it-yourself’’ section of this
manual.
TIRE EQUIPMENT
1. SUMMER tires have a tread designed to
provide superior performance on dry pave-
ment. However, the performance of these
tires will be substantially reduced in snowy
and icy conditions. If you operate your ve-
hicle on snowy or icy roads, NISSAN recom-
mends the use of MUD & SNOW or ALL
SEASON TIRES on all four wheels. Please
consult a NISSAN dealer for the tire type,
size, speed rating and availability informa-
tion.
2. For additional traction on icy roads, studded
tires may be used. However, some U.S.
states and Canadian provinces prohibit their
use. Check local, state and provincial laws
before installing studded tires.
Skid and traction capabilities of studded
snow tires on wet or dry surfaces may be
poorer than that of non-studded snow tires.
3. Tire chains may be used.
Use of tire chains may be prohibited accord-
ing to location. Check the local laws before
installing tire chains. When installing tire
chains, make sure they are of proper size forthe tires on your vehicle and are installed
according to the chain manufacturer’s sug-
gestions.Use only SAE Class “S” chains.
Class “S” chains are used on vehicles with
restricted wheel well clearance. Vehicles
that can use Class “S” chains are designed
to meet the minimum clearances between
the tire and the closest vehicle suspension
or body component required to accommo-
date the use of a winter traction device (tire
chains or cables) . The minimum clearances
are determined using the factory equipped
tire size. Other types may damage your ve-
hicle. Use chain tensioners when recom-
mended by the tire chain manufacturer to
ensure a tight fit. Loose end links of the tire
chain must be secured or removed to pre-
vent the possibility of whipping action dam-
age to the fenders or underbody. If possible,
avoid fully loading your vehicle when using
tire chains. In addition, drive at a reduced
speed. Otherwise, your vehicle may be dam-
aged and/or vehicle handling and perfor-
mance may be adversely affected.
Never install tire chains on spare tires. Do
not use tire chains on dry roads.
COLD WEATHER DRIVING
5-30Starting and driving
ZREVIEW COPY:Ð2003 Truck/Frontier(d22)
Owners Manual(owners)ÐUSA English(nna)
01/16/03Ðcathy
X
Page 170 of 272

Getting the spare tire and tools
For King Cab models:
cMove the driver’s seatback fully forward.
cRemove the jack and wheel nut wrench from
the tool case located behind the driver’s seat.
cRemove the jack rod located behind the driv-
er’s seat.For Crew Cab models:
cTilt the rear bench seat forward.
cRemove the jack, jack rod, and tool case lo-
cated behind the rear bench seat.
All models:
1. Fit the square end of the jack rod into the
square hole of the wheel nut wrench to form
a handle.
2. Find the oval-shaped opening under the
middle of the tailgate. Pass the T-shaped
end of the jack rod through the opening and
direct it toward the spare tire winch, located
directly above the spare tire.
Type A
WCE0064Type BLCE0069WCE0065
6-4In case of emergency
ZREVIEW COPY:Ð2003 Truck/Frontier(d22)
Owners Manual(owners)ÐUSA English(nna)
01/15/03Ðarosenma
X