2003 NISSAN ALTIMA gas type
[x] Cancel search: gas typePage 103 of 256
OPENER OPERATION
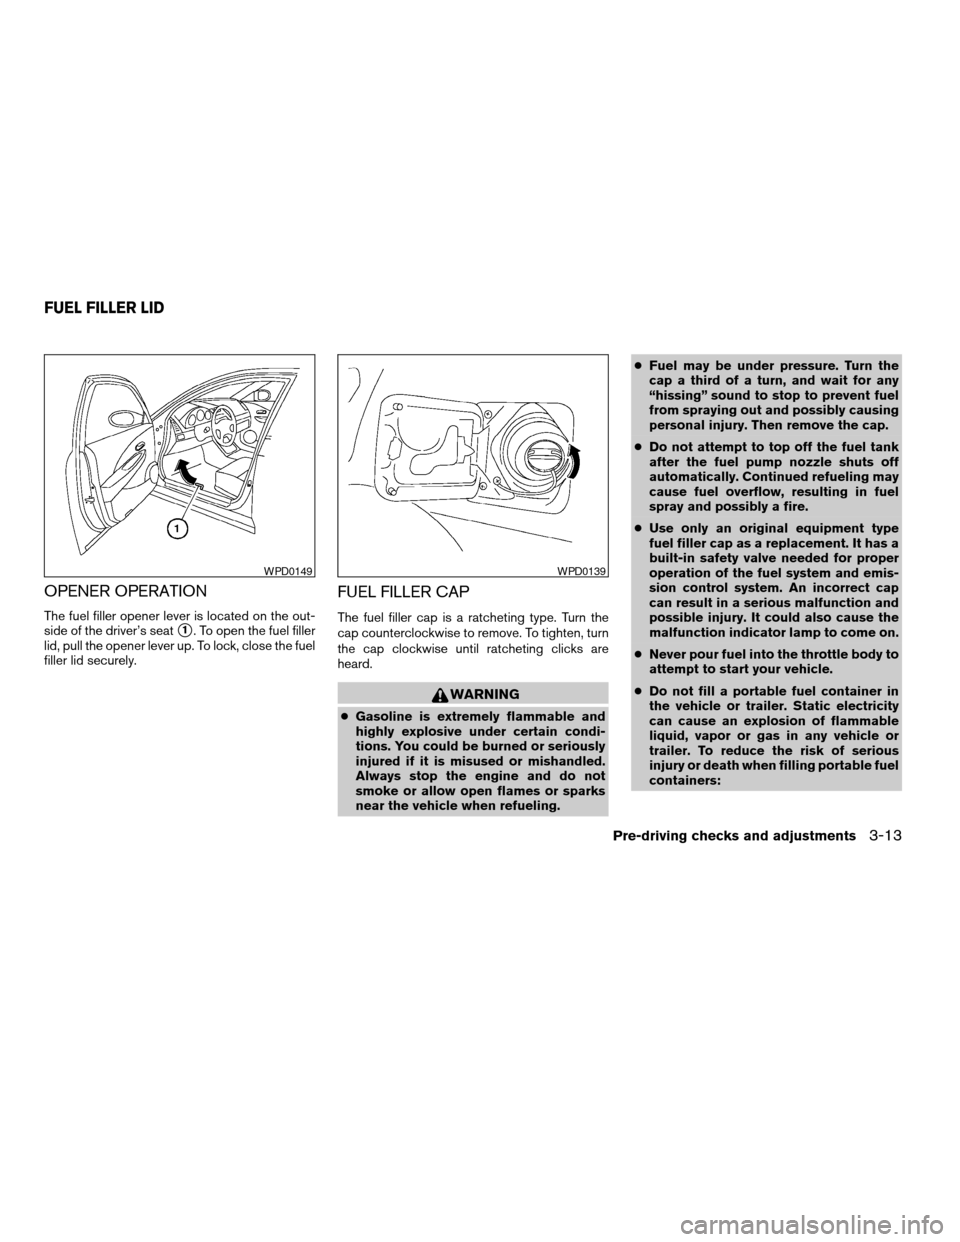
The fuel filler opener lever is located on the out-
side of the driver’s seat
s1. To open the fuel filler
lid, pull the opener lever up. To lock, close the fuel
filler lid securely.
FUEL FILLER CAP
The fuel filler cap is a ratcheting type. Turn the
cap counterclockwise to remove. To tighten, turn
the cap clockwise until ratcheting clicks are
heard.
WARNING
cGasoline is extremely flammable and
highly explosive under certain condi-
tions. You could be burned or seriously
injured if it is misused or mishandled.
Always stop the engine and do not
smoke or allow open flames or sparks
near the vehicle when refueling.cFuel may be under pressure. Turn the
cap a third of a turn, and wait for any
“hissing” sound to stop to prevent fuel
from spraying out and possibly causing
personal injury. Then remove the cap.
cDo not attempt to top off the fuel tank
after the fuel pump nozzle shuts off
automatically. Continued refueling may
cause fuel overflow, resulting in fuel
spray and possibly a fire.
cUse only an original equipment type
fuel filler cap as a replacement. It has a
built-in safety valve needed for proper
operation of the fuel system and emis-
sion control system. An incorrect cap
can result in a serious malfunction and
possible injury. It could also cause the
malfunction indicator lamp to come on.
cNever pour fuel into the throttle body to
attempt to start your vehicle.
cDo not fill a portable fuel container in
the vehicle or trailer. Static electricity
can cause an explosion of flammable
liquid, vapor or gas in any vehicle or
trailer. To reduce the risk of serious
injury or death when filling portable fuel
containers:
WPD0149WPD0139
FUEL FILLER LID
Pre-driving checks and adjustments3-13
ZREVIEW COPY:Ð2003 Altima(l30)
Owners Manual(owners)ÐUSA English(nna)
04/21/03Ðdebbie
X
Page 157 of 256
the tires on your vehicle and are installed
according to the chain manufacturer’s sug-
gestions.Use only SAE Class “S”
chains.Class “S” chains are used on ve-
hicles with restricted tire to vehicle clear-
ance. Vehicles that can use Class “S” chains
are designed to meet the minimum clear-
ances between the tire and the closest ve-
hicle suspension or body component re-
quired to accommodate the use of a winter
traction device (tire chains or cables) . The
minimum clearances are determined using
the factory equipped tire size. Other types
may damage your vehicle. Use chain ten-
sioners when recommended by the tire
chain manufacturer to ensure a tight fit.
Loose end links of the tire chain must be
secured or removed to prevent the possibil-
ity of whipping action damage to the fenders
or underbody. If possible, avoid fully loading
your vehicle when using tire chains. In addi-
tion, drive at a reduced speed. Otherwise,
your vehicle may be damaged and/or vehicle
handling and performance may be adversely
affected.
Never install tire chains on spare tires. Do
not use tire chains on dry roads.SPECIAL WINTER EQUIPMENT
It is recommended that the following items be
carried in the vehicle during winter:
cA scraper and stiff-bristled brush to remove
ice and snow from the windows and wiper
blades.
cA sturdy, flat board to be placed under the
jack to give it firm support.
cA shovel to dig the vehicle out of snowdrifts.
cExtra window washer fluid to refill the reser-
voir tank.
DRIVING ON SNOW OR ICE
WARNING
cWet ice (32°F, 0°C and freezing rain) ,
very cold snow or ice can be slick and
very hard to drive on. The vehicle will
have much less traction or “grip” under
these conditions. Try to avoid driving on
wet ice until the road is salted or
sanded.
cWhatever the condition, drive with cau-
tion. Accelerate and slow down with
care. If accelerating or downshifting too
fast, the drive wheels will lose even
more traction.cAllow more stopping distance under
these conditions. Braking should be
started sooner than on dry pavement.
cAllow greater following distances on
slippery roads.
cWatch for slippery spots (glare ice) .
These may appear on an otherwise
clear road in shaded areas. If a patch of
ice is seen ahead, brake before reach-
ing it. Try not to brake while on the ice,
and avoid any sudden steering
maneuvers.
cDo not use the cruise control on slip-
pery roads.
cSnow can trap dangerous exhaust
gases under your vehicle. Keep snow
clear of the exhaust pipe and from
around your vehicle.
Starting and driving5-21
ZREVIEW COPY:Ð2003 Altima(l30)
Owners Manual(owners)ÐUSA English(nna)
04/21/03Ðdebbie
X
Page 207 of 256
HEADLIGHTS
Replacing the xenon headlight bulb
WARNING
cHIGH VOLTAGE
When xenon headlights are on, they pro-
duce a high voltage. To prevent an electric
shock, never attempt to modify or disas-
semble. Always have your xenon head-
lights replaced at a NISSAN dealer. For
additional information, see “Headlight
and turn signal switch” in the “Instru-
ments and controls” section.
Replacing the halogen headlight bulb
The headlight is a semi-sealed beam type which
uses a replaceable headlight (halogen) bulb. Be-
cause the headlight assembly must be removed
from the vehicle for bulb replacement, see your
NISSAN dealer.
CAUTION
cAiming is not necessary after replacing
the bulb. When aiming adjustment is
necessary, contact a NISSAN dealer.cDo not leave the headlight assembly
open without a bulb installed for a long
period of time. Dust, moisture, smoke,
etc. entering the headlight body may
affect bulb performance. Remove the
bulb from the headlight assembly just
before a replacement bulb is installed.
cOnly touch the plastic base when han-
dling the bulb. Never touch the glass
envelope. Touching the glass could sig-
nificantly affect bulb life and/or head-
light performance.
cHigh pressure halogen gas is sealed
inside the halogen bulb. The bulb may
break if the glass envelope is scratched
or the bulb is dropped.
cUse the same number and wattage as
originally installed:
Low beam:
Wattage: 55
Bulb no.: H1*
High beam:
Wattage: 60
Bulb no.: HB3 (9005)*
*: Always check with the Parts Depart-
ment at a NISSAN dealer for the latest
parts information.
FRONT PARK/TURN/SIDEMARKER
LIGHT
Bulb replacement requires the removal of the
headlight assembly. If replacement is required,
see your NISSAN dealer.
FOG LIGHTS (if so equipped)
Replacing the fog light bulb
CAUTION
cHigh pressure halogen gas is sealed
inside the halogen bulb. The bulb may
break if the glass envelope is scratched
or the bulb is dropped.
cWhen handling the bulb, do not touch
the glass envelope.
LIGHTS
Maintenance and do-it-yourself8-31
ZREVIEW COPY:Ð2003 Altima(l30)
Owners Manual(owners)ÐUSA English(nna)
04/21/03Ðdebbie
X
Page 224 of 256
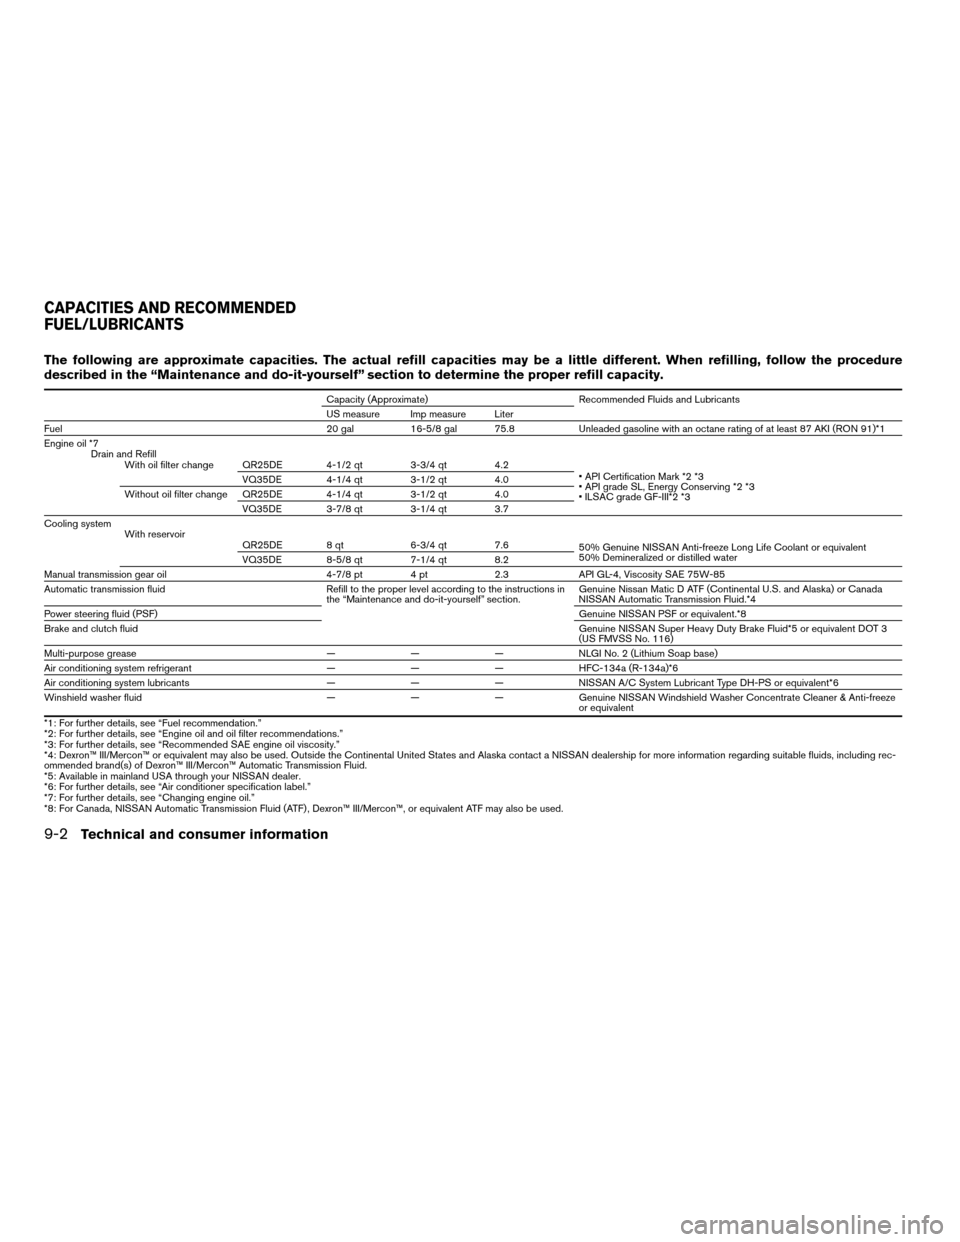
The following are approximate capacities. The actual refill capacities may be a little different. When refilling, follow the procedure
described in the “Maintenance and do-it-yourself” section to determine the proper refill capacity.
Capacity (Approximate) Recommended Fluids and Lubricants
US measure Imp measure Liter
Fuel 20 gal 16-5/8 gal 75.8 Unleaded gasoline with an octane rating of at least 87 AKI (RON 91)*1
Engine oil *7
Drain and Refill
With oil filter change QR25DE 4-1/2 qt 3-3/4 qt 4.2
• API Certification Mark *2 *3
• API grade SL, Energy Conserving *2 *3
• ILSAC grade GF-III*2 *3 VQ35DE 4-1/4 qt 3-1/2 qt 4.0
Without oil filter change QR25DE 4-1/4 qt 3-1/2 qt 4.0
VQ35DE 3-7/8 qt 3-1/4 qt 3.7
Cooling system
With reservoir
QR25DE 8 qt 6-3/4 qt 7.6
50% Genuine NISSAN Anti-freeze Long Life Coolant or equivalent
50% Demineralized or distilled water
VQ35DE 8-5/8 qt 7-1/4 qt 8.2
Manual transmission gear oil 4-7/8 pt 4 pt 2.3 API GL-4, Viscosity SAE 75W-85
Automatic transmission fluid Refill to the proper level according to the instructions in
the “Maintenance and do-it-yourself” section.Genuine Nissan Matic D ATF (Continental U.S. and Alaska) or Canada
NISSAN Automatic Transmission Fluid.*4
Power steering fluid (PSF)Genuine NISSAN PSF or equivalent.*8
Brake and clutch fluidGenuine NISSAN Super Heavy Duty Brake Fluid*5 or equivalent DOT 3
(US FMVSS No. 116)
Multi-purpose grease———NLGINo.2(Lithium Soap base)
Air conditioning system refrigerant— — — HFC-134a (R-134a)*6
Air conditioning system lubricants— — — NISSAN A/C System Lubricant Type DH-PS or equivalent*6
Winshield washer fluid— — — Genuine NISSAN Windshield Washer Concentrate Cleaner & Anti-freeze
or equivalent
*1: For further details, see “Fuel recommendation.”
*2: For further details, see “Engine oil and oil filter recommendations.”
*3: For further details, see “Recommended SAE engine oil viscosity.”
*4: Dexron™ III/Mercon™ or equivalent may also be used. Outside the Continental United States and Alaska contact a NISSAN dealership for more information regarding suitable fluids, including rec-
ommended brand(s) of Dexron™ III/Mercon™ Automatic Transmission Fluid.
*5: Available in mainland USA through your NISSAN dealer.
*6: For further details, see “Air conditioner specification label.”
*7: For further details, see “Changing engine oil.”
*8: For Canada, NISSAN Automatic Transmission Fluid (ATF) , Dexron™ III/Mercon™, or equivalent ATF may also be used.
CAPACITIES AND RECOMMENDED
FUEL/LUBRICANTS
9-2Technical and consumer information
ZREVIEW COPY:Ð2003 Altima(l30)
Owners Manual(owners)ÐUSA English(nna)
04/21/03Ðdebbie
X
Page 229 of 256
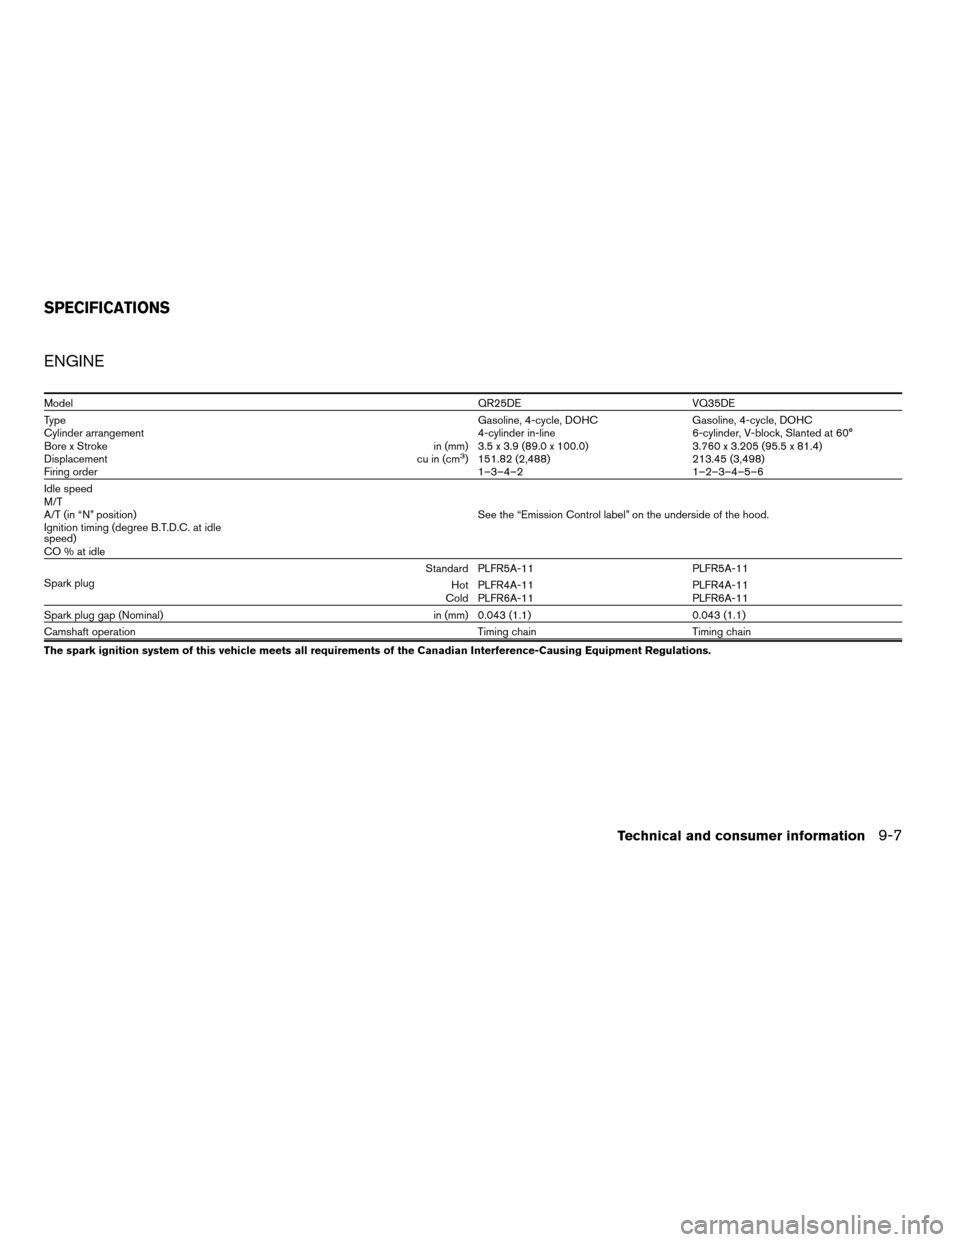
ENGINE
ModelQR25DE VQ35DE
TypeGasoline, 4-cycle, DOHC Gasoline, 4-cycle, DOHC
Cylinder arrangement 4-cylinder in-line 6-cylinder, V-block, Slanted at 60°
Bore x Stroke in (mm) 3.5 x 3.9 (89.0 x 100.0) 3.760 x 3.205 (95.5 x 81.4)
Displacement cu in (cm
3) 151.82 (2,488) 213.45 (3,498)
Firing order1–3–4–2 1–2–3–4–5–6
Idle speed
M/T
A/T (in “N” position) See the “Emission Control label” on the underside of the hood.
Ignition timing (degree B.T.D.C. at idle
speed)
CO % at idle
Spark plugStandard PLFR5A-11 PLFR5A-11
Hot PLFR4A-11 PLFR4A-11
Cold PLFR6A-11 PLFR6A-11
Spark plug gap (Nominal) in (mm) 0.043 (1.1) 0.043 (1.1)
Camshaft operation Timing chain Timing chain
The spark ignition system of this vehicle meets all requirements of the Canadian Interference-Causing Equipment Regulations.
SPECIFICATIONS
Technical and consumer information9-7
ZREVIEW COPY:Ð2003 Altima(l30)
Owners Manual(owners)ÐUSA English(nna)
04/21/03Ðdebbie
X