2003 NISSAN ALTIMA window
[x] Cancel search: windowPage 112 of 256

cto prevent traffic fumes from entering pas-
senger compartment.
cfor maximum cooling when using the air con-
ditioner.
OFF position (Indicator light off):
Outside air is drawn into the passenger compart-
ment and distributed through the selected outlet.
Use the off position for normal heater or air con-
ditioner operation.
Air conditioner button (if so
equipped)
The button is provided only on vehicles equipped
with an air conditioner.
Start the engine, turn the fan control dial to the
desired (1 - 4) position and push the
button to turn on the air conditioner. The indicator
light comes on when the air conditioner is oper-
ating. To turn off the air conditioner, push
the
button again.
The air conditioner cooling function oper-
ates only when the engine is running.
Rear window defroster switch
For more information about the rear window de-
froster switch, see “Rear window defroster
switch” in the “Instruments and controls” section
of this manual.
HEATER OPERATION
Heating
This mode is used to direct heated air to the foot
outlets. Some air also flows from the defrost
outlets.
1. Push the
button to the off position for
normal heating.
2. Turn the air flow control dial to the
position.
3. Turn the fan control dial to the desired posi-
tion.
4. Turn the temperature control dial to the de-
sired position between the middle and the
hot position.
Ventilation
This mode directs outside air to the side and
center ventilators.
1. Push the
button to the off position.
2. Turn the air flow control dial to the
position.
3. Turn the fan control dial to the desired posi-
tion.4. Turn the temperature control dial to the de-
sired position.
Defrosting or defogging
This mode directs the air to the defrost outlets to
defrost/defog the windows.
1. Turn the air flow control dial to the
position.
2. Turn the fan control dial to the desired posi-
tion.
3. Turn the temperature control dial to the de-
sired position between the middle and the
hot position.
cTo quickly remove ice or fog from the win-
dows, turn the fan control dial to 4 and the
temperature control lever to the full HOT
position.
cWhen the
position is selected, the air
conditioner automatically turns on (however,
the indicator light will not illuminate) if the
outside temperature is more than 36 - 37°F
(2 - 3°C) . The air conditioning system will
continue to operate until the fan control dial
is turned to OFF or the vehicle is shut off,
even if the air flow control dial is turned to a
position other than the
position. This
dehumidifies the air which helps defog the
windshield. The
mode automatically
4-4Heater, air conditioner and audio systems
ZREVIEW COPY:Ð2003 Altima(l30)
Owners Manual(owners)ÐUSA English(nna)
04/21/03Ðdebbie
X
Page 114 of 256

4. Push thebutton. The indicator light
comes on.
5. Turn the temperature control dial to the de-
sired position.
Dehumidified defogging
This mode is used to defog the windows and
dehumidify the air.
1. Turn the air flow control dial to the
position.
2. Turn the fan control dial to the desired posi-
tion.
3. Push the
button. The indicator light
comes on.
When the
,or positions in between
are selected, the air conditioner automatically
turns on (however, the indicator light will not
illuminate) if the outside temperature is more than
36 - 37°F (2 - 3°C) . The air conditioning system
will continue to operate until the fan control dial is
turned to OFF or the vehicle is shut off, even if the
air flow control dial is turned to a position other
than the
position. This dehumidifies the air
which helps defog the windshield. The
mode automatically turns off, allowing outside air
to be drawn into the passenger compartment to
further improve the defogging performance.4. Turn the temperature control dial to the de-
sired position.
Operating tips
cKeep the windows and sunroof closed while
the air conditioner is in operation.
cAfter parking in the sun, drive for 2 or 3
minutes with the windows open to vent hot
air from the passenger compartment. Then,
close the windows. This allows the air con-
ditioner to cool the interior more quickly.
cThe air conditioning system should be
operated for approximately 10 minutes
at least once a month. This helps pre-
vent damage to the system due to lack
of lubrication.
cIf the engine coolant temperature
gauge indicates engine coolant tem-
perature over the normal range, turn
the air conditioner off. See “If your
vehicle overheats” in the “In case of
emergency” section of this manual.
AIR FLOW CHARTS
The following charts show the button and dial
positions forMAXIMUM AND QUICKheating,
cooling or defrosting.The air recirculation
button should always be in the OFF posi-
tion for heating and defrosting.
4-6Heater, air conditioner and audio systems
ZREVIEW COPY:Ð2003 Altima(l30)
Owners Manual(owners)ÐUSA English(nna)
04/21/03Ðdebbie
X
Page 118 of 256

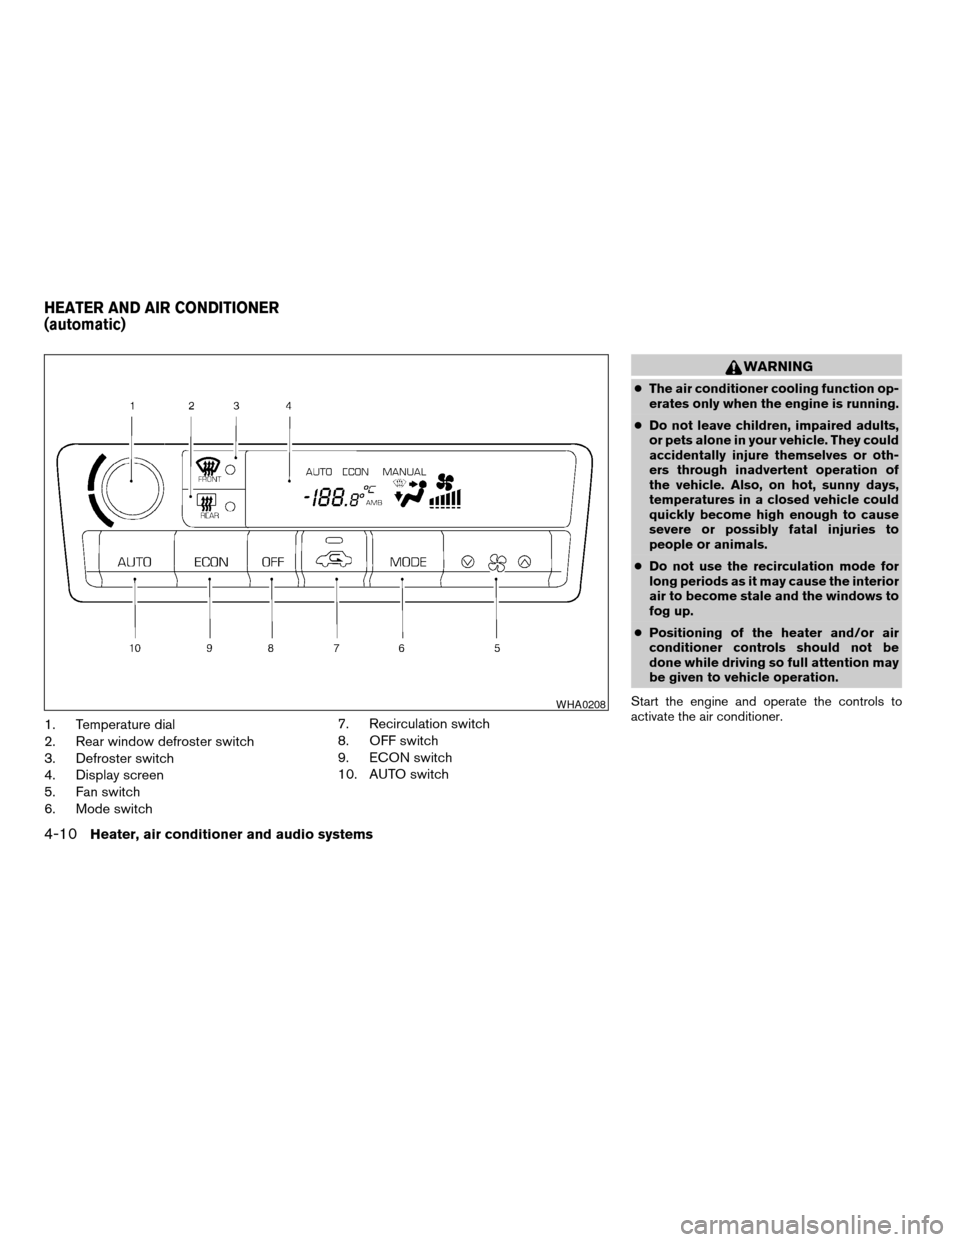
1. Temperature dial
2. Rear window defroster switch
3. Defroster switch
4. Display screen
5. Fan switch
6. Mode switch7. Recirculation switch
8. OFF switch
9. ECON switch
10. AUTO switch
WARNING
cThe air conditioner cooling function op-
erates only when the engine is running.
cDo not leave children, impaired adults,
or pets alone in your vehicle. They could
accidentally injure themselves or oth-
ers through inadvertent operation of
the vehicle. Also, on hot, sunny days,
temperatures in a closed vehicle could
quickly become high enough to cause
severe or possibly fatal injuries to
people or animals.
cDo not use the recirculation mode for
long periods as it may cause the interior
air to become stale and the windows to
fog up.
cPositioning of the heater and/or air
conditioner controls should not be
done while driving so full attention may
be given to vehicle operation.
Start the engine and operate the controls to
activate the air conditioner.
WHA0208
HEATER AND AIR CONDITIONER
(automatic)
4-10Heater, air conditioner and audio systems
ZREVIEW COPY:Ð2003 Altima(l30)
Owners Manual(owners)ÐUSA English(nna)
04/21/03Ðdebbie
X
Page 119 of 256

AUTOMATIC OPERATION
Cooling and/or dehumidified heating
(auto)
This mode may be normally used all year round as
the system automatically works to keep a con-
stant temperature. Air flow distribution and fan
speed are also controlled automatically.
1. Push the AUTO button on. (AUTO will be
displayed.)
2. Turn the temperature dial to the left or right
to set the desired temperature.
cAdjust the temperature dial to about 75°F
(24°C) for normal operation.
cThe temperature of the passenger compart-
ment will be maintained automatically. Air
flow distribution and fan speed are also con-
trolled automatically.
Heating (econ)
The air conditioner does not activate. When you
need to heat only, use this mode.
1. Push the ECON (Economy) button on.
(ECON will be displayed.)
2. Turn the temperature dial to the left or right
to set the desired temperature.cThe temperature of the passenger compart-
ment will be maintained automatically. Air
flow distribution and fan speed are also con-
trolled automatically.
cDo not set the temperature lower than the
outside air temperature. Otherwise the sys-
tem may not work properly.
cNot recommended if windows fog up.
Dehumidified defogging
1. Push the DEF buttonon. The indica-
tor light on the button will come on.
2. Turn the temperature dial to the left or right
to set the desired temperature.
cTo quickly remove ice from the outside of the
windows, push the manual fan control
button
and set to the maximum
position.
cAs soon as possible after the windshield is
clean, push the AUTO button to return to the
auto mode.
cWhen the DEF button
is pushed, the
air conditioner will automatically be turned
on at outside temperatures above 36 - 37°F
(2 - 3°C) . The air conditioning system will
continue to operate until the fan control dial
is turned to OFF or the vehicle is shut off,
even if the air flow control dial is turned to aposition other than the
position. This
dehumidifies the air which helps defog the
windshield. The air recirculate mode auto-
matically turns off, allowing outside air to be
drawn into the passenger compartment to
further improve the defogging performance.
MANUAL OPERATION
Fan speed control
Push the fan control buttonup or down
to manually control the fan speed.
Push the AUTO button to return to automatic
control of the fan speed.
Air recirculation
Push the air recirculation buttonto recir-
culate interior air inside the vehicle. The indicator
light on the switch will come on.
Push it again to make the air inlet controlled
automatically (FRESH, REC/FRE and RECIR-
CULATION) . The indicator will go out.
The air recirculation button will not be activated
when the air conditioner is in DEF mode.
Air flow control
Pushing the manual air flow control button se-
lects the air outlet to:
Heater, air conditioner and audio systems4-11
ZREVIEW COPY:Ð2003 Altima(l30)
Owners Manual(owners)ÐUSA English(nna)
04/21/03Ðdebbie
X
Page 124 of 256

When no CD is loaded, the radio comes on.
Pushing the PWR/VOL control knob again turns
the system off.
Turn the PWR/VOL control knob to the right to
increase volume or to the left to decrease volume.
Adjusting tone quality and speaker balance
Press the AUDIO button to enter the audio adjust
mode:
Bass!Mid!Treb!Fade!Bal
Press the TUNE/FF-REV (
or)or
SEEK/TRACK (
or) to adjust to the
desired levels. The display will return to the regu-
lar radio display after 7 seconds, or you may
press the AUDIO button again to return to the
regular radio display.
Clock operation
Pressing the MENU or CLOCK button displays
the clock with the radio on or off. Press the MENU
or CLOCK button again to turn off the clock
display.
Clock set
1. Press and hold the MENU or CLOCK button
until it beeps (longer than 2 seconds) .2. The hours will start flashing. Press
TUNE/FF-REV (
or)or
SEEK/TRACK (
or) to adjust
the hours.
3. Press the MENU or CLOCK button to
switch to the minute adjustment.
4. Press TUNE/FF-REV (
or)or
SEEK/TRACK (
or) to adjust
the minutes.
5. Press the MENU or CLOCK button again to
exit the clock set mode.
The display will return to the regular clock display
after 7 seconds, or you may press the MENU or
CLOCK button again to return to the regular
clock display.
FM-AM radio operation
FM-AM band select
Push the AM or the FM button to change from AM
to FM reception.
The FM stereo indicator, ST, illuminates during
FM stereo reception. When the stereo broadcast
signal is weak, the radio automatically changes
from stereo to monaural reception.
TUNE/FF—REV
WARNING
The radio should not be tuned while driv-
ing so full attention may be given to ve-
hicle operation.
Use the
andbuttons for manual
tuning. To move quickly through the channels,
hold the tuning buttons down.
SEEK tuning
Push SEEK/TRACK (
or) . SEEK
tuning begins from low to high frequencies or
high to low frequencies, depending on which
button is pressed, and stops at the next broad-
casting station. If using the up button, once the
highest broadcasting station is reached, the ra-
dio continues in the SEEK mode at the lowest
broadcasting station. If using the down button,
once the lowest broadcasting station is reached,
the radio continues in the SEEK mode at the
highest broadcasting station.
SCAN tuning
Push the SCAN button. SCAN illuminates in the
display window. SCAN tuning begins from low to
high frequencies or high to low frequencies.
SCAN tuning stops for 5 seconds at each broad-
casting station that has sufficient signal strength.
4-16Heater, air conditioner and audio systems
ZREVIEW COPY:Ð2003 Altima(l30)
Owners Manual(owners)ÐUSA English(nna)
04/21/03Ðdebbie
X
Page 126 of 256

All Preset Scan
Pressing the Preset Scan button (>1.5 seconds)
scans all the permanent preset memory banks (A,
BorC)from1-6for5seconds. If the Travel
Preset is ON, all the travel preset memory banks
(A,BorC)from1-6arescanned for 5 seconds.
Canceling Preset Scan mode
Pressing any button except CLOCK, EJECT, MIX
and CD cancels the Preset Scan mode.
Speed Sensitive Control Volume (SCV) (if
so equipped)
Your vehicle has Speed Sensitive Control Vol-
ume (SCV) for audio. The audio volume changes
as the driving speed changes.
Press and hold the MENU button (>2 seconds)
until the radio beeps to start the editing mode.
Press the MENU button until the display shows
“SCV”.This display will last 2 seconds and then
change to“OFF”. Press TUNE/FF-REV (
or) to change between:
Off!Low!Mid!High
Compact disc (CD) player operation
Turn the ignition key to the ACC or ON position.
CAUTION
cDo not force a compact disc into the CD
insert slot. This could damage the CD
and/or CD changer/player.
cTrying to load a CD with the CD door
closed could damage the CD and/or CD
changer.
CD button
When the CD button is pressed with a compact
disc loaded and the radio playing, the radio turns
off and the last used compact disc starts to play.
FF (Fast Forward) , REW
(Rewind) buttons
When the TUNE/FF-REV (
or) but-
ton is pressed while the compact disc is playing,
the compact disc plays at an increased speed
while fast forwarding or rewinding. When the
button is released, the compact disc returns to
normal play speed.
SEEK/TRACK buttons
When
is pressed while the compact disc
is playing, the selection following the present one
starts to play from the beginning. Press
several times to skip several selections. Each
time the button is pressed, the CD advances 1additional selection. The track number appears in
the display window. (When the last selection on
the compact disc is skipped, the first selection is
played.)
When
is pressed, the selection being
played returns to the beginning. Press
several times to skip back several selections.
Each time the button is pressed the CD moves
back 1 selection. If the play pattern is in MIX
mode when the button is pressed, the next ran-
dom selection will be played.
MIX button
Press the MIX button to change CD play pat-
terns:
Repeat!Mix!Normal Play
Repeat
Press the MIX button (<1.5 seconds) once to
repeat the current track. The “1” icon is turned on.
Mix
Press the MIX button (<1.5 seconds) again to
start shuffle play of the current disc. The “MIX”
icon is turned on.
Normal play
Press the MIX button (<1.5 seconds) again to
return to normal play mode. The “MIX” icon is
turned off.
4-18Heater, air conditioner and audio systems
ZREVIEW COPY:Ð2003 Altima(l30)
Owners Manual(owners)ÐUSA English(nna)
04/21/03Ðdebbie
X
Page 129 of 256

When no CD is loaded, the radio comes on.
Pushing the PWR/VOL control knob again turns
the system off.
Turn the PWR/VOL control knob to the right to
increase volume or to the left to decrease volume.
Adjusting tone quality and speaker balance
Press the AUDIO button to enter the audio adjust
mode:
Bass!Treb!Fade!Bal
Press the TUNE/FF-REV (
or)or
SEEK/TRACK (
or) to adjust to the
desired levels. The display will return to the regu-
lar radio display after 7 seconds, or you may
press the AUDIO button again to return to the
regular radio display.
Clock operation
Pressing the MENU button displays the clock
with the radio on or off. Press the MENU button
again to turn off the clock display.
Clock set
1. Press and hold the MENU button until it
beeps (>2 seconds) .2. The hours will start flashing. Press
TUNE/FF-REV (
or)or
SEEK/TRACK (
or) to adjust
the hours.
3. Press the MENU button to switch to the
minute adjustment.
4. Press TUNE/FF-REV (
or)or
SEEK/TRACK (
or) to adjust
the minutes.
5. Press the MENU button again to exit the
clock set mode.
The display will return to the regular clock display
after 7 seconds, or you may press the MENU
button again to return to the regular clock display.
FM-AM radio operation
FM-AM band select
Push the AM or the FM button to change from AM
to FM reception.
The FM stereo indicator, ST, illuminates during
FM stereo reception. When the stereo broadcast
signal is weak, the radio automatically changes
from stereo to monaural reception.
TUNE/FF—REV
WARNING
The radio should not be tuned while driv-
ing so full attention may be given to ve-
hicle operation.
Use the
andbuttons for manual
tuning. To move quickly through the channels,
hold the tuning buttons down.
SEEK tuning
Push SEEK/TRACK (
or) . SEEK
tuning begins from low to high frequencies or
high to low frequencies, depending on which
button is pressed, and stops at the next broad-
casting station. If using the up button, once the
highest broadcasting station is reached, the ra-
dio continues in the SEEK mode at the lowest
broadcasting station. If using the down button,
once the lowest broadcasting station is reached,
the radio continues in the SEEK mode at the
highest broadcasting station.
SCAN tuning
Push the SCAN button. SCAN illuminates in the
display window. SCAN tuning begins from low to
high frequencies or high to low frequencies.
SCAN tuning stops for 5 seconds at each broad-
casting station that has sufficient signal strength.
Heater, air conditioner and audio systems4-21
ZREVIEW COPY:Ð2003 Altima(l30)
Owners Manual(owners)ÐUSA English(nna)
04/21/03Ðdebbie
X
Page 133 of 256

2. Thegreenindicator starts blinking and the
display shows“Insert Disc”for 15 sec-
onds.
3. Insert the CD. The display shows“Loading
Disc”.
4. The CD will play after the disc is set to a play
position.
5. The indicator color changes fromblinking
greentosolid greenand the display
shows the Disc icon, Disc number, Track
number and Elapsed Time.
If a disc is not inserted within 15 seconds or if the
load button is pressed during load sequence, the
entire disc load sequence will be canceled.
Disc play
Press the CD button. If a CD is loaded and the
radio is playing, the radio turns off and the last
loaded disc starts to play.
Selected disc play
1. Press the disc select button whose disc icon
is displayed.
2. The indicator blinksgreenduring the
change and the display shows“Changing
Disc”.
3. The CD plays after the disc is set to a play
position.4. The indicator changes fromblinking green
tosolid greenand the display shows the
Disc number, Track number and Elapsed
Time.
FF (fast forward) REW
(rewind) buttons
When the TUNE/FF-REV (
or) but-
ton is pressed while the compact disc is playing,
the compact disc plays at an increased speed
while fast forwarding or rewinding. When the
button is released, the CD returns to normal play
speed.
SEEK/TRACK buttons
When
is pressed while the compact disc
is playing, the selection following the present one
starts to play from the beginning. Press
several times to skip several selections. Each
time the button is pressed, the CD advances 1
additional selection. The track number appears in
the display window. (When the last selection on
the compact disc is skipped, the first selection is
played.)
When
is pressed, the selection being
played returns to the beginning. Press
several times to skip back several selections.
Each time the button is pressed, the CD moves
back 1 selection. If the play pattern is in MIXmode when the button is pressed the next ran-
dom selection will be played.
MIX·PTY
Press the MIX·PTY button to change CD play
patterns:
Repeat!Mix!All Mix!Normal Play
Repeat
Press the MIX·PTY button (<1.5 seconds) once
to repeat the current track. The “1” icon is turned
on, and the display shows“Repeat Track”for 2
seconds. The display then shows the Track num-
ber and Elapsed time as normal.
Mix
Press the MIX·PTY button (<1.5 seconds) again
to start shuffle play of the current disc. The “MIX”
icon is turned on and the display shows“Mix
Tracks”for 2 seconds. The display then shows
the Track number and Elapsed time as normal.
All Mix
Press the MIX·PTY button (<1.5 seconds) again
to start shuffle play of all discs. The “MIX” icon is
turned on, and the display shows“Mix All
Tracks”for 2 seconds. The display then shows
the Track number and Elapsed time as normal.
Also, the indicators of the loaded discs are turned
on with amber color. (Green for current disc.)
Heater, air conditioner and audio systems4-25
ZREVIEW COPY:Ð2003 Altima(l30)
Owners Manual(owners)ÐUSA English(nna)
04/21/03Ðdebbie
X