Page 966 of 3189
![NISSAN ALMERA N16 2003 Electronic Repair Manual EC-636
[QG (WITHOUT EURO-OBD)]
HO2S1 HEATER
2. CHECK HO2S1 POWER SUPPLY CIRCUIT
1. Turn ignition switch “OFF”.
2. Disconnect heated oxygen sensor 1 harness connector.
3. Turn ignition switch “ON NISSAN ALMERA N16 2003 Electronic Repair Manual EC-636
[QG (WITHOUT EURO-OBD)]
HO2S1 HEATER
2. CHECK HO2S1 POWER SUPPLY CIRCUIT
1. Turn ignition switch “OFF”.
2. Disconnect heated oxygen sensor 1 harness connector.
3. Turn ignition switch “ON](/manual-img/5/57350/w960_57350-965.png)
EC-636
[QG (WITHOUT EURO-OBD)]
HO2S1 HEATER
2. CHECK HO2S1 POWER SUPPLY CIRCUIT
1. Turn ignition switch “OFF”.
2. Disconnect heated oxygen sensor 1 harness connector.
3. Turn ignition switch “ON”.
4. Check voltage between HO2S1 terminal 4 and ground with
CONSULT-II or tester.
OK or NG
OK >> GO TO 4.
NG >> GO TO 3.
3. DETECT MALFUNCTIONING PART
Check the following.
●Harness connectors M182, E251
●Harness connectors E75, F36
●Fuse block (J/B) connector M1
●10A fuse
●Harness for open or short between heated oxygen sensor 1 and fuse
>> Repair open circuit or short to ground or short to power in harness or connectors.
4. CHECK HO2S1 OUTPUT SIGNAL CIRCUIT FOR OPEN AND SHORT
1. Turn ignition switch “OFF”.
2. Disconnect ECM harness connector.
3. Check harness continuity between ECM terminal 24 and HO2S1 terminal 1.
Refer to Wiring Diagram.
4. Also check harness for short to ground and short to power.
OK or NG
OK >> GO TO 5.
NG >> Repair open circuit or short to ground or short to power in harness or connectors.
MBIB0091E
Voltage: Battery voltage
PBIB0541E
Continuity should exist.
Page 971 of 3189
![NISSAN ALMERA N16 2003 Electronic Repair Manual HO2S2 HEATER
EC-641
[QG (WITHOUT EURO-OBD)]
C
D
E
F
G
H
I
J
K
L
MA
EC
2.CHECK HO2S2 POWER SUPPLY CIRCUIT
1. Turn ignition switch “OFF”.
2. Disconnect heated oxygen sensor 2 harness connector.
3. T NISSAN ALMERA N16 2003 Electronic Repair Manual HO2S2 HEATER
EC-641
[QG (WITHOUT EURO-OBD)]
C
D
E
F
G
H
I
J
K
L
MA
EC
2.CHECK HO2S2 POWER SUPPLY CIRCUIT
1. Turn ignition switch “OFF”.
2. Disconnect heated oxygen sensor 2 harness connector.
3. T](/manual-img/5/57350/w960_57350-970.png)
HO2S2 HEATER
EC-641
[QG (WITHOUT EURO-OBD)]
C
D
E
F
G
H
I
J
K
L
MA
EC
2.CHECK HO2S2 POWER SUPPLY CIRCUIT
1. Turn ignition switch “OFF”.
2. Disconnect heated oxygen sensor 2 harness connector.
3. Turn ignition switch “ON”.
4. Check voltage between HO2S2 terminal 4 and ground with
CONSULT-II or tester.
OK or NG
OK >> GO TO 4.
NG >> GO TO 3.
3.DETECT MALFUNCTIONING PART
Check the following.
●Harness connectors M182, E251
●Harness connectors E75, F36
●Fuse block (J/B) connector M1
●10A fuse
●Harness for open or short between heated oxygen sensor 2 and fuse
>> Repair open circuit or short to ground or short to power in harness or connectors.
4.CHECK HO2S2 OUTPUT SIGNAL CIRCUIT FOR OPEN AND SHORT
1. Turn ignition switch “OFF”.
2. Disconnect ECM harness connector.
3. Check harness continuity between ECM terminal 2 and HO2S2 terminal 1.
Refer to Wiring Diagram.
4. Also check harness for short to ground and short to power.
OK or NG
OK >> GO TO 5.
NG >> Repair open circuit or short to ground or short to power in harness or connectors.
MBIB0256E
Voltage: Battery voltage
PBIB0541E
Continuity should exist.
Page 1027 of 3189
![NISSAN ALMERA N16 2003 Electronic Repair Manual INJECTOR CIRCUIT
EC-697
[QG (WITHOUT EURO-OBD)]
C
D
E
F
G
H
I
J
K
L
MA
EC
3.CHECK INJECTOR POWER SUPPLY CIRCUIT
1. Turn ignition switch “OFF”.
2. Disconnect injector harness connector.
3. Turn ign NISSAN ALMERA N16 2003 Electronic Repair Manual INJECTOR CIRCUIT
EC-697
[QG (WITHOUT EURO-OBD)]
C
D
E
F
G
H
I
J
K
L
MA
EC
3.CHECK INJECTOR POWER SUPPLY CIRCUIT
1. Turn ignition switch “OFF”.
2. Disconnect injector harness connector.
3. Turn ign](/manual-img/5/57350/w960_57350-1026.png)
INJECTOR CIRCUIT
EC-697
[QG (WITHOUT EURO-OBD)]
C
D
E
F
G
H
I
J
K
L
MA
EC
3.CHECK INJECTOR POWER SUPPLY CIRCUIT
1. Turn ignition switch “OFF”.
2. Disconnect injector harness connector.
3. Turn ignition switch “ON”.
4. Check voltage between injector terminal 1 and ground with
CONSULT-II or tester.
OK or NG
OK >> GO TO 5.
NG >> GO TO 4.
4.DETECT MALFUNCTIONING PART
Check the following.
●Harness connectors M202, F115
●Fuse block (J/B) connector M1
●10A fuse
●Harness for open or short between injector and fuse
>> Repair open circuit or short to ground or short to power in harness or connectors.
5.CHECK INJECTOR OUTPUT SIGNAL CIRCUIT FOR OPEN AND SHORT
1. Turn ignition switch “OFF”.
2. Disconnect ECM harness connector.
3. Check harness continuity between injector terminal 2 and ECM terminals 22, 23, 41, 42.
Refer to Wiring Diagram.
4. Also check harness for short to ground and short to power.
OK or NG
OK >> GO TO 6.
NG >> Repair open circuit or short to ground or short to power in harness or connectors.
6.CHECK INJECTOR
Refer to EC-698, "
Component Inspection" .
OK or NG
OK >> GO TO 7.
NG >> Replace injector.
MBIB0101E
Voltage: Battery voltage
PBIB0582E
Continuity should exist.
Page 1032 of 3189
![NISSAN ALMERA N16 2003 Electronic Repair Manual EC-702
[QG (WITHOUT EURO-OBD)]
FUEL PUMP CIRCUIT
3. DETECT MALFUNCTIONING PART
Check the following.
●Fuse block (J/B) connector B4
●10A fuse
●15A fuse
●Harness for open or short between fuel p NISSAN ALMERA N16 2003 Electronic Repair Manual EC-702
[QG (WITHOUT EURO-OBD)]
FUEL PUMP CIRCUIT
3. DETECT MALFUNCTIONING PART
Check the following.
●Fuse block (J/B) connector B4
●10A fuse
●15A fuse
●Harness for open or short between fuel p](/manual-img/5/57350/w960_57350-1031.png)
EC-702
[QG (WITHOUT EURO-OBD)]
FUEL PUMP CIRCUIT
3. DETECT MALFUNCTIONING PART
Check the following.
●Fuse block (J/B) connector B4
●10A fuse
●15A fuse
●Harness for open or short between fuel pump relay and fuse
>> Repair open circuit or short to ground or short to power in harness or connectors.
4. CHECK FUEL PUMP POWER SUPPLY AND GROUND CIRCUIT FOR OPEN AND SHORT
1. Turn ignition switch “OFF”.
2. Disconnect fuel level sensor unit and fuel pump harness con-
nector.
3. Check harness continuity between fuel pump relay terminal 3
and fuel level sensor unit and fuel pump terminal 5, fuel level
sensor unit and fuel pump terminal 3 and body ground.
Refer to Wiring Diagram.
4. Also check harness for short to ground and short to power.
OK or NG
OK >> GO TO 6.
NG >> GO TO 5.
5. DETECT MALFUNCTIONING PART
Check the following.
●Harness connectors B61, D91 (Hatchback models with power door lock)
●Harness connectors B62, D92 (Hatchback models without power door lock)
●Harness for open or short between fuel level sensor unit and fuel pump and fuel pump relay
●Harness for open or short between fuel level sensor unit and fuel pump and body ground
>> Repair open circuit or short to ground or short to power in harness or connectors.
6. CHECK FUEL PUMP RELAY OUTPUT SIGNAL CIRCUIT FOR OPEN AND SHORT
1. Disconnect ECM harness connector.
2. Check harness continuity between ECM terminal 113 and fuel pump relay terminal 2.
Refer to Wiring Diagram.
3. Also check harness for short to ground and short to power.
OK or NG
OK >> GO TO 8.
NG >> GO TO 7.Continuity should exist.
MBIB0115E
Continuity should exist.
Page 1128 of 3189

DIAGNOSTIC PROCEDURENJEC0641
1 INSPECTION START
Start engine.
Is engine running?
YesorNo
Yes GO TO 13.
No GO TO 2.
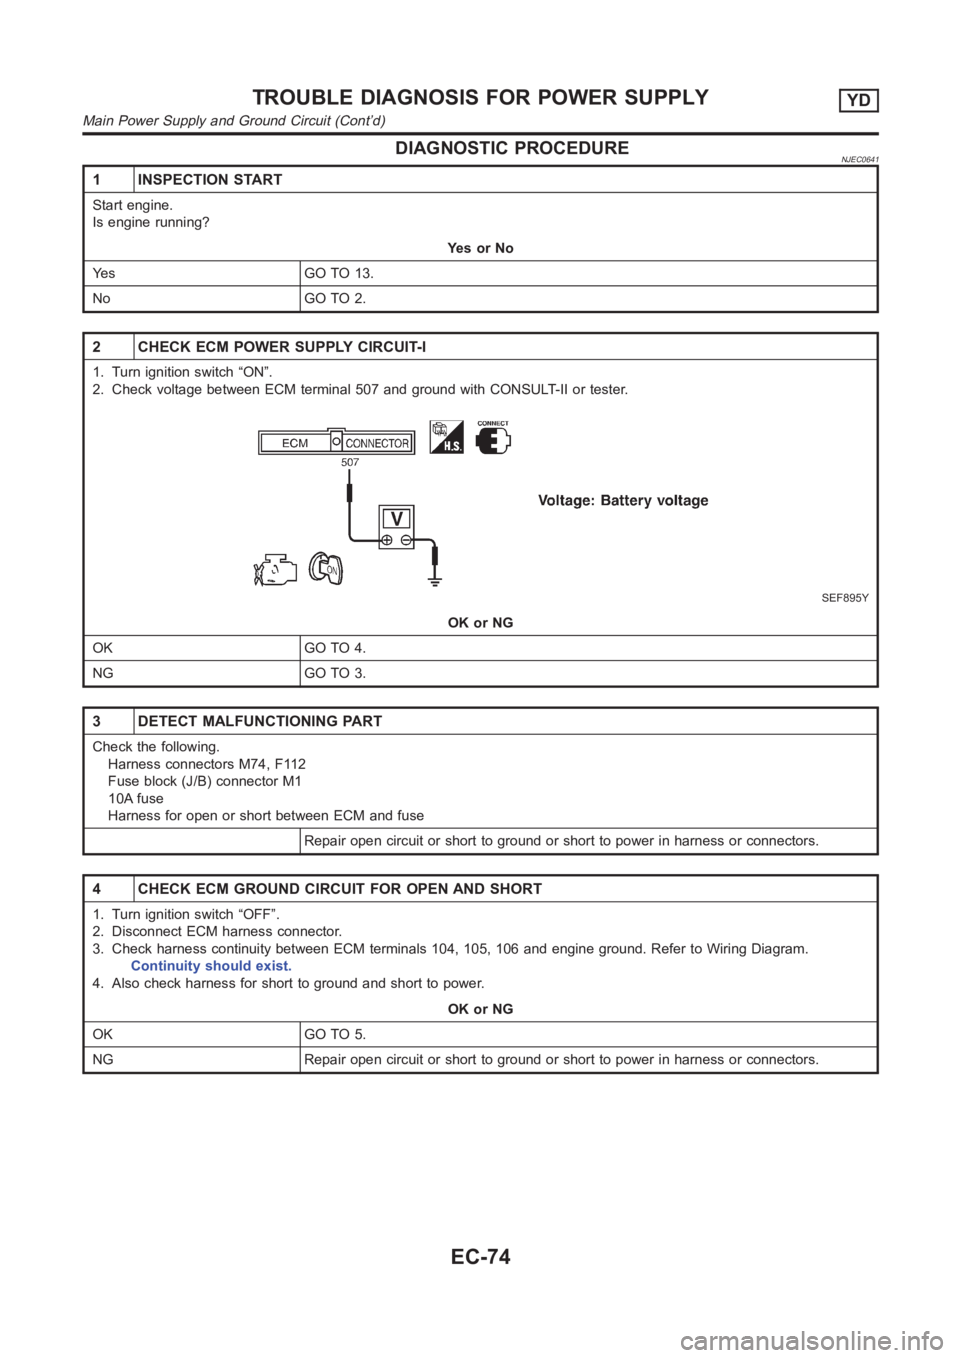
2 CHECK ECM POWER SUPPLY CIRCUIT-I
1. Turn ignition switch “ON”.
2. Check voltage between ECM terminal 507 and ground with CONSULT-II or tester.
SEF895Y
OK or NG
OK GO TO 4.
NG GO TO 3.
3 DETECT MALFUNCTIONING PART
Check the following.
Harness connectors M74, F112
Fuse block (J/B) connector M1
10A fuse
Harness for open or short between ECM and fuse
Repair open circuit or short to ground or short to power in harness or connectors.
4 CHECK ECM GROUND CIRCUIT FOR OPEN AND SHORT
1. Turn ignition switch “OFF”.
2. Disconnect ECM harness connector.
3. Check harness continuity between ECM terminals 104, 105, 106 and engineground. Refer to Wiring Diagram.
Continuity should exist.
4. Also check harness for short to ground and short to power.
OK or NG
OK GO TO 5.
NG Repair open circuit or short to ground or short to power in harness or connectors.
TROUBLE DIAGNOSIS FOR POWER SUPPLYYD
Main Power Supply and Ground Circuit (Cont’d)
EC-74
Page 1166 of 3189
Diagnostic ProcedureNJEC0743
1 CHECK STOP LAMP SWITCH CIRCUIT
1. Turn ignition switch “OFF”.
2. Check the stop lamp when depressing and releasing the stop lamp switch.
MTBL0443
OK or NG
OK GO TO 4.
NG GO TO 2.
2 CHECK STOP LAMP SWITCH POWER SUPPLY CIRCUIT
1. Disconnect stop lamp switch harness connector.
SEF893Y
2. Check voltage between stop lamp switch terminal 1 and ground with CONSULT-II or tester.
SEF435Y
OK or NG
OK GO TO 4.
NG GO TO 3.
3 DETECT MALFUNCTIONING PART
Check the following.
Fuse block (J/B) connector M2
10A fuse
Harness for open and short between stop lamp switch and fuse
Repair open circuit or short to ground or short to power in harness or connectors.
DTC P0571 BRAKE SWYD
Diagnostic Procedure
EC-112
Page 1193 of 3189

2 DETECT MALFUNCTIONING PART
Check the following.
Fuse block (J/B) connector E104
10A fuse
40A fusible link
Harness for open or short between cooling fan relay-1 and fuse
Harness for open or short between cooling fan relay-1 and battery
Repair open circuit or short to ground or short to power in harness or connectors.
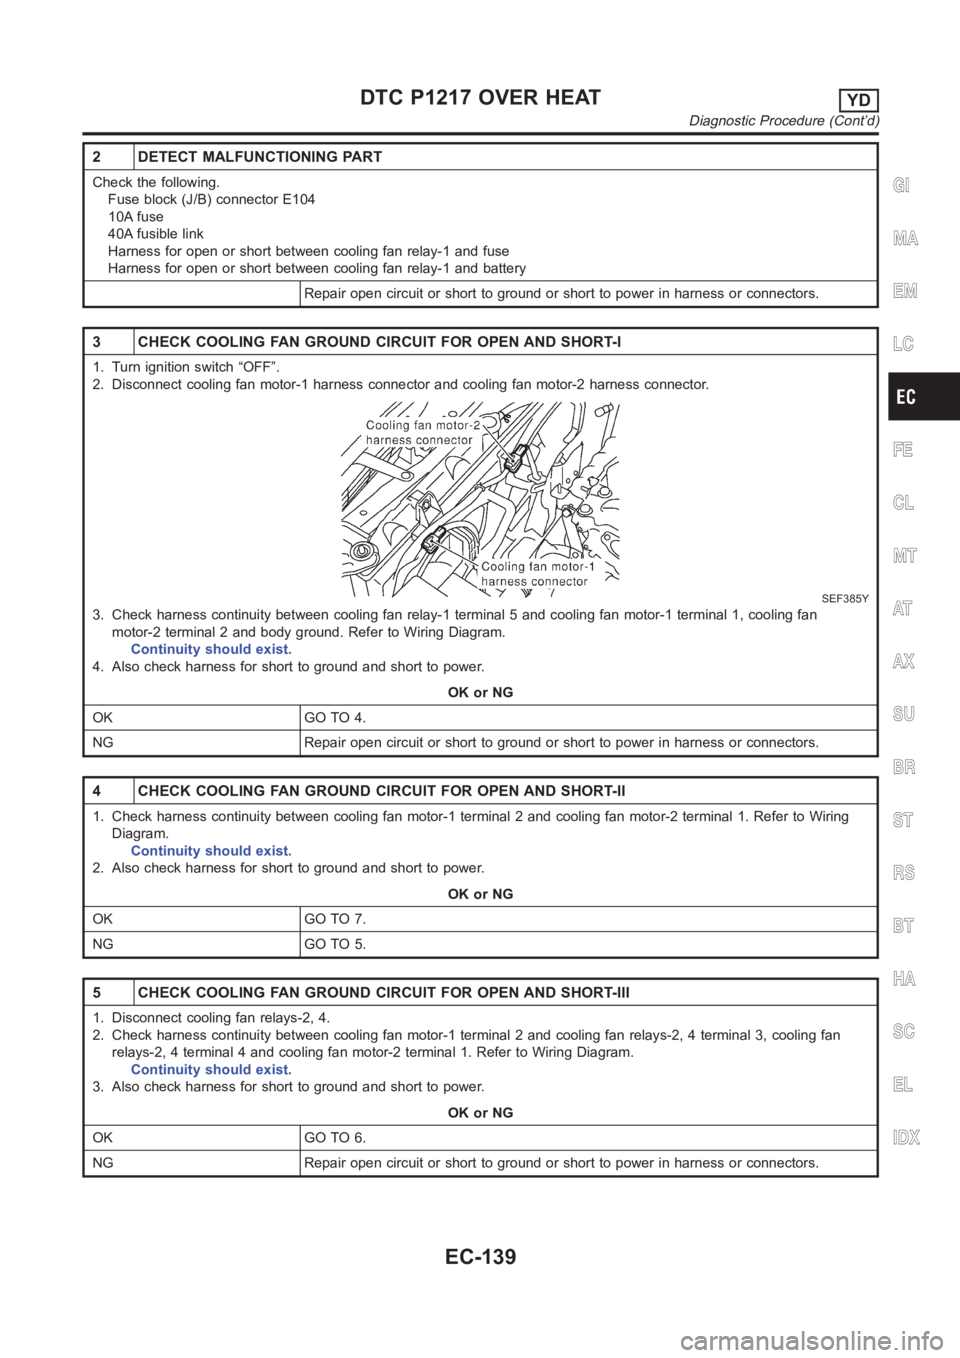
3 CHECK COOLING FAN GROUND CIRCUIT FOR OPEN AND SHORT-I
1. Turn ignition switch “OFF”.
2. Disconnect cooling fan motor-1 harness connector and cooling fan motor-2 harness connector.
SEF385Y
3. Check harness continuity between cooling fan relay-1 terminal 5 and cooling fan motor-1 terminal 1, cooling fan
motor-2 terminal 2 and body ground. Refer to Wiring Diagram.
Continuity should exist.
4. Also check harness for short to ground and short to power.
OK or NG
OK GO TO 4.
NG Repair open circuit or short to ground or short to power in harness or connectors.
4 CHECK COOLING FAN GROUND CIRCUIT FOR OPEN AND SHORT-II
1. Check harness continuity between cooling fan motor-1 terminal 2 and cooling fan motor-2 terminal 1. Refer to Wiring
Diagram.
Continuity should exist.
2. Also check harness for short to ground and short to power.
OK or NG
OK GO TO 7.
NG GO TO 5.
5 CHECK COOLING FAN GROUND CIRCUIT FOR OPEN AND SHORT-III
1. Disconnect cooling fan relays-2, 4.
2. Check harness continuity between cooling fan motor-1 terminal 2 and cooling fan relays-2, 4 terminal 3, cooling fan
relays-2, 4 terminal 4 and cooling fan motor-2 terminal 1. Refer to Wiring Diagram.
Continuity should exist.
3. Also check harness for short to ground and short to power.
OK or NG
OK GO TO 6.
NG Repair open circuit or short to ground or short to power in harness or connectors.
GI
MA
EM
LC
FE
CL
MT
AT
AX
SU
BR
ST
RS
BT
HA
SC
EL
IDX
DTC P1217 OVER HEATYD
Diagnostic Procedure (Cont’d)
EC-139
Page 1247 of 3189

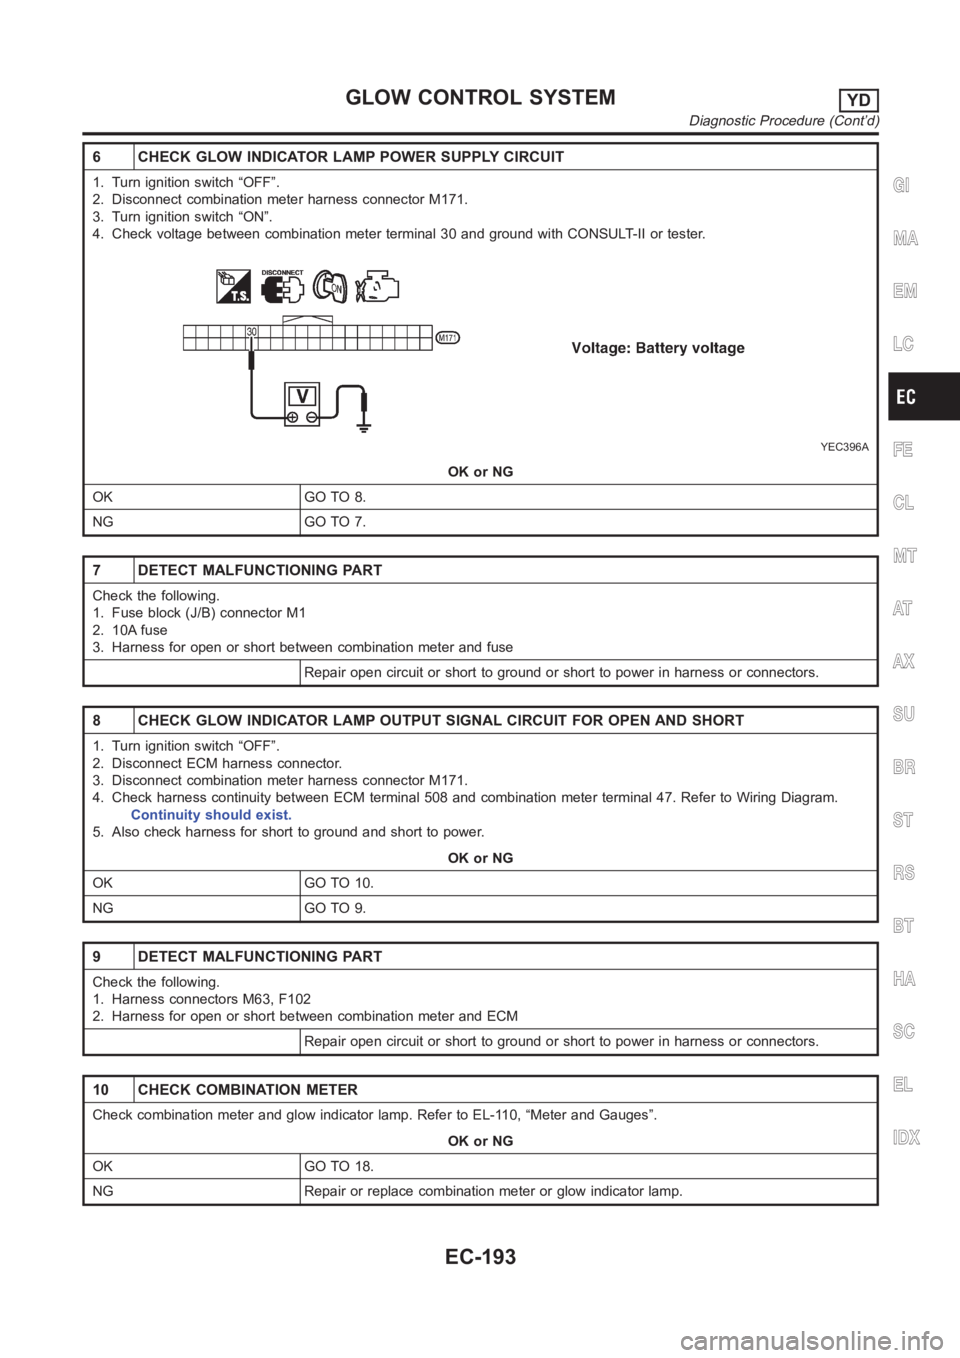
6 CHECK GLOW INDICATOR LAMP POWER SUPPLY CIRCUIT
1. Turn ignition switch “OFF”.
2. Disconnect combination meter harness connector M171.
3. Turn ignition switch “ON”.
4. Check voltage between combination meter terminal 30 and ground with CONSULT-II or tester.
YEC396A
OK or NG
OK GO TO 8.
NG GO TO 7.
7 DETECT MALFUNCTIONING PART
Check the following.
1. Fuse block (J/B) connector M1
2. 10A fuse
3. Harness for open or short between combination meter and fuse
Repair open circuit or short to ground or short to power in harness or connectors.
8 CHECK GLOW INDICATOR LAMP OUTPUT SIGNAL CIRCUIT FOR OPEN AND SHORT
1. Turn ignition switch “OFF”.
2. Disconnect ECM harness connector.
3. Disconnect combination meter harness connector M171.
4. Check harness continuity between ECM terminal 508 and combination meter terminal 47. Refer to Wiring Diagram.
Continuity should exist.
5. Also check harness for short to ground and short to power.
OK or NG
OK GO TO 10.
NG GO TO 9.
9 DETECT MALFUNCTIONING PART
Check the following.
1. Harness connectors M63, F102
2. Harness for open or short between combination meter and ECM
Repair open circuit or short to ground or short to power in harness or connectors.
10 CHECK COMBINATION METER
Check combination meter and glow indicator lamp. Refer to EL-110, “Meter and Gauges”.
OK or NG
OK GO TO 18.
NG Repair or replace combination meter or glow indicator lamp.
GI
MA
EM
LC
FE
CL
MT
AT
AX
SU
BR
ST
RS
BT
HA
SC
EL
IDX
GLOW CONTROL SYSTEMYD
Diagnostic Procedure (Cont’d)
EC-193