Page 3158 of 3189
SST742A
b) Install new self-shear type screws and then cut off self-shear
type screw heads.
SST855C
InspectionNJST0020When steering wheel does not turn smoothly, check the steer-
ing column as follows and replace damaged parts.
a) Check column bearings for damage or unevenness. Lubricate
with recommended multi-purpose grease or replace steering
column as an assembly, if necessary.
b) Check jacket tube for deformation or breakage. Replace if
necessary.
When the vehicle comes into a light collision, check length “L”.
Steering column length “L”:
Refer to SDS, ST-29.
If out of the specifications, replace steering column as an assem-
bly.
SST582B
TILT MECHANISMNJST0020S01After installing steering column, check tilt mechanism opera-
tion.
STEERING WHEEL AND STEERING COLUMN
Disassembly and Assembly (Cont’d)
ST-14
Page 3159 of 3189
ComponentsNJST0021
YST009
1. Rear cover cap
2. Gear sub-assembly
3. O-ring
4. Shim
5. Lock nut
6. Adjusting screw
7. Spring
8. Spring seat9. Retainer
10. Gear housing
11. Center bushing
12. Rack oil seal
13. Rack assembly
14. Rack seal ring
15. O-ring
16. Rack oil seal17. End cover assembly
18. Boot band
19. Dust boot
20. Boot band
21. Tie-rod inner socket
22. Tie-rod outer socket
23. Cotter pin
24. Gear cylinder tube
GI
MA
EM
LC
EC
FE
CL
MT
AT
AX
SU
BR
RS
BT
HA
SC
EL
IDX
POWER STEERING GEAR AND LINKAGE
Components
ST-15
Page 3160 of 3189
Removal and InstallationNJST0022
SST878CA
1. Lower joint
2. Washer
3. Gear and linkage assembly4. Upper gear housing mounting
bracket
5. Rack mounting insulator6. Lower gear housing mounting
bracket
7. Cotter pin
SFA455BA
CAUTION:
The rotation of the spiral cable (SRS “Air bag” component
part) is limited. If the steering gear must be removed, set
the front wheels in the straight-ahead direction. Do not
rotate the steering column while the steering gear is
removed.
Remove the steering wheel before removing the steering
lower joint to avoid damaging the SRS spiral cable.
Detach tie-rod outer sockets from knuckle arms with Tool.
1. Remove stabilizer fixing bolts. Refer to SU-11, “Removal and
Installation”.
2. Disconnect lower joint.
3. Remove gear housing mounting bracket fixing bolts.
4. Remove steering gear assembly.
POWER STEERING GEAR AND LINKAGE
Removal and Installation
ST-16
Page 3161 of 3189

SST879C
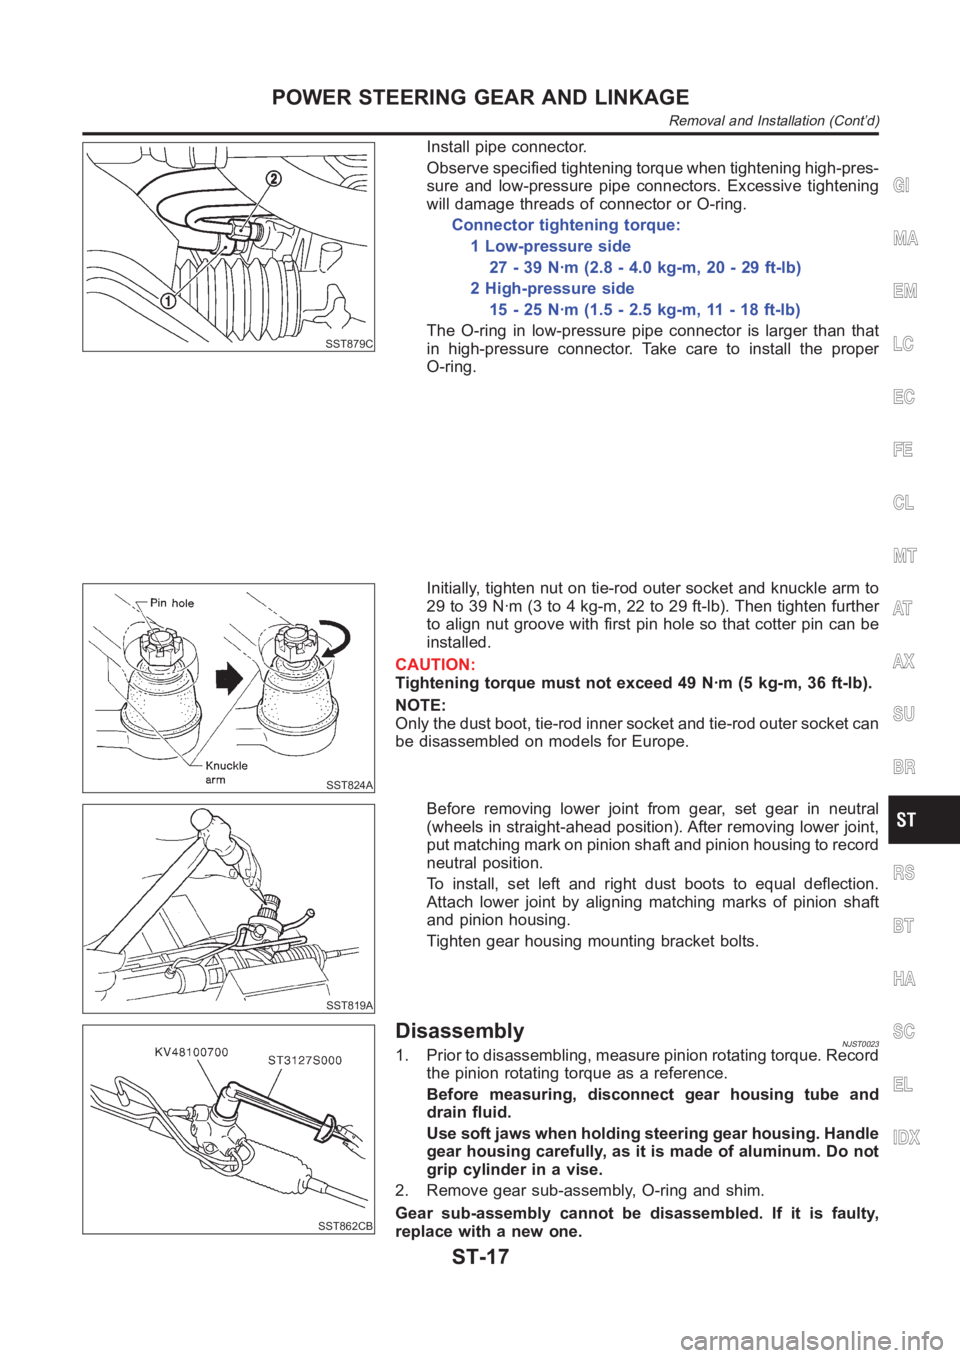
Install pipe connector.
Observe specified tightening torque when tightening high-pres-
sure and low-pressure pipe connectors. Excessive tightening
will damage threads of connector or O-ring.
Connector tightening torque:
1 Low-pressure side
27 - 39 N·m (2.8 - 4.0 kg-m, 20 - 29 ft-lb)
2 High-pressure side
15 - 25 N·m (1.5 - 2.5 kg-m, 11 - 18 ft-lb)
The O-ring in low-pressure pipe connector is larger than that
in high-pressure connector. Take care to install the proper
O-ring.
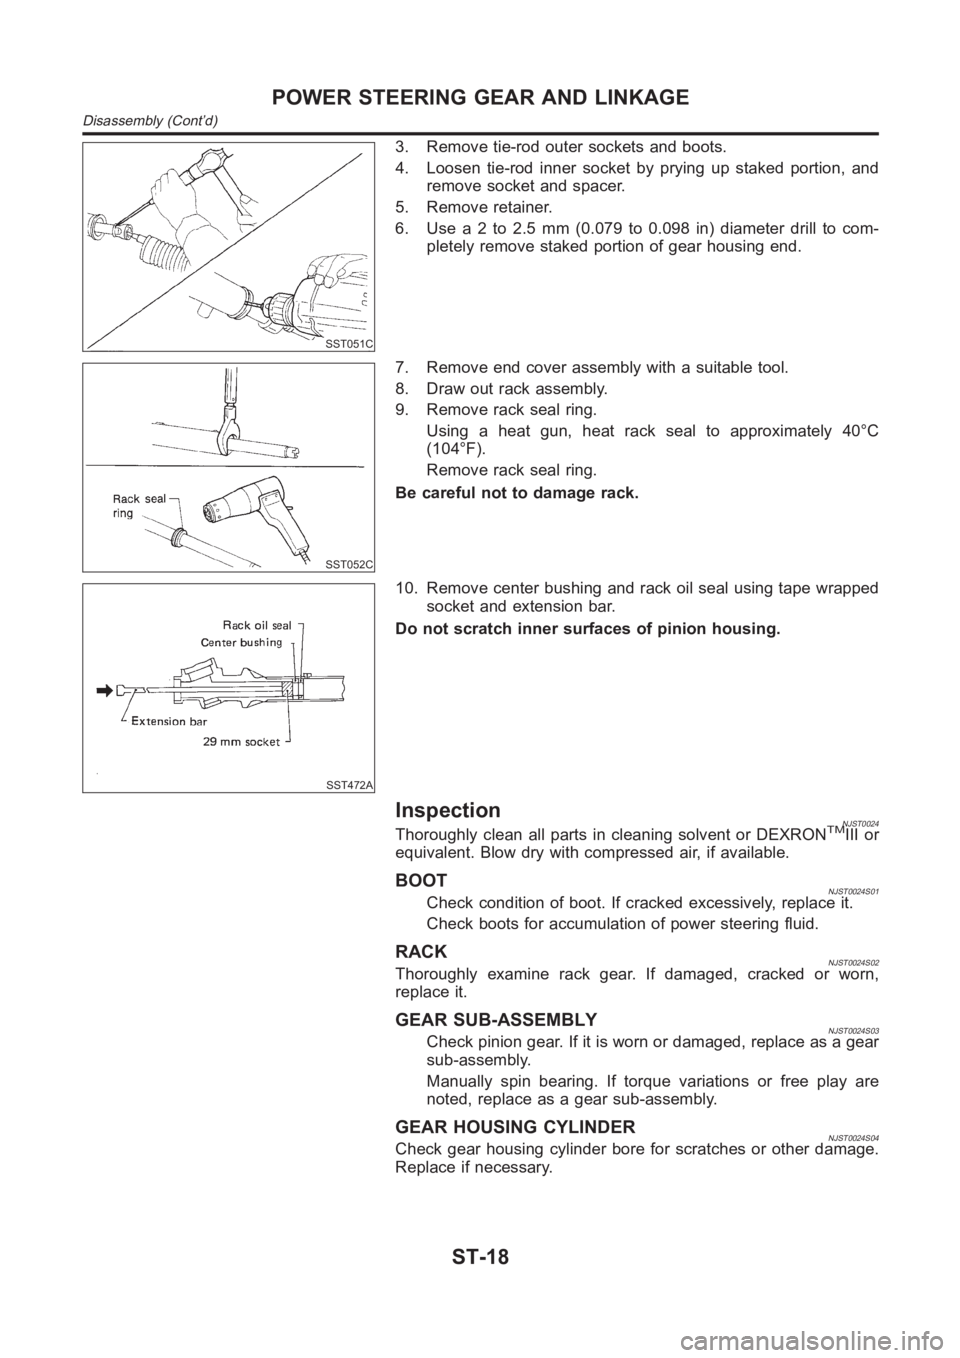
SST824A
Initially, tighten nut on tie-rod outer socket and knuckle arm to
29 to 39 N·m (3 to 4 kg-m, 22 to 29 ft-lb). Then tighten further
to align nut groove with first pin hole so that cotter pin can be
installed.
CAUTION:
Tightening torque must not exceed 49 N·m (5 kg-m, 36 ft-lb).
NOTE:
Only the dust boot, tie-rod inner socket and tie-rod outer socket can
be disassembled on models for Europe.
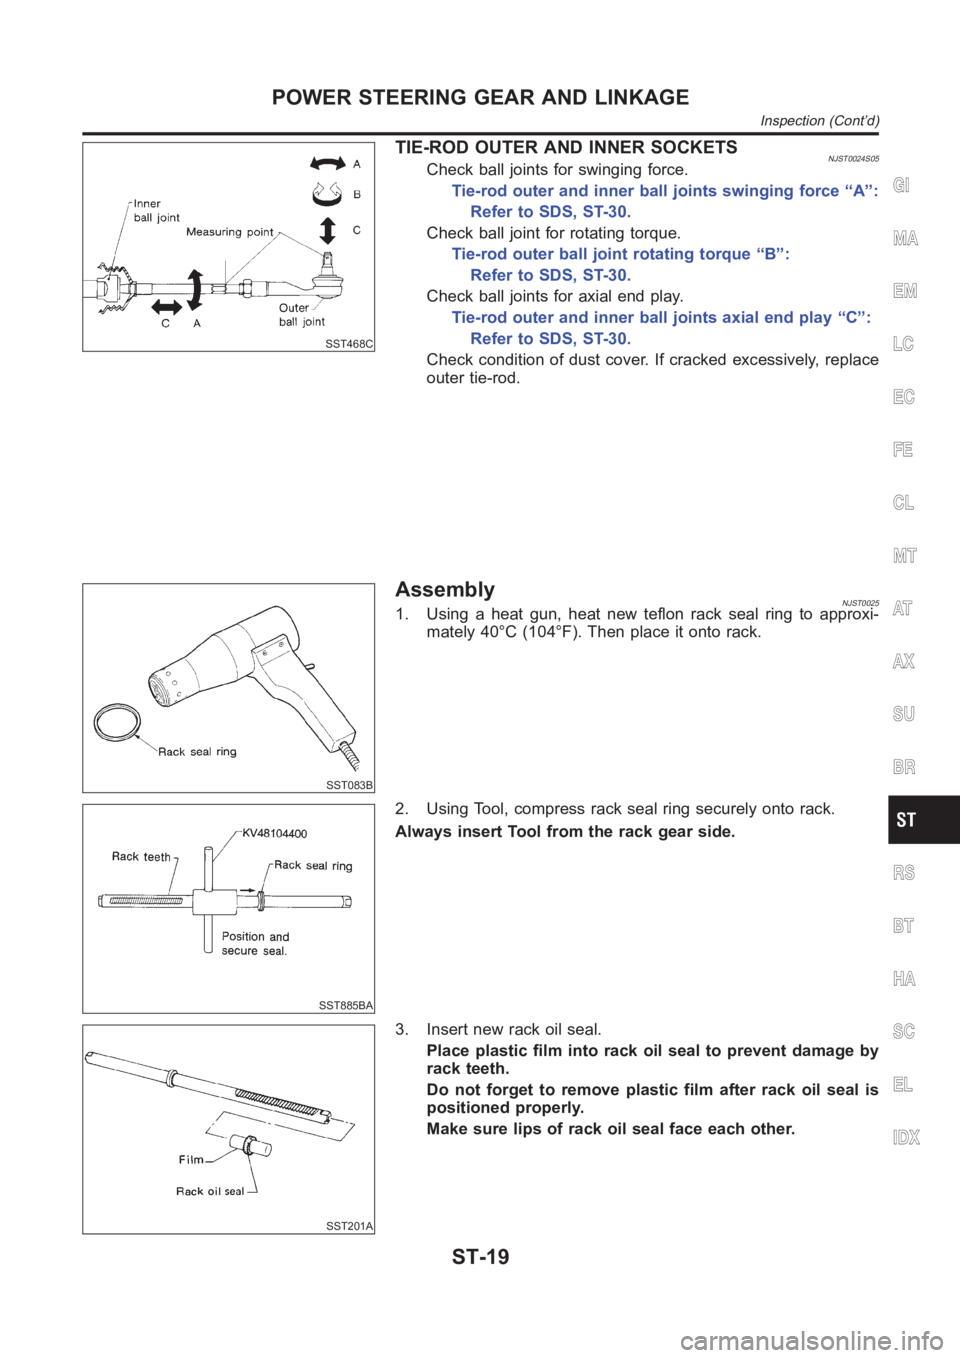
SST819A
Before removing lower joint from gear, set gear in neutral
(wheels in straight-ahead position). After removing lower joint,
put matching mark on pinion shaft and pinion housing to record
neutral position.
To install, set left and right dust boots to equal deflection.
Attach lower joint by aligning matching marks of pinion shaft
and pinion housing.
Tighten gear housing mounting bracket bolts.
SST862CB
DisassemblyNJST00231. Prior to disassembling, measure pinion rotating torque. Record
the pinion rotating torque as a reference.
Before measuring, disconnect gear housing tube and
drain fluid.
Use soft jaws when holding steering gear housing. Handle
gear housing carefully, as it is made of aluminum. Do not
grip cylinder in a vise.
2. Remove gear sub-assembly, O-ring and shim.
Gear sub-assembly cannot be disassembled. If it is faulty,
replace with a new one.
GI
MA
EM
LC
EC
FE
CL
MT
AT
AX
SU
BR
RS
BT
HA
SC
EL
IDX
POWER STEERING GEAR AND LINKAGE
Removal and Installation (Cont’d)
ST-17
Page 3162 of 3189

SST051C
3. Remove tie-rod outer sockets and boots.
4. Loosen tie-rod inner socket by prying up staked portion, and
remove socket and spacer.
5. Remove retainer.
6. Use a 2 to 2.5 mm (0.079 to 0.098 in) diameter drill to com-
pletely remove staked portion of gear housing end.
SST052C
7. Remove end cover assembly with a suitable tool.
8. Draw out rack assembly.
9. Remove rack seal ring.
Using a heat gun, heat rack seal to approximately 40°C
(104°F).
Remove rack seal ring.
Be careful not to damage rack.
SST472A
10. Remove center bushing and rack oil seal using tape wrapped
socket and extension bar.
Do not scratch inner surfaces of pinion housing.
InspectionNJST0024Thoroughly clean all parts in cleaning solvent or DEXRONTMIII or
equivalent. Blow dry with compressed air, if available.
BOOTNJST0024S01Check condition of boot. If cracked excessively, replace it.
Check boots for accumulation of power steering fluid.
RACKNJST0024S02Thoroughly examine rack gear. If damaged, cracked or worn,
replace it.
GEAR SUB-ASSEMBLYNJST0024S03Check pinion gear. If it is worn or damaged, replace as a gear
sub-assembly.
Manually spin bearing. If torque variations or free play are
noted, replace as a gear sub-assembly.
GEAR HOUSING CYLINDERNJST0024S04Check gear housing cylinder bore for scratches or other damage.
Replace if necessary.
POWER STEERING GEAR AND LINKAGE
Disassembly (Cont’d)
ST-18
Page 3163 of 3189

SST468C
TIE-ROD OUTER AND INNER SOCKETSNJST0024S05Check ball joints for swinging force.
Tie-rod outer and inner ball joints swinging force “A”:
Refer to SDS, ST-30.
Check ball joint for rotating torque.
Tie-rod outer ball joint rotating torque “B”:
Refer to SDS, ST-30.
Check ball joints for axial end play.
Tie-rod outer and inner ball joints axial end play “C”:
Refer to SDS, ST-30.
Check condition of dust cover. If cracked excessively, replace
outer tie-rod.
SST083B
AssemblyNJST00251. Using a heat gun, heat new teflon rack seal ring to approxi-
mately 40°C (104°F). Then place it onto rack.
SST885BA
2. Using Tool, compress rack seal ring securely onto rack.
Always insert Tool from the rack gear side.
SST201A
3. Insert new rack oil seal.
Place plastic film into rack oil seal to prevent damage by
rack teeth.
Do not forget to remove plastic film after rack oil seal is
positioned properly.
Make sure lips of rack oil seal face each other.
GI
MA
EM
LC
EC
FE
CL
MT
AT
AX
SU
BR
RS
BT
HA
SC
EL
IDX
POWER STEERING GEAR AND LINKAGE
Inspection (Cont’d)
ST-19
Page 3164 of 3189
SST863C
4. Install center bushing and rack oil seal with rack assembly.
SST321B
5. Insert rack oil seal and end cover assembly to rack. Then
tighten end cover assembly.
SST073B
6. Fasten end cover assembly to gear housing by staking.
SST086BA
7. Set rack gear in neutral position.
Rack stroke “S”:
Refer to SDS, ST-30.
SST880C
8. Install adjustment shims and O-rings to gear sub-assembly.
Install the same number of adjustment shims as before,
regardless of whether or not gear sub-assembly is replaced.
Discard old O-rings; replace with new ones.
9. Tighten gear subassembly securing bolts to specified tighten-
ing torque.
POWER STEERING GEAR AND LINKAGE
Assembly (Cont’d)
ST-20
Page 3165 of 3189
SST865C
10. Ensure that the rack is centered. Install rear cover cap so that
its protrusion is positioned as shown in figure.
SST087B
11. Install diaphragm spring into gear housing.
Always install retainer, spring washer and diaphragm spring in
that order.
Make sure convex end (painted white) of diaphragm spring
faces outward when installing.
12. Install spring seat retainer spring and adjusting screw tempo-
rarily.
SST867C
13. Tighten outer socket lock nut.
Tie-rod length “L”:
Refer to SDS, ST-30.
SST086BA
14. Measure rack stroke.
Rack stroke “S”:
Refer to SDS, ST-30.
SST967A
15. Before installing boot, coat the contact surfaces between boot
and tie-rod with grease.
GI
MA
EM
LC
EC
FE
CL
MT
AT
AX
SU
BR
RS
BT
HA
SC
EL
IDX
POWER STEERING GEAR AND LINKAGE
Assembly (Cont’d)
ST-21