2003 NISSAN 350Z key battery
[x] Cancel search: key batteryPage 73 of 227

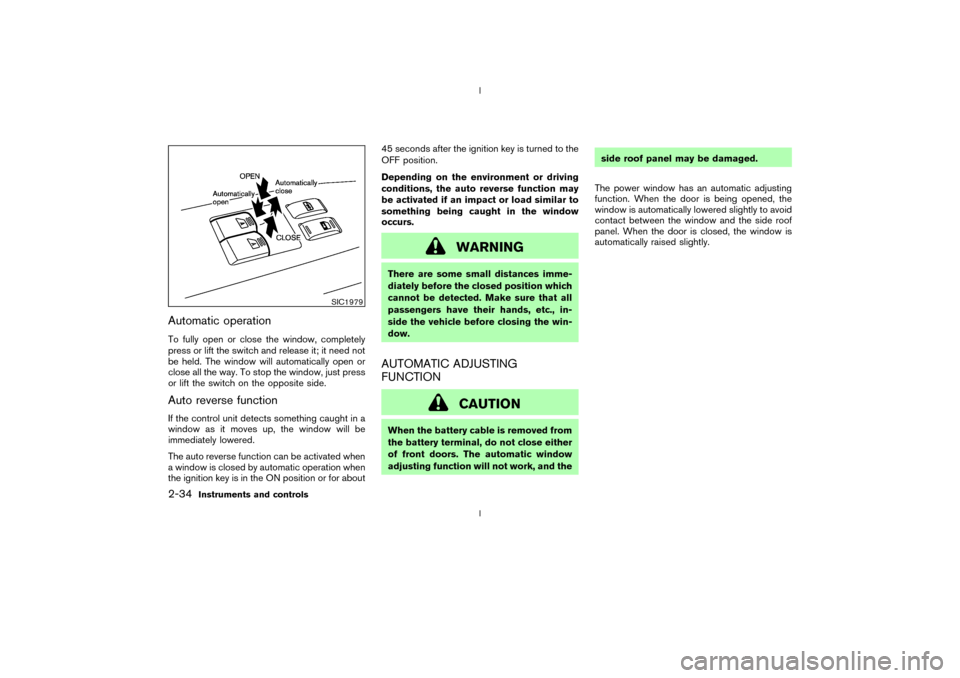
Automatic operationTo fully open or close the window, completely
press or lift the switch and release it; it need not
be held. The window will automatically open or
close all the way. To stop the window, just press
or lift the switch on the opposite side.Auto reverse functionIf the control unit detects something caught in a
window as it moves up, the window will be
immediately lowered.
The auto reverse function can be activated when
a window is closed by automatic operation when
the ignition key is in the ON position or for about45 seconds after the ignition key is turned to the
OFF position.
Depending on the environment or driving
conditions, the auto reverse function may
be activated if an impact or load similar to
something being caught in the window
occurs.
WARNING
There are some small distances imme-
diately before the closed position which
cannot be detected. Make sure that all
passengers have their hands, etc., in-
side the vehicle before closing the win-
dow.AUTOMATIC ADJUSTING
FUNCTION
CAUTION
When the battery cable is removed from
the battery terminal, do not close either
of front doors. The automatic window
adjusting function will not work, and theside roof panel may be damaged.
The power window has an automatic adjusting
function. When the door is being opened, the
window is automatically lowered slightly to avoid
contact between the window and the side roof
panel. When the door is closed, the window is
automatically raised slightly.
SIC1979
2-34
Instruments and controls
Z
02.9.13/Z33-D/V5.0
X
Page 74 of 227

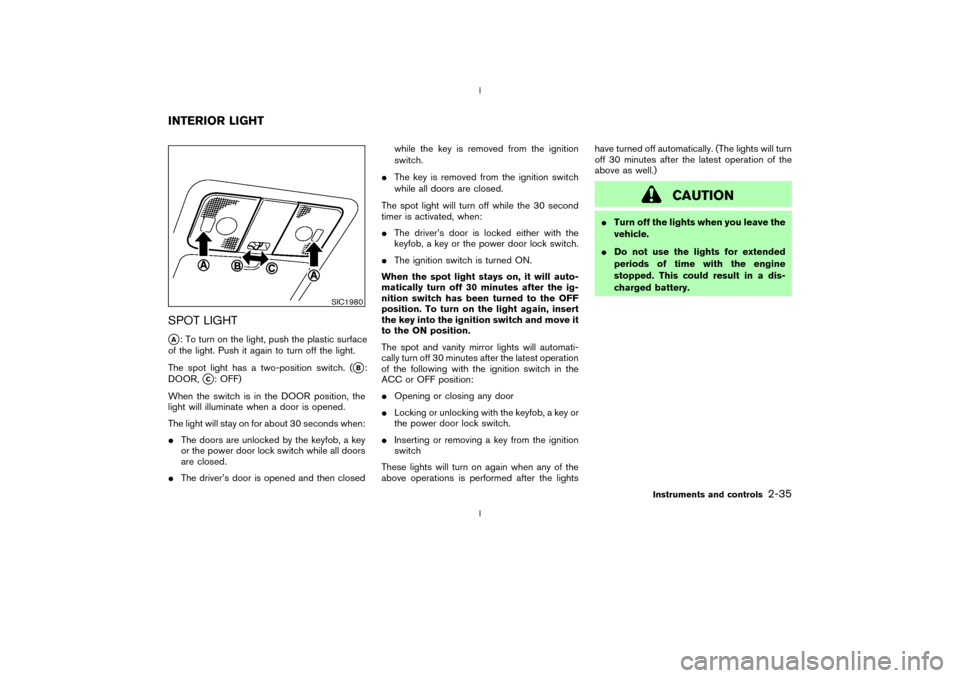
SPOT LIGHTqA: To turn on the light, push the plastic surface
of the light. Push it again to turn off the light.
The spot light has a two-position switch. (
qB:
DOOR,
qC: OFF)
When the switch is in the DOOR position, the
light will illuminate when a door is opened.
The light will stay on for about 30 seconds when:
IThe doors are unlocked by the keyfob, a key
or the power door lock switch while all doors
are closed.
IThe driver's door is opened and then closedwhile the key is removed from the ignition
switch.
IThe key is removed from the ignition switch
while all doors are closed.
The spot light will turn off while the 30 second
timer is activated, when:
IThe driver's door is locked either with the
keyfob, a key or the power door lock switch.
IThe ignition switch is turned ON.
When the spot light stays on, it will auto-
matically turn off 30 minutes after the ig-
nition switch has been turned to the OFF
position. To turn on the light again, insert
the key into the ignition switch and move it
to the ON position.
The spot and vanity mirror lights will automati-
cally turn off 30 minutes after the latest operation
of the following with the ignition switch in the
ACC or OFF position:
IOpening or closing any door
ILocking or unlocking with the keyfob, a key or
the power door lock switch.
IInserting or removing a key from the ignition
switch
These lights will turn on again when any of the
above operations is performed after the lightshave turned off automatically. (The lights will turn
off 30 minutes after the latest operation of the
above as well.)
CAUTION
ITurn off the lights when you leave the
vehicle.
IDo not use the lights for extended
periods of time with the engine
stopped. This could result in a dis-
charged battery.
SIC1980
INTERIOR LIGHT
Instruments and controls
2-35
Z
02.9.13/Z33-D/V5.0
X
Page 82 of 227

3 Pre-driving checks and adjustmentsKeys ........................................................................................... 3-2
Doors......................................................................................... 3-2
Locking with key (Driver's side) ................................... 3-3
Locking with inside lock knob ...................................... 3-3
Locking with power door lock switch ......................... 3-4
Remote keyless entry system ............................................. 3-4
How to use remote keyless entry system.................. 3-5
Battery replacement ........................................................ 3-7
Hood ......................................................................................... 3-8
Rear hatch ............................................................................... 3-9
Opener operation ............................................................. 3-9Secondary rear hatch release .................................... 3-10
Fuel filler lid ........................................................................... 3-10
Opener operation .......................................................... 3-10
Fuel filler cap .................................................................. 3-11
Steering wheel ..................................................................... 3-12
Tilt operation ................................................................... 3-12
Mirrors .................................................................................... 3-13
Inside mirror .................................................................... 3-13
Automatic anti-glare inside mirror
(if so equipped).............................................................. 3-13
Outside mirrors .............................................................. 3-14
Z
02.9.13/Z33-D/V5.0
X
Page 85 of 227

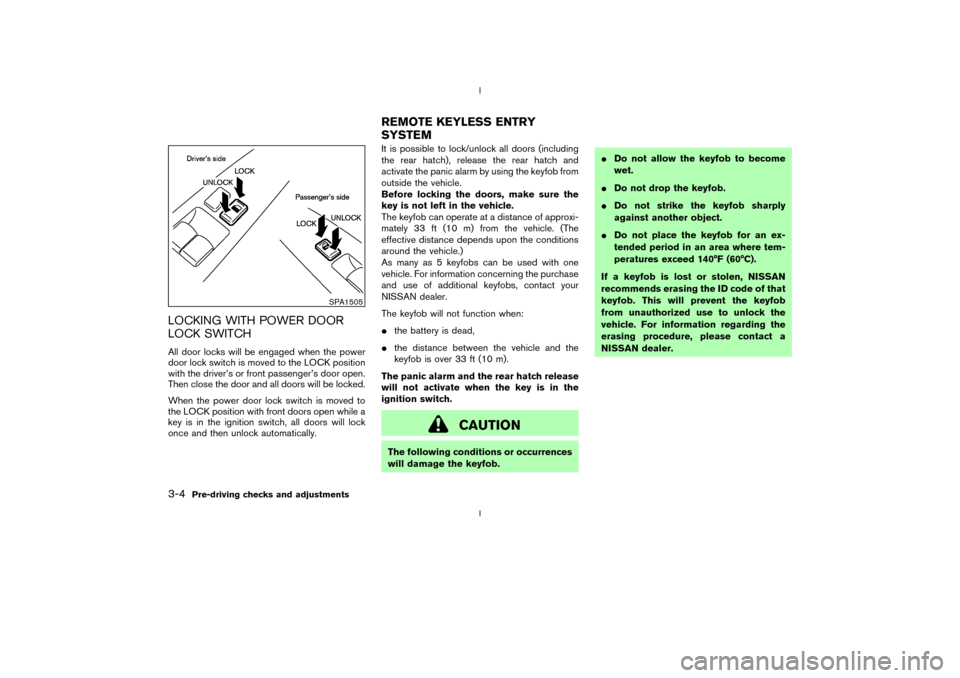
LOCKING WITH POWER DOOR
LOCK SWITCHAll door locks will be engaged when the power
door lock switch is moved to the LOCK position
with the driver's or front passenger's door open.
Then close the door and all doors will be locked.
When the power door lock switch is moved to
the LOCK position with front doors open while a
key is in the ignition switch, all doors will lock
once and then unlock automatically.It is possible to lock/unlock all doors (including
the rear hatch), release the rear hatch and
activate the panic alarm by using the keyfob from
outside the vehicle.
Before locking the doors, make sure the
key is not left in the vehicle.
The keyfob can operate at a distance of approxi-
mately 33 ft (10 m) from the vehicle. (The
effective distance depends upon the conditions
around the vehicle.)
As many as 5 keyfobs can be used with one
vehicle. For information concerning the purchase
and use of additional keyfobs, contact your
NISSAN dealer.
The keyfob will not function when:
Ithe battery is dead,
Ithe distance between the vehicle and the
keyfob is over 33 ft (10 m).
The panic alarm and the rear hatch release
will not activate when the key is in the
ignition switch.
CAUTION
The following conditions or occurrences
will damage the keyfob.IDo not allow the keyfob to become
wet.
IDo not drop the keyfob.
IDo not strike the keyfob sharply
against another object.
IDo not place the keyfob for an ex-
tended period in an area where tem-
peratures exceed 140ÉF (60ÉC).
If a keyfob is lost or stolen, NISSAN
recommends erasing the ID code of that
keyfob. This will prevent the keyfob
from unauthorized use to unlock the
vehicle. For information regarding the
erasing procedure, please contact a
NISSAN dealer.
SPA1505
REMOTE KEYLESS ENTRY
SYSTEM
3-4
Pre-driving checks and adjustments
Z
02.9.13/Z33-D/V5.0
X
Page 88 of 227

LOCK button again for 3 more seconds.Releasing the rear hatch1. Push the REAR HATCH button on the keyfob
for longer than 0.5 seconds with the key
removed from the ignition key cylinder.
2. The rear hatch opens.Using the panic alarmIf you are near your vehicle and feel threatened,
you may activate the alarm to call attention as
follows:
1. Push the PANIC button on the keyfob for
longer than 0.5 secondswith the key
removed from the ignition key cylinder.
2. The theft warning alarm and headlights will
stay on for 30 seconds.
3. The panic alarm stops when:
IIt has run for 30 seconds, or
IThe LOCK or the UNLOCK button is
pressed, or
IThe PANIC or the REAR HATCH button is
pushed on the keyfob for longer than 0.5
seconds.
BATTERY REPLACEMENTReplace the battery as follows:
1. Open the lid using a suitable tool.
2. Replace the battery with a new one.Recommended battery: CR2025 or equiva-
lent
Make sure that theÅside faces the
bottom case.
3. Close the lid securely.
4. Push the keyfob button two or three times to
check its operation.
See your NISSAN dealer if you need any assis-
tance for replacement.
If the battery is removed for any reason
other than replacement, perform step 4
above.
IBe careful not to touch the circuit board
and the battery terminal.
IAn improperly disposed battery can
harm the environment. Always confirm
local regulations for battery disposal.
IThe keyfob is water-resistant; however,
if it gets wet, immediately wipe it com-
pletely dry.
IWhen changing batteries, do not let
dust or oil get on the keyfob.
FCC Notice:
Changes or modifications not expressly
approved by the manufacturer compliance
SPA1374
Pre-driving checks and adjustments
3-7
Z
02.9.13/Z33-D/V5.0
X
Page 108 of 227

SCAN tuning:
Push the SCAN tuning button to tune from low
to high frequencies and stops at each broad-
casting station for 5 seconds. Pushing the but-
ton again during this 5 second period will stop
SCAN tuning and the radio will remain tuned to
that station.
If the SCAN tuning button is not pushed within 5
seconds, SCAN tuning moves to the next sta-
tion.
Station memory operations:
Twelve stations can be set for the FM band (six
for FM1, six for FM2) and six stations can be set
for the AM band.
1. Tune to the desired station using the SEEK,
SCAN or TUNE button.
2. Select the desired station and keep pushing
any of the desired station select buttons (1 to
6) until a beep sound is heard. (The radio
mutes when the select button is pushed.)
3. The channel indicator will then come on and
the sound will resume. Memorizing is now
complete.
4. Other buttons can be set in the same manner.
If the battery cable is disconnected, or if the fuse
blows, the radio memory will be cancelled. Inthat case, reset the desired stations.
Compact disc (CD) player operationTurn the ignition key to the ACC or ON position
and insert the compact disc into the slot with the
label side facing up. The compact disc will be
guided automatically into the slot and start play-
ing.
After loading the disc, the number of tracks on
the disc will appear on the display.
If the radio is already operating, it will automati-
cally turn off and the compact disc will play.
CAUTION
Do not force the compact disc into the
slot. This could damage the player.
If the system has been turned off while the
compact disc was playing, pushing the
ON×OFF/VOL control knob will start the com-
pact disc.
8 cm diameter compact discs can also be used
without an adapter.
CD PLAY:
When the CD (CD play) button is pushed with
the system off and the compact disc loaded, thesystem will turn on and the compact disc will
start to play.
When the CD button is pushed with the com-
pact disc loaded but the radio playing, the radio
will automatically be turned off and the compact
disc will start to play.
DISP CD PLAY TIME:
Push the DISP button for less than 1.5 seconds
while the compact disc is being played to show
the play time on the display.
FF (Fast Forward), REW
(Rewind):
When the(fast forward) or
(rewind)
button is pushed while the compact disc is
being played, the compact disc will play while
fast forwarding or rewinding. When the button is
released, the compact disc will return to normal
play speed.
APS (Automatic Program
Search) FF, APS REW:
When the(APS FF) button is pushed
while the compact disc is being played, the
program next to the present one will start to play
from its beginning. Push several times to skip
through programs. The compact disc will ad-
vance the number of times the button is pushed.
(When the last program on the compact disc is
Heater, air conditioner and audio systems
4-11
Z
02.9.13/Z33-D/V5.0
X
Page 118 of 227

5 Starting and drivingPrecautions when starting and driving ............................. 5-2
Exhaust gas (Carbon monoxide) .................................. 5-2
Three way catalyst ........................................................... 5-3
Low tire pressure warning system
(if so equipped) ................................................................ 5-3
Avoiding collision and rollover ...................................... 5-4
Drinking alcohol/drugs and driving .............................. 5-5
Ignition switch ......................................................................... 5-5
Automatic transmission................................................... 5-5
Manual transmission ........................................................ 5-6
Key positions ..................................................................... 5-7
Nissan vehicle immobilizer system (NVIS)................. 5-7
Before starting the engine ................................................... 5-8
Starting the engine ................................................................ 5-8
Driving the vehicle ................................................................. 5-9
Automatic transmission................................................... 5-9
Manual transmission ..................................................... 5-12
Parking brake........................................................................ 5-14
Cruise control (if so equipped)........................................ 5-15
Precautions on cruise control .................................... 5-15Cruise control operations ............................................ 5-16
Break-in schedule ............................................................... 5-17
Increasing fuel economy .................................................... 5-17
Parking/parking on hills...................................................... 5-18
Power steering ..................................................................... 5-19
Brake system ........................................................................ 5-20
Braking precautions ...................................................... 5-20
Anti-lock brake system (ABS) .................................... 5-20
Traction control system (TCS) (if so equipped).......... 5-22
Vehicle dynamic control (VDC) system
(if so equipped) .................................................................. 5-22
Cold weather driving .......................................................... 5-24
Freeing a frozen door lock .......................................... 5-24
Anti-freeze ....................................................................... 5-24
Battery .............................................................................. 5-24
Draining of coolant water ............................................ 5-24
Tire equipment................................................................ 5-24
Special winter equipment ............................................ 5-24
Driving on snow or ice ................................................. 5-25
Engine block heater (if so equipped) ....................... 5-25
Z
02.9.13/Z33-D/V5.0
X
Page 141 of 227

FREEING A FROZEN DOOR LOCKTo prevent a door lock from freezing, apply
de-icer or glycerin to it through the key hole. If
the lock becomes frozen, heat the key before
inserting it into the key hole.ANTI-FREEZEIn the winter when it is anticipated that the
temperature will drop below 32ÉF (0ÉC), check
anti-freeze to assure proper winter protection.
For additional information, see ªEngine Cooling
Systemº in the ª8. Maintenance and do-it-
yourselfº section.BATTERYIf the battery is not fully charged during extremely
cold weather conditions, the battery fluid may
freeze and damage the battery. To maintain
maximum efficiency, the battery should be
checked regularly. For additional information,
see ªBatteryº in the ª8. Maintenance and do-it-
yourselfº section.DRAINING OF COOLANT WATERIf the vehicle is to be left outside without anti-
freeze, drain the cooling system by opening the
drain plug located under the radiator. Refill
before operating the vehicle. See ªEngine cool-
ing systemº in the ª8. Maintenance and do-it-
yourselfº section for changing engine coolant.
TIRE EQUIPMENT1. SUMMER tires are of a tread design to
provide superior performance on dry pave-
ment. However, the performance of these
tires will be substantially reduced in snowy
and icy conditions. If you operate your vehicle
on snowy or icy roads, NISSAN recommends
the use of MUD & SNOW or ALL SEASON
tires on all four wheels. Please consult your
NISSAN dealer for the tire type, size, speed
rating and availability information.
2. For additional traction on icy roads, studded
tires may be used. However, some provinces
and states prohibit their use. Check local,
state and provincial laws before installing
studded tires.
Skid and traction capabilities of studded
snow tires, on wet or dry surfaces, may be
poorer than that of non-studded snow
tires.
3. Tire chains may be used if desired. Make sure
they are of proper size for the tires on your
vehicle and are installed according to the
chain manufacturer's suggestions. Use of tire
chains may be prohibited according to loca-
tion. Check the local laws before installing
tire chains. When installing tire chains, make
sure they are of proper size for the tires on
your vehicle and are installed according tothe chain manufacturer's suggestions.Use
only SAE Class S chains.Class ªSº chains
are used on vehicles with restricted tire to
vehicle clearance. Vehicles that can use
Class ªSº chains are designed to meet the
SAE standard minimum clearances between
the tire and the closest vehicle suspension or
body component required to accommodate
the use of a winter traction device (tire chains
or cables). The minimum clearances are de-
termined using the factory equipped tire size.
Other types may damage your vehicle. Use
chain tensioners when recommended by the
tire chain manufacturer to ensure a tight fit.
Loose end links of the tire chain must be
secured or removed to prevent the possibility
of whipping action damage to the fenders or
underbody. If possible, avoid fully loading
your vehicle when using tire chains. In addi-
tion, drive at a reduced speed. Otherwise,
your vehicle may be damaged and/or vehicle
handling and performance may be adversely
affected.
Never install tire chains on a T-type spare tire.
Do not use tire chains on dry roads.
SPECIAL WINTER EQUIPMENTIt is recommended that the following items be
carried in the vehicle during winter:
Ia scraper and stiff-bristled brush to remove
COLD WEATHER DRIVING5-24
Starting and driving
Z
02.9.13/Z33-D/V5.0
X