Page 1 of 264
Introduction 4
Instrument Cluster 10
Warning and control lights 10
Gauges 14
Entertainment Systems 17
AM/FM stereo with CD 17
AM/FM stereo cassette with CD 21
Climate Controls 31
Manual heating and air conditioning 31
Electronic automatic temperature control 32
Rear passenger climate control 35
Lights 37
Driver Controls 48
Windshield wiper/washer control 48
Steering wheel adjustment 49
Power windows 54
Mirrors 55
Speed control 56
Message center 68
Locks and Security 83
Keys 83
Locks 83
Anti-theft system 85
Table of Contents
Table of Contents
1
Page 10 of 264
WARNING LIGHTS AND CHIMES
Standard instrument cluster
Optional instrument cluster
Warning lights and gauges can alert you to a vehicle condition that may
become serious enough to cause expensive repairs. A warning light may
illuminate when a problem exists with one of your vehicle’s functions.
Many lights will illuminate when you start your vehicle to make sure the
bulb works. If any light remains on after starting the vehicle, have the
respective system inspected immediately.
Service engine soon:TheService
engine soonindicator light
illuminates when the ignition is first
turned to the ON position to check
the bulb. Solid illumination after the engine is started indicates the On
Board Diagnostics System (OBD-II) has detected a malfunction. Refer to
On board diagnostics (OBD-II)in theMaintenance and Specifications
O/D
OFF
DOOR
AJARCHECK
GAGE
CHECK
FUEL
CAPLOW
WASH
BRAKE
SERVICE
ENGINE
SOON
TRIP
SERVICE
ENGINE
SOON
Instrument Cluster
Instrument Cluster
10
Page 13 of 264

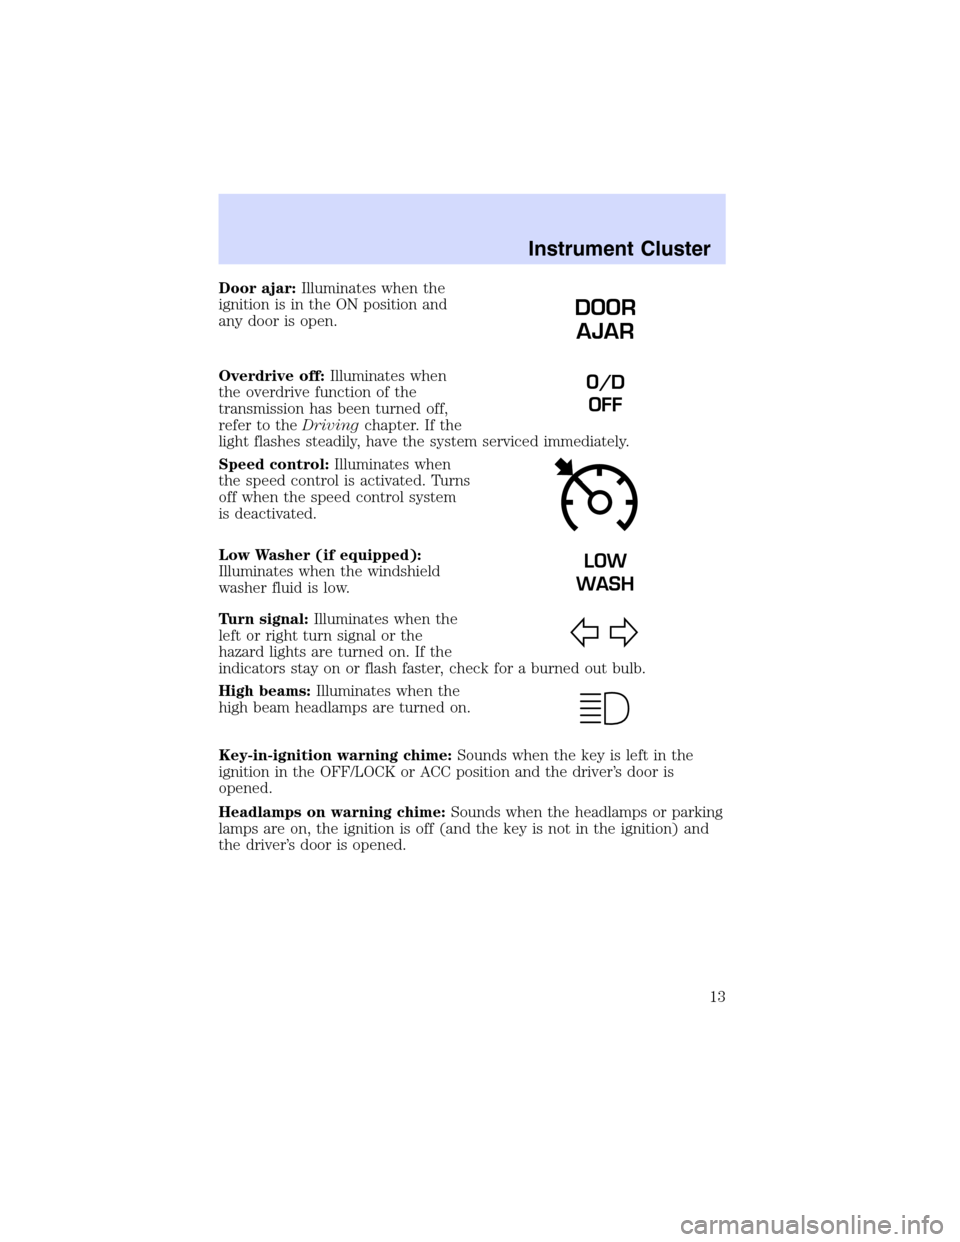
Door ajar:Illuminates when the
ignition is in the ON position and
any door is open.
Overdrive off:Illuminates when
the overdrive function of the
transmission has been turned off,
refer to theDrivingchapter. If the
light flashes steadily, have the system serviced immediately.
Speed control:Illuminates when
the speed control is activated. Turns
off when the speed control system
is deactivated.
Low Washer (if equipped):
Illuminates when the windshield
washer fluid is low.
Turn signal:Illuminates when the
left or right turn signal or the
hazard lights are turned on. If the
indicators stay on or flash faster, check for a burned out bulb.
High beams:Illuminates when the
high beam headlamps are turned on.
Key-in-ignition warning chime:Sounds when the key is left in the
ignition in the OFF/LOCK or ACC position and the driver’s door is
opened.
Headlamps on warning chime:Sounds when the headlamps or parking
lamps are on, the ignition is off (and the key is not in the ignition) and
the driver’s door is opened.
DOOR
AJAR
O/D
OFF
LOW
WASH
Instrument Cluster
13
Page 29 of 264

Error messages
You may experience an error message for the following situations:
•NO DISC when the CD control is pressed and there is not a CD
present.
•DISC ERR when there is a damaged or unreadable disc. Such as, data
discs containing no .mp3 files, or for data discs containing more than
255 files or directories.
•CD ERR for any other disc malfunction.
RADIO FREQUENCIES
AM and FM frequencies are established by the Federal Communications
Commission (FCC) and the Canadian Radio and Telecommunications
Commission (CRTC). Those frequencies are:
AM - 530, 540–1700, 1710 kHz
FM- 87.7, 87.9–107.7, 107.9 MHz
RADIO RECEPTION FACTORS
There are three factors that can affect radio reception:
•Distance/strength: The further you travel from an FM station, the
weaker the signal and the weaker the reception.
•Terrain: Hills, mountains, tall buildings, power lines, electric fences,
traffic lights and thunderstorms can interfere with your reception.
•Station overload: When you pass a broadcast tower, a stronger signal
may overtake a weaker one and play while the weak station frequency
is displayed.
CASSETTE/PLAYER CARE
Do:
•Use only cassettes that are 90 minutes long or less.
•Tighten very loose tapes by inserting a finger or pencil into the hole
and turning the hub.
•Remove loose labels before inserting tapes.
•Allow tapes which have been subjected to extreme heat, humidity or
cold to reach a moderate temperature before playing.
•Clean the cassette player head with a cassette cleaning cartridge after
10–12 hours of play to maintain good sound/operation.
Entertainment Systems
29
Page 37 of 264

HEADLAMP CONTROL
Turns the lamps off.
Turns on the parking lamps,
instrument panel lamps, license
plate lamps and tail lamps.
Turns the headlamps on.
Autolamp delay system
The autolamp system sets the headlamps to turn on and off
automatically. The autolamp control, located on the headlamp control,
may be set to:
•turn on the lamps automatically at night
•turn off the lamps automatically during the daylight
•keep the lamps on for up to three minutes after the key is turned to
OFF.
To turn the autolamps on, rotate the control counterclockwise to
.
Foglamp control
The foglamps can be turned on only
when the headlamp control is in
the
,andposition and
the high beams are not turned on.
Pull headlamp control towards you
to turn foglamps on. The foglamp
indicator light
will illuminate
when foglamp is activated.
Push the headlamp control towards the instrument panel to deactivate
the foglamps.
Daytime running lamps (DRL) (if equipped)
Turns the headlamps on with a reduced output. To activate:
•the ignition must be in the ON position and
•the headlamp control is in the OFF or Parking lamps position
•the parking brake must be disengaged.
A
A
Lights
Lights
37
Page 38 of 264
Always remember to turn on your headlamps at dusk or during
inclement weather. The Daytime Running Light (DRL) System
does not activate your tail lamps and generally may not provide
adequate lighting during these conditions. Failure to activate your
headlamps under these conditions may result in a collision.
High beams
Push the lever toward the
instrument panel to activate. Pull
the lever towards you to deactivate.
Flash to pass
Pull the lever toward you to
activate. Release the lever to
deactivate.
PANEL DIMMER CONTROL
Move the control up and down to
adjust the intensity of the panel
lighting. Operates only when the
exterior lights are switched on.
Move the control to the full upright
position (past detent) to turn on the
interior lamps.
INT2OFFOFFINT1
INT2OFFOFFINT1
A
Lights
38
Page 39 of 264

Move the control to the full down position (past detent) to prevent
interior lamps from illuminating when the doors are opened.
AIMING THE HEADLAMPS
The headlamps on your vehicle are properly aimed before leaving the
assembly plant. If your vehicle is involved in an accident or if you have
problems fixing the alignment of your headlamps, have them checked by
a qualified service technician.
Headlamp aim adjustment
The headlamps on your vehicle can only be vertically adjusted. Your
vehicle does not require horizontal aim adjustments.
To adjust the headlamps:
1. Park your vehicle on a level
surface about 7.6 meters (25 feet)
away from a vertical plain surface
(3). Check your headlamp alignment
at night or in a dark area so that
you can see the headlamp beam
pattern.
•(1) Eight feet
•(2) Center height of lamp to
ground
•(3) Twenty-five feet
•(4) Horizontal reference line
2. The center of the headlamp has a 3.0 mm circle on the lens. Measure
the height from the center of your headlamp to the ground (2) and mark
a 2.4 meter (8 foot) long horizontal line on the plain surface (1) at this
height (masking tape works well).
3. Turn on the low beam headlamps.
The brightest part of the light
should be below the horizontal line
(4). If it is above the line the
headlamp will need to be adjusted.
4. Open the hood.
Lights
39
Page 40 of 264
5. Locate the vertical adjuster for
each headlamp. Adjust the aim by
turning the adjuster control either
clockwise (to adjust down) or
counterclockwise (to adjust up).
Note:Usea4mmsocket or box
wrench to turn the vertical adjuster
control.
6. Horizontal aiming is not required
for this vehicle and is
non-adjustable.
TURN SIGNAL CONTROL
•Push down to activate the left
turn signal.
•Push up to activate the right turn
signal.
INTERIOR LAMPS
Courtesy/reading lamps
The courtesy lamp will turn on
when:
•any door is opened, unless the
dimmer switch is in the full down
position.
•the instrument panel dimmer
switch is rotated all the way up
(past detent).
•pressing the
on the remote
entry key fob and the ignition is
in the OFF position.
INT2OFFOFFINT1
Lights
40