Page 170 of 304

170 OperationAt the gas station
You will hear when the fuel cap is tight-
ened.
�
Close the fuel filler flap.
You should hear the latch close shut.
Check regularly and before a long trip1Windshield washer and headlamp
cleaning system*
More information on filling up the res-
ervoir can be found in the “Operation”
section (
�page 179).
2Brake fluid
More information on brake fluid can be
found in the “Technical data” section
(
�page 271).
3Coolant level
More information on coolant can be
found in the “Operation” section
(�page 176).
4Engine oil level
More information on engine oil can be
found in the “Operation” section
(�page 172).
Opening hood (
�page 171).Coolant
For normal replenishing, use water (pota-
ble water quality). More information on
coolant can be found in the “Operation”
section (
�page 176).
Exterior lamp switch (
�page 83).
Vehicle lighting
Check function and cleanliness. For more
information on replacing light bulbs, refer
to page (
�page 221) in the “Practical
hints” section.
Exterior lamp switch (
�page 83).
Tire inflation pressure
More information on tire inflation pressure
can be found in the “Operation” section
(
�page 181).
iLeaving the engine running and the fuel
cap open can cause the
?
lamp to
illuminate.
More information can be found in the
“Practical hints” section (
�page 199).
Page 173 of 304
173 Operation
Engine compartment
You can check the engine oil level with
the oil dipstick�
Open the hood (
�page 171).
�
Pull out oil dipstick1 (
�page 175) and
wipe the tip clean.
�
Reinsert the oil dipstick into the dip-
stick guide tube as far as it will go.
1Oil dipstick
�
Pull out the oil dipstick again after
approximately 3 seconds.
The oil level is acceptable when it
leaves a line between the upper and
lower marks of the dipstick.
For adding oil (
�page 175).
See “Practical hints” (
�page 200) if the
low engine oil level warning lamp in the in-
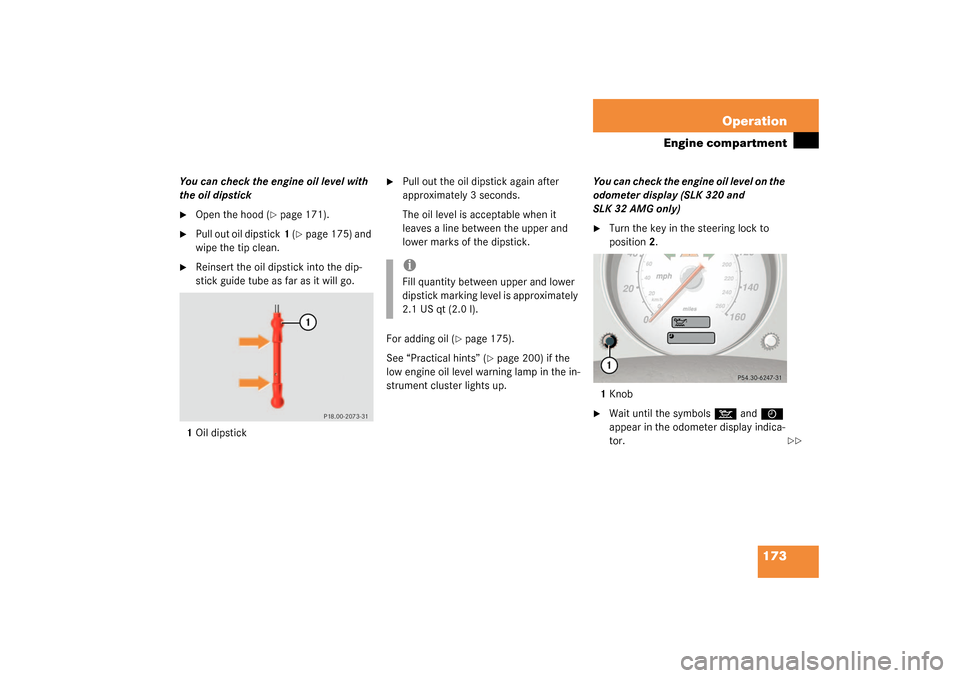
strument cluster lights up.You can check the engine oil level on the
odometer display (SLK 320 and
SLK 32 AMG only)
�
Turn the key in the steering lock to
position2.
1Knob
�
Wait until the symbols
:
and
I
appear in the odometer display indica-
tor.
iFill quantity between upper and lower
dipstick marking level is approximately
2.1 US qt (2.0 l).
��
Page 174 of 304

174 OperationEngine compartment�
Within 1 second press knob1 on the
instrument cluster twice.
One of the following messages will sub-
sequently appear in the indicator:�
OK
�
-1.0 Q
(Canada:
-1.0 L
)
�
-1.5 Q
(Canada:
-1.5 L
)
�
-2.0 Q
(Canada:
-2.0 L
)
For adding oil (
�page 175).If there is excessive engine oil with the en-
gine at normal operating temperature, a
signal sounds and the following message
will blink in the odometer display:
HI�
Have excess oil siphoned.
If theI
symbol flashes in the odometer
display field, a proper oil level check can-
not be performed.
�
Wait 5 minutes before repeating check
procedure.
Perform the oil level check with the dip-
stick (
�page 173) if it cannot be complet-
ed via the odometer display field. In this
case we recommend that you that you
have the system checked at a
Mercedes-Benz Center.See “Practical hints” (
�page 200) if the
low engine oil level warning lamp in the in-
strument cluster lights up.
!If the message
-2.0 Q
(Canada:
-2.0 L
) blinks and a signal
sounds, add oil according to amount
displayed.
iIf the
:
and
I
symbols are con-
tinuously illuminated after pressing the
left knob on the instrument cluster
twice, and if there is no change in the
odometer display field or the low en-
gine oil level warning lamp comes on, a
malfunction has occurred to the sys-
tem.
Perform the engine oil level check with
the dipstick (
�page 173).
If no oil leaks are noted, drive to the
nearest Mercedes-Benz Center to have
the system checked.
Page 181 of 304

181 Operation
Tires and wheels
Life of tire
The service life of a tire is dependent upon
varying factors including but not limited to:�
Driving style
�
Tire pressure
�
Distance driven
Direction of rotation
Unidirectional tires offer added advantag-
es, such as better aquaplaning perfor-
mance. To benefit, however, you must
ensure that the tires rotate in the direction
specified.
An arrow on the sidewall indicates the in-
tended direction of tire rotation.Checking tire inflation pressureCorrect the tire pressure only when tires
are cold.
Regularly check your tire pressure at inter-
vals of no more than 14 days.
If the tires are warm, you should only cor-
rect the tire pressure if it is too low for cur-
rent operating conditions.
A table on the fuel filler flap lists the spec-
ified tire inflation pressures for warm and
cold tires as well as for various operating
conditions.
Warning!
G
Tires and spare tire should be replaced after
six years, regardless of the remaining tread.!Keep unmounted tires in a cool, dry
place with as little exposure to light as
possible. Protect tires from contact
with oil, grease and gasoline.
Warning!
G
If the tire pressure repeatedly drops:�
Check the tires for punctures from for-
eign objects.
�
Check to see whether air is leaking from
the valves or from around the rim.
iThe pressures listed for light loads are
minimum values offering high driving
comfort.
Increased inflation pressures listed for
heavier loads may also be used for light
loads. These higher pressures produce
favorable handling characteristics. The
ride of the vehicle, however, will be
somewhat harder. Never exceed the
max. values or inflate tires below the
min. values listed in the fuel filler flap.
Page 189 of 304

189 Operation
Vehicle care
Engine cleaning
Prior to cleaning the engine compartment,
make sure to protect electrical compo-
nents and connectors from contact with
water and cleaning agents.
Corrosion protection, such as MB Anticor-
rosion Wax should be applied to the engine
compartment after every engine cleaning.
Before applying, all control linkage bush-
ings and joints should be lubricated. The
poly-V-belt and all pulleys should be pro-
tected from any wax. Vehicle washing
Do not use hot water or wash your vehicle
in direct sunlight. Use only a mild car wash
detergent, such as Mercedes-Benz ap-
proved Car Shampoo.
Thoroughly spray the vehicle with a dif-
fused jet of water. Direct only a very weak
spray towards the ventilation intake. Use
plenty of water and rinse the sponge and
chamois frequently.
Rinse with clear water and thoroughly dry
with a chamois. Do not allow cleaning
agents to dry on the finish.
Due to the width of the vehicle, fold in out-
side mirrors prior to running the vehicle
through an automatic car wash to prevent
damage to the mirrors.
In the winter, thoroughly remove all traces
of road salt as soon as possible.
When washing the underbody, do not for-
get to clean the inner sides of the wheels.Ornamental moldings
For regular cleaning and care of very dirty
chrome-plated parts, use a chrome clean-
er.
Headlamps, tail lamps, turn signal
lenses
Use a mild car wash detergent, such as
Mercedes-Benz approved Car Shampoo,
with plenty of water.
To prevent scratches, never apply strong
force and use only a soft, non-scratchy
cloth when cleaning the lenses. Do not at-
tempt to wipe dirty lenses with a dry cloth
or sponge.
Page 191 of 304
 u")
191 Operation
Vehicle care
�
Prior to cleaning the inside of the rear
window, turn key in steering lock to
position2.
1Rear shelf in vertical position
�
Operate hardtop via the switch
(�page 129) until rear shelf1 is in a
vertical position.
The roof will remain in this position for
approximately 7 minutes, sufficient
time for cleaning the inside of the rear
window.Light alloy wheels
Mercedes-Benz approved Wheel Care
should be used for regular cleaning of the
light alloy wheels.
If possible, clean wheels once a week with
Mercedes-Benz approved Wheel Care, us-
ing a soft bristle brush and a strong spray
of water.
Follow instructions on container.Instrument cluster
Use a gentle dishwashing detergent or
mild detergent for delicate fabrics as a
washing solution. Wipe with a cloth moist-
ened in lukewarm solution. Do not use
scouring agents.
Steering wheel and gear selector lever
Wipe with a damp cloth and dry thoroughly
or clean with Mercedes-Benz approved
Leather Care.
Cup holder
Use a gentle dishwashing detergent or
mild detergent for delicate fabrics as a
washing solution. Wipe with a cloth moist-
ened in lukewarm solution. Do not use
scouring agents.
Hard plastic trim items
Pour Mercedes-Benz approved Interior
Care onto a soft lint-free cloth and apply
with light pressure.
iThe roof will only stay in this position
when the key is in steering lock
position2.
If you pull on the hardtop switch again,
you can continue to clean the rear win-
dow for another 7 minutes.iUse only acid-free cleaning materials.
Acid could lead to corrosion.
Page 192 of 304

192 OperationVehicle careHeadliner
Clean with soft bristle brush, or use a
dry-shampoo cleaner in case of excessive
dirt.
Seat belts
The webbing must not be treated with
chemical cleaning agents. Use only clear,
lukewarm water and soap. Do not dry the
webbing at temperatures above 176°F
(80°C) or in direct sunlight.Upholstery
Using aftermarket seat covers or wearing
clothing that have the tendency to give off
coloring (e.g. when wet, etc.) may cause
the upholstery to become permanently dis-
colored. By lining the seats with a proper
intermediate cover, contact-discoloration
will be prevented.
Leather upholstery
Wipe leather upholstery with a damp cloth
and dry thoroughly or clean with
Mercedes-Benz approved Leather Care.
Exercise particular care when cleaning per-
forated leather as its underside should not
become wet.Cloth upholstery
Clean with soft bristle brush, or use a
dry-shampoo cleaner in case of excessive
dirt.
Plastic and rubber parts
Do not use oil or wax on these parts.Warning!
G
Do not bleach or dye seat belts as this may
severely weaken them. In a crash they may
not be able to provide adequate protection.
Page 194 of 304

194 Practical hintsWhat to do if …?
What to do if …?Lamps in instrument clusterGeneral information:
If a bulb in the instrument cluster fails to
light up during the bulb self-check when turning the key in steering lock to
position2, have it checked and replaced if
necessary.Problem
Possible cause
Suggested solution
v
The yellow ESP warning lamp
flashes while driving.
The ESP or traction control has come into op-
eration because of detected traction loss in
at least one tire.
�
When driving off apply as little throttle
as possible.
�
While driving, ease up on the acceler-
ator.
�
Adapt your speed and driving to the
prevailing road and weather condi-
tions.
�
Do not deactivate the ESP.
Exceptions: (
�page 70)
Failure to follow these instructions in-
creases the risk of accidents.
¿
The yellow BAS/ESP malfunction
indicator lamp comes on while
driving.
The ESP has detected a malfunction and
switched off. Risk of accident! Adapt your
speed and driving to the prevailing road con-
ditions.
�
Turn the ESP back on (
�page 70).
If the ESP cannot be turned back on, have
the system checked at an authorized
Mercedes-Benz Center as soon as possi-
ble.