Page 154 of 304
154 Controls in detailUseful featuresRolling code programming
To train a garage door opener (or other roll-
ing code devices) with the rolling code fea-
ture, follow these instructions after
completing the “Programming” portion of
this text. (A second person may make the
following training procedures quicker and
easier.)�
Locate training button on the garage
door opener motor head unit.
Exact location and color of the button
may vary by garage door opener brand.
If there is difficulty locating the trans-
mitting button, refer to garage door
opener operator’s manual.
�
Press “training” button on the garage
door opener motor head unit.
The “training light” is activated.You have 30 seconds time to initiate the
following step.
�
Firmly press and release the pro-
grammed integrated remote control
transmit button.
�
Press and release same button a sec-
ond time to complete the training pro-
cess.
Some garage door openers may require
you to do this procedure a third time to
complete the training.
�
Confirm the garage door operation by
pressing the programmed button on
the integrated remote control transmit-
ter. Canadian programming
During programming, your hand-held
transmitter may automatically stop trans-
mitting.
�
Continue to press and hold the inte-
grated remote control transmitter but-
ton (refer to steps two through four in
the “Programming” portion) while you
press and re-press (“cycle”) your
hand-held transmitter every 2 seconds
until the frequency signal has been
learned.
Upon successful training, the indicator
lamp will flash slowly and then rapidly
after several seconds.
Page 155 of 304
155 Controls in detail
Useful features
Operation of remote control�
Turn key in steering lock to position1
or2.
�
Select and press the appropriate but-
ton to activate the remote controlled
device.
The integrated remote control trans-
mitter continues to send the signal as
long as the button is pressed – up to
20 seconds.Erasing the remote control memory
�
Turn key in steering lock to position1
or2.
�
Simultaneously hold down the left and
right side buttons for approximately
20 seconds, or until the indicator lamp
blinks rapidly.
The codes of all three channels are
erased.iIf you sell your vehicle, erase the codes
of all three channels.
Page 169 of 304
169 Operation
At the gas station
At the gas station
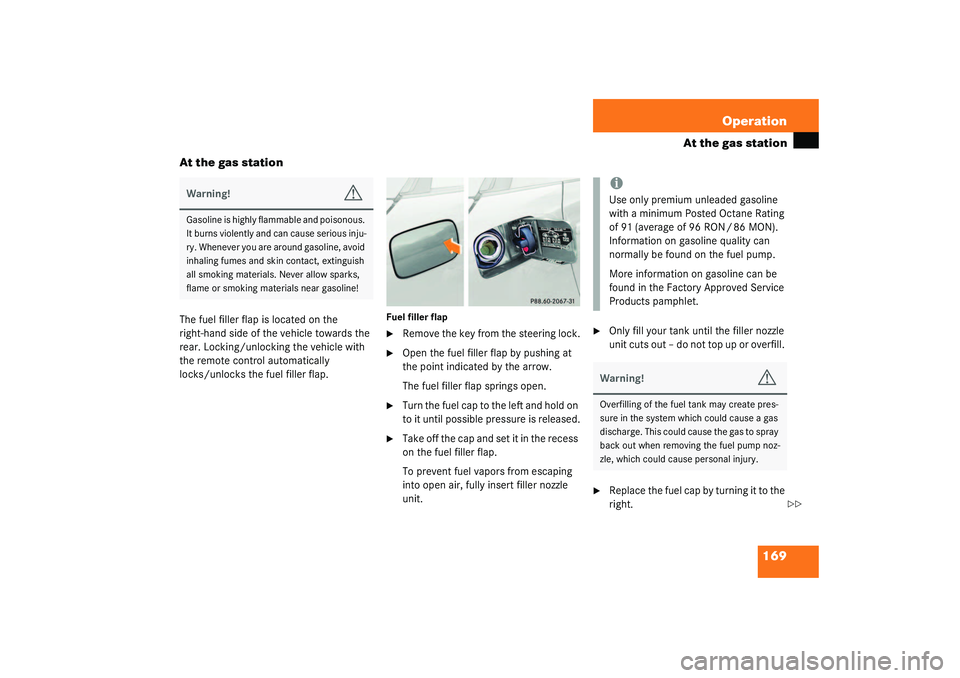
The fuel filler flap is located on the
right-hand side of the vehicle towards the
rear. Locking/unlocking the vehicle with
the remote control automatically
locks/unlocks the fuel filler flap.
Fuel filler flap�
Remove the key from the steering lock.
�
Open the fuel filler flap by pushing at
the point indicated by the arrow.
The fuel filler flap springs open.
�
Turn the fuel cap to the left and hold on
to it until possible pressure is released.
�
Take off the cap and set it in the recess
on the fuel filler flap.
To prevent fuel vapors from escaping
into open air, fully insert filler nozzle
unit.
�
Only fill your tank until the filler nozzle
unit cuts out – do not top up or overfill.
�
Replace the fuel cap by turning it to the
right.
Warning!
G
Gasoline is highly flammable and poisonous.
It burns violently and can cause serious inju-
ry. Whenever you are around gasoline, avoid
inhaling fumes and skin contact, extinguish
all smoking materials. Never allow sparks,
flame or smoking materials near gasoline!
iUse only premium unleaded gasoline
with a minimum Posted Octane Rating
of 91 (average of 96 RON / 86 MON).
Information on gasoline quality can
normally be found on the fuel pump.
More information on gasoline can be
found in the Factory Approved Service
Products pamphlet.Warning!
G
Overfilling of the fuel tank may create pres-
sure in the system which could cause a gas
discharge. This could cause the gas to spray
back out when removing the fuel pump noz-
zle, which could cause personal injury.
��
Page 210 of 304

210 Practical hintsUnlocking/locking in an emergency
Unlocking/locking in an emergencyUnlocking the vehicle
Unlocking the driver’s door
If you are unable to unlock the driver’s
door with the remote control, open the
door using the key as follows:
1Unlocking
2Locking
3Protective cap�
Remove protective cap3 from driver’s
door lock.
�
Unlock the door wi th t he key . T o do so,
push key into the lock until it stops and
turn it to the left1.Unlocking the trunk
If you are unable to unlock the trunk with
the remote control, open the trunk using
the key as follows:
1Unlocked
2Neutral position
3Locked
�
Insert the key into the trunk lid lock
until it stops.
�
Turn the key counterclockwise to
position1.
�
Pull handle and lift the trunk lid
(�page 77).
iUnlocking your vehicle with the key will
trigger the anti-theft alarm system. To
cancel the alarm, do one of the follow-
ing:�
Press button
Œ
or
‹
on the
remote control.
�
Insert the key in the steering lock
and turn it to position1.
iUsing the key does not operate the
central locking system.
Page 211 of 304
211 Practical hints
Unlocking/locking in an emergency
Locking the vehicle
If you are unable to lock the vehicle with
the remote control, lock it with the key as
follows:�
Close the passenger door and the
trunk.
�
Press the central locking switch in the
upper center console (
�page 79).
�
Check to see whether the locking knob
on the passenger door is still visible. If
necessary, push it down manually.
�
Lock the driver’s door with the key. To
do so, push key into the lock until it
stops and turn it to the right2
(�page 210).
�
Lock the trunk, if necessary with the
key. To do so, push key into the trunk
lid lock until it stops.
Turn the key clockwise to position3
(�page 210).
!Do not place the key inside the trunk,
since the trunk is locked once its lid is
closed and the vehicle was previously
centrally locked.iUnlocking your vehicle with the key will
trigger the anti-theft alarm system. To
cancel the alarm, do one of the follow-
ing:�
Press button
Œ
or
‹
on the
remote control.
�
Insert the key in the steering lock
and turn it to position1.
iUsing the key does not operate the
central locking system.
Page 212 of 304
212 Practical hintsUnlocking/locking in an emergencyChanging batteries in remote control
If the batteries in the remote control are
discharged, the vehicle can no longer be
locked or unlocked. It is recommended to
have the batteries replaced at an autho-
rized Mercedes-Benz Center.
Batteries contain materials that can harm
the environment if disposed of improperly.
Recycling of batteries is the preferred
method of disposal. Many states require
sellers of batteries to accept old batteries
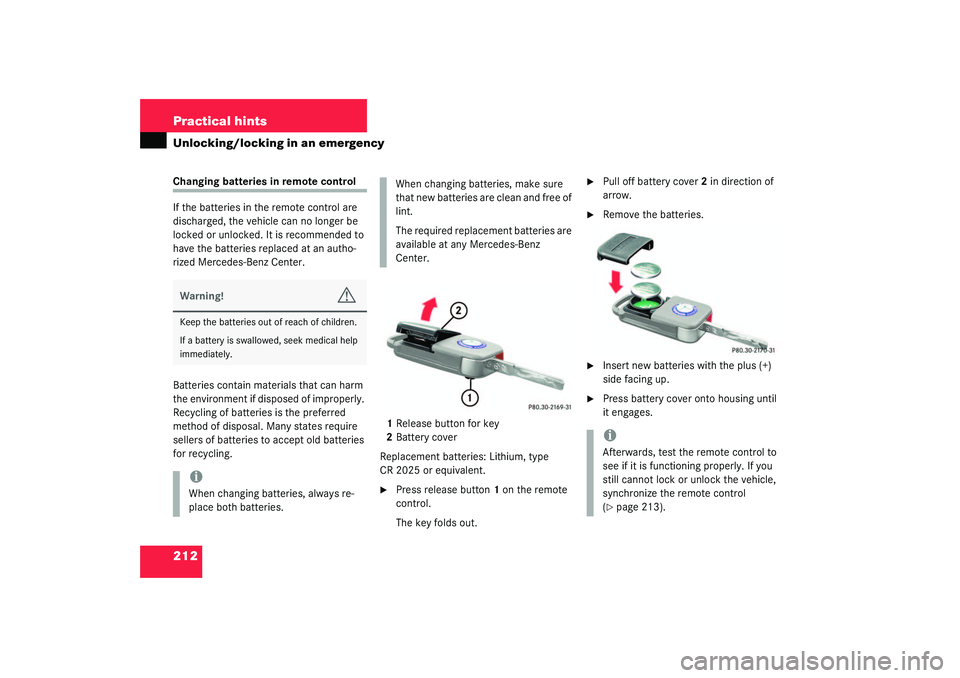
for recycling.1Release button for key
2Battery cover
Replacement batteries: Lithium, type
CR 2025 or equivalent.
�
Press release button1 on the remote
control.
The key folds out.
�
Pull off battery cover2 in direction of
arrow.
�
Remove the batteries.
�
Insert new batteries with the plus (+)
side facing up.
�
Press battery cover onto housing until
it engages.
Warning!
G
Keep the batteries out of reach of children.
If a battery is swallowed, seek medical help
immediately.iWhen changing batteries, always re-
place both batteries.
When changing batteries, make sure
that new batteries are clean and free of
lint.
The required replacement batteries are
available at any Mercedes-Benz
Center.
iAfterwards, test the remote control to
see if it is functioning properly. If you
still cannot lock or unlock the vehicle,
synchronize the remote control
(�page 213).
Page 213 of 304
213 Practical hints
Unlocking/locking in an emergency
Synchronizing remote control
If you are unable to lock or unlock the ve-
hicle with the remote control, the remote
control may have to be re synchronized.�
Aim transmitter eye at vehicle and
briefly press transmit button
Œ
or
‹
twice.
�
Within approximately 30 seconds
insert key in steering lock and turn it to
position2 (
�page 29).
The remote control should once again be
operational.
If the remote control is still malfunctioning,
contact an authorized Mercedes-Benz
Center.
Fuel filler flap
In case the central locking system does
not release the fuel filler flap, you can open
it manually.�
Open the trunk.
1Release knob
2Cover
�
Open cover2 in the right side trunk
panel.
The cover is located behind the trunk
lid hinge.
�
Pull the release knob1 in direction of
arrow.
The fuel filler flap is opened simulta-
neously.
Page 286 of 304
286 IndexAlarm system
Anti-theft 71
Alignment bolt 240
Alignment bolt (vehicle tool kit) 279
Anticorrosion/antifreeze 274
Antiglare
Automatic 99
Antilock brake system (ABS) 279
Anti-theft alarm system
Arming 71
Canceling alarm 71
Disarming 71
Anti-theft systems 71
Anti-theft alarm system 71
Immobilizer 71
Tow-away alarm 72
Aquaplaning see Hydroplaning 163
Armrest
Storage compartment 141
Ashtray 142
ATF (automatic transmission fluid)* 176
Audio system
Audio and telephone, operation 111
Button and soft key operation 115
Cassette mode 118
CD mode 120Operating and display elements 112
Operating safety 111
Operation 115
Radio mode 116
Switching off 115
Switching on 115
Telephone operation 123
Audio systems 111
Automatic antiglare for rear view
mirror 99
Automatic central locking
Activating 79
Deactivating 79
Factory setting 78
Individual setting 79
Automatic lighting control
Activating 86
Deactivating 86
Automatic locking when driving 78
Automatic transmission* 93
Accelerator position 98
Emergency operation (Limp Home
Mode) 98
Fluid level 176
Gear ranges 95
Gear selector lever position 96Gear shifting malfunctions 98
Kickdown 98
Manual shifting 94
One-touch gearshifting 94
Program mode selector switch 97
Selector lever position 93
Starting with 41
Transmission fluid 176
Winter program mode 97
B
BabySmart
TM
Airbag deactivation system 62
Compatible child seats 62, 279
Self-test 63
BabySmart
TM airbag deactivation
system 279
Backrest tilt 31
Backup lamps 222, 225
Bulbs 222
BAS 68, 279
BAS/ESP
Malfunction indicator lamp 194
Batteries, Remote control
Check lamp 75
Batteries, remote control
Changing 212