Page 134 of 304
134 Controls in detailRetractable hardtopUnlocked status noticed while driving�
Stop the vehicle.
�
Leave the ignition switched on
�
To lock the retractable hardtop in its
fully closed position, push the retract-
able hardtop switch forward.
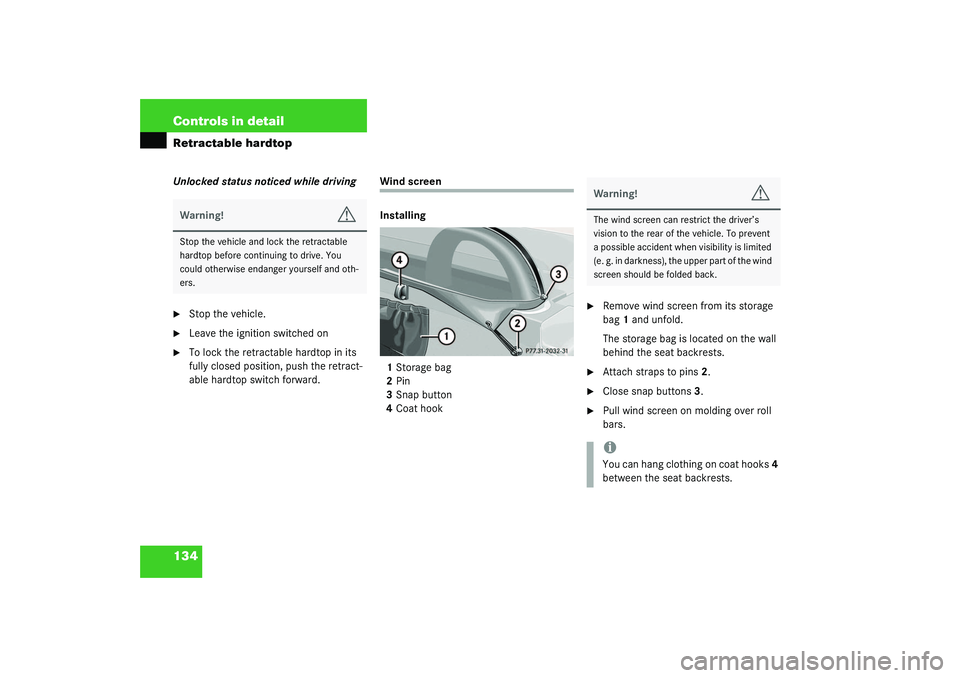
Wind screen
Installing
1Storage bag
2Pin
3Snap button
4Coat hook
�
Remove wind screen from its storage
bag1 and unfold.
The storage bag is located on the wall
behind the seat backrests.
�
Attach straps to pins2.
�
Close snap buttons3.
�
Pull wind screen on molding over roll
bars.
Warning!
G
Stop the vehicle and lock the retractable
hardtop before continuing to drive. You
could otherwise endanger yourself and oth-
ers.
Warning!
G
The wind screen can restrict the driver’s
vision to the rear of the vehicle. To prevent
a possible accident when visibility is limited
(e. g. in darkness), the upper part of the wind
screen should be folded back.iYou can hang clothing on coat hooks4
between the seat backrests.
Page 135 of 304
135 Controls in detail
Retractable hardtop
Removing�
Pull wind screen on molding back over
roll bars.
�
Open snap buttons3.
�
Loosen straps from pins2.
�
Fold wind screen and put it back into
storage bag1.iPull on snap button head to open the
snap button.
Page 150 of 304

150 Controls in detailUseful features
Upgrade signals
The Tele Aid system processes calls using
the following priority.�
Automatic emergency – First priority
�
Manual emergency – Second priority
�
Roadside assistance – Third priority
�
Information – Fourth priority
Should a higher priority call be initiated
while you are connected, an upgrade (al-
ternating) tone will be heard, and the ap-
propriate indicator lamp will flash. If
certain information such as vehicle identi-
fication number or customer information is
not available, the operator may need to re-
transmit.During this time you will hear a beep and
voice contact will be interrupted. Voice
contact will resume once the retransmis-
sion is completed. Once a call is conclud-
ed, a beep will be heard and the
appropriate indicator lamp will stop flash-
ing. Audio system operation will resume.
!If the indicator lamps do not start flash-
ing after pressing one of the buttons or
remain illuminated (in red) at any time,
the Tele Aid system has detected a
fault or the service is not currently ac-
tive, and may not initiate a call. Visit
your Mercedes-Benz Center and have
the system checked or contact the Re-
sponse Center at 1-800-756-9018 (in
the USA) or 1-888-923-8367 (in
Canada) as soon as possible.
!If the indicator lamp continues to flash
or the system does not reset, contact
the Response Center at
1-800-756-9018 (in the USA) or
1-888-923-8367 (in Canada), or
Mercedes-Benz Customer Assistance
at 1-800-FOR-MERCedes
(1-800-367-6372) in the USA or Cus-
tomer Service at 1-800-387-0100 in
Canada.
Page 153 of 304

153 Controls in detail
Useful features
Programming or reprogramming the
integrated remote control�
Turn key in the steering lock to
position1 or2.
�
Hold the end of the hand-held transmit-
ter of the device you wish to train
approximately 2 to 5 inches (5 cm to
12 cm) away from the surface of the in-
tegrated remote control located on the
inside rear view mirror, keeping the in-
dicator lamp in view.
�
Using both hands, simultaneously push
the hand-held transmitter button and
the desired integrated remote control
button. Do not release the buttons until
completing next step.
�
The indicator lamp on the integrated
remote control will flash, first slowly
and then rapidly. The rapid flashing
lamp indicates successful program-
ming of the new frequency signal.
�
When the indicator lamp flashes rapid-
ly, release both buttons.
�
To program the remaining two buttons,
repeat the steps above.
iFor operation in the USA only: This de-
vice complies with Part 15 of the
FCC Rules. Operation is subject to the
following two conditions:
(1) This device may not cause harmful
interference, and
(2) this device must accept any inter-
ference received, including interfer-
ence that may cause undesired
operation.
Any unauthorized modification to this
device could void the user’s authority
to operate the equipment.
iIf, after several attempts, you do not
successfully program the integrated re-
mote control device to learn the signal
of the hand-held transmitter, the ga-
rage door opener could be equipped
with the “rolling code feature”.
Page 155 of 304
155 Controls in detail
Useful features
Operation of remote control�
Turn key in steering lock to position1
or2.
�
Select and press the appropriate but-
ton to activate the remote controlled
device.
The integrated remote control trans-
mitter continues to send the signal as
long as the button is pressed – up to
20 seconds.Erasing the remote control memory
�
Turn key in steering lock to position1
or2.
�
Simultaneously hold down the left and
right side buttons for approximately
20 seconds, or until the indicator lamp
blinks rapidly.
The codes of all three channels are
erased.iIf you sell your vehicle, erase the codes
of all three channels.
Page 279 of 304

Prevents the wheels from locking up
during braking so that the vehicle can
continue to be steered.
Alignment bolt
Metal pin with thread. The center")
279 Technical terms
ABS
(A
ntilock B
rake S
ystem)
Prevents the wheels from locking up
during braking so that the vehicle can
continue to be steered.
Alignment bolt
Metal pin with thread. The centering
pin is an aid used when changing a tire
to align the wheel with the wheel hub.
BabySmart
TM
airbag deactivation
system
This system detects if a special system
compatible child restraint seat is in-
stalled on the passenger seat. The sys-
tem will automatically deactivate the
passenger front airbag when such a
seat is properly installed (indicator
lamp
7
in the center console lights
up). See your authorized
Mercedes-Benz Center for availability.BabySmart
TM
compatible child seats
Special restraint system for children.
The sensor system for the passenger
seat prevents deployment of the pas-
senger front airbag if a BabySmart
TM
compatible child seat is installed.
BAS
(B
rake A
ssist S
ystem)
System for potentially reducing braking
distances in emergency braking situa-
tions. The system is activated when it
senses an emergency based on how
fast the brake is applied.
CAC
(C
ustomer A
ssistance C
enter)
Mercedes-Benz customer service cen-
ter, which can help you with any ques-
tions about your vehicle and provide
assistance in the event of a break-
down.CAN system
(C
ontroller A
rea N
etwork)
Data bus network serving to control ve-
hicle functions such as door locking or
windshield wiping.
Cockpit
All instruments, switches, buttons and
indicator/warning lamps in the passen-
ger compartment needed for vehicle
operation and monitoring.
Collapsible tire
An especially compact spare tire that
must be inflated with a provided air
pump before using. It should only be
used to bring the vehicle to the nearest
service station.
Cruise control
Driving convenience system for auto-
matically maintaining the vehicle speed
set by the driver.
Page 293 of 304
 75
Brakes 198
CHECK ENGINE 199
Engine diagnostics 199
ESP 194
Fuel reserve 201")
293 Index
Lamps, exterior
Front 221
Rear 222
Lamps, indicator and warning
ABS 196
Airbag Off 56
Battery (Remote control) 75
Brakes 198
CHECK ENGINE 199
Engine diagnostics 199
ESP 194
Fuel reserve 201
Instrument cluster 201
Seat belts 199
Service indicator 185
SRS 52
Turn signals 21
Lamps, malfunction indicator
BAS/ESP 194
Layout of poly-V-belt drive 259
Leather upholstery
Cleaning 192
License plate lamps
Replacing bulbs 222, 226
Light alloy wheels
Cleaning 191Technical data 262
Lighter see Cigarette lighter 143
Lighting 83
Combination switch 85
Daytime running lamp mode 83
Exterior lamp switch 83
Front fog lamps 84
High beam flasher 85
High beams 85
Instrument cluster illumination 88
Interior 86
Low beam 83
Parking lamps 83
Rear fog lamp 84
Trunk 87
Limiting the gear range 95
Limp Home Mode 98
Lock buttons 281
Locking 47, 74
Centrally from inside 80
Driver’s door and trunk in an
emergency 211
Fuel filler flap 169
Global, Remote control 75
Loss of keys 77
Loss of Service and Warranty Information Booklet 257
Low beam headlamps
Replacing bulbs 221, 223
Lowering
Vehicle 242
Lubricants
Technical data 269
M
Main dimensions 267
Maintenance 10, 185
Manual operations
Fuel filler flap 213
Hardtop 215
Interior lighting control 87
Locking the driver’s door and
trunk 211
Unlocking the driver’s door 210
Unlocking the trunk 210
Unlocking transmission selector
lever 214
Manual seat
Adjusting 31
Adjusting backrest tilt 32
Adjusting head restraint height 32
Adjusting seat height 31
Seat fore and aft adjustment 31