Page 216 of 304
216 Practical hintsOpening/closing in an emergency�
Keep wrench with you for later use in
closing and locking the retractable
hardtop.
�
Pull the loop of right control cable2 out
of the opening.
�
Remove first aid kit (
�page 206).
�
Open the left side trim panel in the
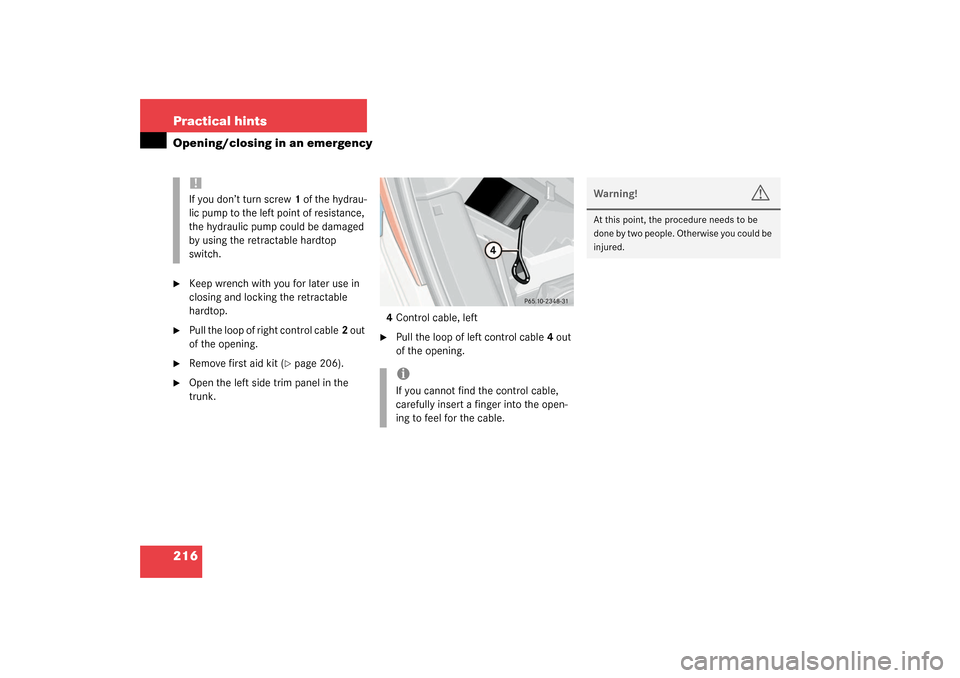
trunk. 4Control cable, left
�
Pull the loop of left control cable4 out
of the opening.
!If you don’t turn screw1 of the hydrau-
lic pump to the left point of resistance,
the hydraulic pump could be damaged
by using the retractable hardtop
switch.
iIf you cannot find the control cable,
carefully insert a finger into the open-
ing to feel for the cable.
Warning!
G
At this point, the procedure needs to be
done by two people. Otherwise you could be
injured.
Page 217 of 304
217 Practical hints
Opening/closing in an emergency
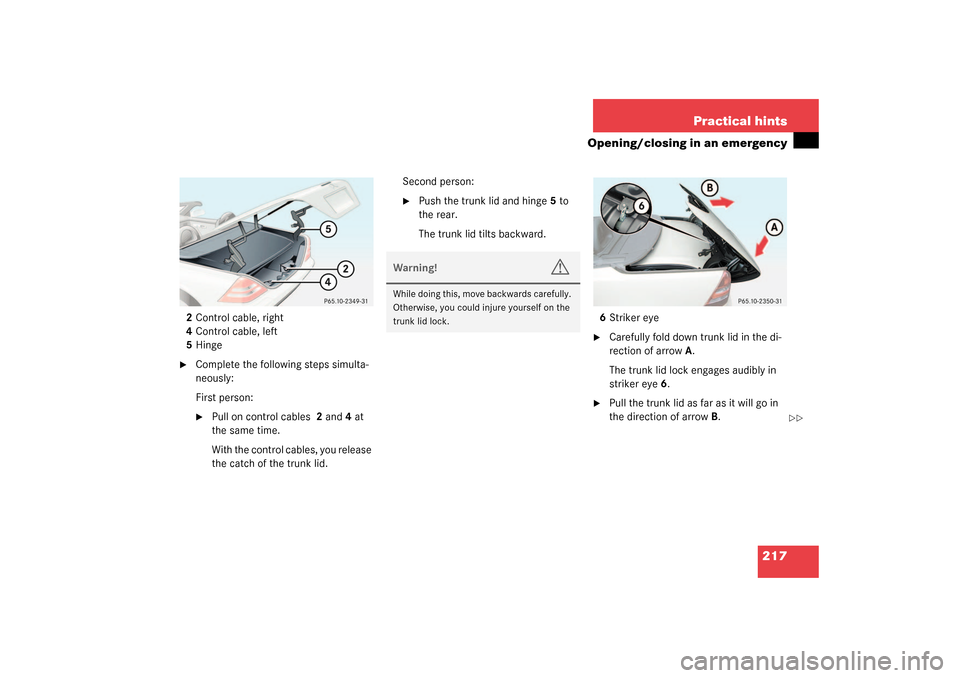
2Control cable, right
4Control cable, left
5Hinge�
Complete the following steps simulta-
neously:
First person:�
Pull on control cables 2 and4 at
the same time.
With the control cables, you release
the catch of the trunk lid.Second person:
�
Push the trunk lid and hinge5 to
the rear.
The trunk lid tilts backward.
6Striker eye
�
Carefully fold down trunk lid in the di-
rection of arrowA.
The trunk lid lock engages audibly in
striker eye6.
�
Pull the trunk lid as far as it will go in
the direction of arrowB.
��
Warning!
G
While doing this, move backwards carefully.
Otherwise, you could injure yourself on the
trunk lid lock.
Page 218 of 304

218 Practical hintsOpening/closing in an emergency7Bottom half of retractable hardtop�
Have each person stand on either side
of the trunk.
�
At the same time, reach from each side
of the trunk underneath the bottom
half of retractable hardtop7.
�
In a smooth motion, pull up on the re-
tractable hardtop in the direction of the
arrow until the bottom half of the re-
tractable hardtop is standing vertically.
8Pins for the retractable hardtop locking
mechanism
9Holes for the pins
�
Complete the next steps simultaneous-
ly. Have one person stand on each side
of the vehicle.�
Move the retractable hardtop with
one hand in the direction of the ar-
row.
�
With the other hand, guide pins8
belonging to the retractable hard-
top locking mechanism into corre-
sponding holes9 located in the
upper edges of the windshield.
Warning!
G
Do not place your hands near the upper
windshield area, trunk lid, or between roof
panels while the retractable hardtop is being
raised and locked. Serious personal injury
may occur.
��
Warning!
G
Do not place your hands in areas marked X.
Serious personal injury may occur.
Page 219 of 304
219 Practical hints
Opening/closing in an emergency
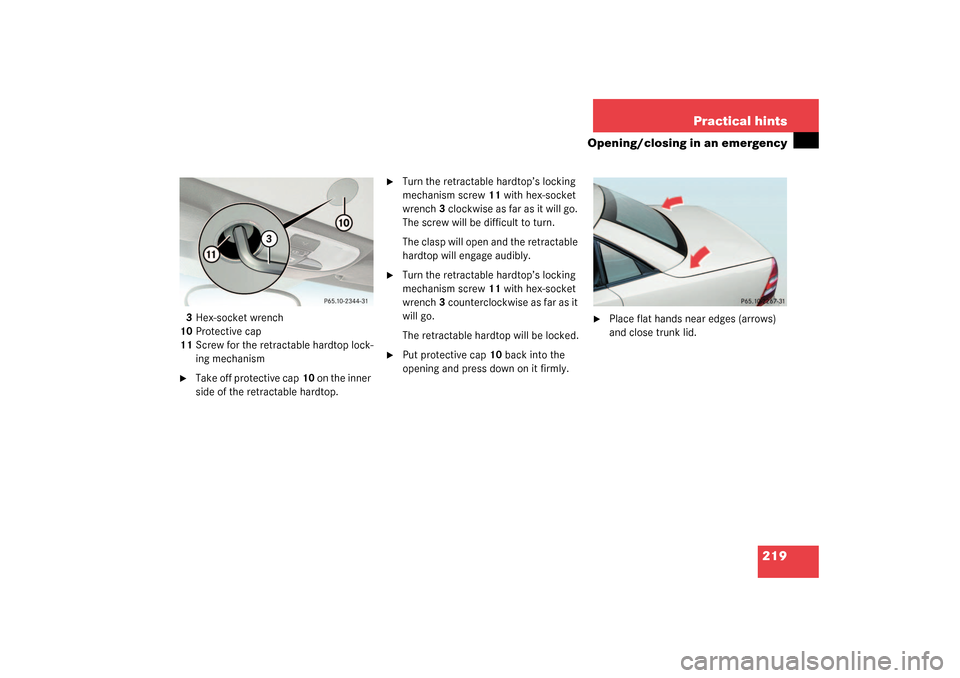
3Hex-socket wrench
10Protective cap
11Screw for the retractable hardtop lock-
ing mechanism�
Take off protective cap10 on the inner
side of the retractable hardtop.
�
Turn the retractable hardtop’s locking
mechanism screw11 with hex-socket
wrench3 clockwise as far as it will go.
The screw will be difficult to turn.
The clasp will open and the retractable
hardtop will engage audibly.
�
Turn the retractable hardtop’s locking
mechanism screw11 with hex-socket
wrench3 counterclockwise as far as it
will go.
The retractable hardtop will be locked.
�
Put protective cap10 back into the
opening and press down on it firmly.
�
Place flat hands near edges (arrows)
and close trunk lid.
Page 220 of 304
220 Practical hintsOpening/closing in an emergencyHave the retractable hardtop operation
checked at your authorized
Mercedes-Benz Center as soon as possi-
ble.
iAfter you have closed the retractable
hardtop manually, you can no longer�
lock the trunk lid
�
close the rear quarter windows
The trunk lid will also no longer seal
properly.
Page 225 of 304

225 Practical hints
Replacing bulbs
Side marker lamp bulb�
Switch off the lights.
�
Carefully slide lamp towards front.
�
Remove rear end first.
�
Twist bulb socket counterclockwise
and pull out.
�
Gently push bulb into socket, turn
counterclockwise and remove.
�
Insert new bulb in socket, push in and
twist clockwise.
�
Reinstall bulb socket, push in and twist
clockwise.
�
To reinstall lamp, set rear end in
bumper and let front end snap into
place.
Replacing bulbs for rear lamps
Tail lamp assemblies
1Brake lamp
2Turn signal lamp
3Tail, parking and standing lamp, side
marker
4Backup lamp
5Rear fog lamp (driver’s side)
�
Switch off the lights.
�
Open trunk lid (
�page 77).
�
Remove cover in right side panel.
�
Remove first aid kit (
�page 206).
Remove cover in left side panel.
�
Turn bulb socket counterclockwise and
pull out.
�
Gently push bulb into socket, turn
counterclockwise and remove.
�
Insert new bulb in socket, push in and
turn clockwise.
�
Reinstall bulb socket, push in and turn
clockwise.
�
Close cover.
Page 226 of 304
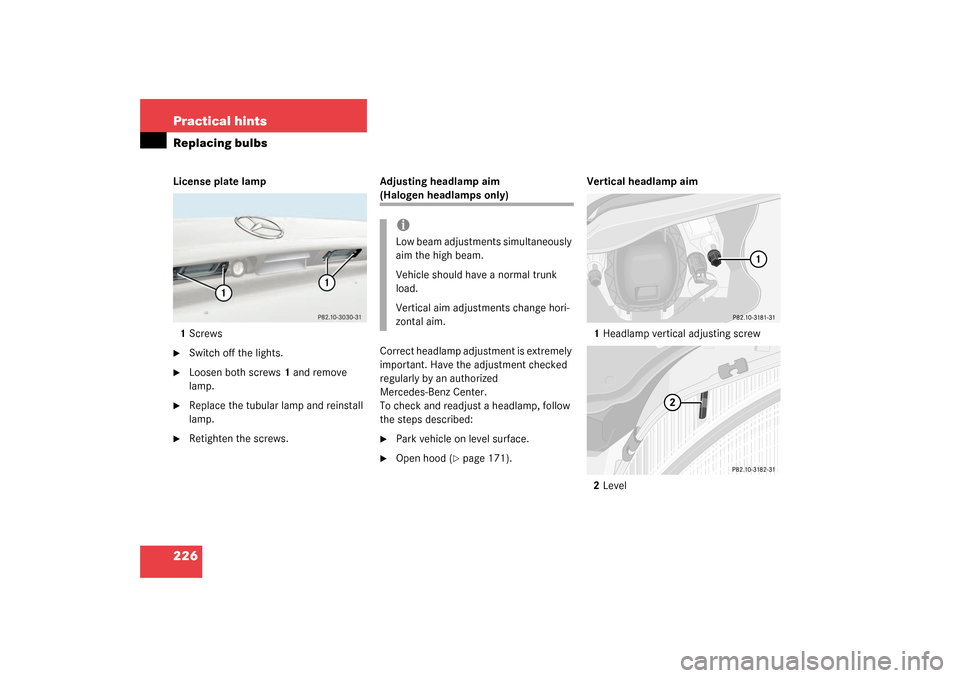
226 Practical hintsReplacing bulbsLicense plate lamp
1Screws�
Switch off the lights.
�
Loosen both screws1 and remove
lamp.
�
Replace the tubular lamp and reinstall
lamp.
�
Retighten the screws.Adjusting headlamp aim
(Halogen headlamps only)
Correct headlamp adjustment is extremely
important. Have the adjustment checked
regularly by an authorized
Mercedes-Benz Center.
To check and readjust a headlamp, follow
the steps described:�
Park vehicle on level surface.
�
Open hood (
�page 171).Vertical headlamp aim
1Headlamp vertical adjusting screw
2Level
iLow beam adjustments simultaneously
aim the high beam.
Vehicle should have a normal trunk
load.
Vertical aim adjustments change hori-
zontal aim.
Page 229 of 304
 (
�page 208) or a
spare wheel with collapsible tire
(SLK 230 Kompressor and SLK 320 only)
(
�p")
229 Practical hints
Flat tire
Flat tire
Your vehicle is equipped with a TIREFIT kit
(SLK 32 AMG only) (
�page 208) or a
spare wheel with collapsible tire
(SLK 230 Kompressor and SLK 320 only)
(
�page 207).
You can identify which TIREFIT kit
(SLK 32 AMG only) you have as follows:
�
The TIREFIT container of kit 1 is a
squeeze container.
�
The TIREFIT container of kit 2 is a rigid
container and includes a flange for filler
hose (outlet) and air hose (inlet).
Preparing the vehicle�
Park the vehicle as far as possible from
moving traffic on a hard surface.
�
Turn on hazard warning flashers.
�
Engage the steering wheel lock in the
straight ahead position and set the
parking brake.
�
Move the selector lever toP (manual
transmission to first or reverse gear.
�
Have any passenger exit the vehicle at
a safe distance from the roadway.
Sealing tires with TIREFIT kit 1
Small tire punctures, only those in the
tread, can be sealed with TIREFIT.
TIREFIT can be used in ambient tempera-
tures down to -4°F (-20°C).
The TIREFIT kit stored in the trunk
(�page 208) contains the TIREFIT
container, a filler hose, a valve stem tool,
a valve core and a sticker.
�
Foreign objects (e.g. screws or nails)
should not be removed from the tire.
�
Attach the sticker where it will be easily
seen by the driver on the instrument
cluster.
Warning!
G
Keep TIREFIT away from sparks, open flame
or heat source.
Do not smoke.
Warning!
G
TIREFIT is a limited repair device. TIREFIT
cannot be used for:�
cuts or punctures larger than approx.
0.16 in (4 mm)
�
on a flat tire, or a damaged wheel
�
tire damage caused by driving with ex-
tremely low tire pressure
Do not drive the vehicle under such circum-
stances.
Contact your nearest Mercedes-Benz
Center for assistance or call Roadside Assis-
tance.