Page 242 of 304
242 Practical hintsFlat tire
�
Unscrew the alignment bolt, install last
wheel bolt and tighten slightly.
Lowering the vehicle
�
Lower vehicle by turning crank coun-
terclockwise until vehicle is resting ful-
ly on its own weight.
�
Pull the jack out of the jack support
tube.
�
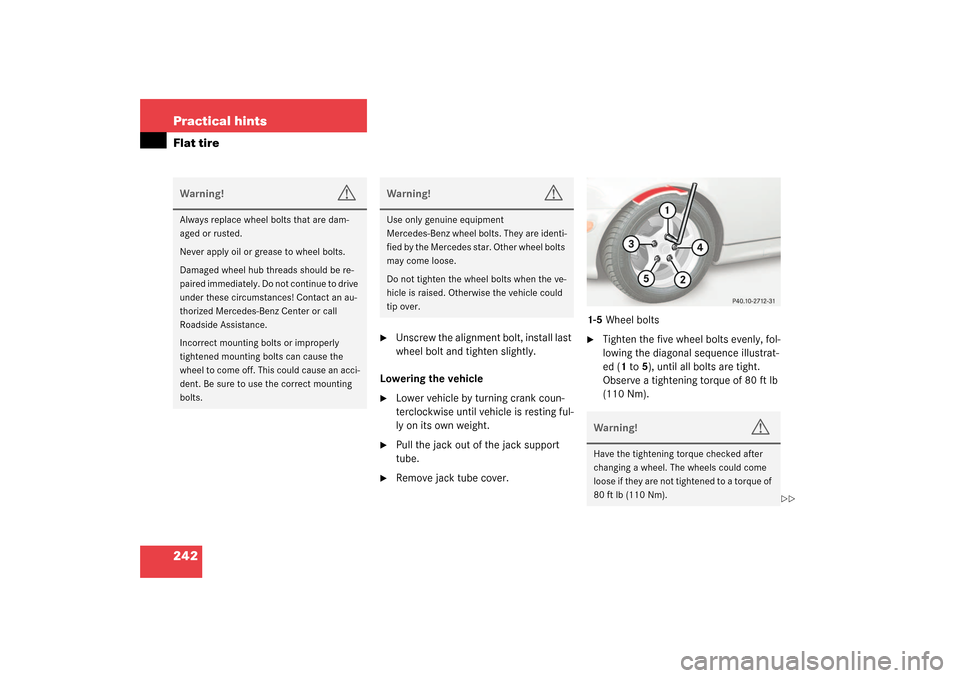
Remove jack tube cover.1-5Wheel bolts
�
Tighten the five wheel bolts evenly, fol-
lowing the diagonal sequence illustrat-
ed (1to5), until all bolts are tight.
Observe a tightening torque of 80 ft lb
(110 Nm).
Warning!
G
Always replace wheel bolts that are dam-
aged or rusted.
Never apply oil or grease to wheel bolts.
Damaged wheel hub threads should be re-
paired immediately. Do not continue to drive
under these circumstances! Contact an au-
thorized Mercedes-Benz Center or call
Roadside Assistance.
Incorrect mounting bolts or improperly
tightened mounting bolts can cause the
wheel to come off. This could cause an acci-
dent. Be sure to use the correct mounting
bolts.
Warning!
G
Use only genuine equipment
Mercedes-Benz wheel bolts. They are identi-
fied by the Mercedes star. Other wheel bolts
may come loose.
Do not tighten the wheel bolts when the ve-
hicle is raised. Otherwise the vehicle could
tip over.
Warning!
G
Have the tightening torque checked after
changing a wheel. The wheels could come
loose if they are not tightened to a torque of
80 ft lb (110 Nm).
��
Page 244 of 304
244 Practical hintsFlat tire
�
Detach the electric air pump.
�
Reinstall tire valve cap.
�
Stow the electrical plug and the air
hose behind the flap and place the air
pump back in the trunk.
�
Close the trunk lid.Storing collapsible spare wheel in
wheel well
Before you can store the spare wheel with
collapsible tire in the wheel well you have
to release the air pressure of the tire.
�
Unscrew valve stem removal tool,
which is part of the valve cap, from tire
valve.
�
Using the valve stem removal tool,
open tire valve slightly by turning the
tire valve insert counterclockwise to
release air pressure.
�
When the air pressure has been re-
leased, remove tire valve insert (pro-
tect it from dirt and sand) using the
previously removed tire valve cap.
�
Once all air is out of the tire, and the
tire has collapsed to its original shape,
reinstall the tire valve insert and valve
cap.
�
Place spare wheel in wheel well and
secure it with the pump holder.
�
Tu rn pu m p hold er cl ockwi se to its st op.
Warning!
G
Follow recommend inflation pressures.
Do not overinflate tires. Overinflating tires
can result in sudden deflation (blowout) be-
cause they are more likely to become punc-
tured or damaged by road debris, potholes
etc.
Do not underinflate tires. Underinflated tires
wear unevenly, adversely affect handling
and fuel economy, and are more likely to fail
from being overheated.
Do not overload the tires by exceeding the
specified vehicle capacity weight (as indicat-
ed by the label on the pillar in the driver’s
door opening). Overloading the tires can
overheat them, possibly causing a blowout.
Warning!
G
To prevent possible injury when unscrewing
air pump filler hose from tire valve after in-
flating the tire, use a rag since the tire valve
could be hot.
Page 246 of 304
246 Practical hintsBatteryDisconnecting the battery�
Turn off all electrical consumers.
�
Open the hood (
�page 171).
�
Disconnect the battery negative
lead3.
�
Remove the cover2 from the positive
terminal.
�
Disconnect the battery positive lead.
Removing the battery�
Remove the screw on the swivel bar.
�
Remove the swivel bar. Take out the
battery.
Charging and reinstalling battery�
Charge battery in accordance with the
instructions of the battery charger
manufacturer.
�
Reinstall the charged battery. Follow
the previously described steps in re-
verse order.
Reconnecting the battery�
Turn off all electrical consumers.
�
Connect the positive lead and fasten its
cover2.
�
Connect the negative lead3.
Batteries contain materials that can harm
the environment if disposed of improperly.
Large 12-volt storage batteries contain
lead. Recycling of batteries is the preferred
method of disposal. Many states require
sellers of batteries to accept old batteries
for recycling.Warning!
G
Never charge a battery while still installed in
the vehicle. Gases may escape during charg-
ing and cause explosions that may result in
paint damage, corrosion or personal injury.!Never invert the terminal connections!!The battery, its filler caps and the vent
tube must always be securely installed
when the vehicle is in operation.
iThe following procedures must be car-
ried out following any interruption of
battery power (e.g. due to reconnec-
tion):�
Set the clock (
�page 90).
�
Resynchronize the ESP
(�page 195).
�
Re-enter the radio code (see radio
operating instructions).
�
Resynchronize side windows
(�page 128).
Page 288 of 304
288 IndexChild safety 60
Airbags 54
Infant and child restraint systems 57,
60
Cigarette lighter 143
Cleaning
Cloth upholstery 192
Cup holder 191
Gear selector lever 191
Hard plastic trim items 191
Headliner 192
Instrument cluster 191
Leather upholstery 192
Light alloy wheels 191
Plastic and rubber parts 192
Rear window 190
Seat belts 192
Steering wheel 191
Windows 190
Windshield 45
Wiper blades 190
Cleaning*
Headlamps 100
Climate control 102
Adjusting air distribution 104
Adjusting air volume 104Air conditioning 106
Air recirculation mode 105
Deactivating the climate control
system 110
Defogging windshield 109
Defrosting 108
Reactivating the climate control
system 110
Rear window defroster 105
Residual heat utilization 107
Residual ventilation 107
Setting the temperature 104
Clock 21
Setting 90
Closing
Glove box 139
Hood 172
Retractable hardtop 215
Side windows 127
Trunk 77
Windows 127
Closing hardtop
In an emergency 215
Cloth upholstery
Cleaning 192
Cockpit 18, 279Coin holder 142
Collapsible tire 279
Combination switch 84, 85
High beam flasher 44, 85
Turn signals 43
Windshield wipers 44
Consumer information 276
Control and operation of radio
transmitters 166
Coolant 176, 273
Adding 176, 177
Anticorrosion/antifreeze
quantity 273
Capacities 269
Checking level 176
Temperature 167
Temperature gauge 88
Coolant level
Checking 170, 176
Cruise control 136, 279
Canceling 137
Driving downhill 137
Driving uphill 137
Fine adjustment 138
Saving current speed 137
Setting speeds 138
Page 297 of 304
297 Index
Safety systems
Driving 66
Saving current speed 137
Seat belts 57
Cleaning 192
Fastening 37
Proper use of 39, 59
Safety guidelines 55
Warning lamp 199
Seat heater*
Switching off 81
Switching on 81
Seats 81
Adjusting 30
Heater* 81
Manual 31
Rapid seat heating* 81
Selector lever 21
Lock 41
Position (automatic
transmission*) 21, 93
Self-test
BabySmart
TM airbag deactivation
system 63
Tele Aid* 145
ServiceCalling up the service indicator 186
Major service (Service B) 185
Minor service (Service A) 185
Overdue 186
Spare parts 256
Types 186
When due 185
Service (maintenance) 185
Service and Warranty Booklet
Loss of 257
Service and warranty information 8
Service indicator 185
Calling up 186
Clearing 185, 186
Service life (tires) 181
Service System see FSS 185
Setting
Clock 90
Cruise control 137
Higher speed in cruise control 138
Lower speed in cruise control 138
Slower speed in cruise control 138
Speed in cruise control 138
Temperature (interior) 104
Settings
Factory, Remote control 75Selective 75
Shelf behind roll bar 141
Shift lock 282
Shifting
Gear selector lever positions 96
Gearshift lever 91
Into optimal gear range (automatic
transmission*) 94
Into reverse (manual
transmission) 92
Side impact airbags 57
Side marker lamps
Replacing bulbs 221, 222, 225
Side windows
Automatic opening 127
Cleaning 190
Closing 127
Opening 127
Opening fully 127
Synchronizing power windows 128
Simultaneous wiping and washing
Windshield wipers 45
Single wipe 45
Snow chains 184
Soft keys
Audio system 115
Page:
< prev 1-8 9-16 17-24