Page 21 of 376

21 At a glance
Instrument cluster
Item
Page
1
Coolant temperature
gauge with:D
Coolant temperature
warning lamp
254
2
Speedometer with:;
Brake warning lamp,
except Canada
253
3
Brake warning lamp,
Canada only
v
Antilock Brake Sys-
tem (ABS)/Electronic
Stability Program
(ESP) warning lamp
250
E
Distronic (DTR)* indi-
cator lamp (white) or
warning lamp (red)
1
1Vehicles without Distronic*: Indicator lamp with-
out function. It illuminates with the key in starter
switch position2. It should go out when the engine
is running.
251
L
K
Turn signal indicator
lamps
Item
Page
3
Left multifunction display
with:
Trip odometer
109
Main odometerStored speed for
Distronic*
117
4
Reset knob
5
Tachometer with:
109
A
High beam headlamp
indicator
104
?
Engine malfunction in-
dicator lamp
256
C
Roll bar warning lamp
255
-
Antilock Brake Sys-
tem (ABS) malfunc-
tion indicator lamp
251
Item
Page
1
Supplemental
restraint system
(SRS) indicator lamp
252
<
Seat belt nonusage
warning lamp
256
6
Right multifunction
display with:
Selector lever
position
39
Outside temperature
display
109
Program mode
141
7
Fuel gauge with:A
Fuel reserve warning
lamp
255
Page 29 of 376

29 Getting started
Unlocking
Starter switch positionsStarter switch0For removing key
1Power supplies to some electrical con-
sumers, such as seat adjustment
2Ignition (power supply for all electrical
consumers) and driving position
3Starting position
Warning!
G
When leaving the vehicle always remove the
key from the starter switch, take the KEY-
LESS-GO
* card (if so equipped) with you
and lock the vehicle. Do not leave children
unattended in the vehicle, or with access to
an unlocked vehicle. Unsupervised use of
vehicle equipment may cause an accident
and/or serious personal injury.
!If the key is left in the starter switch
position0 for an extended period of
time, it can no longer be turned in the
starter switch.�
Remove the key from the starter
switch and reinsert.
If the key can still not be turned, the
starter battery may not be sufficiently
charged.
�
Check the starter battery and
charge it if necessary (
�page 319).
�
Get a jump start (
�page 323).
More information can be found in the
“Controls in detail” section
(
�page 80).
Page 43 of 376
43 Getting started
Driving
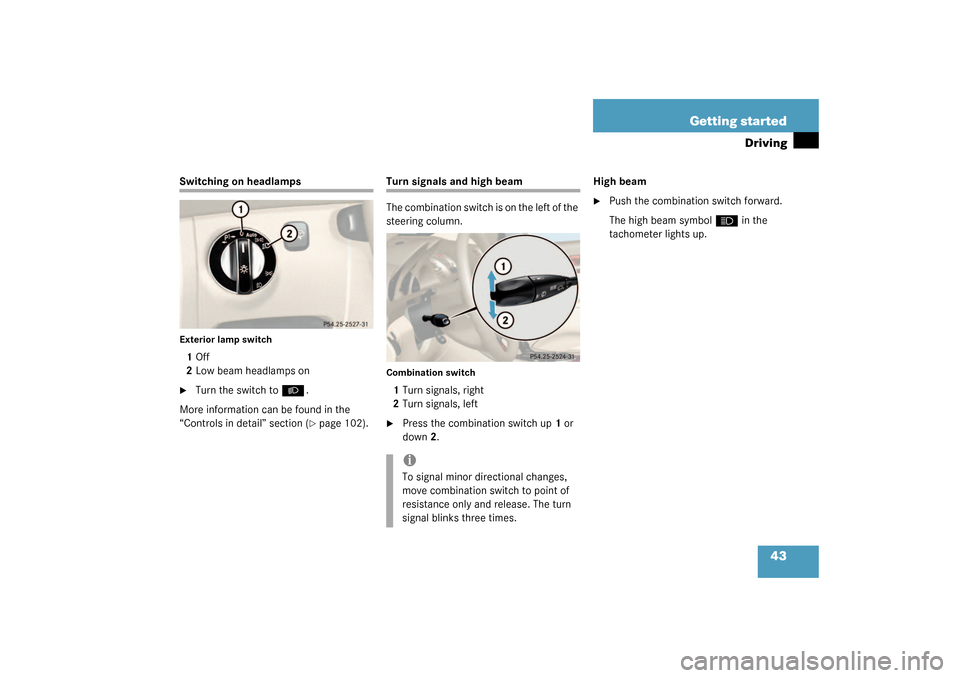
Switching on headlampsExterior lamp switch1Off
2Low beam headlamps on�
Turn the switch to
B
.
More information can be found in the
“Controls in detail” section (�page 102).
Turn signals and high beam
The combination switch is on the left of the
steering column.Combination switch1Turn signals, right
2Turn signals, left�
Press the combination switch up1 or
down2.High beam
�
Push the combination switch forward.
The high beam symbol
A
in the
tachometer lights up.
iTo signal minor directional changes,
move combination switch to point of
resistance only and release. The turn
signal blinks three times.
Page 44 of 376

44 Getting startedDrivingWindshield wipers
The combination switch is on the left of the
steering column.Combination switch1Single wipe
2Switching on windshield wipers�
Make sure that the ignition is switched
on.Switching on windshield wipers
�
Turn the combination switch to the de-
sired position depending on the inten-
sity of the rain.
0 Windshield wipers off
I Intermittent wiping (interval depen-
dent on wetness of windshield)
IINormal wiper speed
IIIFast wiper speed (Canada only:
goes to setting II when the car is
standing still)
Single wipe
�
Press switch briefly in the direction of
arrow1.
The windshield wipers wipe one time
without washer fluid.
iThe intermittent wiping interval is de-
pendent on wetness of windshield.
Wiping will not occur with a door open.
!Do not leave windshield wipers in inter-
mittent setting when vehicle is taken to
an automatic car wash or during wind-
shield cleaning. Wipers will operate in
the presence of water sprayed on the
windshield, and wipers may be dam-
aged as a result.
The switch should not be left in inter-
mittent setting as the wipers will wipe
the windshield once every time the en-
gine is started. Dust that accumulates
on the windshield might scratch the
glass when wiping occurs on a dry
windshield.
Page 84 of 376

84 Controls in detailLocking and unlockingSeparately unlocking the trunk�
Turn the key completely to the left to
position1.
You can now open the trunk.
Loss of SmartKey or mechanical key
If you lose a SmartKey or mechanical key,
you should do the following:
�
Have the SmartKey deactivated by an
authorized Mercedes-Benz Center.
�
Report the loss of the SmartKey or the
mechanical key immediately to your
car insurance company.
�
If necessary have the mechanical lock
replaced.
Your authorized Mercedes-Benz Center
will be glad to supply you with a replace-
ment.
KEYLESS-GO card*
Specially equipped vehicles come with two
KEYLESS-GO cards. On these vehicles, the
validity of the KEYLESS-GO card is
checked every time you grasp a door
handle.
If the card is valid, your vehicle unlocks �
the doors
�
the trunk lid
�
the glove box
�
the storage space under the armrest
�
the storage compartment in the rear
�
the fuel filler flap
Warning!
G
When leaving the vehicle, always remove the
key from the starter switch, take the KEY-
LESS-GO
* card (if so equipped) with you
and lock the vehicle. Do not leave children
unattended in the vehicle, or with access to
an unlocked vehicle. Unsupervised use of
vehicle equipment may cause an accident
and/or serious personal injury.
!To prevent possible malfunction, avoid
exposing the KEYLESS-GO* card to
high levels of electromagnetic radia-
tion.
Page 85 of 376

85 Controls in detail
Locking and unlocking
Important notes on using KEYLESS-GO*�
Always carry the KEYLESS-GO card
with you.
�
Never store the KEYLESS-GO card to-
gether with:�
electronic items such as a cellular
phone or another KEYLESS-GO card
�
metallic objects such as coins or
metal foil
Doing so could impair the function of
the KEYLESS-GO system.
�
Always take a SmartKey with you in
case of a malfunction of the KEY-
LESS-GO system.
�
To lock or unlock the vehicle, the card
must be located outside the vehicle
within approximately 3 ft. (1 m) of a
door or the trunk lid.
�
In order to start the engine with the
KEYLESS-GO card�
the KEYLESS-GO card must be lo-
cated in the vehicle
�
all the doors must be closed
�
If you have started the engine with the
KEYLESS-GO start/stop button, you
can only turn it off again with this but-
ton, even if you have put the key in the
starter switch in the meantime.
�
This does not apply if, after starting, the
selector lever is still in positionP. The
key will then have priority over the card
and the vehicle’s electrical system will
operate according to the position of
the key in the starter switch, even stop-
ping the engine.
�
If the KEYLESS-GO card is positioned
farther away from the vehicle (e.g. in-
side clothing or briefcase) and can no
longer be recognized by the system,
the vehicle cannot be locked or the en-
gine started via the KEYLESS-GO sys-
tem.
�
If the KEYLESS-GO card is removed
from the vehicle while the ignition is
switched on (e.g. if passenger exits the
vehicle with the card), the message Chip card not recognized!
will ap-
pear in the multifunction display.
Find the card or change its present lo-
cation immediately (e.g. place it on the
front passenger seat or insert it in shirt
pocket).
�
Remember that the engine can be
started by anyone with a KEYLESS-GO
card that is left inside the vehicle. If you
leave the card behind when exiting and
locking the vehicle, the message
Chip
card still in vehicle!
will appear in
the multifunction display.
Page 102 of 376
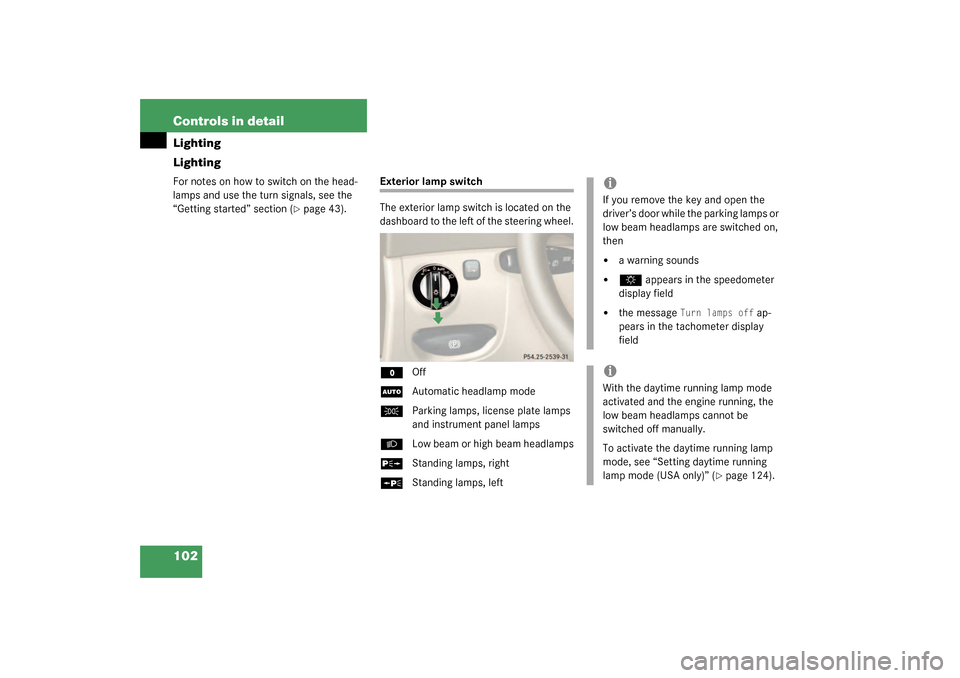
102 Controls in detailLighting
LightingFor notes on how to switch on the head-
lamps and use the turn signals, see the
“Getting started” section (
�page 43).
Exterior lamp switch
The exterior lamp switch is located on the
dashboard to the left of the steering wheel.M
Off
U
Automatic headlamp mode
C
Parking lamps, license plate lamps
and instrument panel lamps
B
Low beam or high beam headlamps
ˆ
Standing lamps, right
‚
Standing lamps, left
iIf you remove the key and open the
driver’s door while the parking lamps or
low beam headlamps are switched on,
then �
a warning sounds
�
$
appears in the speedometer
display field
�
the message
Turn lamps off
ap-
pears in the tachometer display
field
iWith the daytime running lamp mode
activated and the engine running, the
low beam headlamps cannot be
switched off manually.
To activate the daytime running lamp
mode, see “Setting daytime running
lamp mode (USA only)” (
�page 124).
Page 104 of 376

104 Controls in detailLightingUSA only:
The high beam headlamps can also be ac-
tivated when driving with the daytime run-
ning lamp mode activated and the exterior
lamp switch in position
M
.
To activate the daytime running lamp
mode, see “Setting daytime running lamp
mode (USA only)” (
�page 124).
Locator lighting and night security
illumination
Locator lighting and night security illumi-
nation are described in the control system
section, see “Setting locator lighting”
(
�page 125) and "Exterior lamps delayed
switch-off" (
�page 125).Switching on front fog lamps
�
Make sure that the low beam head-
lamps are switched on.
�
Pull out exterior lamp switch to first
stop.
The green indicator lamp
‡
in the
lamp switch lights up.
Switching on rear fog lamp
�
Make sure that the low beam head-
lamps are switched on.
�
Pull out exterior lamp switch to second
stop.
The yellow indicator lamp
†
in the
lamp switch lights up.
Combination switch
The combination switch is located on the
left side of the steering column.
1High beam
2High beam flasher
Switching on high beams�
Turn the exterior lamp switch to
B
or to
U
(�page 102).
�
Push the combination switch in
direction1.
The high beam symbol in the tachome-
ter will light up.
iSee notes on the exterior lamp switch
(�page 102).