Page 76 of 376

76 Safety and SecurityAnti-theft systemsArming the alarm system
The alarm system is armed after locking
the vehicle with the remote control. The
turn signal lamps blink three times to indi-
cate that the alarm system is activated.
The
‹
indicator lamp in the central
locking switch (
�page 23) will blink after
approximately 10 seconds when the alarm
system is completely armed.Disarming the alarm system
The alarm system is disarmed when you
unlock your vehicle with the remote con-
trol. The turn signal lamps blink once to in-
dicate that the alarm system is
deactivated.
Canceling the alarm
To cancel the alarm:
With the key
�
Insert the key in the starter switch.
or
�
Press the
Œ
or
‹
button.
The alarm is canceled.With KEYLESS-GO*
�
Grasp the outside door handle.
or
�
Press the KEYLESS-GO start/stop but-
ton.
The alarm is canceled.
iIf the turn signal lamps do not blink
three times, a door or the hood may not
be closed properly.
Close the respective element and lock
the vehicle again.
iThe alarm system will rearm automati-
cally again after aprroximately 40 sec-
onds if no door was opened.
Page 80 of 376

80 Controls in detailLocking and unlockingIn the “Controls in detail” section you will
find detailed information on how to oper-
ate the equipment installed on your vehi-
cle. if you are already familiar with the
basic functions of your vehicle, this section
will be of particular interest to you.
To quickly familiarize yourself with the ba-
sic functions of the vehicle, refer to the
“Getting started” section of this manual.
The corresponding page numbers are giv-
en at the beginning of each segment.
Locking and unlockingKeys
Your vehicle comes supplied with two
SmartKeys with remote controls and a re-
movable mechanical key. The locking tabs
for the mechanical key portion of the two
keys are a different color to help distin-
guish each key unit.
The remote control key provides an ex-
tended operating range. To prevent theft,
however, it is advisable to only unlock the
vehicle when you are in close proximity to
it.
The key centrally locks and unlocks:�
the doors
�
the trunk lid
�
the glove box
�
the storage space under the armrest
�
the storage compartment in the rear
�
the fuel filler flap
SmartKey with remote controls1‹
Lock button
2
Š
Unlock button for the trunk lid
3Mechanical key locking tab
4
Œ
Unlock button
5Battery check lamp
6
Â
Panic button (
�page 67)
iYou can also open and close the re-
tractable hardtop using the key
(�page 163).
Page 81 of 376

81 Controls in detail
Locking and unlocking
Factory setting
Global unlocking�
Press button
Œ
.
All turn signals blink once. The locking
knobs in the doors move up.
The vehicle will lock again automatically
within approximately 40 seconds of un-
locking if neither door nor trunk is opened.
Global locking
�
Press button
‹
.
All turn signals blink three times. The lock-
ing knobs in the doors move down.Individual setting
If you frequently travel alone, you may wish
to reprogram the key so that
pressing
Œ
only unlocks the driver’s
door, interior lockable storage compart-
ments and the fuel filler flap.
�
Press and hold buttons
Œ
and
‹
simultaneously for about six seconds
until the battery check lamp5 blinks
twice.
The key will then function as follows:
Unlocking driver’s door
�
Press button
Œ
once.
Global unlocking
�
Press button
Œ
twice.
Global locking
�
Press button
‹
.Restoring to factory setting
�
Press and hold buttons
Œ
and
‹
simultaneously for about six seconds
until the battery check lamp5 blinks
twice.
!To prevent possible malfunction, avoid
exposing the key to high levels of elec-
tromagnetic radiation.
Warning!
G
When leaving the vehicle, always remove the
key from the starter switch, take the KEY-
LESS-GO
* card (if so equipped) with you
and lock the vehicle. Do not leave children
unattended in the vehicle, or with access to
an unlocked vehicle. It is possible for chil-
dren to open a locked door from the inside,
which could result in an accident or serious
injury.
Page 84 of 376

84 Controls in detailLocking and unlockingSeparately unlocking the trunk�
Turn the key completely to the left to
position1.
You can now open the trunk.
Loss of SmartKey or mechanical key
If you lose a SmartKey or mechanical key,
you should do the following:
�
Have the SmartKey deactivated by an
authorized Mercedes-Benz Center.
�
Report the loss of the SmartKey or the
mechanical key immediately to your
car insurance company.
�
If necessary have the mechanical lock
replaced.
Your authorized Mercedes-Benz Center
will be glad to supply you with a replace-
ment.
KEYLESS-GO card*
Specially equipped vehicles come with two
KEYLESS-GO cards. On these vehicles, the
validity of the KEYLESS-GO card is
checked every time you grasp a door
handle.
If the card is valid, your vehicle unlocks �
the doors
�
the trunk lid
�
the glove box
�
the storage space under the armrest
�
the storage compartment in the rear
�
the fuel filler flap
Warning!
G
When leaving the vehicle, always remove the
key from the starter switch, take the KEY-
LESS-GO
* card (if so equipped) with you
and lock the vehicle. Do not leave children
unattended in the vehicle, or with access to
an unlocked vehicle. Unsupervised use of
vehicle equipment may cause an accident
and/or serious personal injury.
!To prevent possible malfunction, avoid
exposing the KEYLESS-GO* card to
high levels of electromagnetic radia-
tion.
Page 85 of 376

85 Controls in detail
Locking and unlocking
Important notes on using KEYLESS-GO*�
Always carry the KEYLESS-GO card
with you.
�
Never store the KEYLESS-GO card to-
gether with:�
electronic items such as a cellular
phone or another KEYLESS-GO card
�
metallic objects such as coins or
metal foil
Doing so could impair the function of
the KEYLESS-GO system.
�
Always take a SmartKey with you in
case of a malfunction of the KEY-
LESS-GO system.
�
To lock or unlock the vehicle, the card
must be located outside the vehicle
within approximately 3 ft. (1 m) of a
door or the trunk lid.
�
In order to start the engine with the
KEYLESS-GO card�
the KEYLESS-GO card must be lo-
cated in the vehicle
�
all the doors must be closed
�
If you have started the engine with the
KEYLESS-GO start/stop button, you
can only turn it off again with this but-
ton, even if you have put the key in the
starter switch in the meantime.
�
This does not apply if, after starting, the
selector lever is still in positionP. The
key will then have priority over the card
and the vehicle’s electrical system will
operate according to the position of
the key in the starter switch, even stop-
ping the engine.
�
If the KEYLESS-GO card is positioned
farther away from the vehicle (e.g. in-
side clothing or briefcase) and can no
longer be recognized by the system,
the vehicle cannot be locked or the en-
gine started via the KEYLESS-GO sys-
tem.
�
If the KEYLESS-GO card is removed
from the vehicle while the ignition is
switched on (e.g. if passenger exits the
vehicle with the card), the message Chip card not recognized!
will ap-
pear in the multifunction display.
Find the card or change its present lo-
cation immediately (e.g. place it on the
front passenger seat or insert it in shirt
pocket).
�
Remember that the engine can be
started by anyone with a KEYLESS-GO
card that is left inside the vehicle. If you
leave the card behind when exiting and
locking the vehicle, the message
Chip
card still in vehicle!
will appear in
the multifunction display.
Page 90 of 376

90 Controls in detailLocking and unlocking�
Pull remote trunk lid release switch1.
The trunk unlocks. The indicator
lamp2 comes on. It remains lit until
you close the trunk again.
Trunk lid emergency release
The emergency release button is located
on the left side of the trunk.
Illumination of the emergency release but-
ton:�
The button will blink for 30 minutes af-
ter opening the trunk.
�
The button will blink for 60 minutes af-
ter closing the trunk.
�
Briefly press the emergency release
button.
The trunk unlocks and the trunk lid
opens.
iTo facilitate trunk loading and unload-
ing when the hardtop is retracted, you
can raise the hardtop from its storage
position in the trunk using the loading
aid feature (
�page 198). You may also
unhook the luggage cover.
Remember to resecure the luggage
cover after loading/unloading the
trunk. Otherwise you will not be able to
lower the retractable hardtop.
!The emergency release button does
not open the trunk lid if the vehicle bat-
tery is discharged or disconnected.iIf the emergency release button is
pressed and the vehicle was centrally
locked, the exterior lamps will flash and
the alarm will sound as the trunk lid
opens.
To cancel the alarm, insert the key in
the starter switch or press button
Œ
or
‹
on the key.
Page 92 of 376

92 Controls in detailLocking and unlockingLocking and unlocking from the inside
You can lock or unlock the vehicle from in-
side using the central locking switches.
This can be useful, for example, if you want
to unlock the passenger door from the in-
side or want to lock the vehicle before
starting to drive.
The switches are located above and be-
tween the center air vents of the air condi-
tioning.
Central locking switches1Locking
2Unlocking
Locking�
Press central locking switch1.
If all the doors are closed, the vehicle
locks.
Unlocking
�
Press central locking switch2.
The vehicle unlocks.
iYou can open a locked door from inside
at any time. Open door only when con-
ditions are safe to do so.
If you have locked the vehicle with the
key or the KEYLESS-GO* card, the cen-
tral locking switches do not work.
iIf the vehicle was previously centrally
locked using the SmartKey or the
KEYLESS-GO* card, it will not unlock
using the central locking switch.Warning!
G
When leaving the vehicle, always remove the
key from the starter switch, take the KEY-
LESS-GO
* card (if so equipped) with you
and lock the vehicle. Do not leave children
unattended in the vehicle, or with access to
an unlocked vehicle. Unsupervised use of
vehicle equipment may cause an accident
and/or serious personal injury.
Page 93 of 376
93 Controls in detail
Seats
Seats
Information on seat adjustment can be
found in the “Getting started” section
(�page 32).
Lumbar support
You can adjust the contour of the seat’s
lumbar support to best support your spine.
The thumbwheel is located on the lower
side of the seat.
1Thumb wheel�
Make sure the ignition is switched on.
All the lamps in the instrument cluster
should light up.
�
Set the lumbar support between 0
and 5.
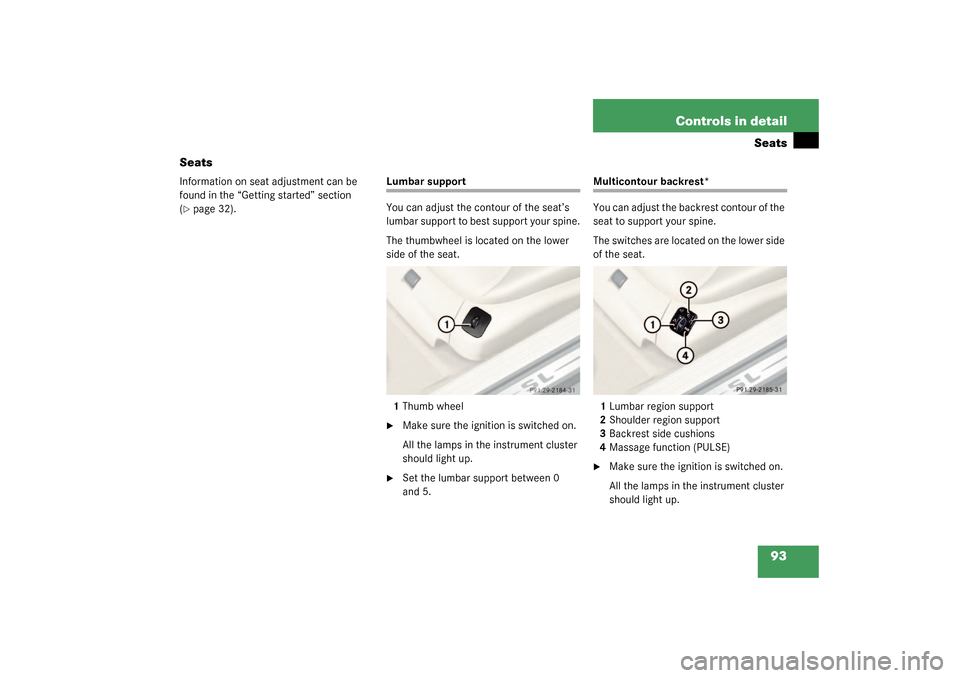
Multicontour backrest*
You can adjust the backrest contour of the
seat to support your spine.
The switches are located on the lower side
of the seat.
1Lumbar region support
2Shoulder region support
3Backrest side cushions
4Massage function (PULSE)�
Make sure the ignition is switched on.
All the lamps in the instrument cluster
should light up.