Page 195 of 376
195 Controls in detail
Useful features
Parcel net in trunk
There are three nets available in the trunk
to secure loads:�
a pocket net on each side of the right
and left trunk side walls
�
a trunk floor net
�
Pull the trunk floor net from the trunk
back wall towards the front over the
luggage.
�
Hang the hooks of the net on the eyes
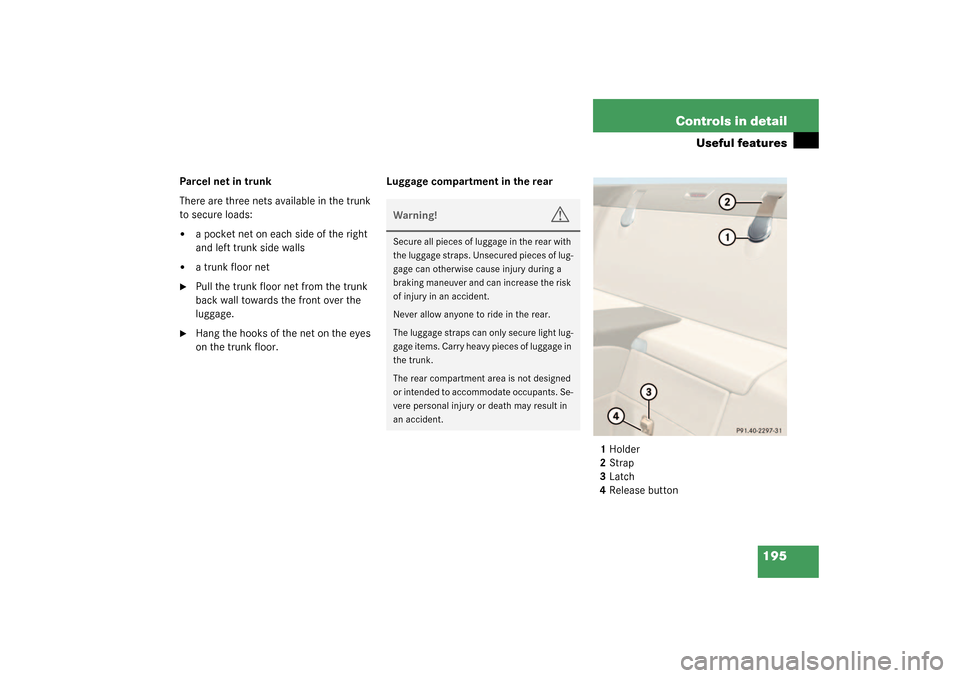
on the trunk floor.Luggage compartment in the rear
1Holder
2Strap
3Latch
4Release button
Warning!
G
Secure all pieces of luggage in the rear with
the luggage straps. Unsecured pieces of lug-
gage can otherwise cause injury during a
braking maneuver and can increase the risk
of injury in an accident.
Never allow anyone to ride in the rear.
The luggage straps can only secure light lug-
gage items. Carry heavy pieces of luggage in
the trunk.
The rear compartment area is not designed
or intended to accommodate occupants. Se-
vere personal injury or death may result in
an accident.
Page 196 of 376

196 Controls in detailUseful features�
Pull the strap2 out of the holder1.
�
Secure the luggage with the strap so
that it cannot move.
�
Insert the strap in the latch3.
Releasing the strap
�
Press the release button4 and guide
the strap back to the holder.
Ashtray
1Cover plate
2Sliding knob
Opening ashtray�
Briefly touch the cover plate1.
The ashtray opens automatically.Removing the ashtray insert
�
Secure vehicle from movement by set-
ting the parking brake. Move the selec-
tor lever to positionN.
Now you have more room to take out
the insert.
�
Press the sliding knob2 to the right.
The insert will eject a short distance.
Replacing the ashtray insert
�
Press the insert into the frame until it
snaps into place.
Warning!
G
The shelf below the rear window should not
be used to carry objects. This will avoid such
objects from being thrown about and injur-
ing vehicle occupants during an accident or
sudden maneuver.
The trunk is the preferred place to carry ob-
jects.
Warning!
G
Remove ashtray only with vehicle standing
still. Set the parking brake to secure vehicle
from movement. Move gear selector lever to
positionN. With gear selector lever in
positionN, turn off the engine.
Page 222 of 376

222 OperationDriving instructionsStanding water
Passenger compartmentDriving abroad
Abroad, there is a widely-spread
Mercedes-Benz service network at your
disposal. If you plan to drive into areas
which are not listed in the index of your
Mercedes-Benz Center directory, you
should request pertinent information from
your authorized Mercedes-Benz Center.Control and operation of radio trans-
mitters
COMAND, radio and telephone
!Do not drive through flooded areas or
water of unknown depth.
If you must drive through standing wa-
ter, drive slowly to prevent water from
entering the passenger compartment
or the engine compartment. Water in
these areas could cause damage to
electrical components or wiring of the
engine or transmission, or could result
in water being ingested by the engine
through the air intake, causing severe
internal engine damage. Any such dam-
age is not covered by the Mer-
cedes-Benz Limited Warranty.
Warning!
G
Always fasten items being carried as secure-
ly as possible.
In an accident, during hard braking or sud-
den maneuvers, loose items will be thrown
around inside the vehicle, and cause injury
to vehicle occupants unless the items are
securely fastened in the vehicle.
The trunk is the preferred place to carry ob-
jects.
Warning!
G
Please do not forget that your primary re-
sponsibility is to drive the vehicle safely.
Only operate the COMAND (Cockpit Man-
agement and Data System), radio or tele-
phone
1 if road, weather, and traffic
conditions permit.
Bear in mind that at a speed of just 30 mph
(approximately 50 km / h), your vehicle is
covering a distance of approximately
44 feet (approximately 13.5 m) every sec-
ond.
1Observe all legal requirements.
Page 272 of 376

272 Practical hintsWhat to do if …Left display
Right display
Possible cause
Possible solution
<
Seat belt system
Visit workshop!
The seat belt system is malfunction-
ing.
�
Visit an authorized Mercedes-Benz Center
as soon as possible.
Ê
Close
trunk lid!
This message will appear whenever
the trunk lid is open.
�
Close the trunk lid.
Close
trunk separator!
You are trying to open or close the
roof even though the luggage cover
in the trunk is not pulled out.
�
Pull out the luggage cover and secure it
(�page 160).
B
Coolant
Check level!
The coolant level is too low.
�
Add coolant (
�page 230).
�
If you have to add coolant frequently, have
the cooling system checked by an autho-
rized Mercedes-Benz Center.
Warning!
G
Do not spill antifreeze on hot engine parts.
Antifreeze contains ethylene glycol which
may burn if it comes into contact with hot
engine parts. You can be seriously burned.
!Do not ignore the low engine coolant
level warning. Extended driving with
this message and symbol displayed
may cause serious engine damage not
covered by the Mercedes-Benz Limited
Warranty.
Do not drive without sufficient amount
of coolant in the cooling system. The
engine will overheat, causing major en-
gine damage.
Page 321 of 376

321 Practical hints
Batteries
Removing the batteries
Removing the battery for electrical con-
sumers�
Remove the screws securing the bat-
tery in the trunk.
�
Remove the battery support and brack-
et. Take out the battery.
Removing the starter battery
�
Remove the screws securing the start-
er battery in the engine compartment.
�
Lift the retaining bracket and remove
the battery.
Charging and reinstalling batteries�
Charge batteries in accordance with
the instructions of the battery charger
manufacturer.
�
Reinstall the charged battery. Follow
the previously described steps in re-
verse order.
Reconnecting the batteries
Reconnecting the starter battery�
Turn off all electrical consumers.
�
Connect the positive lead and fasten its
cover.
�
Connect the negative lead.
Warning!
G
Never charge a battery while still installed in
the vehicle. Gases may escape during charg-
ing and cause explosions that may result in
paint damage, corrosion or personal injury.
!To avoid damage to electrical compo-
nents, always reconnect the starter
battery (in engine compartment) first. !Never invert the terminal connections!!The battery, its filler caps, and the vent
tube must always be securely installed
when the vehicle is in operation.
Page 367 of 376

367 Index
N
Navigation system
Operating 117
Night security illumination 125
O
Octane number 355
Odometer, main 21
Oil
Adding 229
Checking level 228
Consumption 228
Dipstick 228
Filler neck 229
Oil level
Checking 226
One-touch shifting 138
Opening
Ashtray 196
Cup holders 190
Doors from the inside 89
Fuel filler flap 225
Glove box 190
Hood 227
Luggage cover 160
Retractable hardtop (key) 163
Retractable hardtop (switch) 160Side windows 158
Storage space in the armrest 193
Storage space in the center
console 193
Sunshade* 167
Trunk from inside vehicle 89
Trunk lid 83
Operating
CD player 116
Navigation system 117
Radio 116
Telephone* 133
Operator’s Manual 8
Overhead control panel 25
Overspeed range 109, 354
P
Panic alarm 67
Panic button on SmartKey 67
Panorama roof*
Sunshade* 166
Sunshade* closing 167
Sunshade* opening 167
Parcel net in passenger footwell 194
Parcel net in trunk 195
Parctronic* deactivation switch 24
Parking 218Parking assistance (Parktronic*) 186
Parking brake
Engaging 47
Message in display 271
Releasing 41
Parking brake pedal 19
Parking lamps 296
Replacing the bulbs 299
Switching on 102
Parking position
Exterior rear view mirrors 100, 131
Parktronic* 24, 186, 354
Activating 189
Cleaning sensors 246
Deactivating 189
Malfunctioning 189
Minimum distance 187
Range 187
Rear sensors 187
Sensors 246
Warning indicators 19, 187
Passenger side
Front airbag 57
Head-thorax airbag 58
Parcel net in footwell 194
Pedals 215
Page 370 of 376

370 Index
Locator lighting 125
Miles/kilometers in
speedometer 123
Multifunction display language 123
Night security illumination 125
Radio station 116
Speedometer display mode 123
Station selection mode 128
Suspension tuning 183
Temperature (interior) 149
Temperature indicator 122
Time display mode 122
Tire inflation pressure 129
Units
Speedometer 123
Temperature 122
Tire inflation pressure 129
Vehicle level control 184
Setting speed
Cruise control 169, 170
Distronic* 176, 177Settings
Calling up Distronic* 117, 174
Convenience functions 129
Factory (electronic key) 81
Individual (electronic key) 81
Resetting all (control system) 120
Settings menu
Individual vehicle settings 119
Submenus 120
Shifting
into optimal gear range 138
Shifting gears
On steering wheel (SL 55 AMG) 142
Shoulder support
Seat adjustment 94
Side air vents 23
Side marker lamps 296, 299
Side windows 157
Automatic opening 158
Closing 158
Closing (KEYLESS-GO*) 88
Opening 158
Opening fully 158
Stopping 158
Synchronizing power windows 158SL 500
Spare wheel 338
Tires 338
SL 55 AMG Kompressor
Tires 338
SL 55 AMG Kompressor
MANUAL shift program mode 142
Steering wheel gearshift control 143
Snow chains 240
Spare fuses 288, 329
Spare tire see Spare wheel 302
Spare wheel* 289, 312
Inflating tire 316
Tire inflation pressure 316
Speed settings
Cruise control 170
Distronic* 177
Speedometer 21
Setting units 123
Sporty driving style 183
SRS 355
Indicator lamp 252
Standing lamps 102, 296
Replacing bulbs 299
Standing water
Driving instructions 222