Page 316 of 376
.
1Flap
2Air hose with pressure gauge and vent
screw
3Union nut
4Electrical plug
�
Open")
316 Practical hintsFlat tireInflating the spare tire�
Take the electric air pump out of the
trunk (
�page 289).
1Flap
2Air hose with pressure gauge and vent
screw
3Union nut
4Electrical plug
�
Open flap 1 on air pump.
�
Pull out the electrical plug 4 and air
hose with the pressure gauge 2.
�
Remove the valve cap from the tire
valve.
�
Screw the air hose 2 onto the tire valve.
�
Insert electrical plug 4 into vehicle ci-
gar lighter socket.
�
Turn the key in the ignition to
position1.
or
�
Press the KEYLESS-GO* start/stop
button on the selector lever once with-
out depressing the brake pedal.
�
Press 1 on the electric air pump switch.
The electric air pump should now
switch on and inflate the tire.
�
Inflate the tire to approx. 36 psi
(2.5 bar).
This takes about five minutes for the
spare tire. The air hose 2 and the union
nut 3 can become hot duration infla-
tion. Exercise proper caution to avoid
burning yourself when using the equip-
ment.
!Do not lower the vehicle before inflat-
ing the spare wheel tire. Otherwise the
rim may be damaged.Warning!
G
Observe instructions on air pump label.
Page 317 of 376

317 Practical hints
Flat tire
�
Press 0 on the electric air pump switch.
�
Turn the key in the ignition to
position0.
or
�
Press KEYLESS-GO* start/stop button
on the selector lever twice without de-
pressing the brake pedal.
The electric air pump should now be
switched off.
�
If the tire pressure is above 36 psi
(2.5 bar), release excess tire pressure
using the vent screw.
�
Detach the electric air pump.
�
Stow the electrical plug and the air
hose behind the flap and place the air
pump back in the trunk.
!Do not operate the air pump longer
than eight minutes without interrup-
tion. Otherwise it may overheat.
You may operate the air pump again af-
ter it has cooled off.
Warning!
G
Follow recommend inflation pressures.
Do not overinflate tires. Overinflating tires
can result in sudden deflation (blowout) be-
cause they are more likely to become punc-
tured or damaged by road debris, potholes
etc.
Do not underinflate tires. Underinflated tires
wear unevenly, adversely affect handling
and fuel economy, and are more likely to fail
from being overheated.
iThe flat tire may be transported in the
trunk when the retractable hardtop is
lowered. Use the protective sheet pro-
vided with the spare wheel. Do not ac-
tivate the tire inflation pressure
monitor until the deflated tire has been
removed from the vehicle.
Page 318 of 376
318 Practical hintsFlat tireLowering the vehicle�
Lower vehicle by turning crank coun-
terclockwise until the full weight of the
vehicle is resting on the ground.
�
Pull the jack out of the jack support
tube.
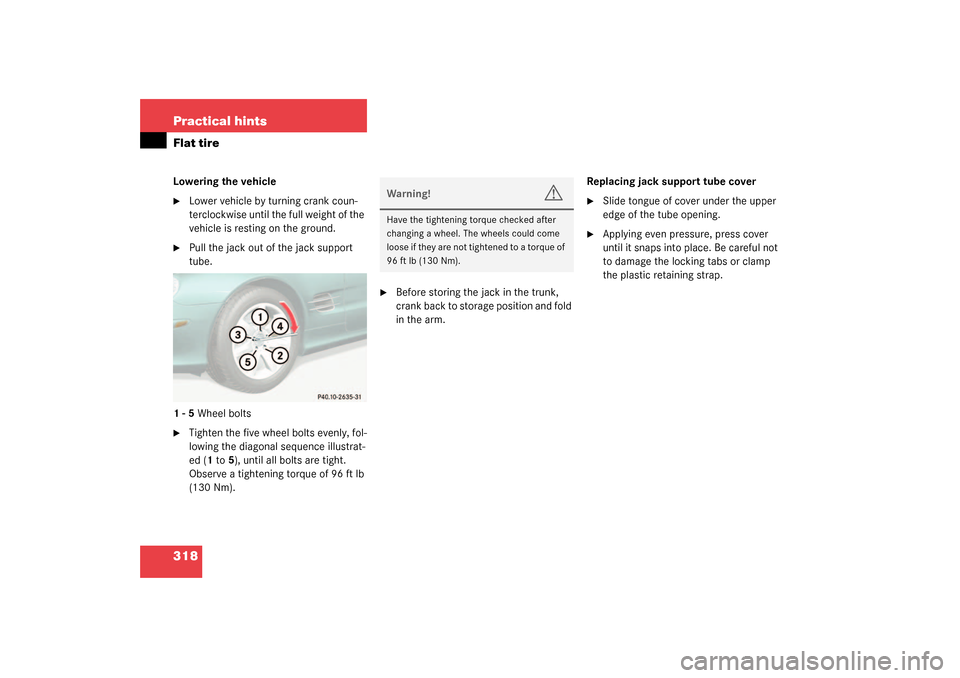
1 - 5 Wheel bolts
�
Tighten the five wheel bolts evenly, fol-
lowing the diagonal sequence illustrat-
ed (1 to 5), until all bolts are tight.
Observe a tightening torque of 96 ft lb
(130 Nm).
�
Before storing the jack in the trunk,
crank back to storage position and fold
in the arm.Replacing jack support tube cover
�
Slide tongue of cover under the upper
edge of the tube opening.
�
Applying even pressure, press cover
until it snaps into place. Be careful not
to damage the locking tabs or clamp
the plastic retaining strap.
Warning!
G
Have the tightening torque checked after
changing a wheel. The wheels could come
loose if they are not tightened to a torque of
96 ft lb (130 Nm).
Page 359 of 376

359 Index
Brakes 216
Warning lamp 253
Break-in period 214
Bulbs, replacing
Backup lamps 299
Brake lamps 296
Front lamps 295, 298
License plate lamps 300
Parking lamps 299
Rear fog lamp 299
Standing lamps 299
Tail lamp assemblies 299
Turn signal lamps, front 298
Turn signal lamps, rear 299
C
CAC (Customer Assistance Center) 351
CAN System 351
Capacities
Fuels, coolants, lubricants etc. 342
Catalytic converter 223
CD player
Operating 116
Center air vents 23
Center console
Lower part 24
Upper part 23Centigrade
Setting temperature units 122
Central locking
Automatic 91
Central locking switch 92
Switching on/off (control
system) 128
Unlocking from inside 92
Central locking switch 23
Central unlocking switch 23
Changing
Batteries (key) 293
Batteries (KEYLESS-GO* card) 294
Key setting 81
KEYLESS-GO* card setting 86
Vehicle level 185
Charging
Vehicle batteries 321
CHECK ENGINE malfunction indicator
lamp 21, 256
Checking
Batteries (KEYLESS-GO* card) 87
Coolant level 230
Oil level 226, 228
Tire inflate pressure 226
Vehicle lighting 226Vehicle lock status (KEYLESS-GO*
card) 87
Child safety
Airbags 54
Automatic child seat recognition 64
Infant and child restraint systems 52
Cigarette lighter 23, 197
Cleaning
Headlamps 146
Windshield 44
Clock 19
Closing
Glove box 190
Hood 228
Retractable hardtop (electronic
key) 164
Retractable hardtop (switch) 161
Side windows 158
Side windows (KEYLESS-GO*) 88
Sunshade* 167
Trunk lid 83, 91
Cockpit 352
Collapsible tire 352
COMAND 23
COMAND* 352
COMAND*, radio and telephone 222
Page 362 of 376

362 IndexE
Easy-entry/exit 129
Interrupting movement 130
Message in display 271
Easy-Pack 198
Lowering manually 292
Electric air pump 316
Electrical consumer battery 232
Electrical outlet 199
Electronic Stability Program see ESP
Emergency call system*
Initiating emergency call 203
Requirements 201
Emergency engine shut-down 50
Emergency operation (Limp Home
Mode) 144
Emergency operations
Locking the vehicle 292
Lowering Easy-Pack 292
Unlocking interior storage
compartments 291
Unlocking the trunk 291
Unlocking the vehicle 290
Emission control 224
Emission control label 334Engine
Compartment 227
Starting with KEYLESS-GO* 40
Starting with the key 40
Turning off with KEYLESS-GO* 49
Turning off with the key 48
Engine number 352
Engine oil 228, 343
Adding 229
Additives 343
Checking level 228
Consumption 228
Filler neck 229
Messages in display 280
Engine oil level see Oil level 226
ESP 68, 70, 352
Messages in display 261
Switching off 71
Switching on 72
ESP control switch 24
ESP/ABS warning lamp 21
ETD (emergency tensioning device) 52,
60, 352F
Fahrenheit
Setting temperature units 122
Fastening the seat belts 37
Fine adjustment
Cruise control 170
Distronic* 177
First aid kit 288
Flat tire 302
Spare wheel 312
TIREFIT kit 302, 308
Flexible Service System (FSS) 241
Fog lamp, rear 104, 296
Replacing bulb 299
Fog lamps, front 104
Replacing bulbs 296
Front airbags 57
Front lamps 296
Replacing bulbs 298
FSS (Flexible Service System) 241, 352
Page 373 of 376
 88
Locking separately 83
Message in display 272
Ope")
373 Index
Trip computer 131
Trip odometer 21
Resetting 109
Trunk
Closing the lid 91
Easy-Pack load assist 198
Lighting 107
Lock button (KEYLESS-GO*) 88
Locking separately 83
Message in display 272
Opening from inside vehicle 89
Opening the lid 83
Parcel net 195
Trunk lid lock 291
Unlocking (KEYLESS-GO*) 88
Unlocking in an emergency 291
Unlocking separately 82
Trunk lid 82
Trunk lid emergency release 90
Trunk lighting 107
Turn signals 19, 43
Additional in mirrors 296
Front bulbs 296
Indicator lamps 21
Rear bulbs 296U
Units
Setting speedometer units 123
Setting temperature units 122
Setting tire inflation pressure
units 129
Unlocking 28
Centrally from inside 92
Driver’s door in an emergency 290
Fuel filler flap 225
Global (KEYLESS-GO* card) 86
Interior storage compartments 291
Storage compartments 194
Trunk 82, 89
Trunk (KEYLESS-GO*) 88
Trunk in an emergency 291
Vehicle in an emergency 290
With the electronic key 28
With the KEYLESS-GO* card 30, 84
Uphill driving
Cruise control 169
V
Vehicle
Individual settings 119
Locking 23
Locking in an emergency 292Minimum distance (Parktronic*) 187
Towing 325
Unlocking 23
Unlocking in an emergency 290
Vehicle level 184, 356
Changing 185
Setting 185
Automatic 185
Manual 185
Vehicle level control 356
Vehicle level control switch 24
Vehicle lighting
Checking 226
Vehicle lock status
Checking (KEYLESS-GO*) 87
Vehicle tool kit 288
Alignment bolt 288
Fuse chart 288
Fuse extractor 288
Hex-socket wrench 288
Open-end wrench 288
Screwdriver 288
Spare fuses 288
Universal pliers 288
Wheel wrench 288
Ventilation and residual heat 154