Page 269 of 376

269 Practical hints
What to do if …
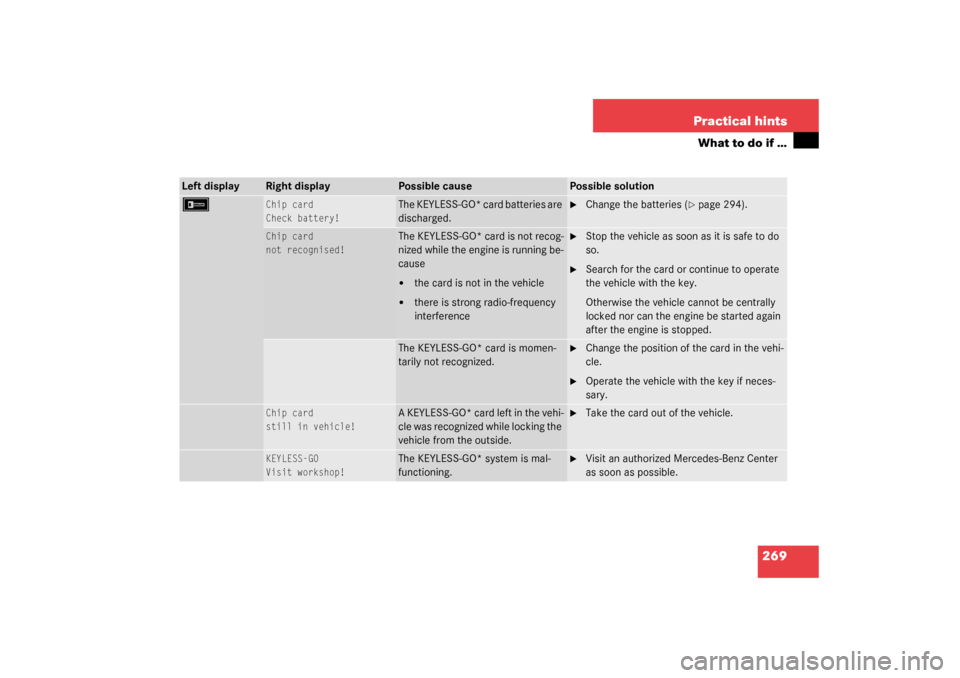
Left display
Right display
Possible cause
Possible solution
F
Chip card
Check battery!
The KEYLESS-GO* card batteries are
discharged.
�
Change the batteries (
�page 294).
Chip card
not recognised!
The KEYLESS-GO* card is not recog-
nized while the engine is running be-
cause�
the card is not in the vehicle
�
there is strong radio-frequency
interference
�
Stop the vehicle as soon as it is safe to do
so.
�
Search for the card or continue to operate
the vehicle with the key.
Otherwise the vehicle cannot be centrally
locked nor can the engine be started again
after the engine is stopped.
The KEYLESS-GO* card is momen-
tarily not recognized.
�
Change the position of the card in the vehi-
cle.
�
Operate the vehicle with the key if neces-
sary.
Chip card
still in vehicle!
A KEYLESS-GO* card left in the vehi-
cle was recognized while locking the
vehicle from the outside.
�
Take the card out of the vehicle.
KEYLESS-GO
Visit workshop!
The KEYLESS-GO* system is mal-
functioning.
�
Visit an authorized Mercedes-Benz Center
as soon as possible.
Page 293 of 376

293 Practical hints
Locking/unlocking in an emergency
Changing batteries
If the batteries in the key or the KEY-
LESS-GO* card are discharged, the vehicle
can no longer be locked or unlocked. It is
recommended to have the batteries re-
placed at an authorized Mercedes-Benz
Center.
Batteries contain materials that can harm
the environment if disposed of improperly.
Recycling of batteries is the preferred
method of disposal. Many states require
sellers of batteries to accept old batteries
for recycling.Key
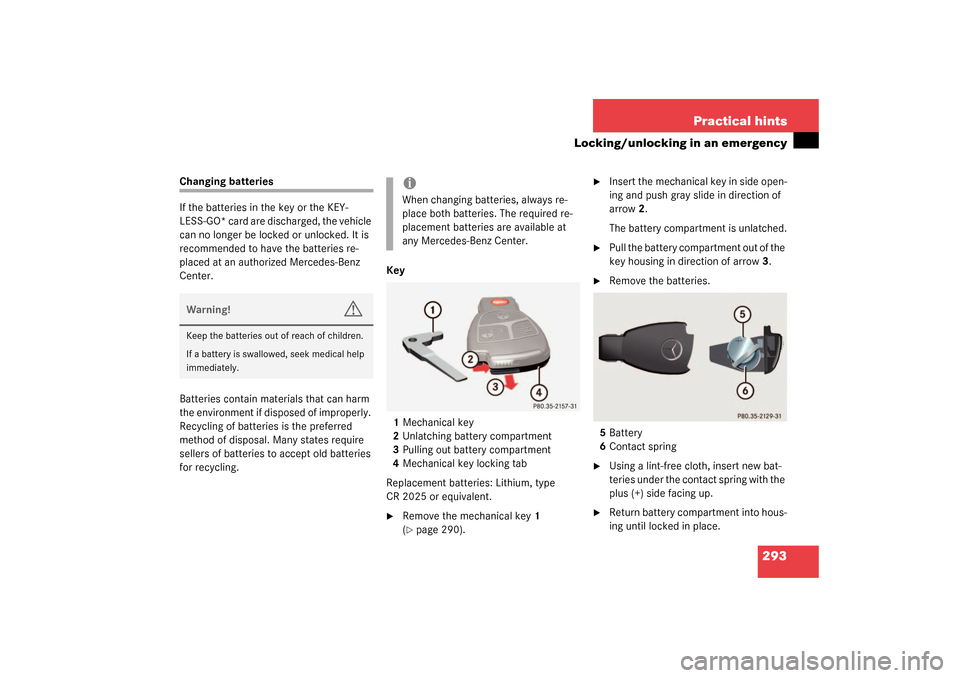
1Mechanical key
2Unlatching battery compartment
3Pulling out battery compartment
4Mechanical key locking tab
Replacement batteries: Lithium, type
CR 2025 or equivalent.
�
Remove the mechanical key1
(�page 290).
�
Insert the mechanical key in side open-
ing and push gray slide in direction of
arrow2.
The battery compartment is unlatched.
�
Pull the battery compartment out of the
key housing in direction of arrow3.
�
Remove the batteries.
5Battery
6Contact spring
�
Using a lint-free cloth, insert new bat-
teries under the contact spring with the
plus (+) side facing up.
�
Return battery compartment into hous-
ing until locked in place.
Warning!
G
Keep the batteries out of reach of children.
If a battery is swallowed, seek medical help
immediately.
iWhen changing batteries, always re-
place both batteries. The required re-
placement batteries are available at
any Mercedes-Benz Center.
Page 294 of 376
294 Practical hintsLocking/unlocking in an emergencyKEYLESS-GO card*
1Battery cover
Replacement batteries: Lithium, type
CR 2025 or equivalent.�
Pry open the cover 1.
�
Remove the batteries.
�
Install new batteries as indicated by
the “+” and “-” markings in the KEY-
LESS-GO card.
�
Replace battery cover 1.
Page 319 of 376

319 Practical hints
Batteries
Batteries
Your vehicle is equipped with two batter-
ies:�
The starter battery (located in the en-
gine compartment)
�
The battery for electrical consumers
(located in the trunk)
Starter battery in the engine compartment1Positive terminal
2Negative terminal
Warning!
G
Failure to follow these instructions can re-
sult in severe injury or death.
Never lean over batteries while connecting,
you might get injured.
Battery fluid contains sulfuric acid. Do not
allow this fluid to come in contact with eyes,
skin or clothing. In case it does, immediately
flush affected area with water and seek
medical help if necessary.
A battery will also produce hydrogen gas,
which is flammable and explosive. Keep
flames or sparks away from battery, avoid
improper connection of jumper cables,
smoking, etc.
!Never loosen or detach battery termi-
nal clamps while the engine is running
or the key is in the starter switch. Oth-
erwise the alternator and other elec-
tronic components could be severely
damaged.
Have the starter battery checked regu-
larly by an authorized Mercedes-Benz
Center
Refer to Service Booklet for mainte-
nance intervals or contact your autho-
rized Mercedes-Benz Center for further
information.Warning!
G
Do not place metal objects on the battery as
this could result in a short circuit.
Use leak-proof batteries only to avoid the
risk of acid burns in the event of an acci-
dent.
Page 320 of 376

320 Practical hintsBatteries
Disconnecting the batteriesDisconnecting the battery for electrical
consumers
�
Unhook the luggage cover in the trunk.
�
Remove the trunk floor.
The battery for electrical consumers is
located in the right hand area of the
trunk (
�page 289).
�
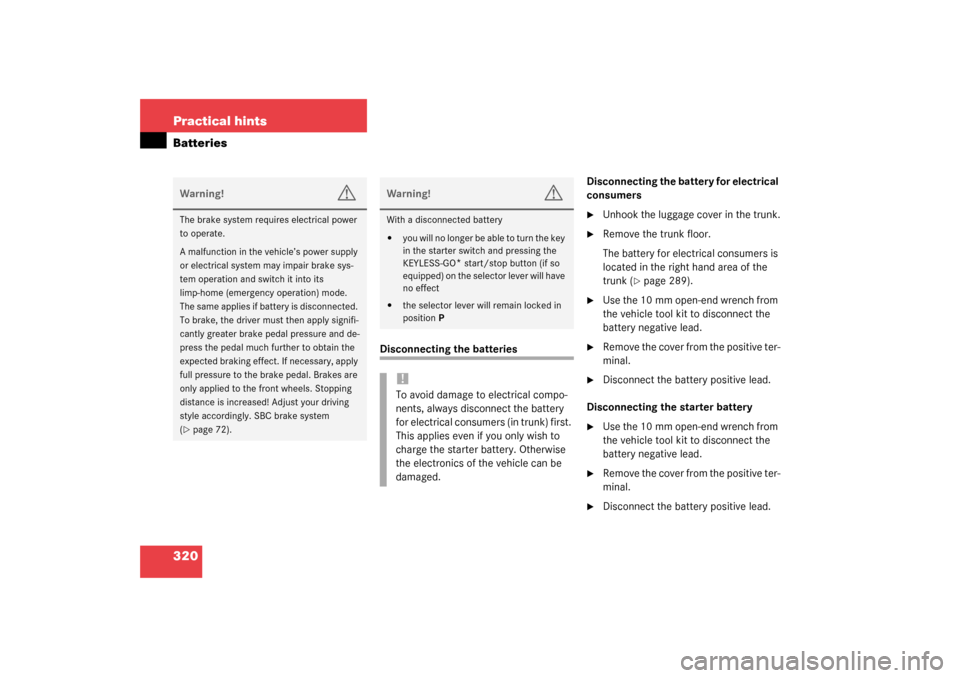
Use the 10 mm open-end wrench from
the vehicle tool kit to disconnect the
battery negative lead.
�
Remove the cover from the positive ter-
minal.
�
Disconnect the battery positive lead.
Disconnecting the starter battery
�
Use the 10 mm open-end wrench from
the vehicle tool kit to disconnect the
battery negative lead.
�
Remove the cover from the positive ter-
minal.
�
Disconnect the battery positive lead.
Warning!
G
The brake system requires electrical power
to operate.
A malfunction in the vehicle’s power supply
or electrical system may impair brake sys-
tem operation and switch it into its
limp-home (emergency operation) mode.
The same applies if battery is disconnected.
To brake, the driver must then apply signifi-
cantly greater brake pedal pressure and de-
press the pedal much further to obtain the
expected braking effect. If necessary, apply
full pressure to the brake pedal. Brakes are
only applied to the front wheels. Stopping
distance is increased! Adjust your driving
style accordingly. SBC brake system
(�page 72).
Warning!
G
With a disconnected battery�
y o u w i l l n o l o n g e r b e a b l e t o t u r n t h e k e y
in the starter switch and pressing the
KEYLESS-GO
* start/stop button (if so
equipped) on the selector lever will have
no effect
�
the selector lever will remain locked in
positionP!To avoid damage to electrical compo-
nents, always disconnect the battery
for electrical consumers (in trunk) first.
This applies even if you only wish to
charge the starter battery. Otherwise
the electronics of the vehicle can be
damaged.
Page 327 of 376

327 Practical hints
Towing the vehicle
Installing towing eye bolt
Front of vehicle
1Cover on right side of front bumper.
To remove cover:�
Press mark on cover in direction of ar-
row.
�
Lift cover off to reveal threaded hole for
towing eye bolt.
!When towing the vehicle with all wheels
on the ground, please note the follow-
ing:
With the automatic central locking acti-
vated and the key in starter switch
position2, or KEYLESS-GO* start/stop
button (if so equipped) in position2,
the vehicle doors lock if the left front
wheel as well as the right rear wheel
are turning at vehicle speeds of approx.
9mph (15km/h) or more.
To prevent the vehicle door locks from
locking, deactivate the automatic cen-
tral locking (
�page 91).
Towing of the vehicle should only be
done using the properly installed tow-
ing eye bolt. Never attach tow cable,
tow rope or tow rod to the vehicle chas-
sis, frame or suspension parts.
iThe selector lever will remain locked in
positionP and the key will not turn in
the starter switch if the battery is dis-
connected or discharged. See notes on
the battery (
�page 319) or on jump
starting (
�page 323).
Page 355 of 376

355 Technical terms
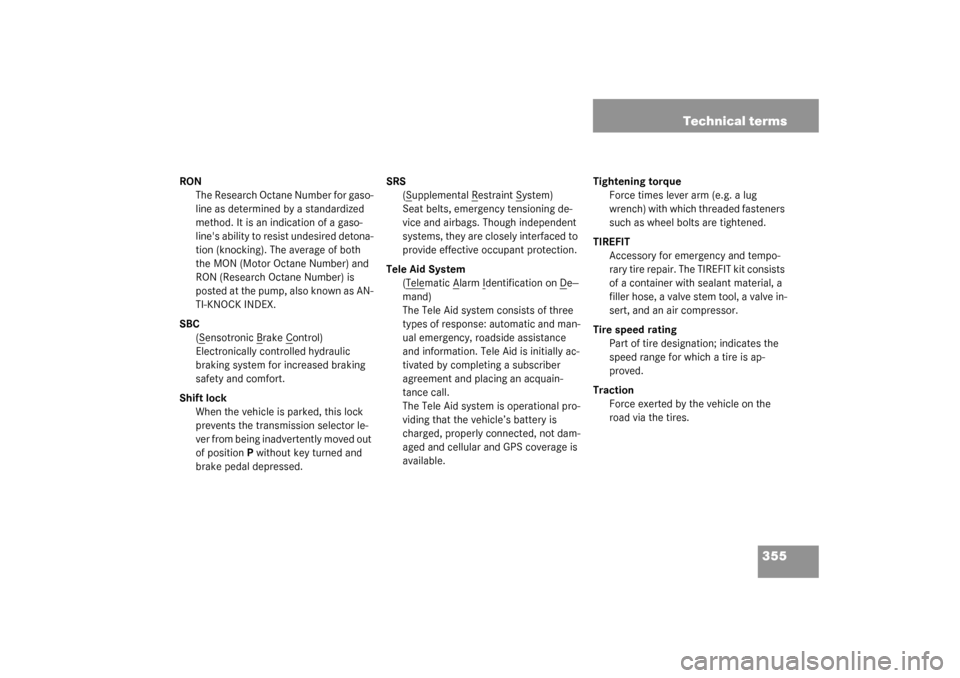
RON
The Research Octane Number for gaso-
line as determined by a standardized
method. It is an indication of a gaso-
line's ability to resist undesired detona-
tion (knocking). The average of both
the MON (Motor Octane Number) and
RON (Research Octane Number) is
posted at the pump, also known as AN-
TI-KNOCK INDEX.
SBC
(S
ensotronic B
rake C
ontrol)
Electronically controlled hydraulic
braking system for increased braking
safety and comfort.
Shift lock
When the vehicle is parked, this lock
prevents the transmission selector le-
ver from being inadvertently moved out
of position P without key turned and
brake pedal depressed. SRS
(S
upplemental R
estraint S
ystem)
Seat belts, emergency tensioning de-
vice and airbags. Though independent
systems, they are closely interfaced to
provide effective occupant protection.
Tele Aid System
(Tele
matic A
larm I
dentification on D
e--
mand)
The Tele Aid system consists of three
types of response: automatic and man-
ual emergency, roadside assistance
and information. Tele Aid is initially ac-
tivated by completing a subscriber
agreement and placing an acquain-
tance call.
The Tele Aid system is operational pro-
viding that the vehicle’s battery is
charged, properly connected, not dam-
aged and cellular and GPS coverage is
available.Tightening torque
Force times lever arm (e.g. a lug
wrench) with which threaded fasteners
such as wheel bolts are tightened.
TIREFIT
Accessory for emergency and tempo-
rary tire repair. The TIREFIT kit consists
of a container with sealant material, a
filler hose, a valve stem tool, a valve in-
sert, and an air compressor.
Tire speed rating
Part of tire designation; indicates the
speed range for which a tire is ap-
proved.
Traction
Force exerted by the vehicle on the
road via the tires.
Page 362 of 376

362 IndexE
Easy-entry/exit 129
Interrupting movement 130
Message in display 271
Easy-Pack 198
Lowering manually 292
Electric air pump 316
Electrical consumer battery 232
Electrical outlet 199
Electronic Stability Program see ESP
Emergency call system*
Initiating emergency call 203
Requirements 201
Emergency engine shut-down 50
Emergency operation (Limp Home
Mode) 144
Emergency operations
Locking the vehicle 292
Lowering Easy-Pack 292
Unlocking interior storage
compartments 291
Unlocking the trunk 291
Unlocking the vehicle 290
Emission control 224
Emission control label 334Engine
Compartment 227
Starting with KEYLESS-GO* 40
Starting with the key 40
Turning off with KEYLESS-GO* 49
Turning off with the key 48
Engine number 352
Engine oil 228, 343
Adding 229
Additives 343
Checking level 228
Consumption 228
Filler neck 229
Messages in display 280
Engine oil level see Oil level 226
ESP 68, 70, 352
Messages in display 261
Switching off 71
Switching on 72
ESP control switch 24
ESP/ABS warning lamp 21
ETD (emergency tensioning device) 52,
60, 352F
Fahrenheit
Setting temperature units 122
Fastening the seat belts 37
Fine adjustment
Cruise control 170
Distronic* 177
First aid kit 288
Flat tire 302
Spare wheel 312
TIREFIT kit 302, 308
Flexible Service System (FSS) 241
Fog lamp, rear 104, 296
Replacing bulb 299
Fog lamps, front 104
Replacing bulbs 296
Front airbags 57
Front lamps 296
Replacing bulbs 298
FSS (Flexible Service System) 241, 352